Makelangelo News Robot Arm

Weekly summary ending 2018-02-22

Hey, gang! Here is what we worked on in the last week, where we are heading next, and how you can join us.

Makelangelo Update Released!

Makelangelo Software v7.20.1 and Makelangelo firmware v9.0.0 are out now. This is a major change to the firmware which rewrites all the logic for planning movement, especially with acceleration and deceleration. If you upgrade one then you must upgrade both. We have written a guide to help you with updating the Makelangelo firmware that should make this easy for you.

One of the side effects is that the old and busted steps/min values have been replaced with new hotness mm/s and mm/s/s. I am getting good drawing results with top speed=90mm/s, drawing speed=60mm/s, and acceleration=300mm/s/s. See for yourself.

Makelangelo 5 at Science World Vancouver, Feb 20, 2019

Wednesday the power was out for a scheduled electrical upgrade and we used the time at Vancouver’s Telus World of Science to take some better photographs and video. I hope that with this I can finally make a presentation pitch video that does the machine sweet vengeful justice.

Fun fact: A large sheet of acrylic has enough static cling and surface tension to hold an A0 sheet of paper without tape.

Makelangelo on a white board

I find that the Makelangelo suction cups work great on glass …and not so great on a class room white board. I tasked Jacob with designing a new system and he went through several rapid prototype iterations.

In house we’ve moved on a few versions from what you just saw and have an even better design. When it’s ready we’ll offer it in the store and on Thingiverse.

I should also mention Scott has been doing a great job of manufacturing Makelangelos and documenting process. I don’t mention enough how good he’s doing (very!) at a job some people would look down on. Documentation is hard, yo! He’s even inventing better ways to make the machines faster with less futzing.

Sixi motors arrived

Jin was taking some much earned time off this week, during which time the motors and the power supply we ordered finally arrived. As I write this he’s doing electrical tests and torque tests and making sure that everything is to spec.

Meanwhile, on the other side of town,

In anticipation of our new CNC machine arriving in ~6 weeks I’ve been taking night classes to learn how to be a better machinist. Here’s a funny from my last session:

Manners really seal the deal.

Next

The next week is Jacob & Scott’s last week of internship. Pizza party? Pizza party. If everything goes well with the testing we should be installing the new motors into Sixi this week. I can wait, but I don’t want to… 😭

Join Us

Get the latest Sixi Master Assembly for Fusion360 on Patreon
OR
Buy anything in our store and mention ‘The Fusion link’ in the notes field to get a link by email.

You can use this file to build your own copy of the robot arm.  Put that 3D printer you bought to use – Make it your own! Share your creation with others!  That’s what open source is about.  If you build one we would love to share it with others.  I am actively seeking talent… show me what you got.

As always, follow our daily progress on our Instagram or see our older stuff on Youtube.

You can do us a huge favor by watching just 2 minutes of video on our Youtube channel. We have 44k subscribers on IG and we need 100k minutes watched to monetize our channel. If you all watch 2 minutes of video that’s 88k minutes done, finito, in the bank, sayanora. So Like, Share, Subscribe! We thank you.

Lastly, thank you for your likes, subscribes, comments, and purchases. You keep the lights on and the mood high so we can keep working on awesome things that will help the planet.

3D Printing Makelangelo Robot Arm

Weekly summary ending 2018-02-15

Hey, gang! Here is what we worked on in the last week, where we are heading next, and how you can join us.

Welcome Jacob & Scott

We have new interns! Our factory grows! Mwhahahahaha~! I get these two bright young men for three whole weeks and I am working them tirelessly to breaking beneath the unforgiving whip of industry on every project that we’ve been saving as “great if we had more unfiltered evil time”.

Among their first tasks has been converting some of the STL files we use into Fusion 360 versions so that we can tweak them; testing parts they designed;

practicing their maniacal laughter; and repairing a 3D printer that has an unfortunate accident

New Dozuki Process Control

Scott & Jacob have also been building new documentation for our team, DIYers, and new users. Documenting our process means more control and better quality. I love Dozuki ever since I saw it used by Prusa Printers. Check out the start of our documentation.

Sixi Robot Arm Anchor and Shoulder First Look

Yes! The first version of the anchor and the shoulder have been birthed from the primordial ooze printed. As soon as omc-stepperonline.com come back from Lunar New Years and ship our parts (we expect delivery ~the 20th) then we’ll be putting it together and finally conquering the planet making it move.

Get Educated

I’m back in school to up my game!

First off, Mandarin. I keep ordering fancy parts from China and I hear all the best deals are on chinese-only sites like Taobao. It is easier to convince people that robots are the future if I speak their language. One in six people understands Mandarin so it’s the obvious choice.

Second off, professional Machinist courses. I’ve signed up to take CNC lathe work at BCIT and their classroom is a machine porn wet dream.

Next

Next week we have a scheduled power outage for another electrical upgrade to the super ray. I plan to spend the time at Vancouver’s Science World wreaking havoc filming footage for a new Makelangelo video. We don’t plan to be there more than once for this, so I’m drawing schemes storyboards for the first time. Nice!

Join Us

Get the latest Sixi Master Assembly for Fusion360 on Patreon
OR
Buy anything in our store and mention ‘The Fusion link’ in the notes field to get a link by email.

You can use this file to build your own copy of the robot arm.  Put that 3D printer you bought to use – Make it your own! Share your creation with others!  That’s what open source is about.  If you build one we would love to share it with others.  I am actively seeking talent… show me what you got.

As always, follow our daily progress on our Instagram or see our older stuff on Youtube.

Lastly, thank you for your likes, subscribes, comments, and purchases. You keep the lights on and the mood high so we can keep working on awesome things that will help the planet.

Special thanks to Bernie at Coast Precision CNC that saw my broken printer Instagram post and offered me one of his spare thermistors. We were back up and running the same day! Excellent.

Makelangelo News

Makelangelo Software v7.17.0

Today I’m pleased to release Makelangelo Software v.7.17.0, the open source control program for our Makelangelo drawing robot.  This new version can now generate spirographs and read Scratch sketches.  Read on for all the details.

Minor improvements

First, some little details.  I’ve added a Help menu that contains the About tab and a link directly to the forums.

Makelangelo Spirographs

Generate Art > Spirograph will open the spirograph dialog and immediately generate the first spirograph.

By default the generator creates hypotrochoid drawings.  A hypotrochoid drawing is made by rolling a circle inside a ring, while keeping your pen at the same spot in the circle at all times.

Selecting epitrochoid will put the circle on the outside fo the ring.

The Major radius (R) value is the size of the ring.

The Minor radius (r) value is the size of the circle rolling around the ring.

The Scale (p) value is the distance from the center of the circle to the fixed point that the pen will follow.

The Sample (quality) increases the number of lines used to draw the shape.  More samples means smoother line.

Makelangelo Scratch Support

Scratch, from MIT, is the Minecraft of computer programming.  Each block does a different thing and blocks can only be combined in certain ways.

Supported scratch commands

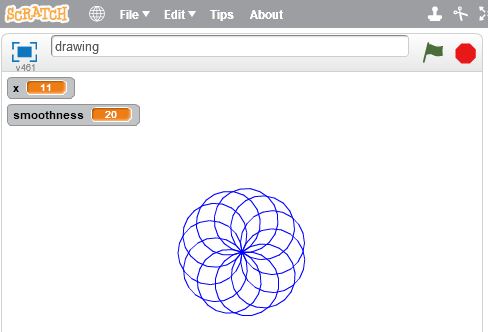
The scratch program above, when run (by clicking the green flag icon, generates a kind of spirograph.  (Total coincidence.)

Scratch programs can be downloaded from the website to your computer

And then uploaded to the Makelangelo software.  Remember to change the file type to SB2

File > Open > Type = SB2

You should then immediately see the sketch drawn in the main view.

The extra lines are Makelangelos’s drawing of the pen holder

All scratch programs supported by Makelangelo Software v.7.17.0 must begin with a “When flag clicked” block.

Makelangelo Scratch (Scratchelangelo?) supports:

  • Move
  • Pen up/down
  • Turn and point in direction
  • Change x/y
  • Set x/y
  • Creating variables
  • Set variable to a number
  • Change variable by [operation]
  • Repeat [operation]
  • Hide, show, wait, and clear are ignored by Makelangelo and convenient for Scratch testing.
  • All other Scratch commands will probably cause an obscure error message.

There is no hard limit to the length of a sketch, the number of variables, or the complexity of a sketch.

As always, you can discuss these improvements in the forums.  We’d love to see what you make!

m5 dxf preview
Makelangelo News

Makelangelo 5 Now 100% Open Hardware

Today I’m pleased to announce that the Makelangelo robots are now 100% Open Hardware.  Get all the open hardware laser cutting and 3D printing files for the Makelangelo 5 and Makelangelo 3 right here.

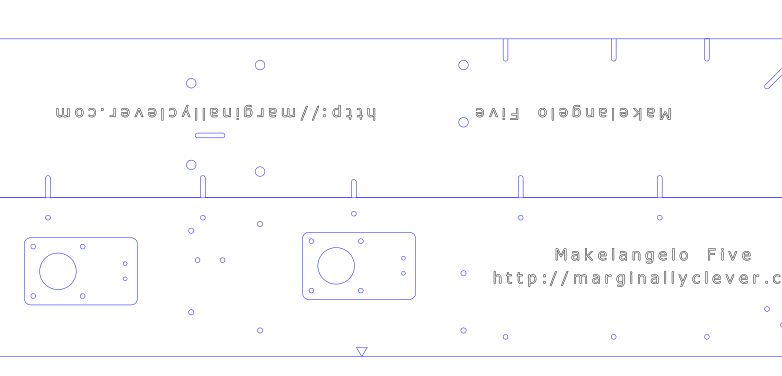
The Makelangelo 5 Thingiverse files includes the DXF pattern for laser cutting the two wood layers and the 3D printed parts.

The Makelangelo 3 Thingiverse files also include the laser cutting DXF pattern files.  There are no 3D printed parts in the M3.

If you’re reading this and deciding which one to build: the M5 is much easier to run, but only goes big enough for an A2 or A3 image.  The M3 can scale up to do much larger drawings and is much more challenging to setup.

Whichever you decide, our forums are the best place to discuss your choice, get technical help, or show off your new mod idea.

Makelangelo Tutorials

How to Set Up a Makelangelo 3.2 Robot

This tutorial video shows you how to set up everything you need to run your Makelangelo 3.2 robot. Watch for guidance from receiving your robot to fully installed and ready to draw.

Install It Anywhere

The Makelangelo 3.2 can be setup on any other vertical surface. Any wall, easel, or window in your classroom, home, or business can host this drawing robot. For installation on glass or windows, suction cup mount option is now available at checkout.

Keep Updated

Just like your phone app updates, we work out bugs and continue to refine our software for all Makelangelos. Visit our Downloads page to ensure you have the latest versions to keep your drawing robot working smoothly.

We Like Your Feedback

Is there something missing from this tutorial? Is there something else that you think Makelangelo owners should know? Post to our Forum or contact us with your questions.