In March of 2026 I completed the Factorio game mod Pyanadons after 1953 hours, 50 minutes, and 8 seconds. Pyanadons is, for most people, a journey of several kilohours. Completing a run takes time, energy, will, and – of course, logistics strategy. What follows are some thoughts that I hope will improve your odds of a successful run.
Dial is a Java Swing component designed to create a customizable dial interface. This component allows users to interact using the mouse wheel, click-and-drag actions, or keyboard keys. It features an ActionListener to handle turn commands, making it easy to integrate into various Java applications that require a rotary input method. It can be sometimes be more intuitive than a JSlider, which cannot “roll over” back to the starting value.
Key Features
Mouse Wheel Interaction: Turn the dial smoothly with the mouse wheel.
Mouse Click+Drag: Click and drag to adjust the dial.
Keyboard Control: Use the +/- keys to increment or decrement the dial value.
Rollover: Unlike JSlider, the dial can wrap around back to the start. Great for controlling an angle value.
Basic Usage
import com.marginallyclever.dial.Dial;
import javax.swing.*;
import java.awt.event.ActionEvent;
import java.awt.event.ActionListener;

public class DialDemo {
    public static void main(String[] args) {
        JFrame frame = new JFrame("Dial Demo");
        Dial dial = new Dial();

        dial.addActionListener(new ActionListener() {
            @Override
            public void actionPerformed(ActionEvent e) {
                System.out.println("Dial turned: " + dial.getValue());
            }
        });

        frame.add(dial);
        frame.setSize(200, 200);
        frame.setDefaultCloseOperation(JFrame.EXIT_ON_CLOSE);
        frame.setVisible(true);
    }
}
Final Thoughts
You can customize the appearance and behavior of the dial through its properties. Adjust the color, range, and initial value as needed to fit your application.
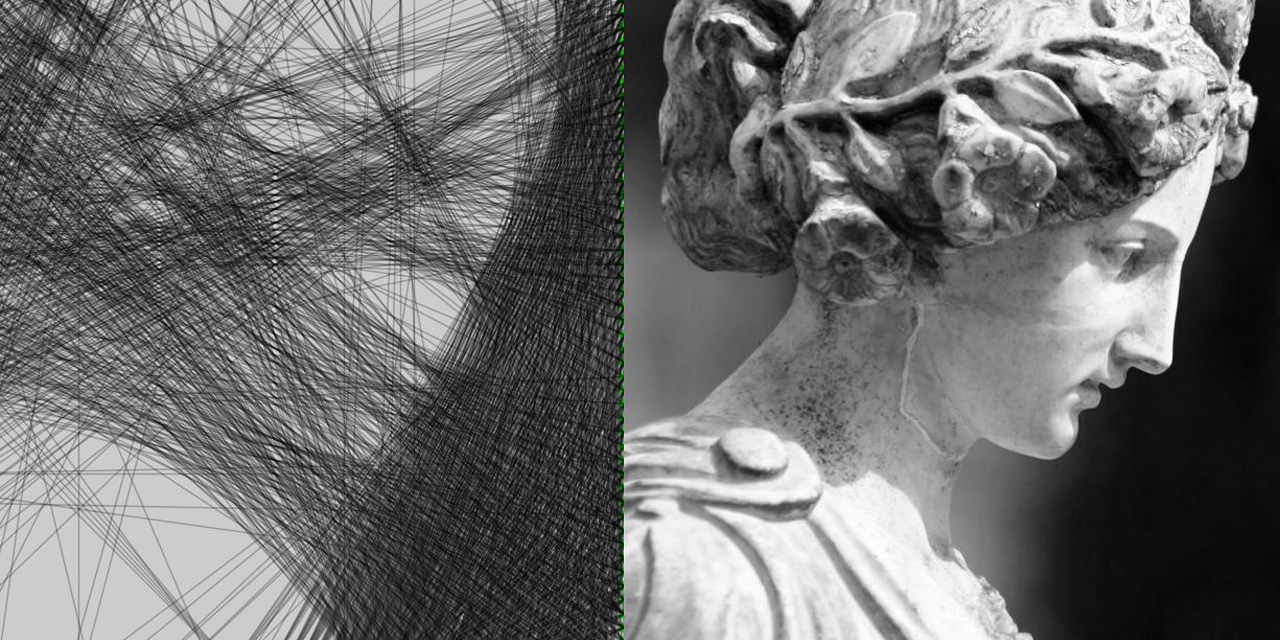
Since then I have been struggling with the challenge of multi-color weaving. One example is seen in the fork link above. Another is instagram artist art.nitka:
I’m pretty sure that if I can get two colors to work then it should extend easily to many colors. Like… the jump is from one to all the things. Bit of a curve.
In the original method I start at nail 0. then i look at all the possible threads that could go out from there and find the one that most closely matches my thread color (black). Longer thread s can get a higher score, so they can easily get more points, but shorter thread s can have less error so it quickly averages out. Once I find the best thread to some other nail N, I place it and move to nail N. Placing it means that I draw the thread on a blank canvas AND I substract that color from the original image. This way I am unlikely to go back over the same pair of nails and eventually the image should be mostly erased, leading to a natural stop.
My first attempt at multicolor was to have a black thread and a white thread alternating back and forth over the image. It wasn’t great.
My second attempt I made two copies of the source image, one for each thread color. I built a list of threads for each image separately. On their own each one was sort of OK. I could put white threads on a black background or black threads on a white background and it was as good as the original method. But put them together and there were obvious problems – The threads didn’t mix in the right order.
Suppose the picture was a white circle in the middle of a black circle. The white threads should go on first to make the center, and then the black threads should cover the white ones around the edge. The problem gets more complicated with a human face, where a dark thread for the eyes might have light thread in the middle for the nose and around the edges for the sides of the face… and then dark again on the edges for the hair!
When the lines are to be combined in the finished image, I start with an empty stack B. I want to add line A to stack B so that when I look down through the stack the image is most-correct. Some white might be on top of some black and vice versa. Remember: it might not be strictly white-black-white-black-etc. Lines are not woven together – a new white thread cannot be under previous white threads.
It is a convenient property that two lines only cross at a single point. I can find the intersection of two line segments to tell if the threads overlap at all and where, then look at the image at that point and ask “which of these two threads would be best on top?” It is very quick to calculate… but wrong.
Sometimes the answer is indeterminate: lines might be parallel, non-intersecting, or equally good.
Sometimes it would be better to put A under some B lines, because the total error is lower than A being above all B. eg, some error might make a better final image. How much? Where? I don’t know. Aye, that’s the rub.
What it means is that a simple binary sort won’t work. I tried BubbleSort and I tried a TreeSort. Neither of them works quite right. The end result has sorting that is obviously wrong.
The Color Circular Weaving Solution
I don’t know! I have to get back to work, so it will just have to simmer in the crock pot that is my skull. Until a solution is found… wish me luck and share this with your friends. Maybe you or someone you know has a hint.
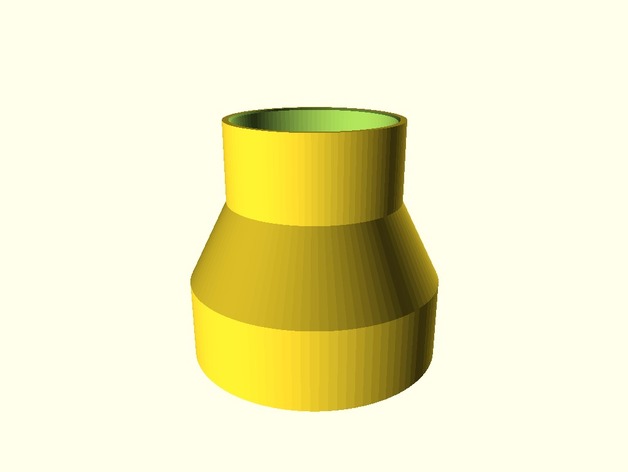
Recently a good friend asked me to make an adapter to connect the air hose from his vacuum to the air hose on his new scroll saw. Both were, obviously different sizes. 3D printing to the rescue!
Shortly after he went home happy, I was thinking it would be great to have a tool that solves this problem forever. Thingiverse has an option to make customizable, parametric designs. So I whipped out SCAD modelling program and in about an hour crafted this tool that is free for everyone.
You can change the diameter of the two hose ends, how far the hose ends sink into the adapter, and the thickness of the walls. There is a small lip inside the shape to keep the hose from moving too far into the adapter.
In the first two weeks it has been remixed ten times already. Fantastic! If you find it useful, please tag me online or join my Patreon.
Robot Overlord Java app contains lots and lots of classes, some of which are robots and their gui.
I want robot developers to have an easy time adding their robots to RO. A simple interface, minimal distraction, and examples to work from are Good Things. I’m told that RO can use a Service Provider Interface (SPI) to load a jar it’s never seen before, a jar that contains an implementation of the interface. I would then
make a RobotInterface,
make every robot I’ve already got use that interface
move each robot to a separate jar and load said jars through SPI
make a separate github project for each robot
advertise these plugins via tutorials so that you can fork a repo, adjust to taste, and publish your new thing.
What I’m discovering is that SPI is tricky tricky.
I can’t find any online examples where someone has done this successfully.
I have not yet got RO to load my first robot’s jar file, tho I’m trying. Is the jar packaged wrong? Maybe it doesn’t say “yes, I have that interface!” in the right way.
Is RO not even seeing the jar? I’m told SPI looks for any jar on the classpath. I printed out the classpath, then put the robot jar in one of those classpath folders and ran the app again. Nothing.
There are several possible points of failure, none of which can be clearly eliminated as possibilities. Worse, I’m not sure how these plugins would be debugged. Running RO would not give a lot of insight into the plugins’ inner workings. Would I still be able to tweak code in real time? That is a must.
So I ask you, dear reader: am I way off track? What do?
I should note here that I do not want to have to run RO from the command line with a custom classpath. While I’m able to do it, I doubt that the people who buy robots and use them will even know how to open a command line. Imagine a grade school teacher trying to set up for their students, or your aged mother who’s used to OSX. It ain’t happening. You don’t want that tech support phone call and neither do I.