News Robot Arm

Weekly summary ending 2018-02-01

Hey, friends! Here is what we worked on in the last week, where we are heading next, and how you can join us.

Last week I mentioned that I’m trying to sell a vending machine to make room for a CNC metal cutting machine. The CNC quote came back at >$40k CAD.

As you probably know by now, we’ve been working on a robot arm. Last week we ended off with a new cycloidal gearbox. Well this week we printed two more and installed them.

We’ve had many challenges dealing with friction in our power transmission. Bevel gears have been a real problem – There’s no perfect solution to make bevel gears and some of the tutorials we found online were flat out wrong… which we figured out only after following the tutorials.

There are, in fact, three popular ways to make bevel gears.

Once we had a better understanding of how to make bevel gears correctly, it only took three tries to get the gears perfectly tuned on our printers. With that out of the way we can finally show our three motors working together to move the first three joints of the robot arm.

Fun fact! The joints and motors work as a differential: one motor is needed to move the hand, but it takes two working together to turn the wrist, and three working together to turn the ulna.

Next

I am currently deep into the Makelangelo firmware, trying to solve a mystery that should improve speed across all our robots.

Jin is working on the math for our motors. There is an ideal speed (in RPM) to get best torque, and from that ideal we can calculate what Sixi’s actual speed will be. We didn’t know earlier because the priority was strength and accuracy. Fast, Strong, Precise: pick two!

How you can join us

Get the latest Sixi Master Assembly for Fusion360 on Patreon
OR
Buy anything in our store and mention ‘The Fusion link’ in the notes field to get a link by email.

You can use this file to build your own copy of the robot arm.  Put that 3D printer you bought to use – Make it your own! Share your creation with others!  That’s what open source is about.  If you build one we would love to share it with others.  I am actively seeking talent… show me what you got.

As always, follow our daily progress on our Instagram or see our older stuff on Youtube.

Lastly, thank you for your likes, subscribes, comments, and purchases. You keep the lights on and the mood high so we can keep working on awesome things for you.

News

Weekly summary ending 2018-01-24

Hey, friends! It’s good to be back. I thought some sunshine would chase my winter blues away, but it looks like what I really need is more robots. Here is what we worked on in the last week, where we are heading next, and how you can join us.

I reviewed Jin’s work on belt tension. He did a great job!

After that, I found I’d set my expectations too high. A shaft collar in the Tuning Fork was slipping. For more on what those words mean, see our youtube channel history. Here’s me opening the wrist to extract the shaft collar.

I found an M2 nut had stripped inside the shaft collar. The shaft collar slipping means power is not transmitted from the motor to the wrist. Attaching a gear to a tube has proven to be a real challenge for us. How would you do it?

Because I wear many hats here, sometimes I have to sit down and make our robots for customers. I make them in batches to save time.

Get it today: Our remix of DaGHizmo’s design. The Thingiverse license for DaGHizmo’s model says “attribution, non-commercial, share-alike”. In the comments on the file we asked and received an exemption permit from DaGHizmo to sell the remix. We’ve also shared our remix for everyone.

Our future Makelangelos will use this design. The older model had a semi-transparent model made of laser cut acrylic parts that were glued together. The glue would break in shipping and just one more reason why I avoid all glue in our robots. This newer model ships much better. Bonus, it holds markers and pens of more sizes than the old model. Right now the color of the parts is random but I believe we are moving towards yellow.

On closer examination I was wrong! The hole through the part shaped like a top hat is a little bit off, which presses the ring shaped piece to one side and binds the arms against the brim of the hat. Maybe someone out there can design a better plotter.

Next

Currently Jin and I are working in two different, parallel directions.

Jin is actively making progress with the gearbox. Today was his third iteration and he spent several hours testing speeds and accelerations to build a motion profile. That motion profile can be used in simulations to program the robot.

I am finishing Makelangelos for paying customers. I’d say half my time is spent in quality control on each machine. I call my nephew to come work assembling robots but he doesn’t check his phone. Too much Fortnite League. If you’re in Vancouver BC and want a couple hours on the weekend putting things together then contact us.

I’ve also been trying to sell a vending machine to make room for a CNC mill/lathe combo. Aluminum parts and faster plastic production would be a huge win for us.

How you can join us

Get the latest Sixi Master Assembly for Fusion360 on Patreon
OR
Buy anything in our store and mention ‘The Fusion link’ in the notes field to get a link by email.

You can use this file to build your own copy of the robot arm.  Put that 3D printer you bought to use – Make it your own! Share your creation with others!  That’s what open source is about.  If you build one we would love to share it with others.  I am actively seeking talent… show me what you got.

As always, follow our daily progress on our Instagram or see our older stuff on Youtube.

Lastly, thank you for your likes, subscribes, comments, and purchases. You keep the lights on and the mood high so we can keep working on awesome things for you.

Makelangelo News

Makelangelo Software v7.17.0

Today I’m pleased to release Makelangelo Software v.7.17.0, the open source control program for our Makelangelo drawing robot.  This new version can now generate spirographs and read Scratch sketches.  Read on for all the details.

Minor improvements

First, some little details.  I’ve added a Help menu that contains the About tab and a link directly to the forums.

Makelangelo Spirographs

Generate Art > Spirograph will open the spirograph dialog and immediately generate the first spirograph.

By default the generator creates hypotrochoid drawings.  A hypotrochoid drawing is made by rolling a circle inside a ring, while keeping your pen at the same spot in the circle at all times.

Selecting epitrochoid will put the circle on the outside fo the ring.

The Major radius (R) value is the size of the ring.

The Minor radius (r) value is the size of the circle rolling around the ring.

The Scale (p) value is the distance from the center of the circle to the fixed point that the pen will follow.

The Sample (quality) increases the number of lines used to draw the shape.  More samples means smoother line.

Makelangelo Scratch Support

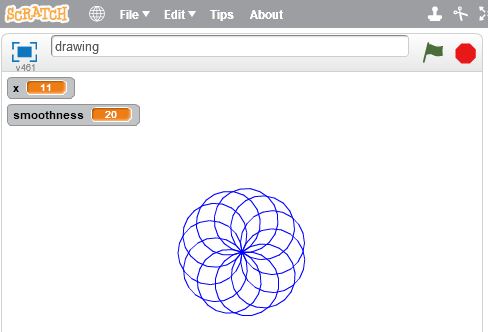
Scratch, from MIT, is the Minecraft of computer programming.  Each block does a different thing and blocks can only be combined in certain ways.

Supported scratch commands

The scratch program above, when run (by clicking the green flag icon, generates a kind of spirograph.  (Total coincidence.)

Scratch programs can be downloaded from the website to your computer

And then uploaded to the Makelangelo software.  Remember to change the file type to SB2

File > Open > Type = SB2

You should then immediately see the sketch drawn in the main view.

The extra lines are Makelangelos’s drawing of the pen holder

All scratch programs supported by Makelangelo Software v.7.17.0 must begin with a “When flag clicked” block.

Makelangelo Scratch (Scratchelangelo?) supports:

  • Move
  • Pen up/down
  • Turn and point in direction
  • Change x/y
  • Set x/y
  • Creating variables
  • Set variable to a number
  • Change variable by [operation]
  • Repeat [operation]
  • Hide, show, wait, and clear are ignored by Makelangelo and convenient for Scratch testing.
  • All other Scratch commands will probably cause an obscure error message.

There is no hard limit to the length of a sketch, the number of variables, or the complexity of a sketch.

As always, you can discuss these improvements in the forums.  We’d love to see what you make!

m5 dxf preview
Makelangelo News

Makelangelo 5 Now 100% Open Hardware

Today I’m pleased to announce that the Makelangelo robots are now 100% Open Hardware.  Get all the open hardware laser cutting and 3D printing files for the Makelangelo 5 and Makelangelo 3 right here.

The Makelangelo 5 Thingiverse files includes the DXF pattern for laser cutting the two wood layers and the 3D printed parts.

The Makelangelo 3 Thingiverse files also include the laser cutting DXF pattern files.  There are no 3D printed parts in the M3.

If you’re reading this and deciding which one to build: the M5 is much easier to run, but only goes big enough for an A2 or A3 image.  The M3 can scale up to do much larger drawings and is much more challenging to setup.

Whichever you decide, our forums are the best place to discuss your choice, get technical help, or show off your new mod idea.

News Opinion

CES 2018 Robots? Mostly Garbage

Right! I’m in a bad mood today and the crap out of CES 2018 isn’t helping. My short review is “most of these are garbage, and the rest have some brain damage.” Here’s a quick run down of the big ticket items and why I do or do not like them. (more…)