Sixi 2 robot arm
2. Picasso Box Assembly
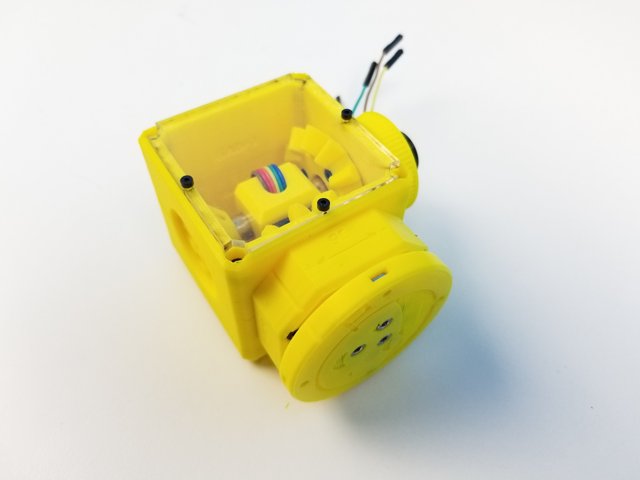
Step 1 Tools and Parts Required for This Chapter
Click the large image to open full size.
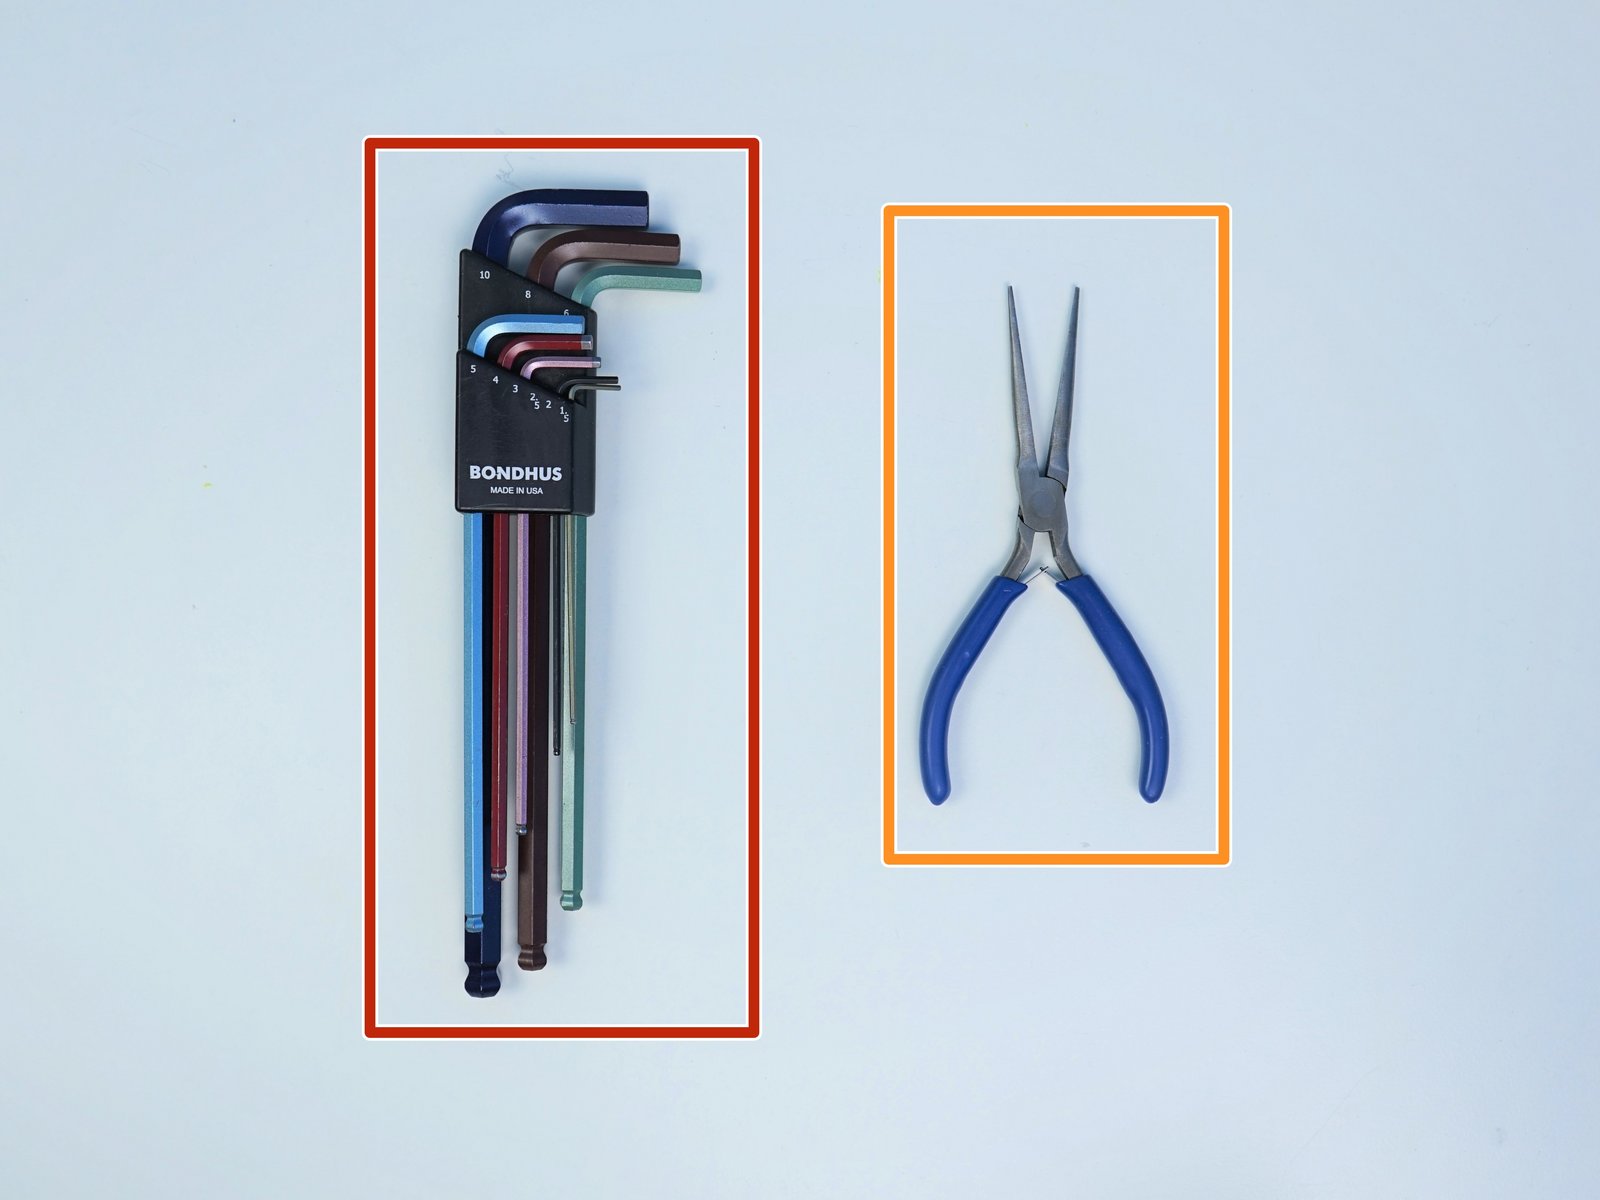
Package #6
Alan Keys
Needle Nose Plier
Step 2 Hand Gearbox - Input Shaft & Rotor Parts
Click the large image to open full size.
- Note:
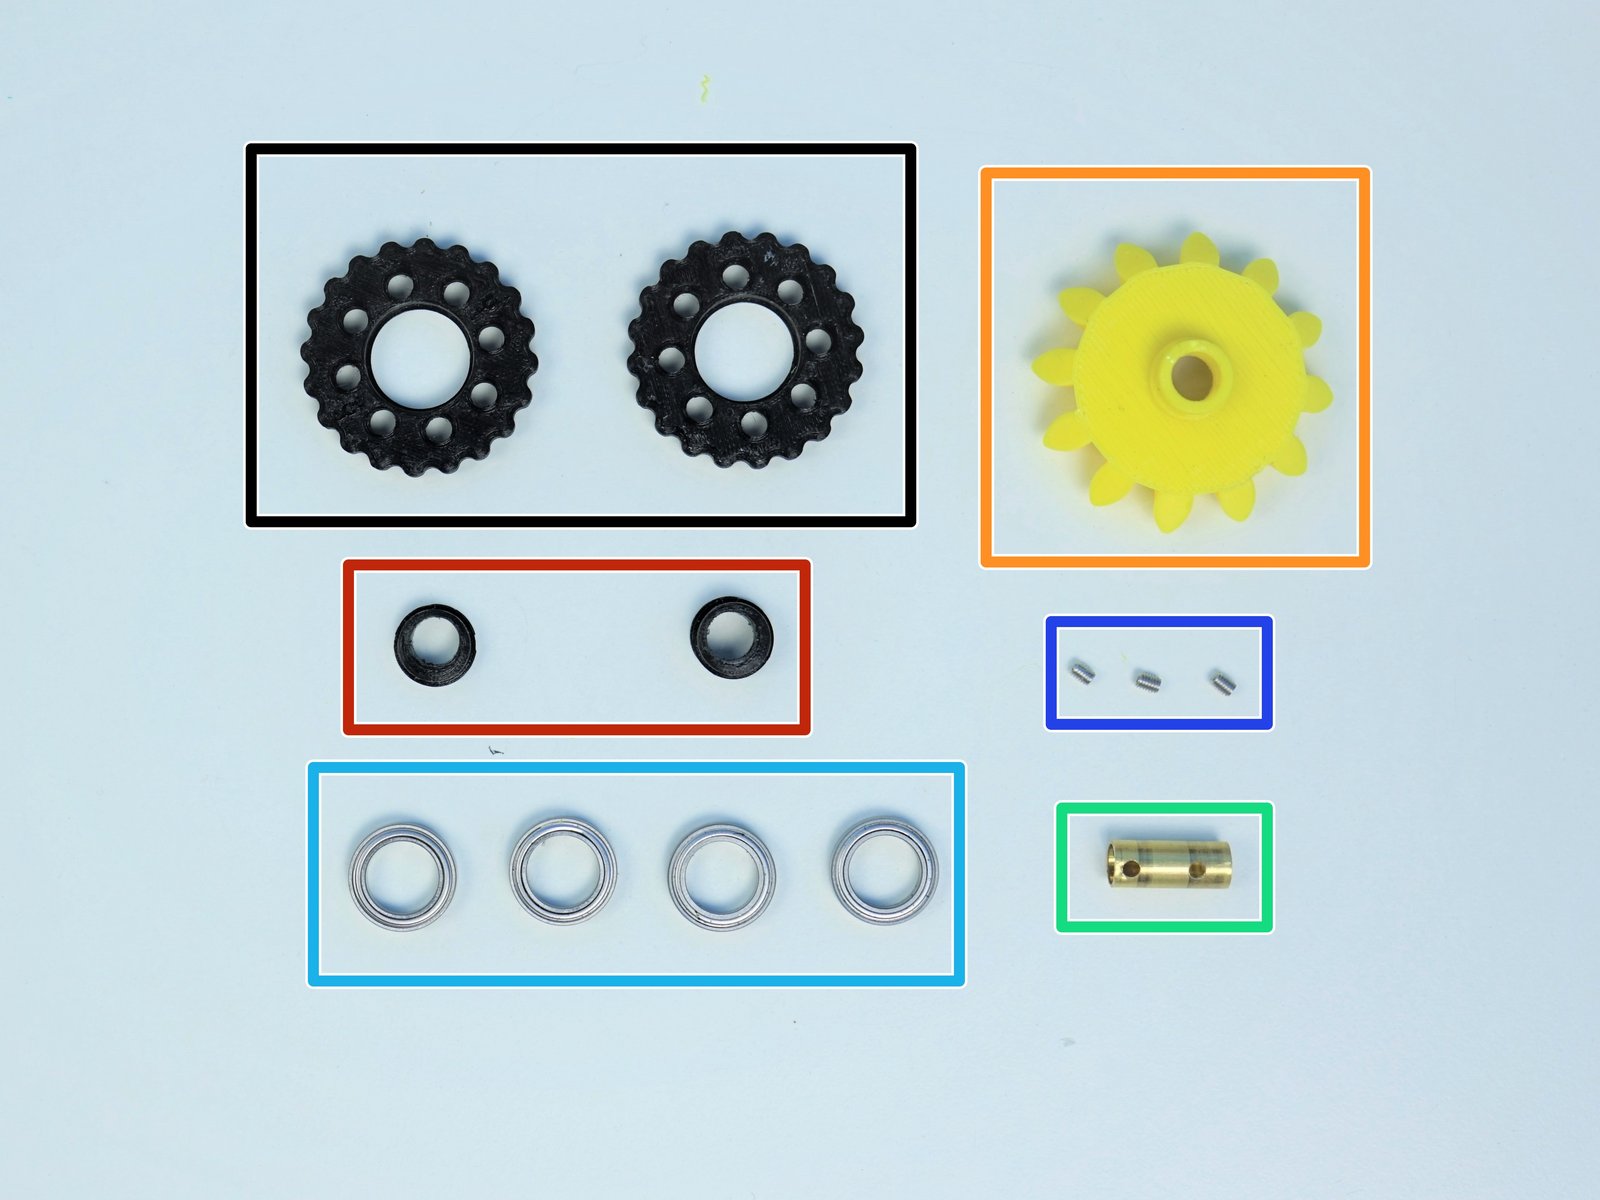
Prepare the following components:
[3D] - 6Da Hand GB Rotors
[3D] - 6Da Hand GB Eccentric Cams
[3D] - 6Db Hand GB Bevel Gear
Brass Tube [5/16' x 19.5mm]
6701 Bearing [12x18x4mm] (x4)
M3x4mm SetScrew (x3)
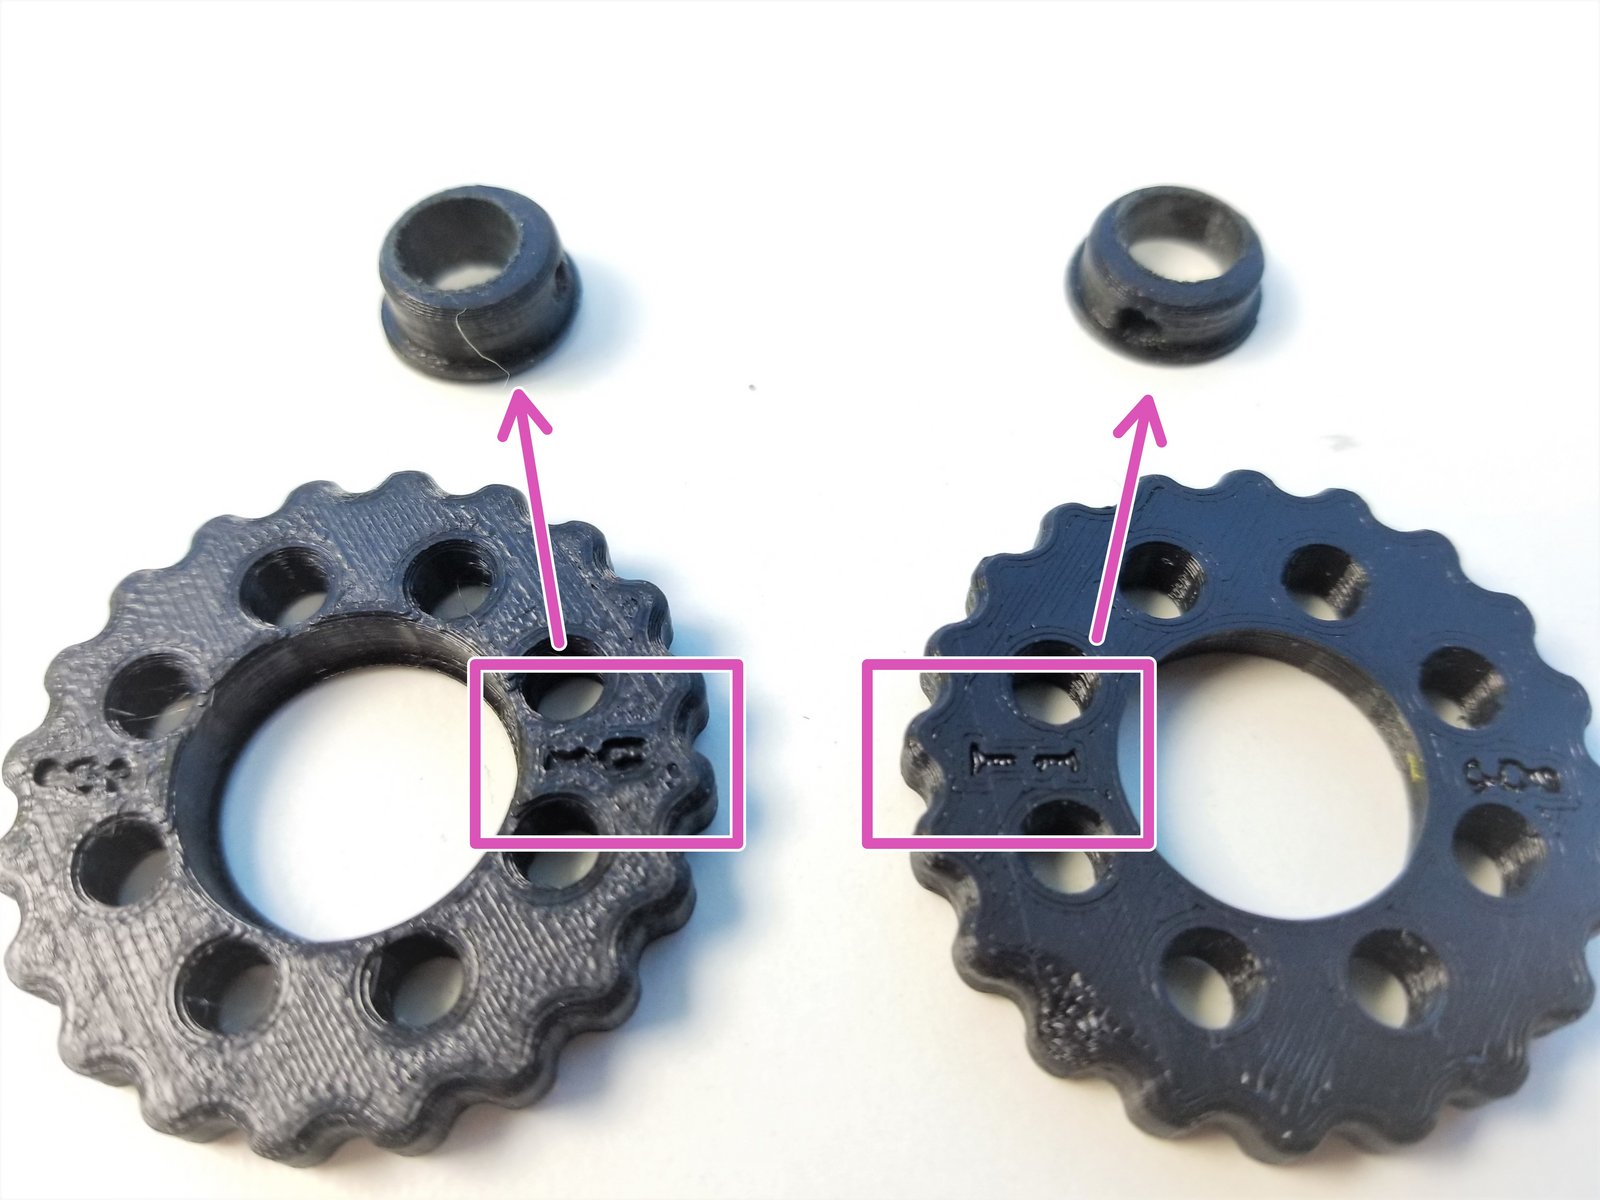
- Note:
Rotors are Labelled "T" and "B" for Top and Bottom according to Eccentric Cams' Top and Bottom, Thick Piece = Bottom and Thin Piece = Top
Step 3 Hand Gearbox - Input Shaft 1
Click the large image to open full size.
- Note:
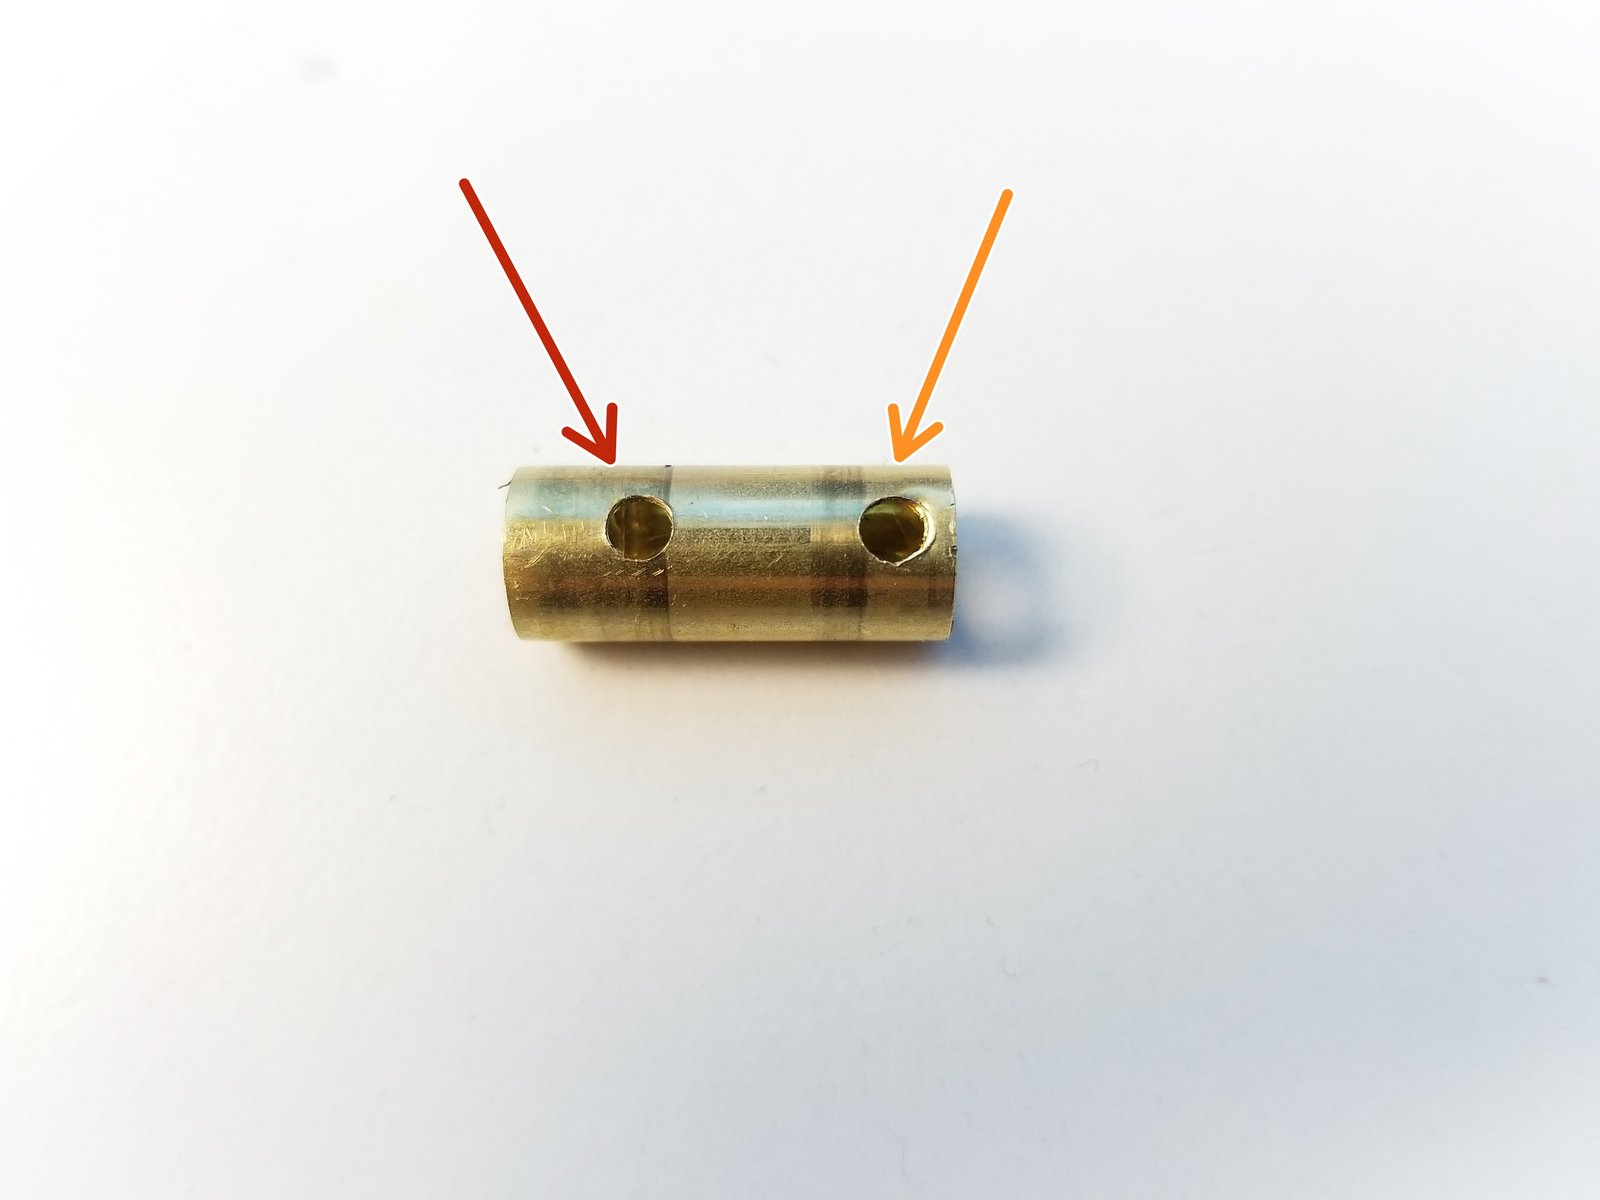
Brass Tube has one side that has 2 holes
Furthest away from the edge is for Bevel Gear Set Screw
Closest to the right edge is for Top Eccentric Cam Set Screw
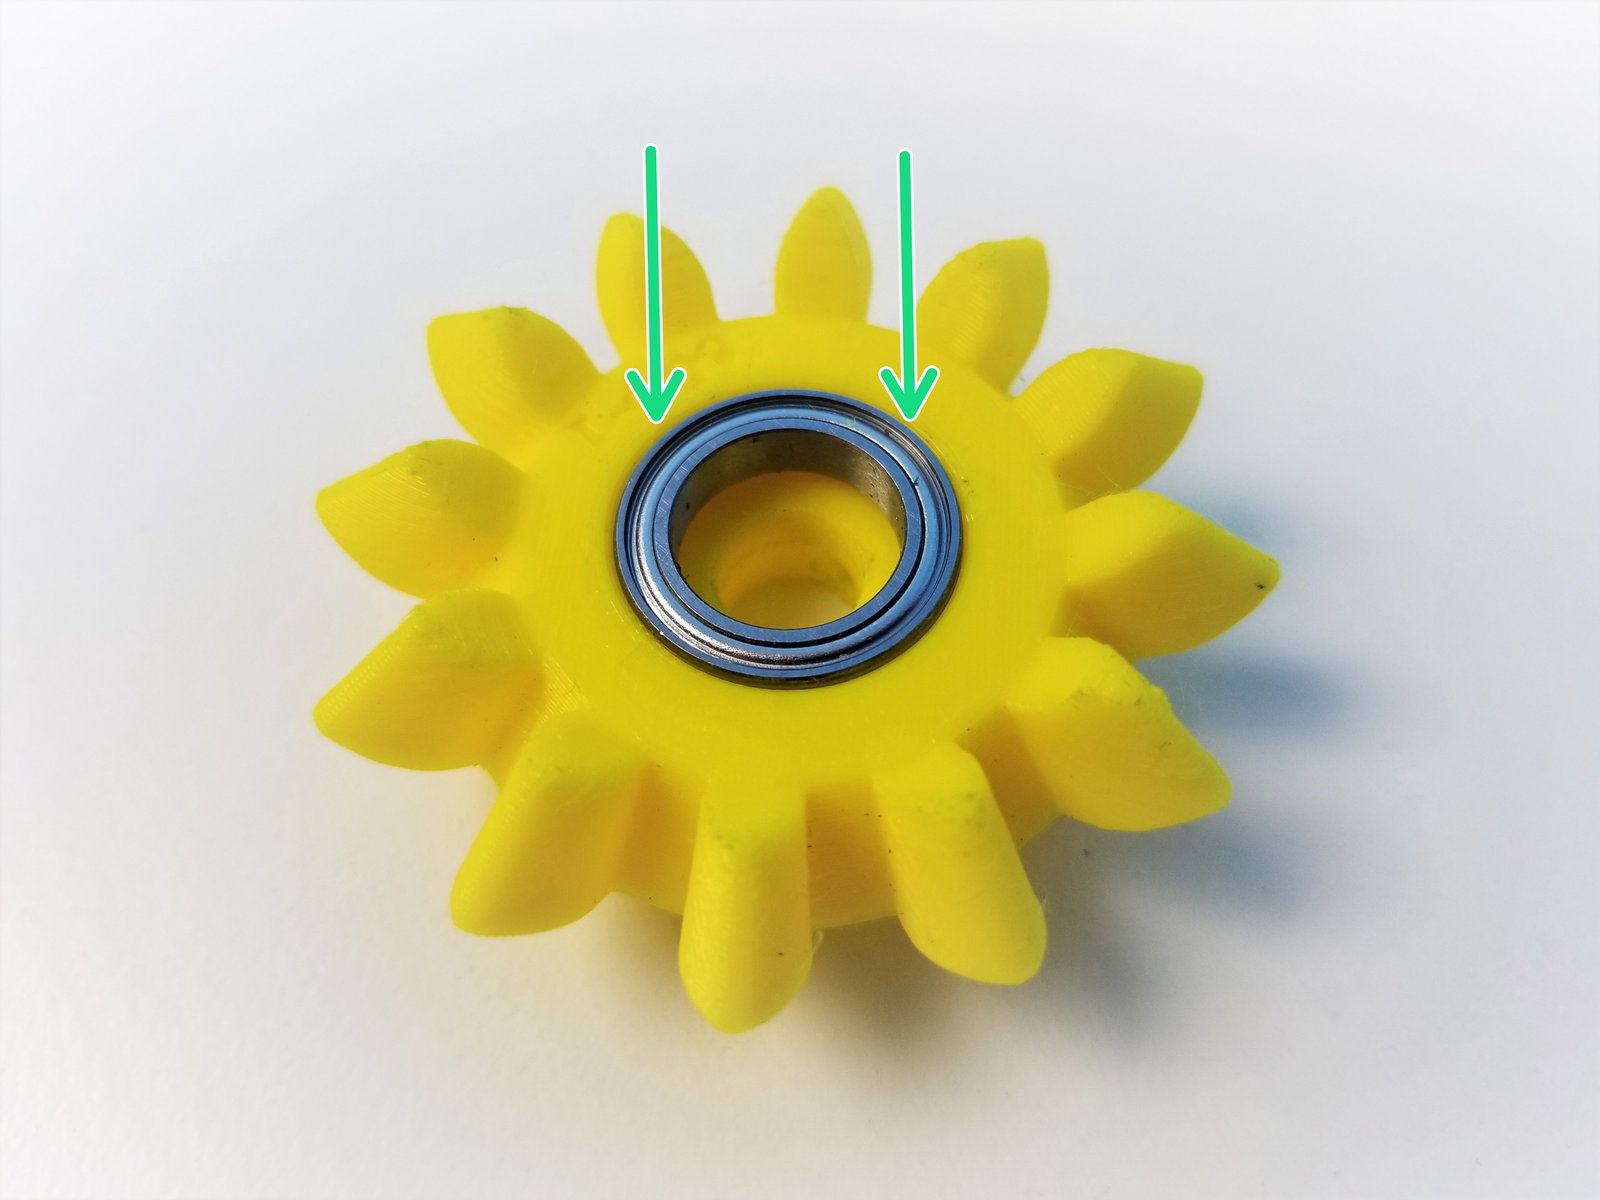
Insert 6701 Bearing in the Bevel Gear
Step 4 Hand Gearbox - Input Shaft 2
Click the large image to open full size.
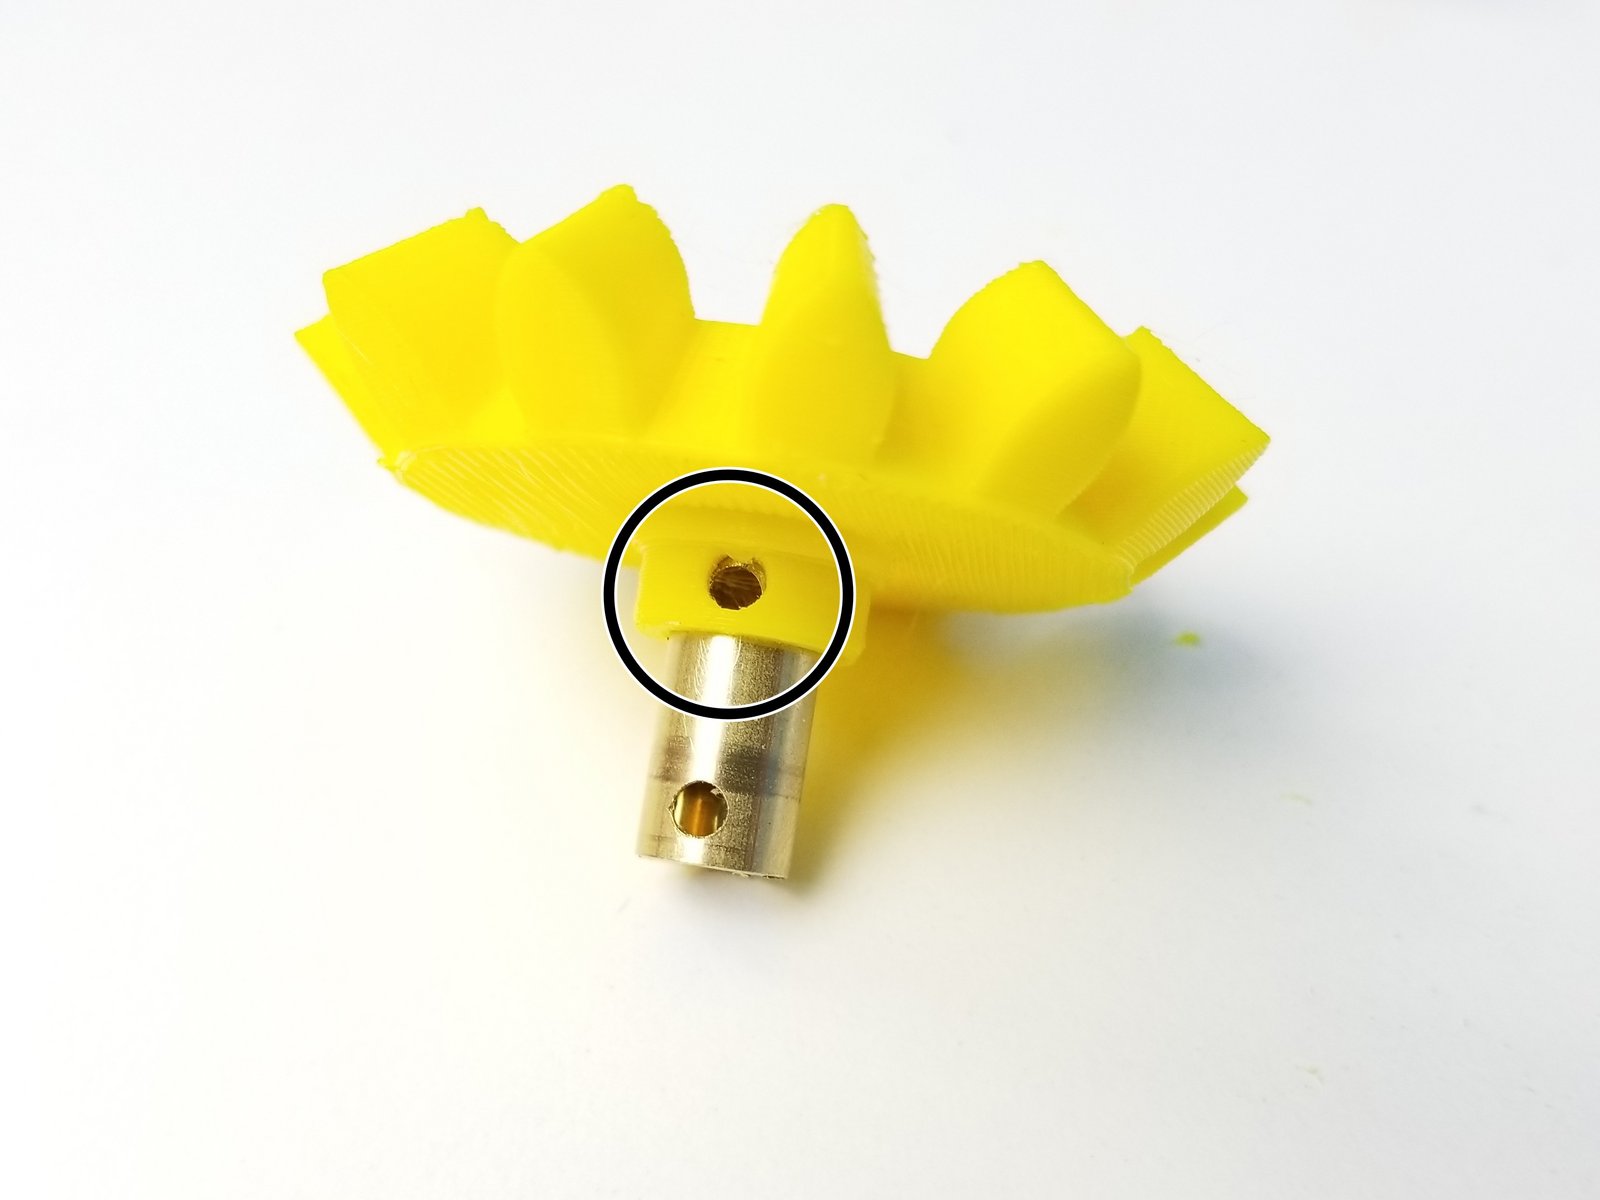
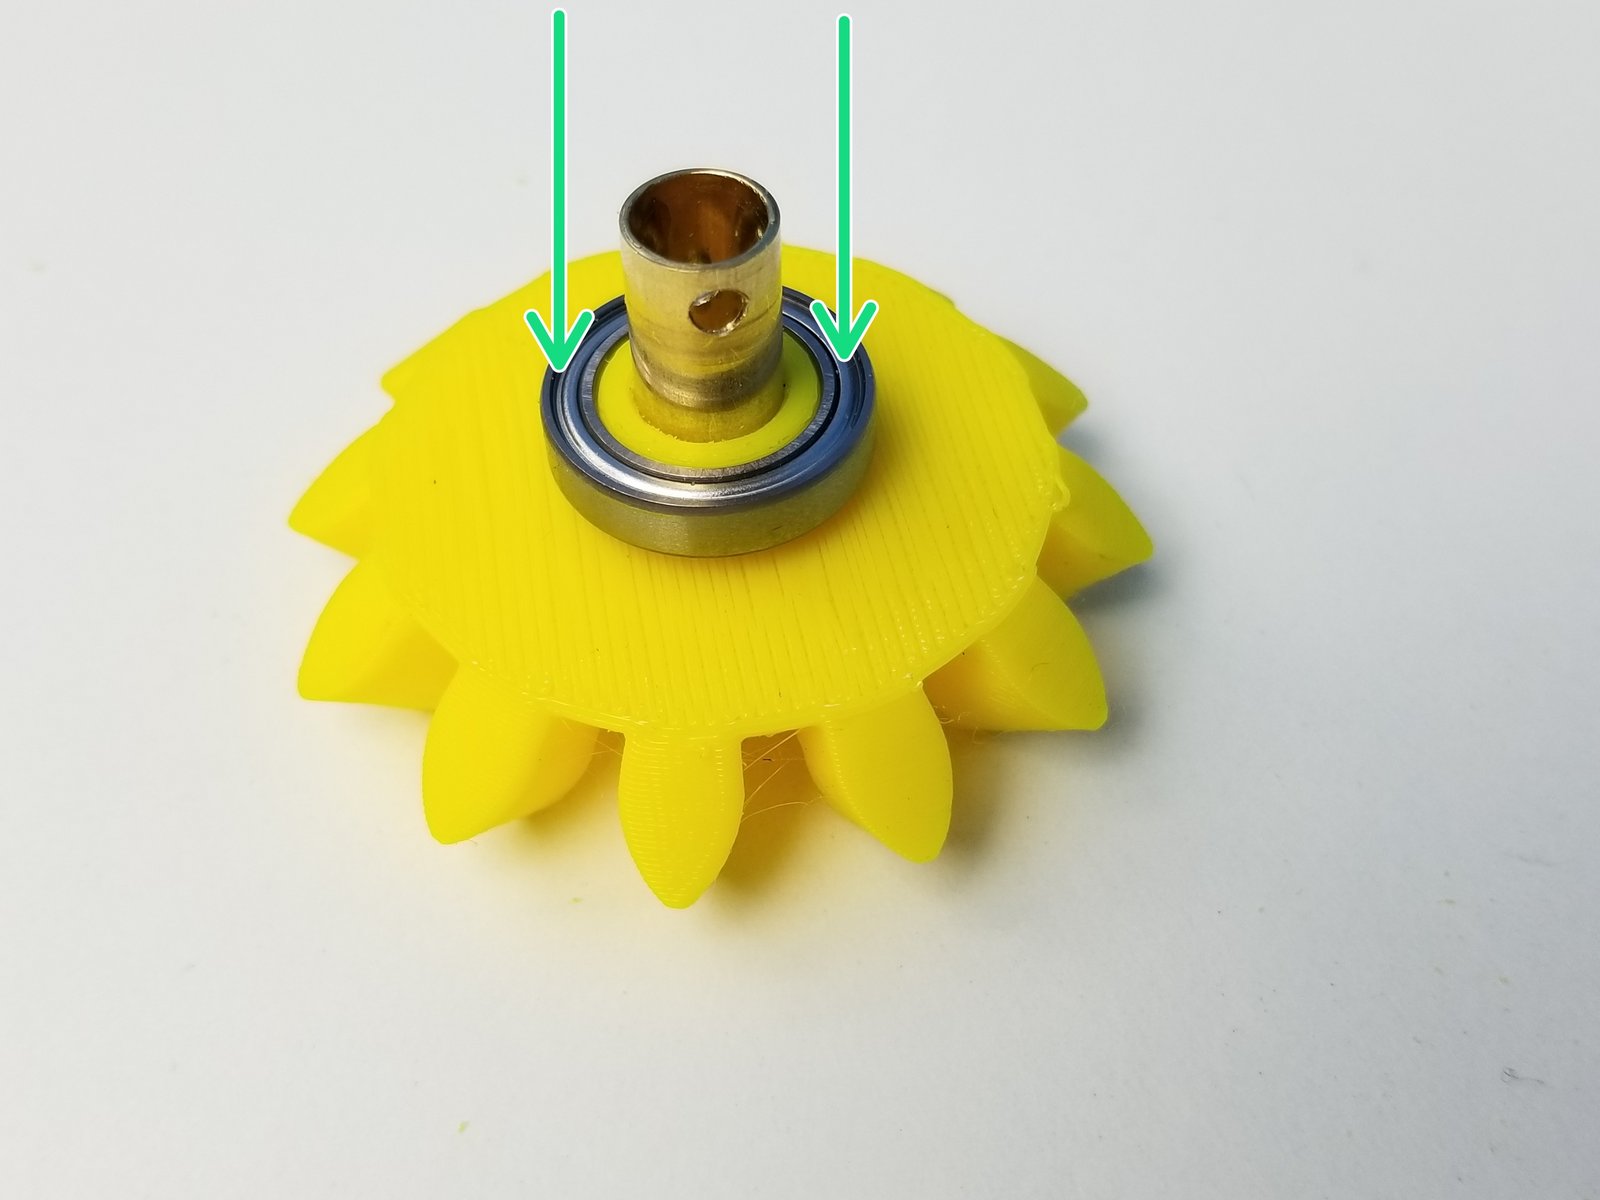
Align the Brass Tube Hole to the Bevel Gear Set Screw Hole
Secure the Gear using M3 Set Screw
- Warning:
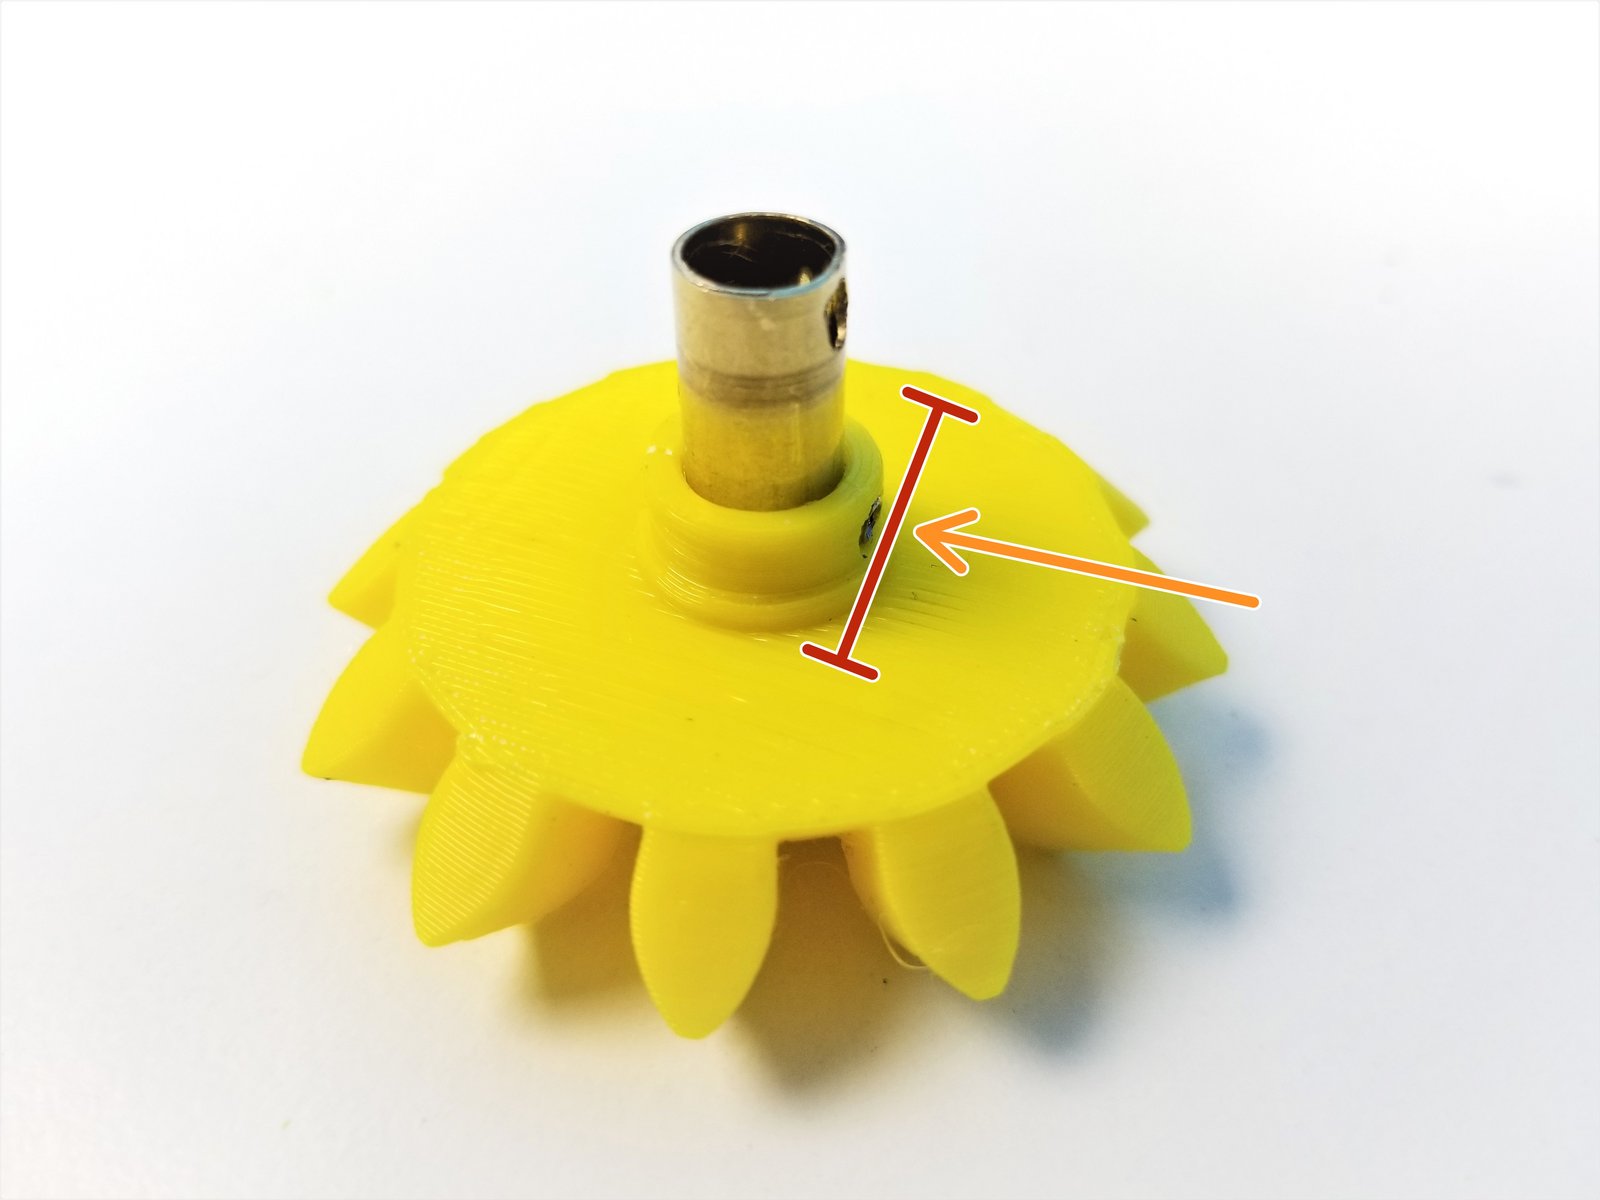
Make sure the Set Screw goes in just enough for the bearing to go on, NO MORE THAN THAT
Slide the 6701 Bearing over the Set Screw Hole on Bevel Gear
Step 5 Hand Gearbox - Rotors
Click the large image to open full size.
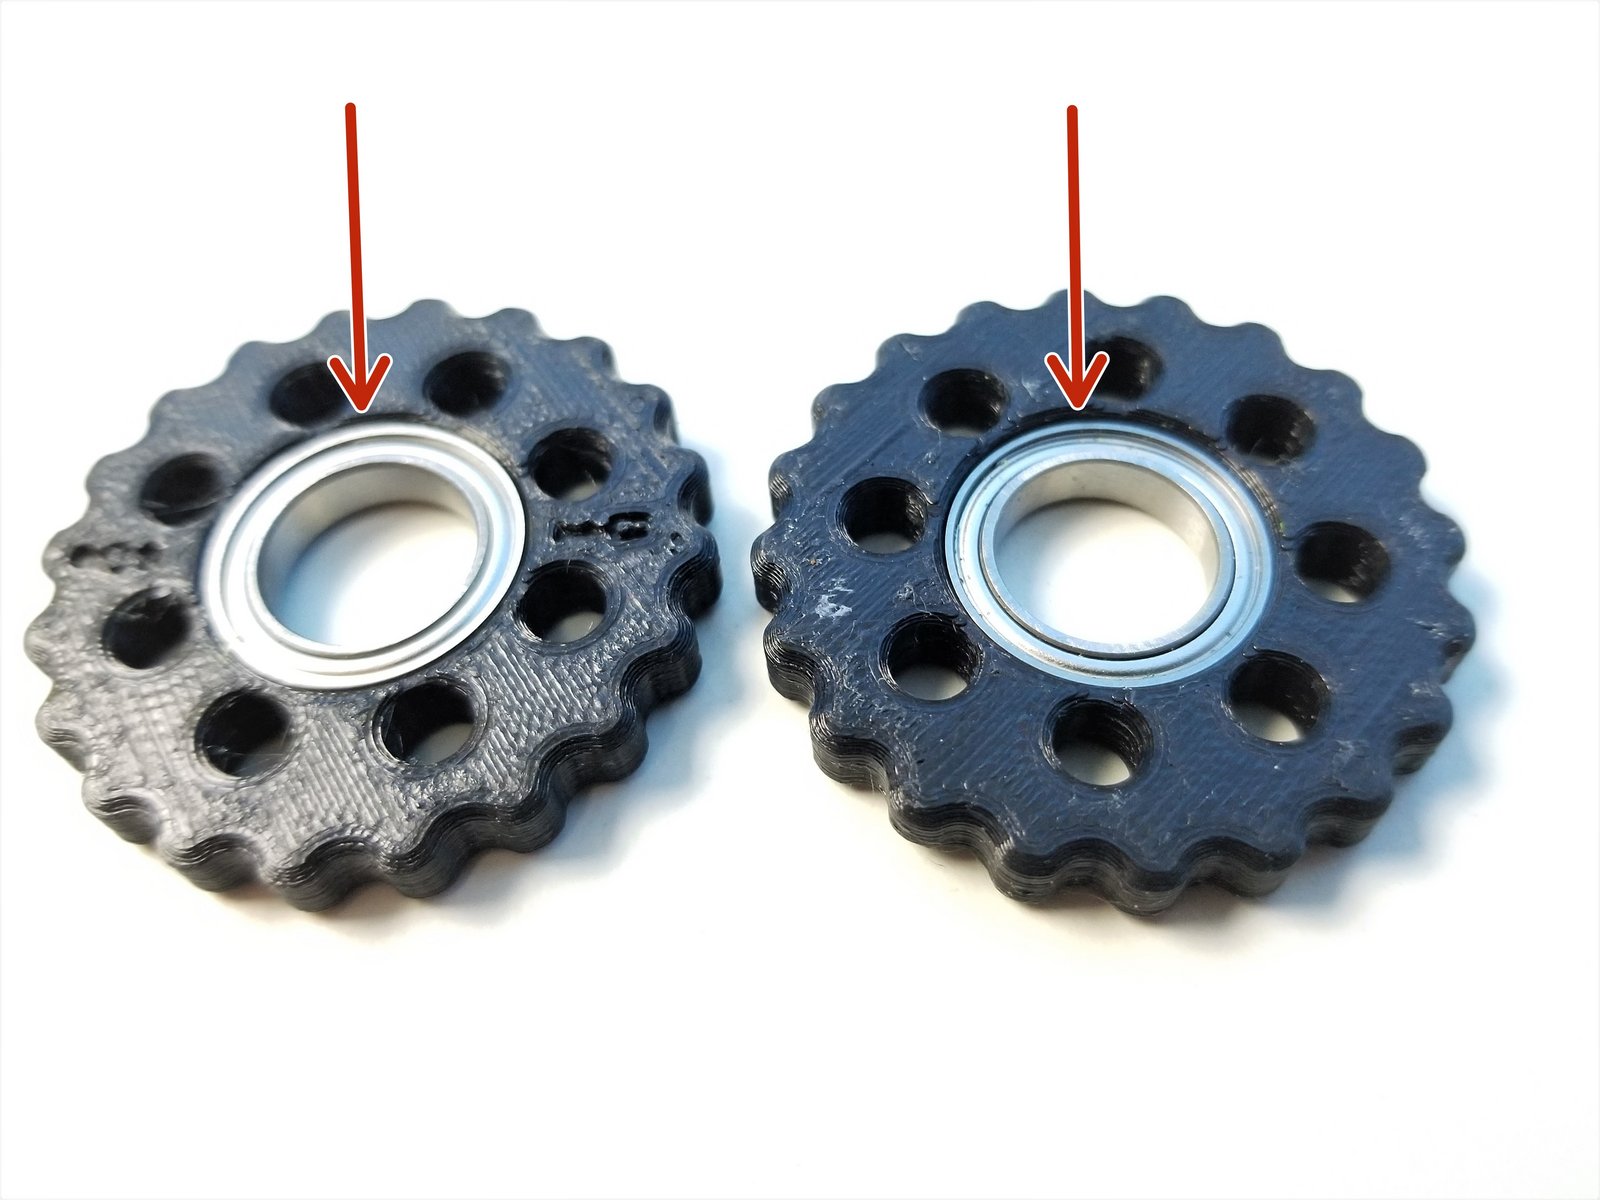
Insert 6701 Bearings into each Rotor. Make sure they are fully inserted
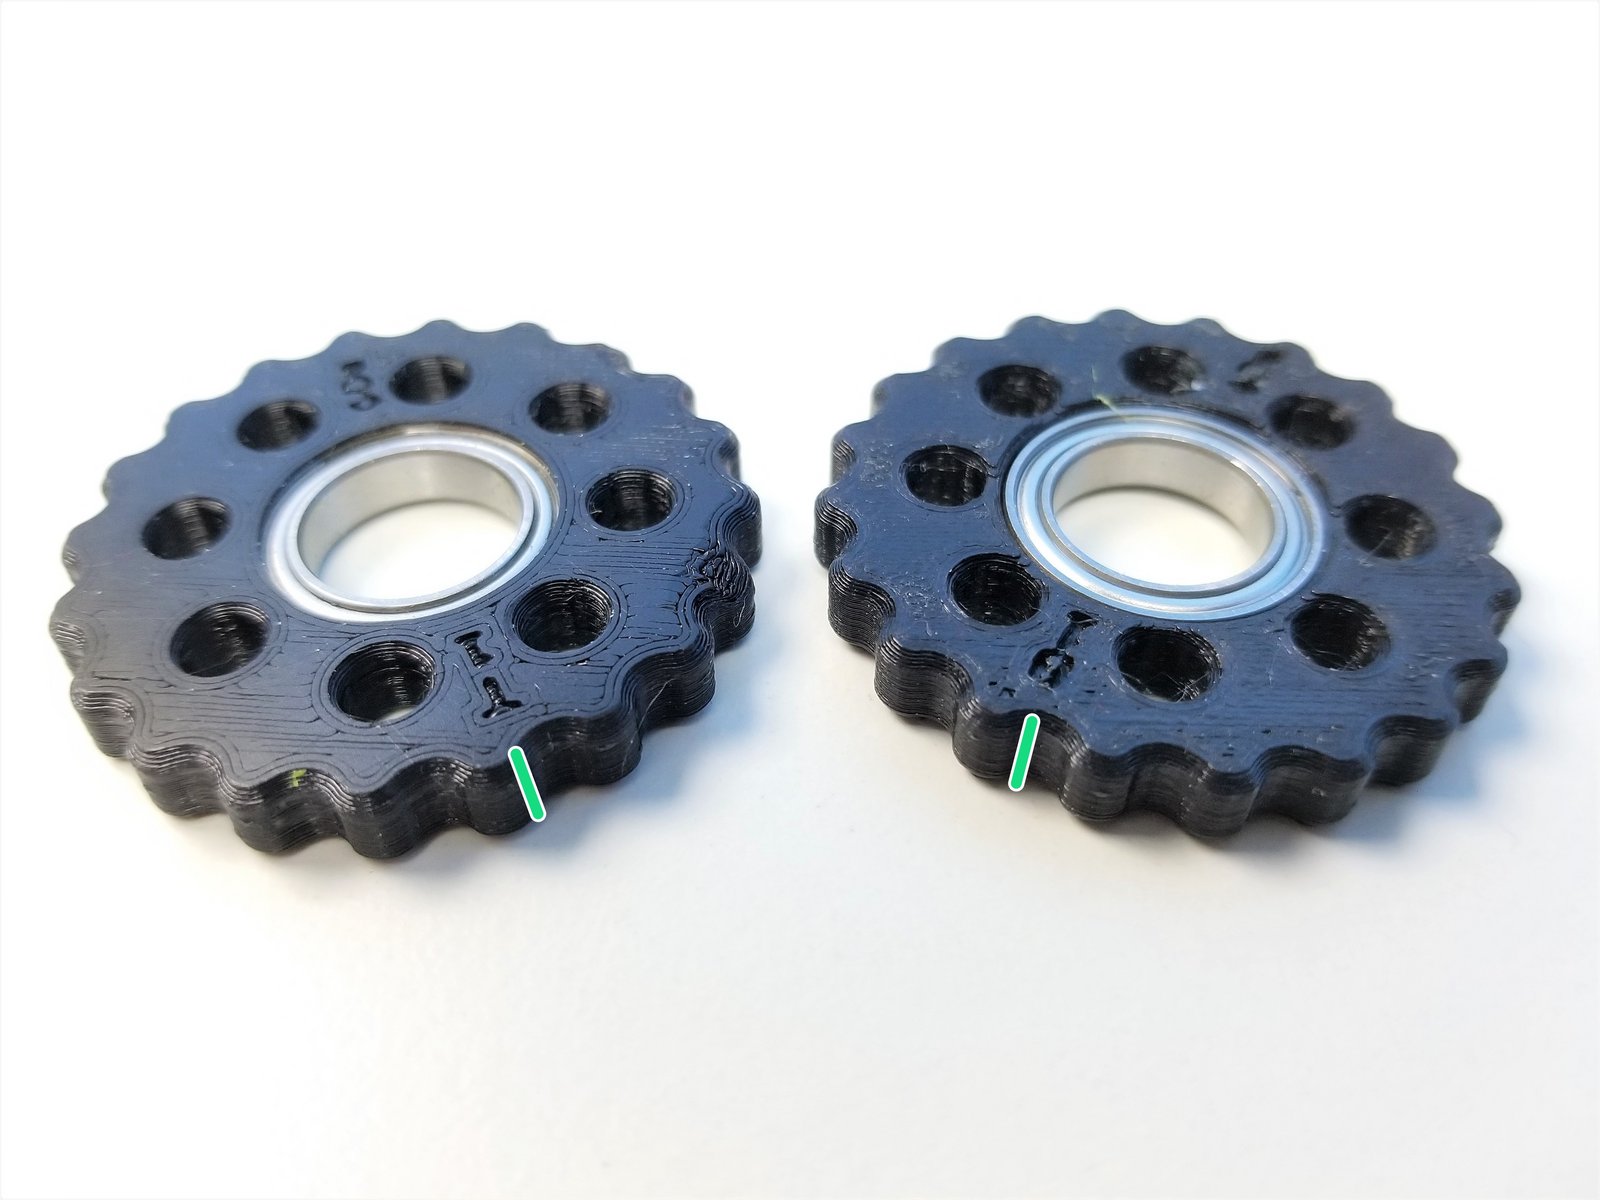
Make a sharpie mark on the side of the Rotors along the "T" and "B" label. This will help the alignment process in the future.
Step 6 Hand Gearbox - Input Shaft & Rotor
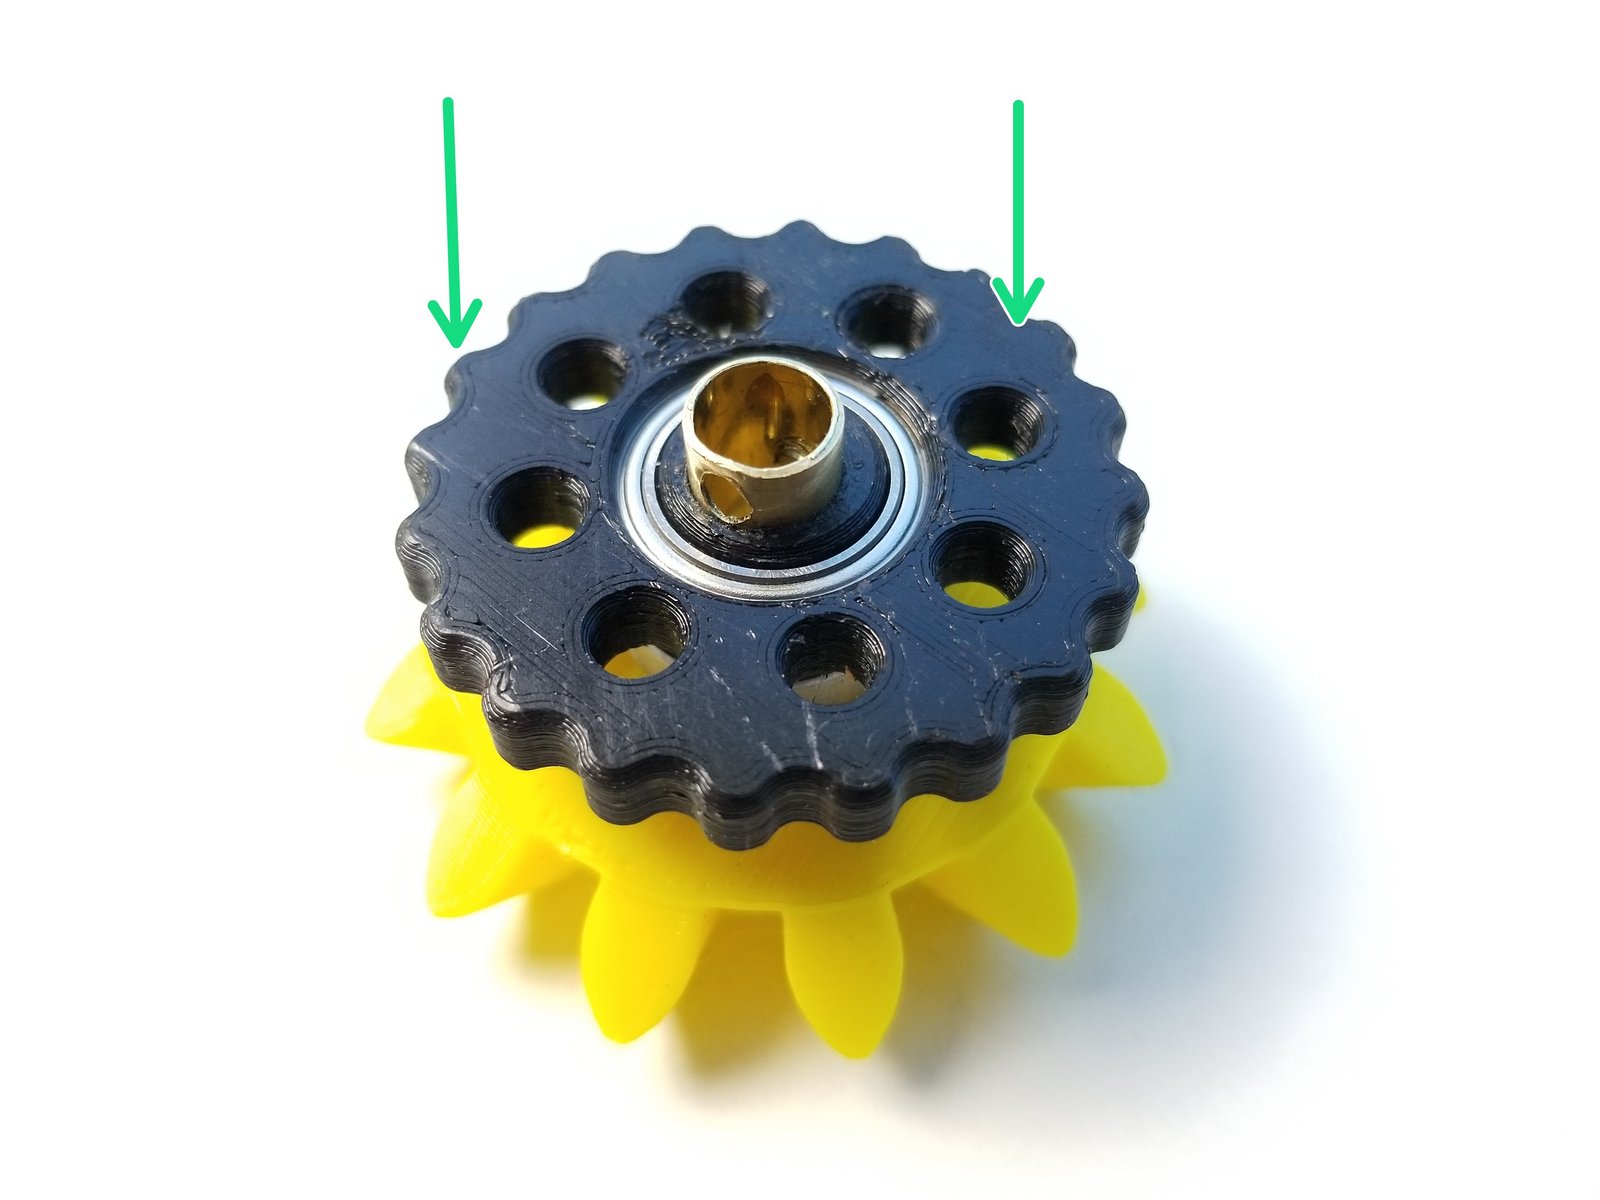
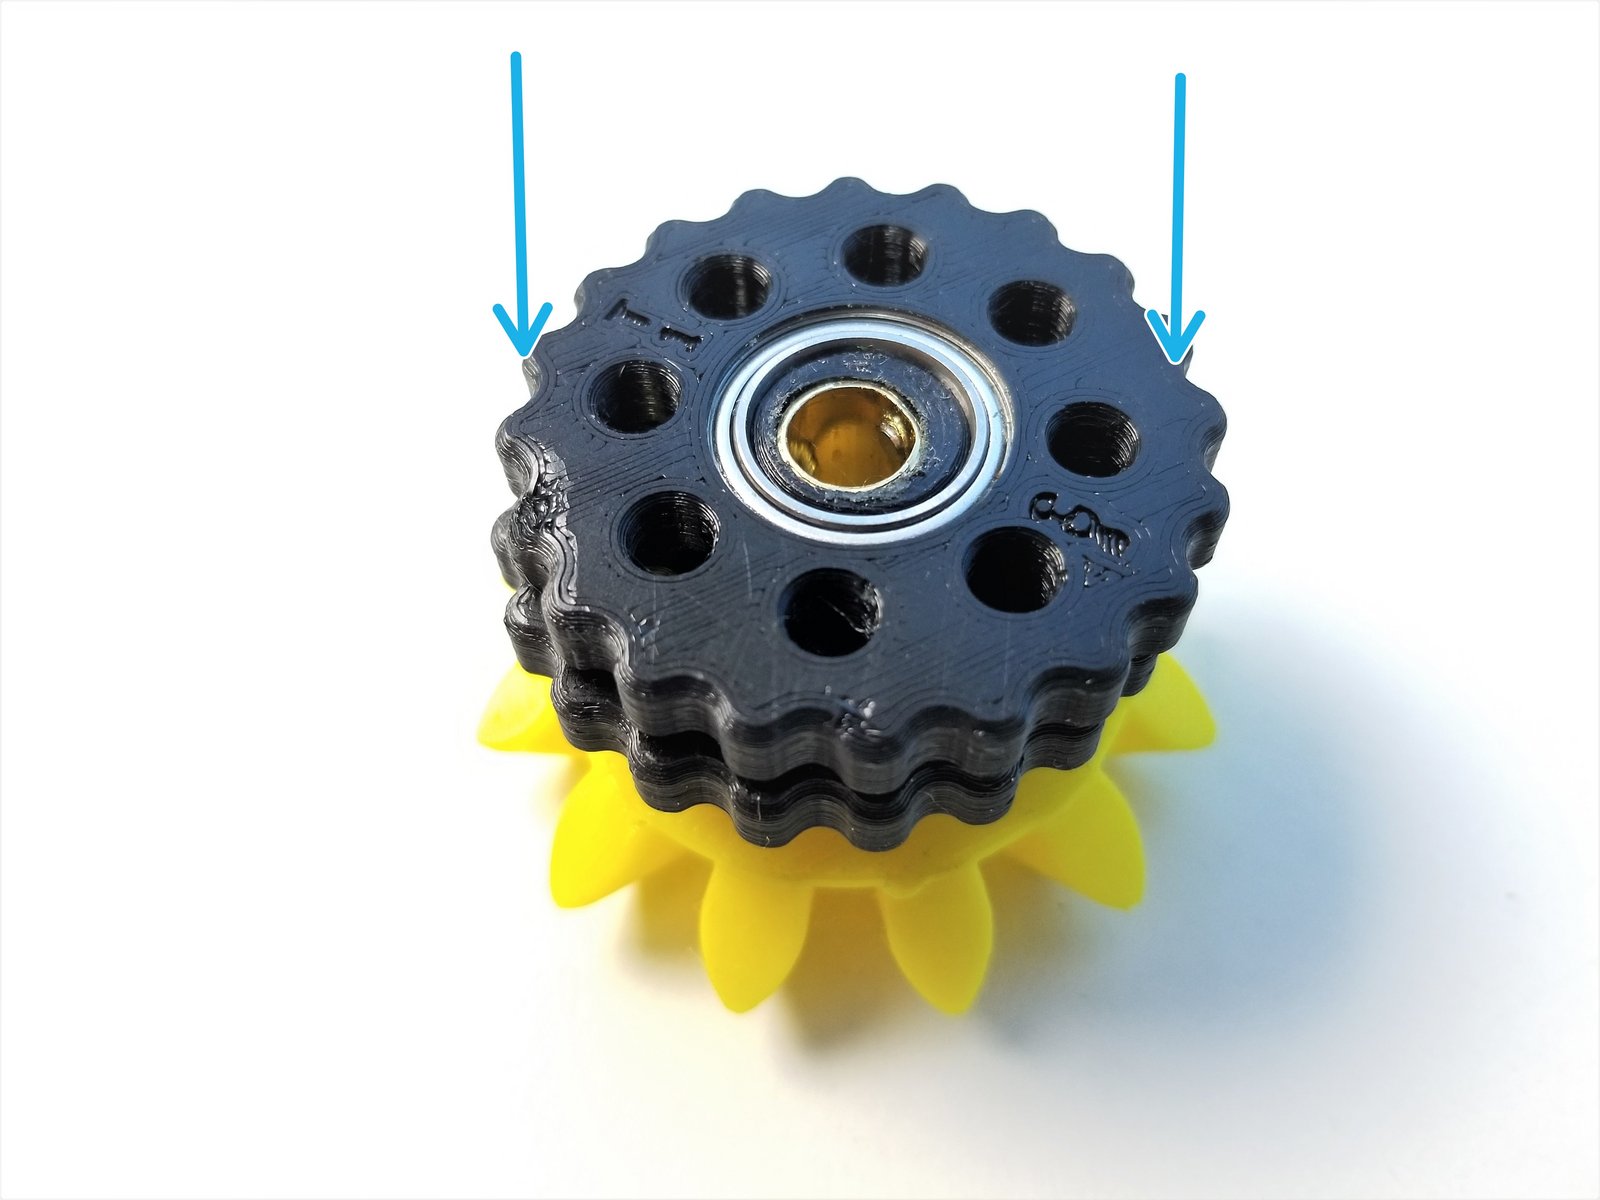
Click the large image to open full size.
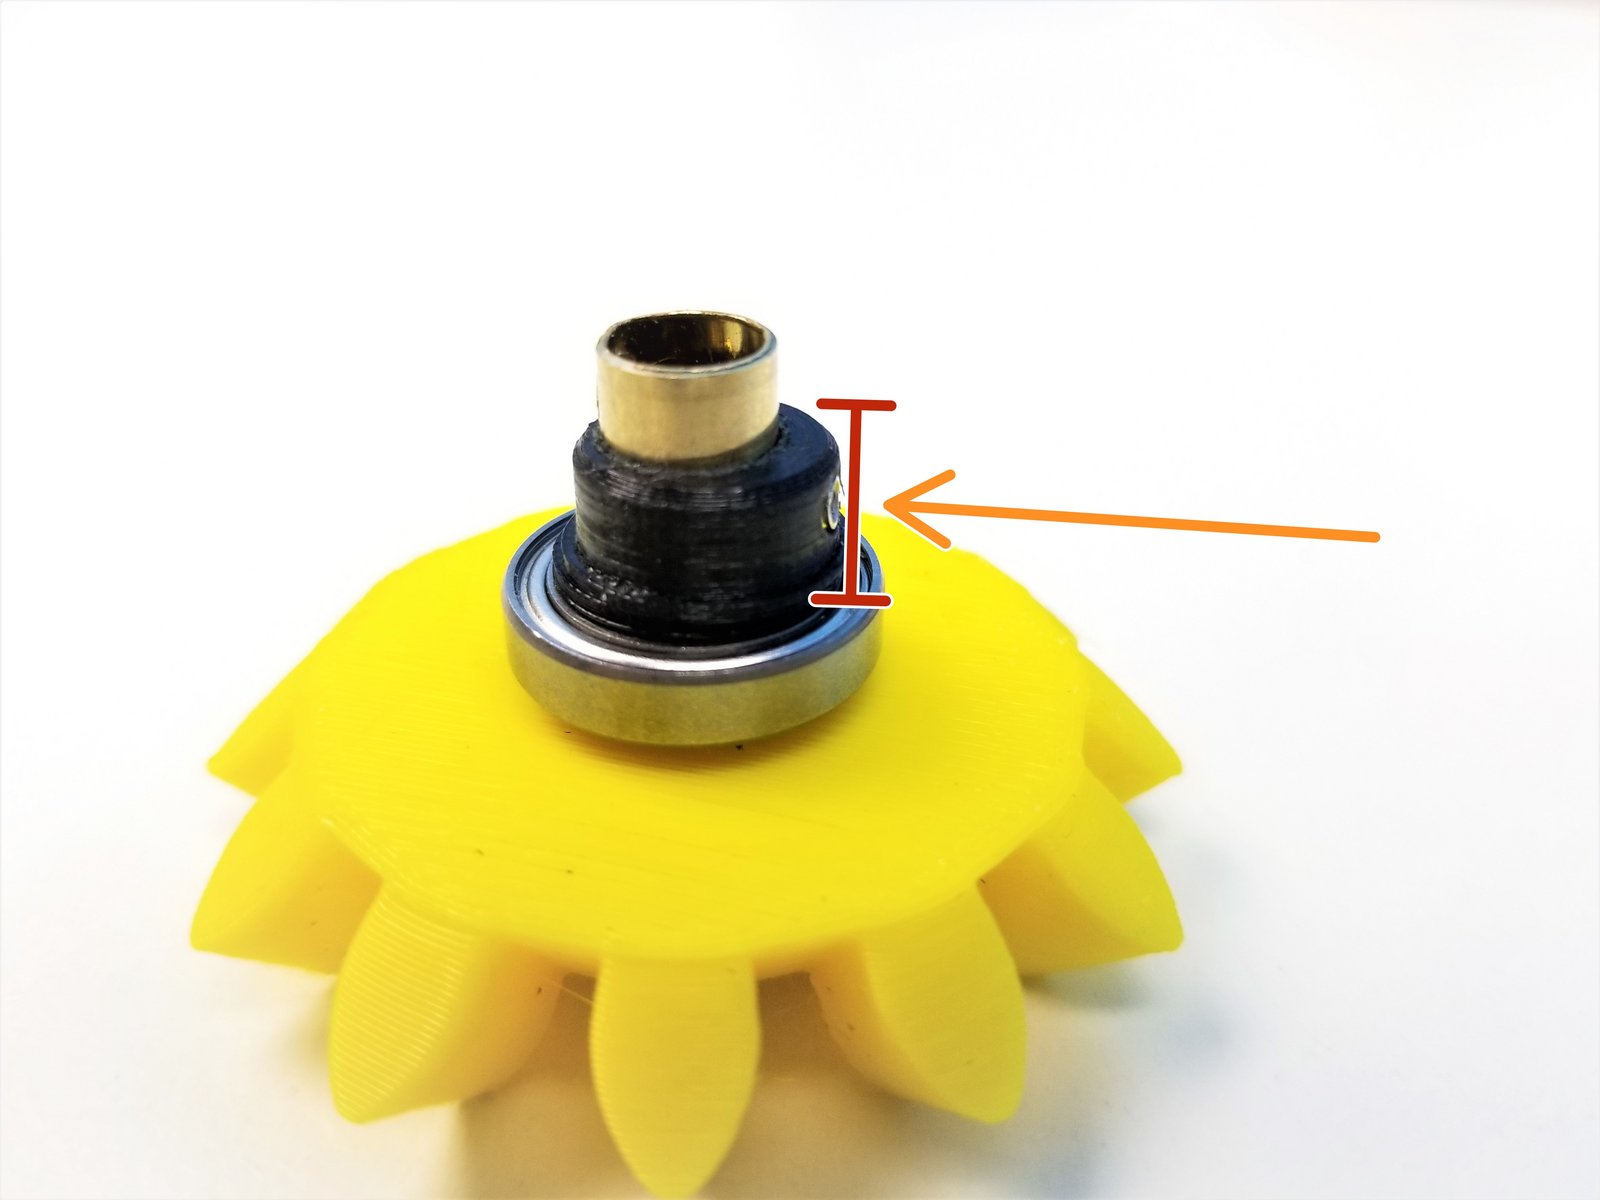
Align the Thick Eccentric Cam {Bottom} and use the M3 Set Screw to secure its location
- Warning:
Make sure the Set Screw goes in just enough for the bearing to slide over NO MORE!!
Place the "B" Rotor onto the eccentric cam with the "B" label facing the Bevel Gear
Repeat with the Thin Eccentric Cam {Top} and "T" Rotor with "T" label facing up
Step 7 Hand Gearbox - Output Disks
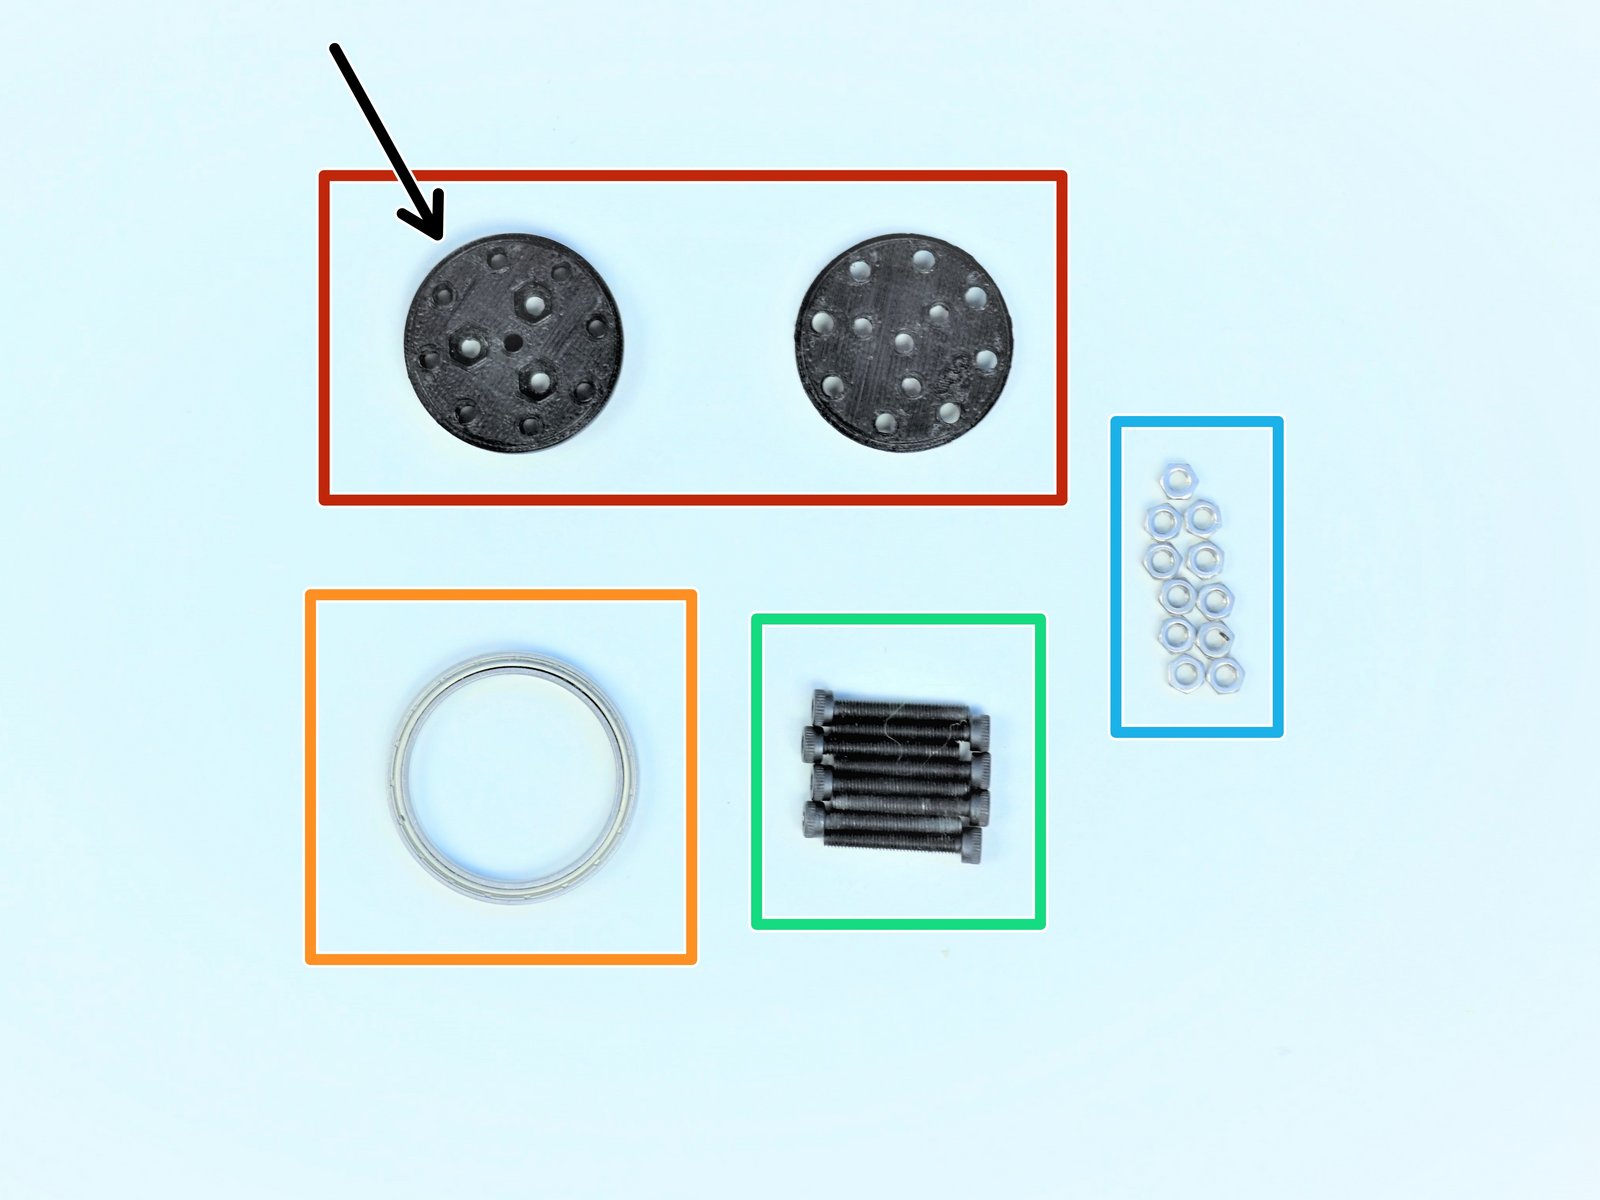
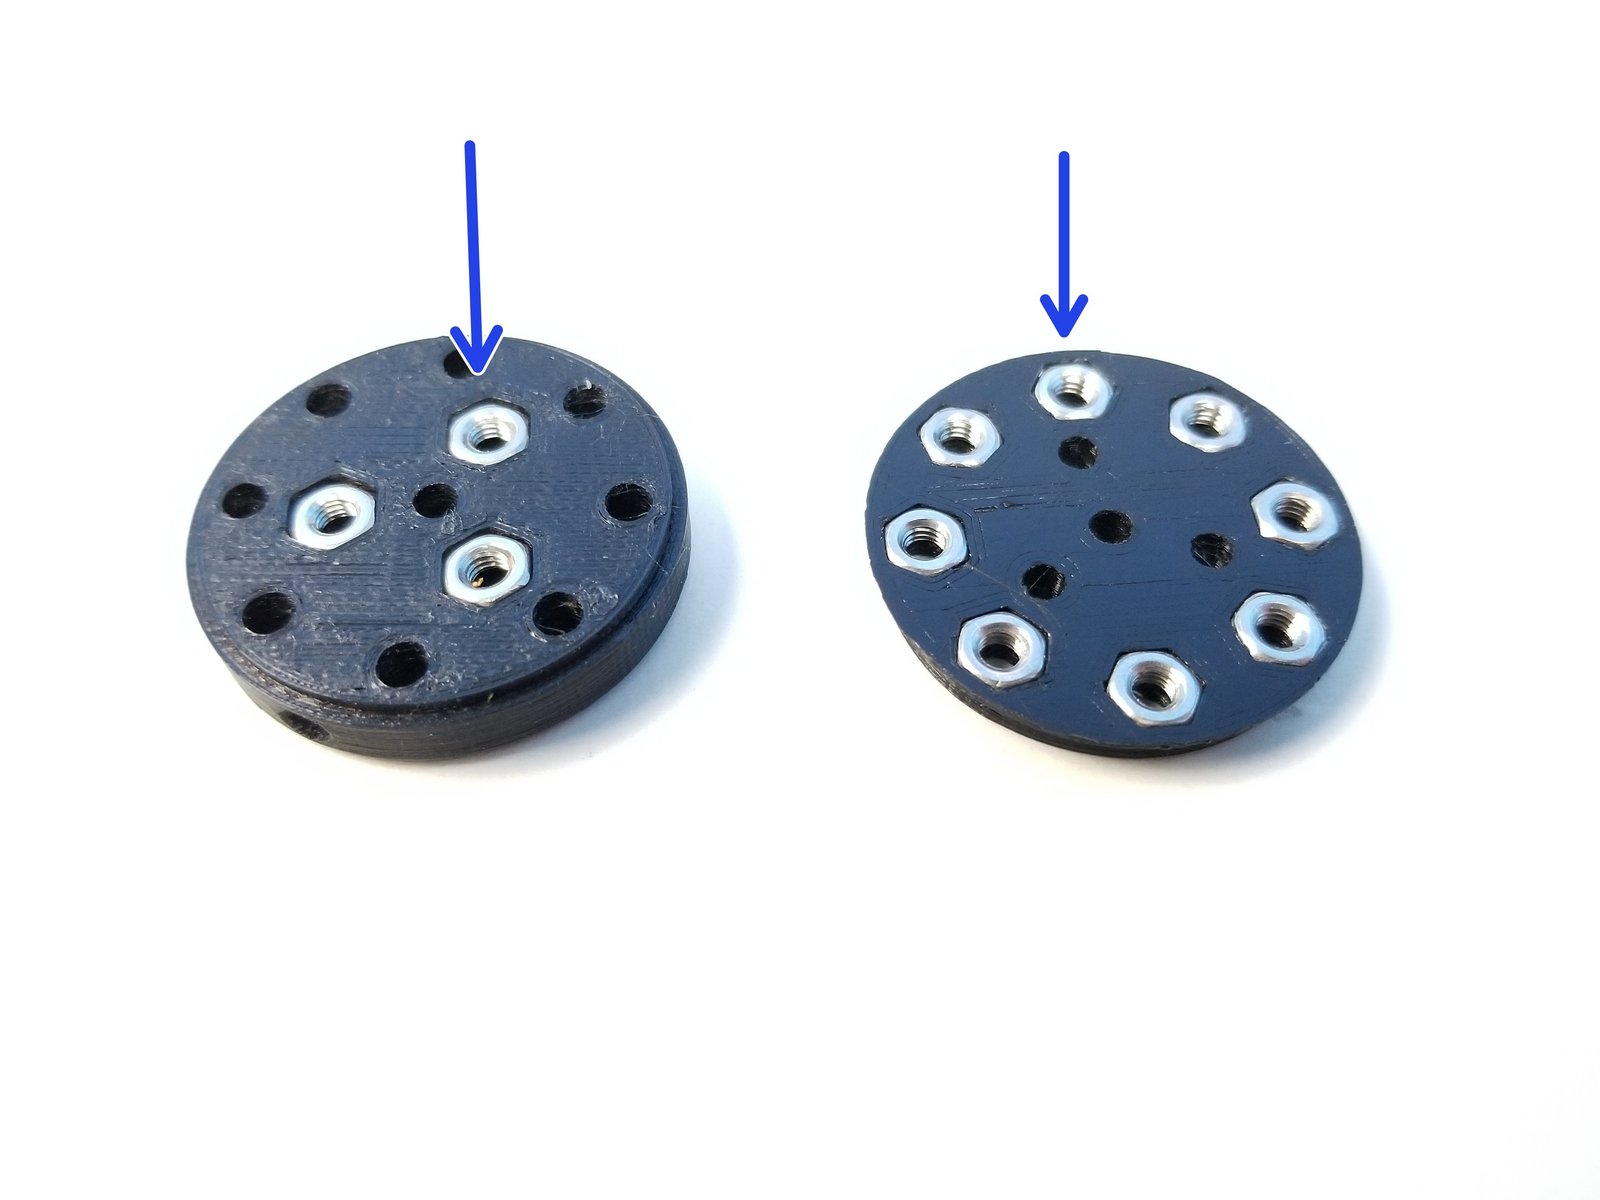
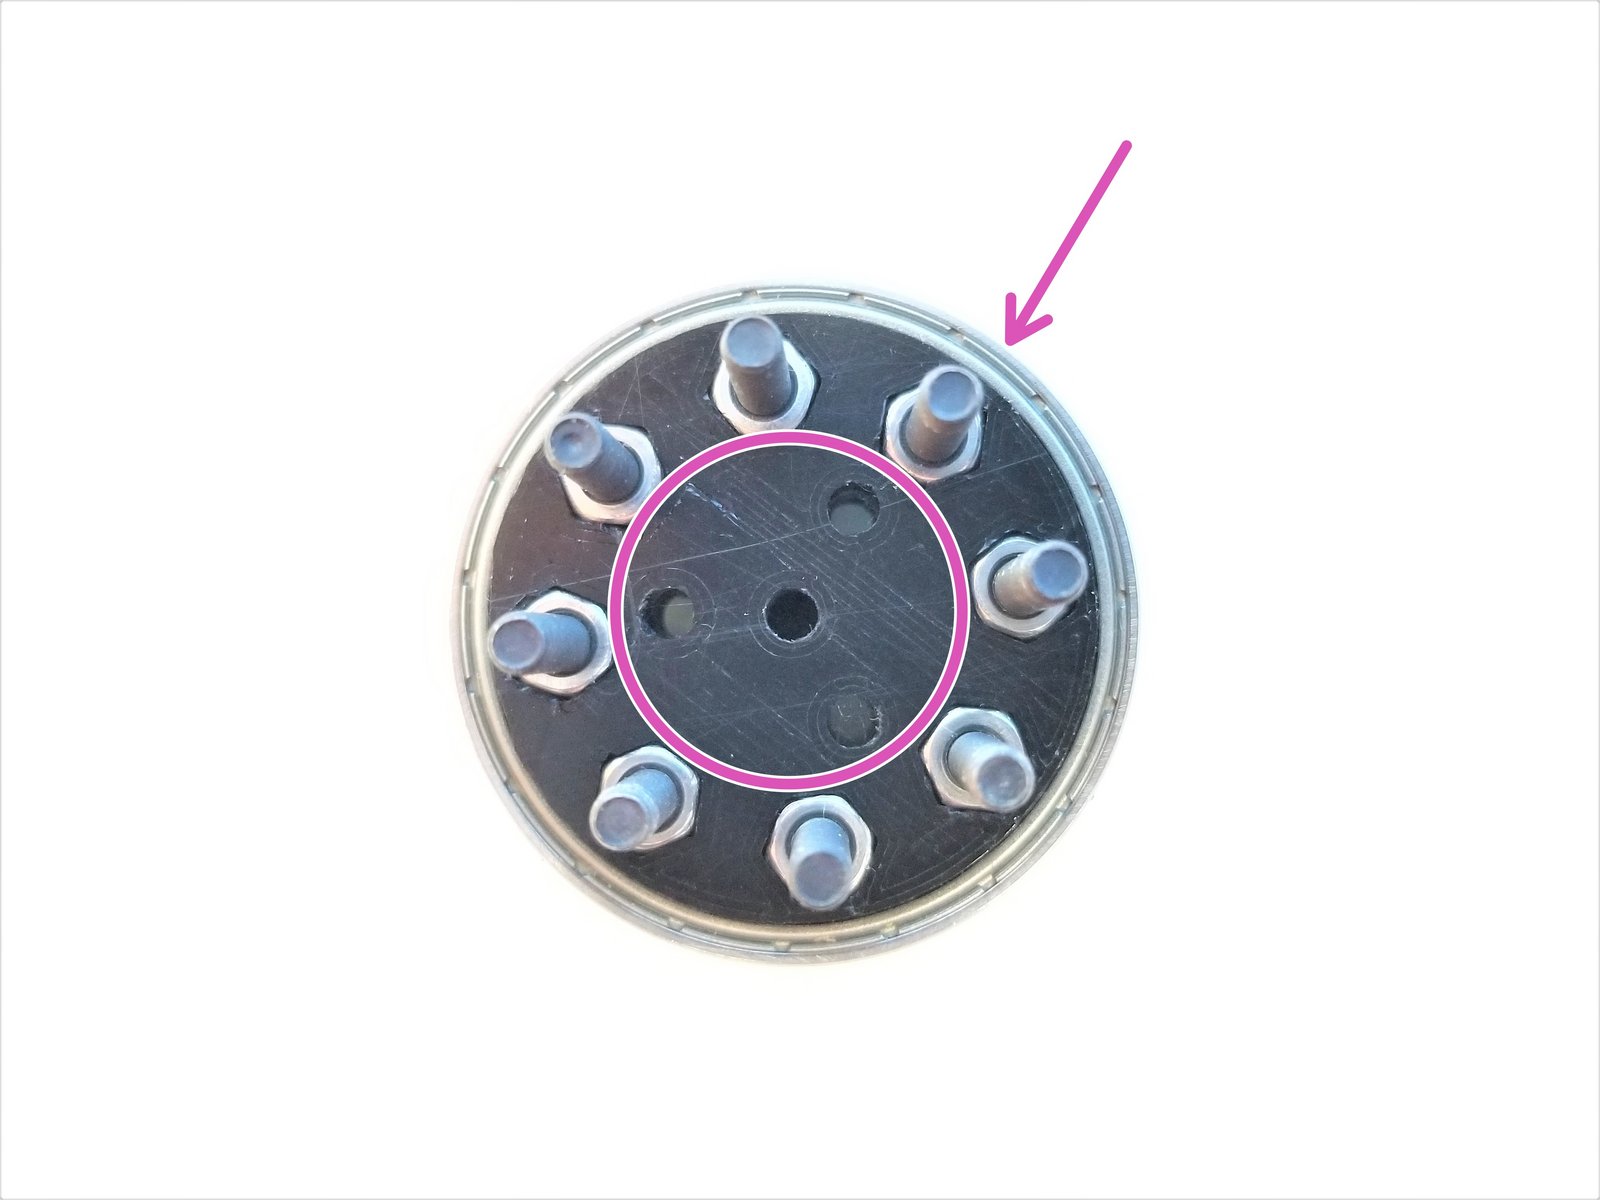
Click the large image to open full size.
- Note:
Prepare the following components:
[3D] - 6Da Hand GB Output Disks
Thicker Output Disk is considered "Top"
6706 Bearing [30x37x4mm] (x1)
M3x20mm Screws (x8)
M3 Hex Nuts (x11)
Insert M3 Hex Nuts in the nut inserts of Both Output Disks
Align the 3 middle holes of Top and Bottom Disks. Clamp the 6706 bearing with the Output Disks using M3x20mm Screws
Step 8 Hand Gearbox Housing - Parts
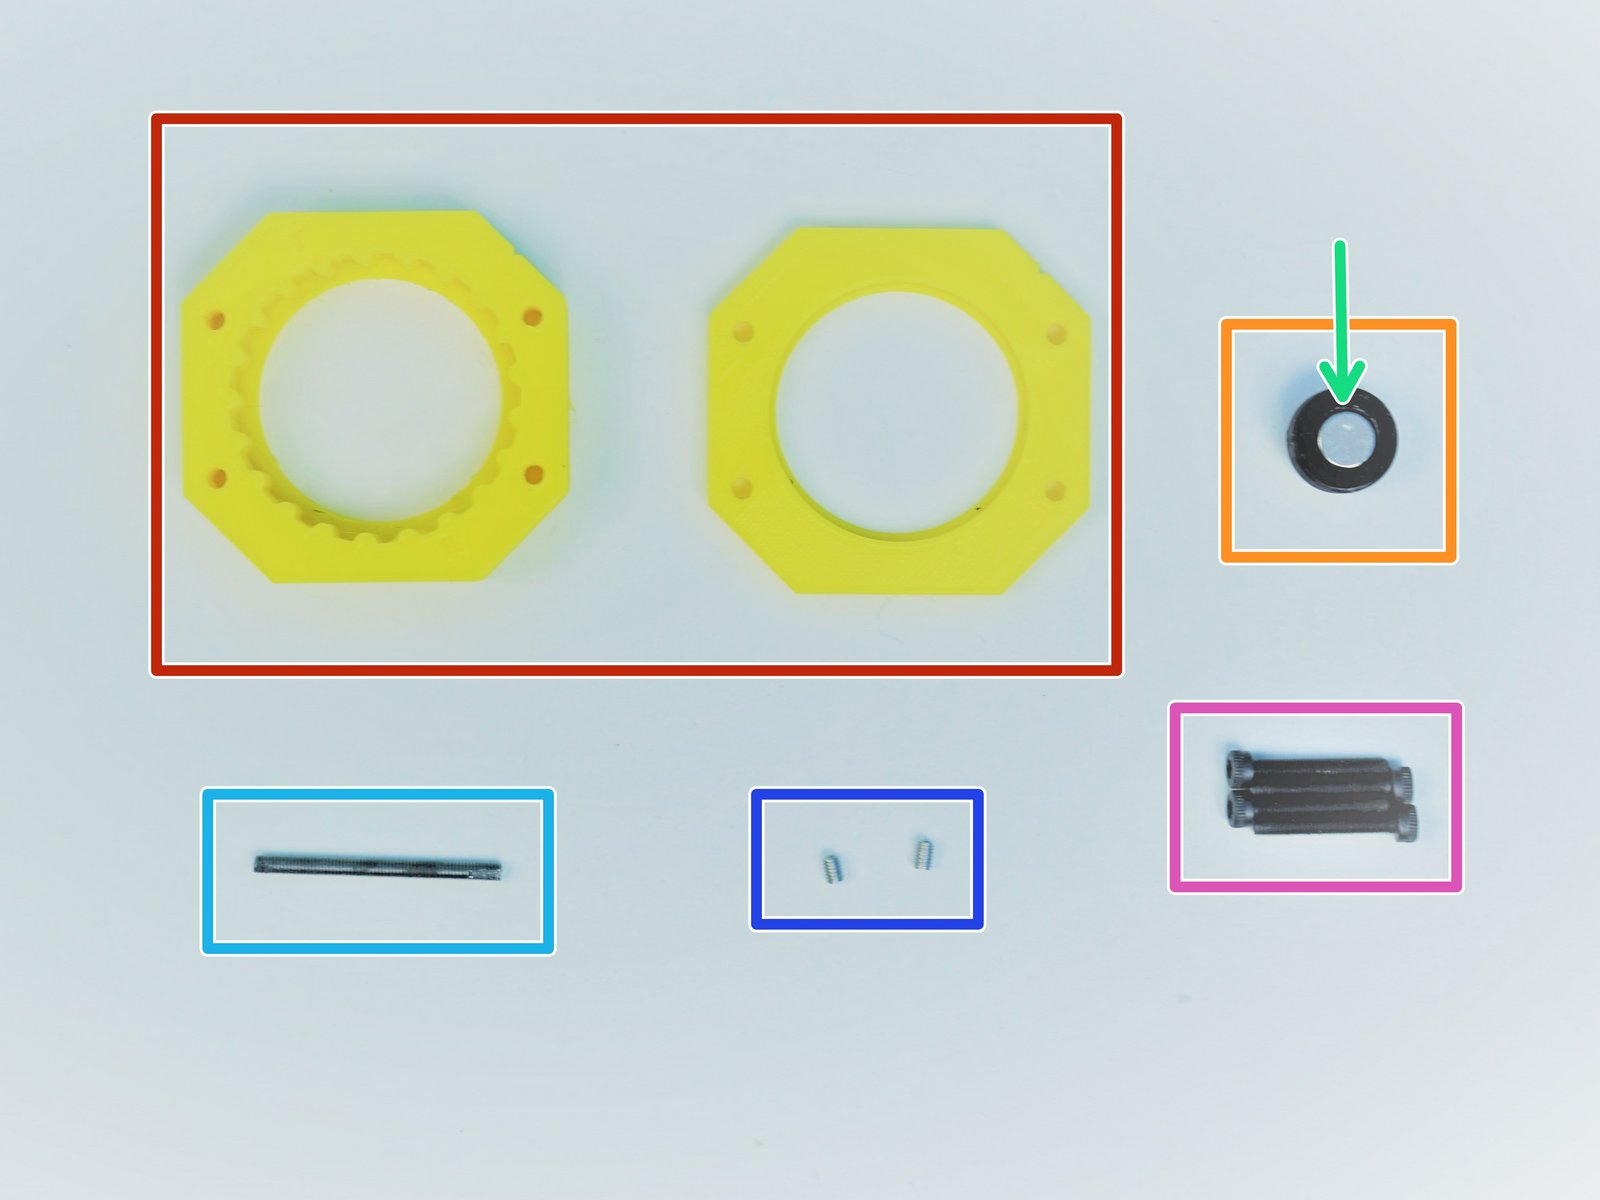
Click the large image to open full size.
- Note:
Prepare the following components:
[3D] - 6Da Hand GB Housing {Top & Bottom}
[3D] - 6Da Hand GB Magnet Holder
8x2.5mm Neodymium Magnet
M3x35mm Threaded Rod
- Warning:
Since February 2020, this is replaced with Brass Tube [1/8'x35mm]
M3x4mm Set Screws (x2)
M3x20mm Screws (x4)
Step 9 Hand Gearbox Housing - Rotor Alignment
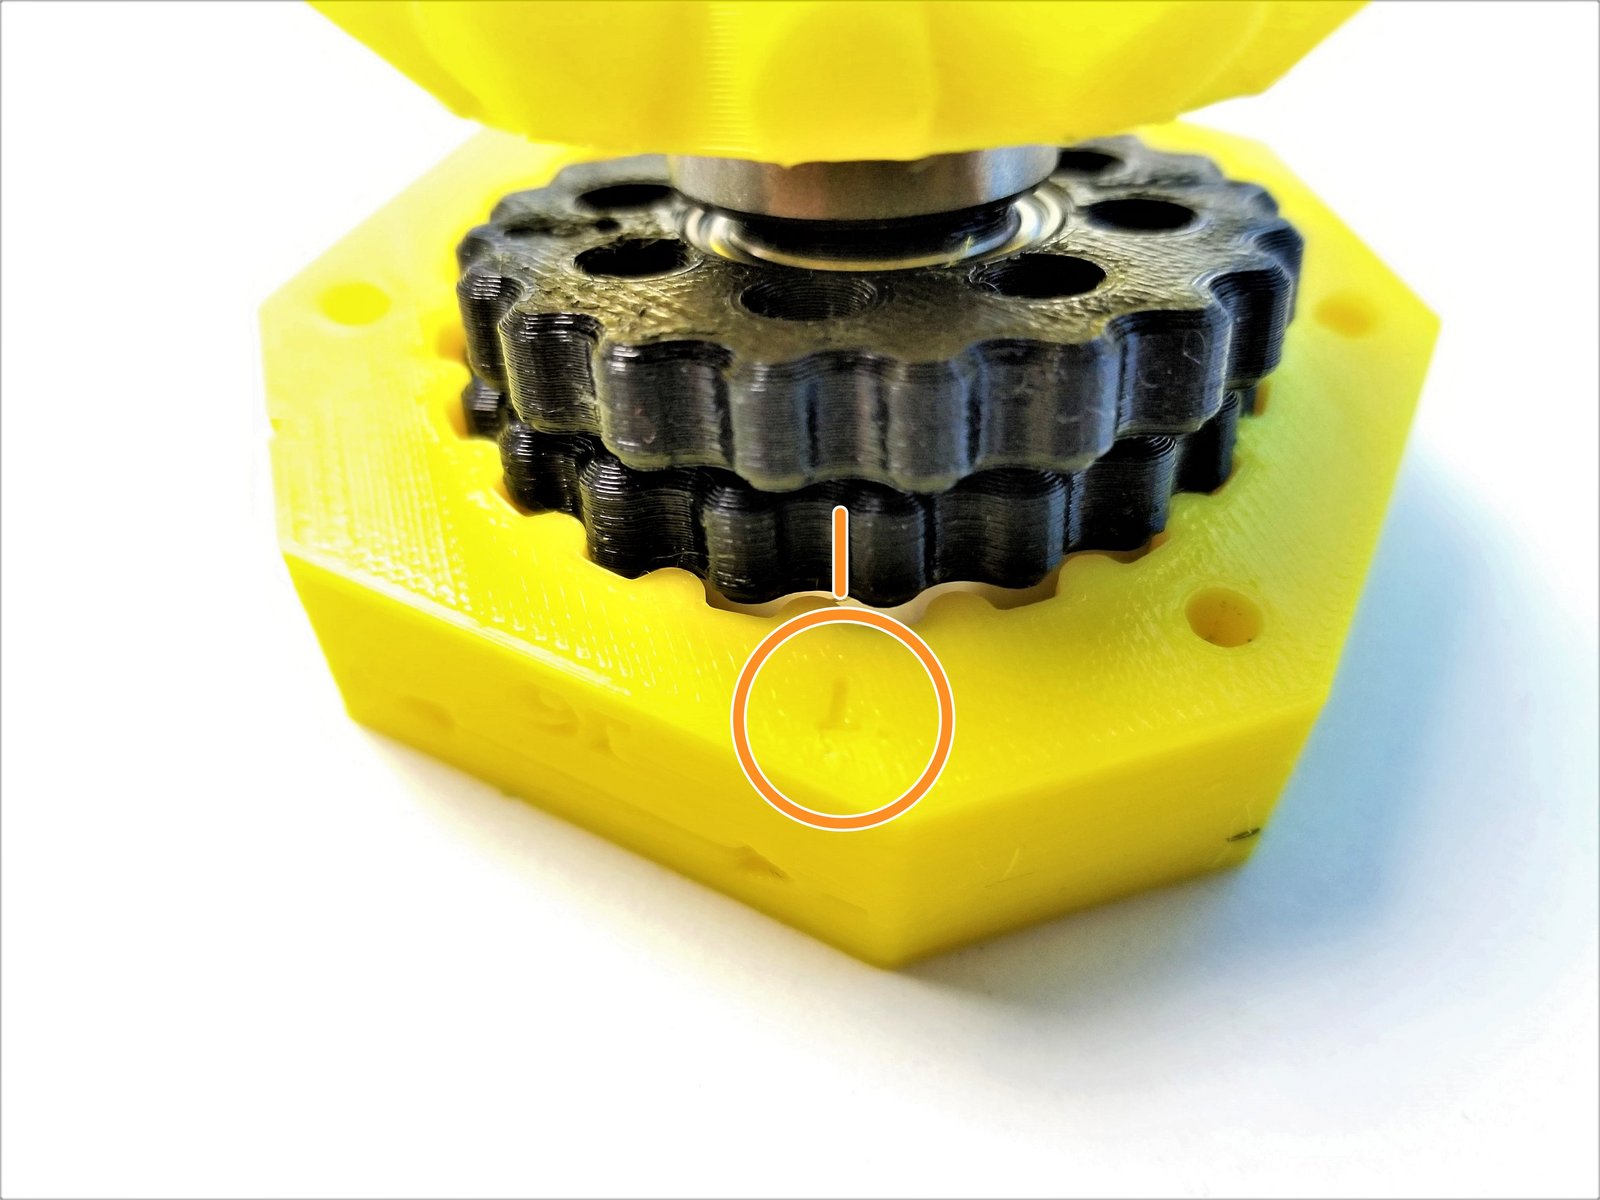
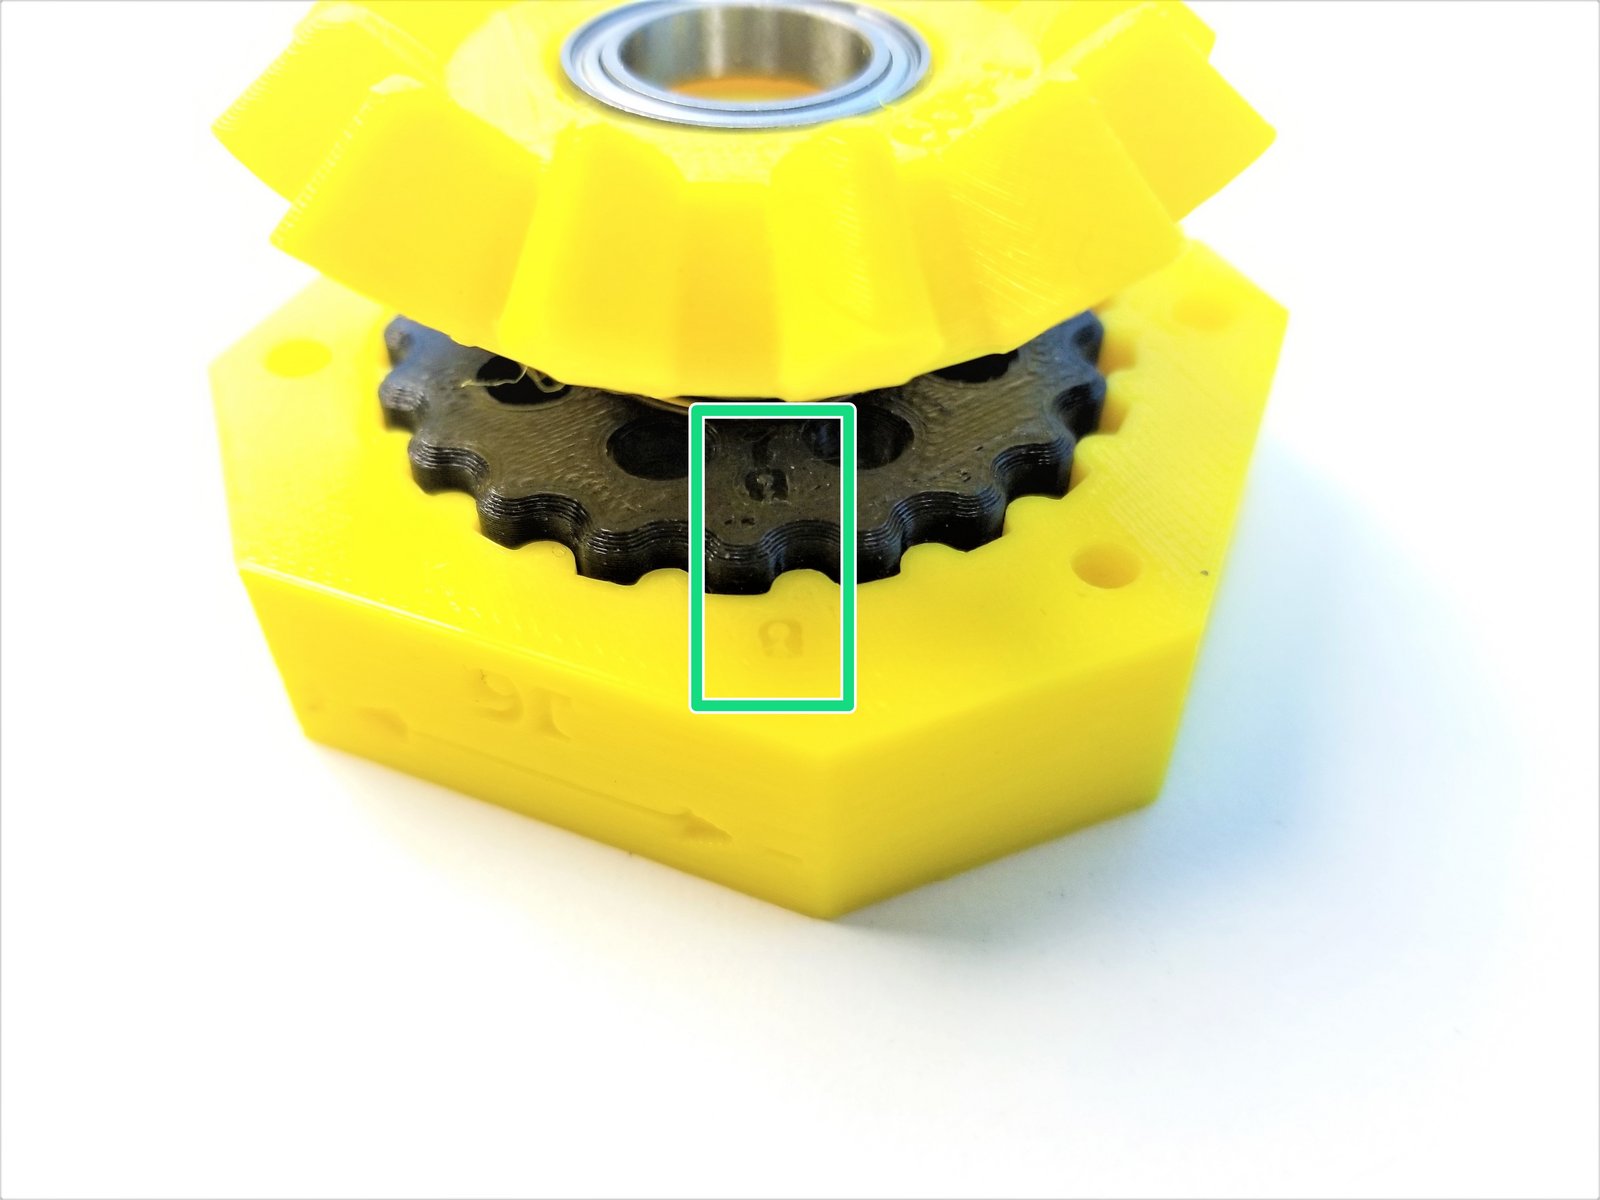
Click the large image to open full size.
- Warning:
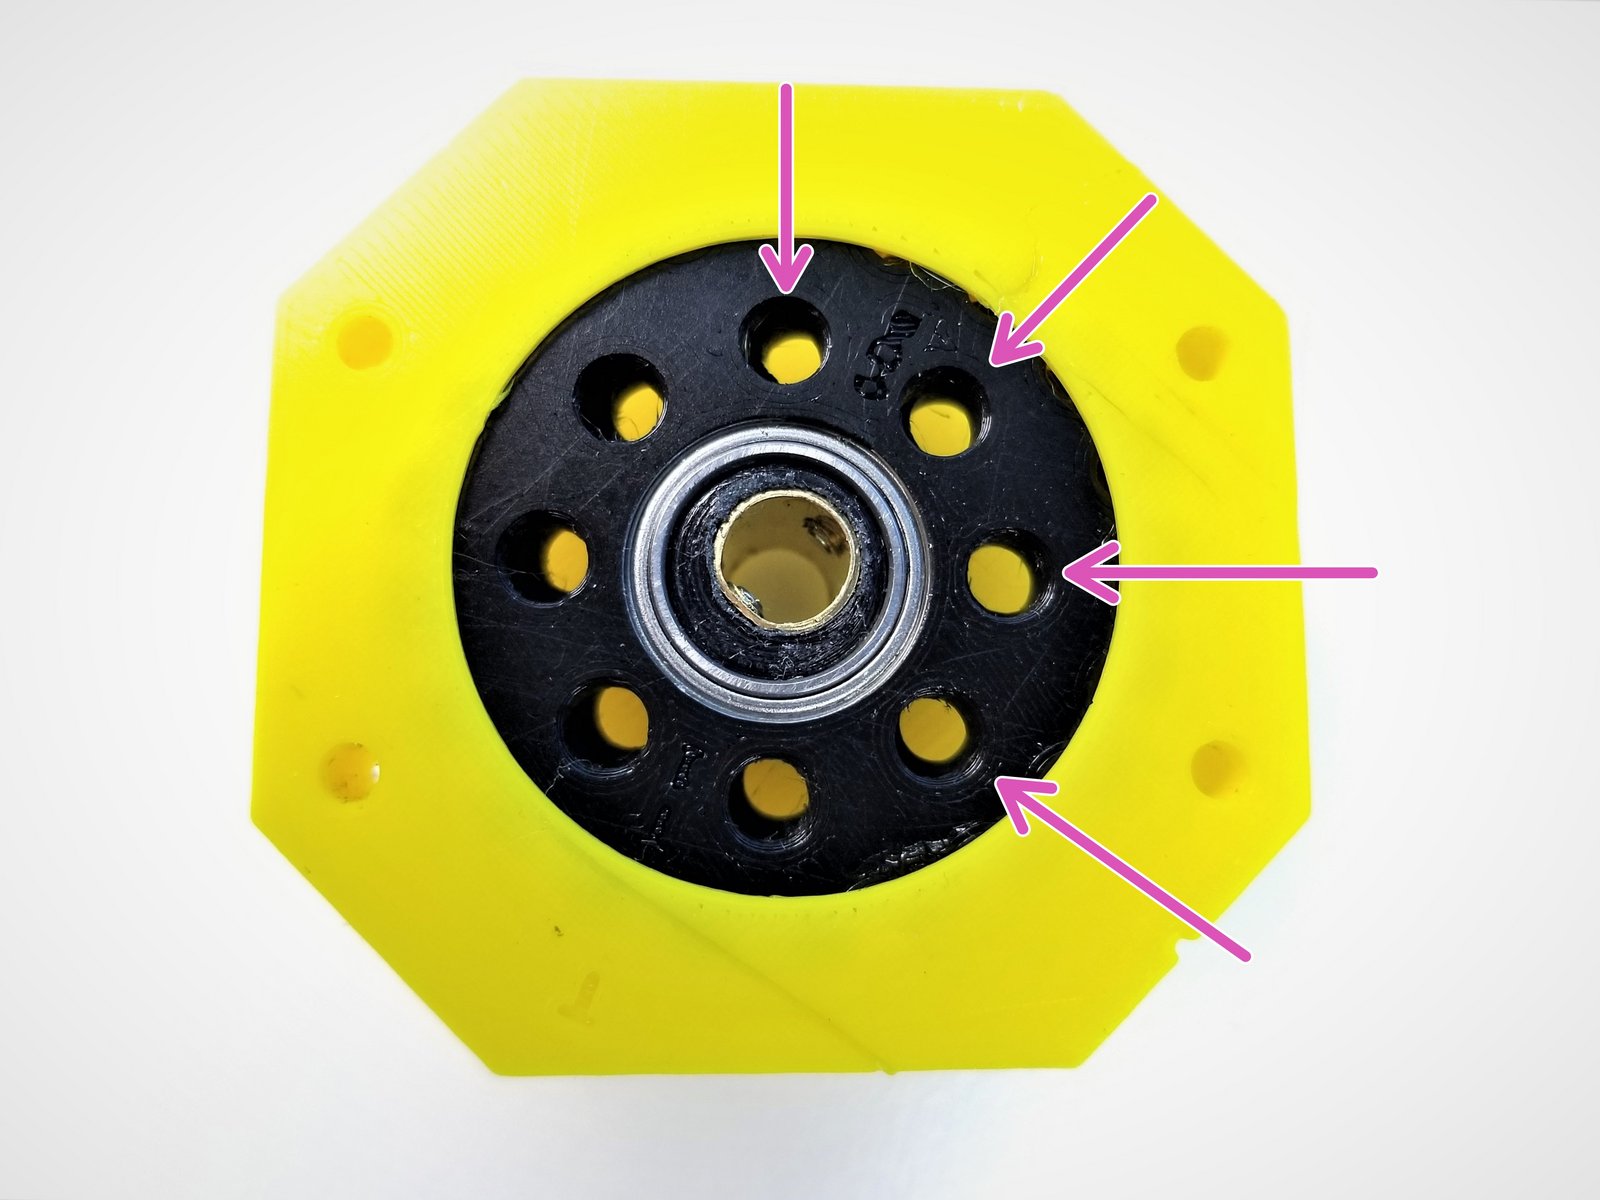
Rotor Alignment is very IMPORTANT! Follow the pictures carefully!
- Note:
Make sure there are sharpie marks on the side of the Rotors where it lines up with "T" and "B" on the rotors
Align the Side Mark of "T" Rotor to the "T" on the Housing, and only insert Top Rotor into the housing.
Align the Side Mark of "B" Rotor to the "B" on the Housing, and insert the Bottom Rotor
When aligned properly all 8 holes made by 2 rotors intersecting should have equal spacing
- Note:
Verify that you can manually turn the eccentric shaft in the center and that the rotors smoothly turn inside the housing. Tight printing and misaligned rotors can cause the gearbox to jam.
Step 10 Hand Gearbox Housing - Top Housing
Click the large image to open full size.
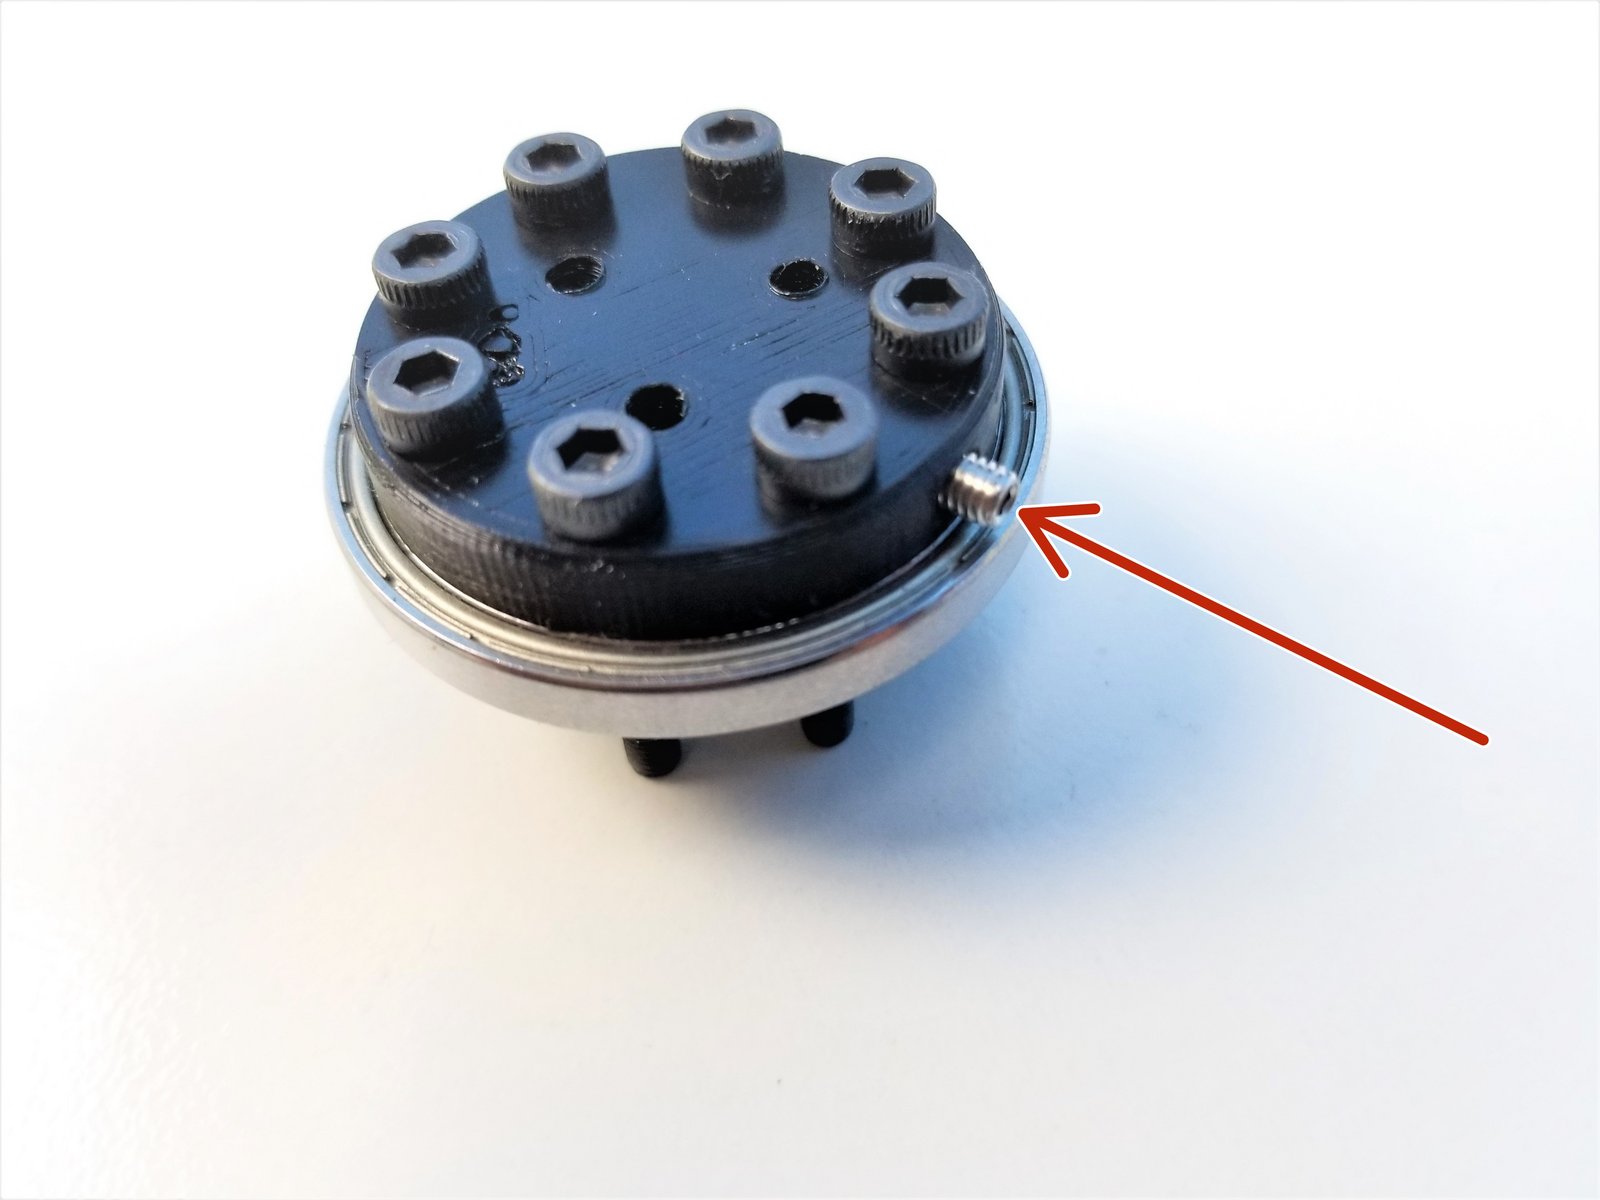
Insert M3 Set Screw on the side of the Output disk
Insert the Assembled Output Disk pins through the Rotors
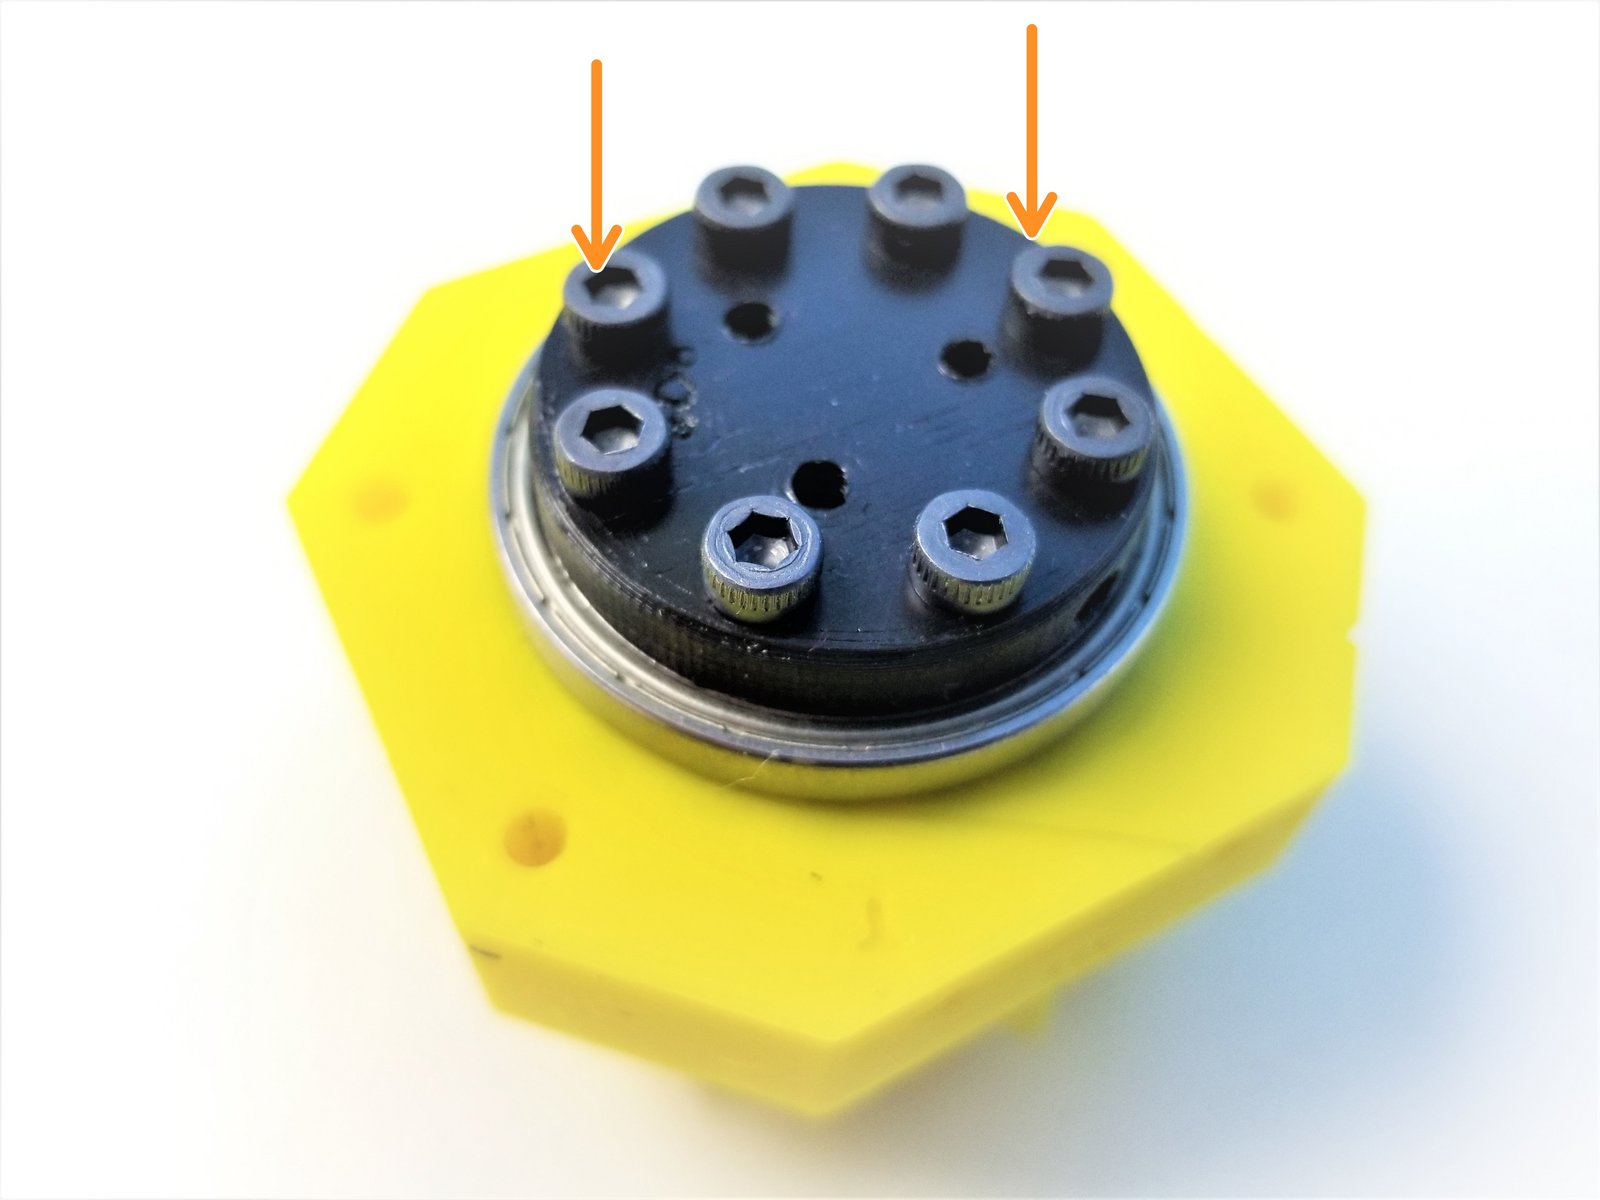
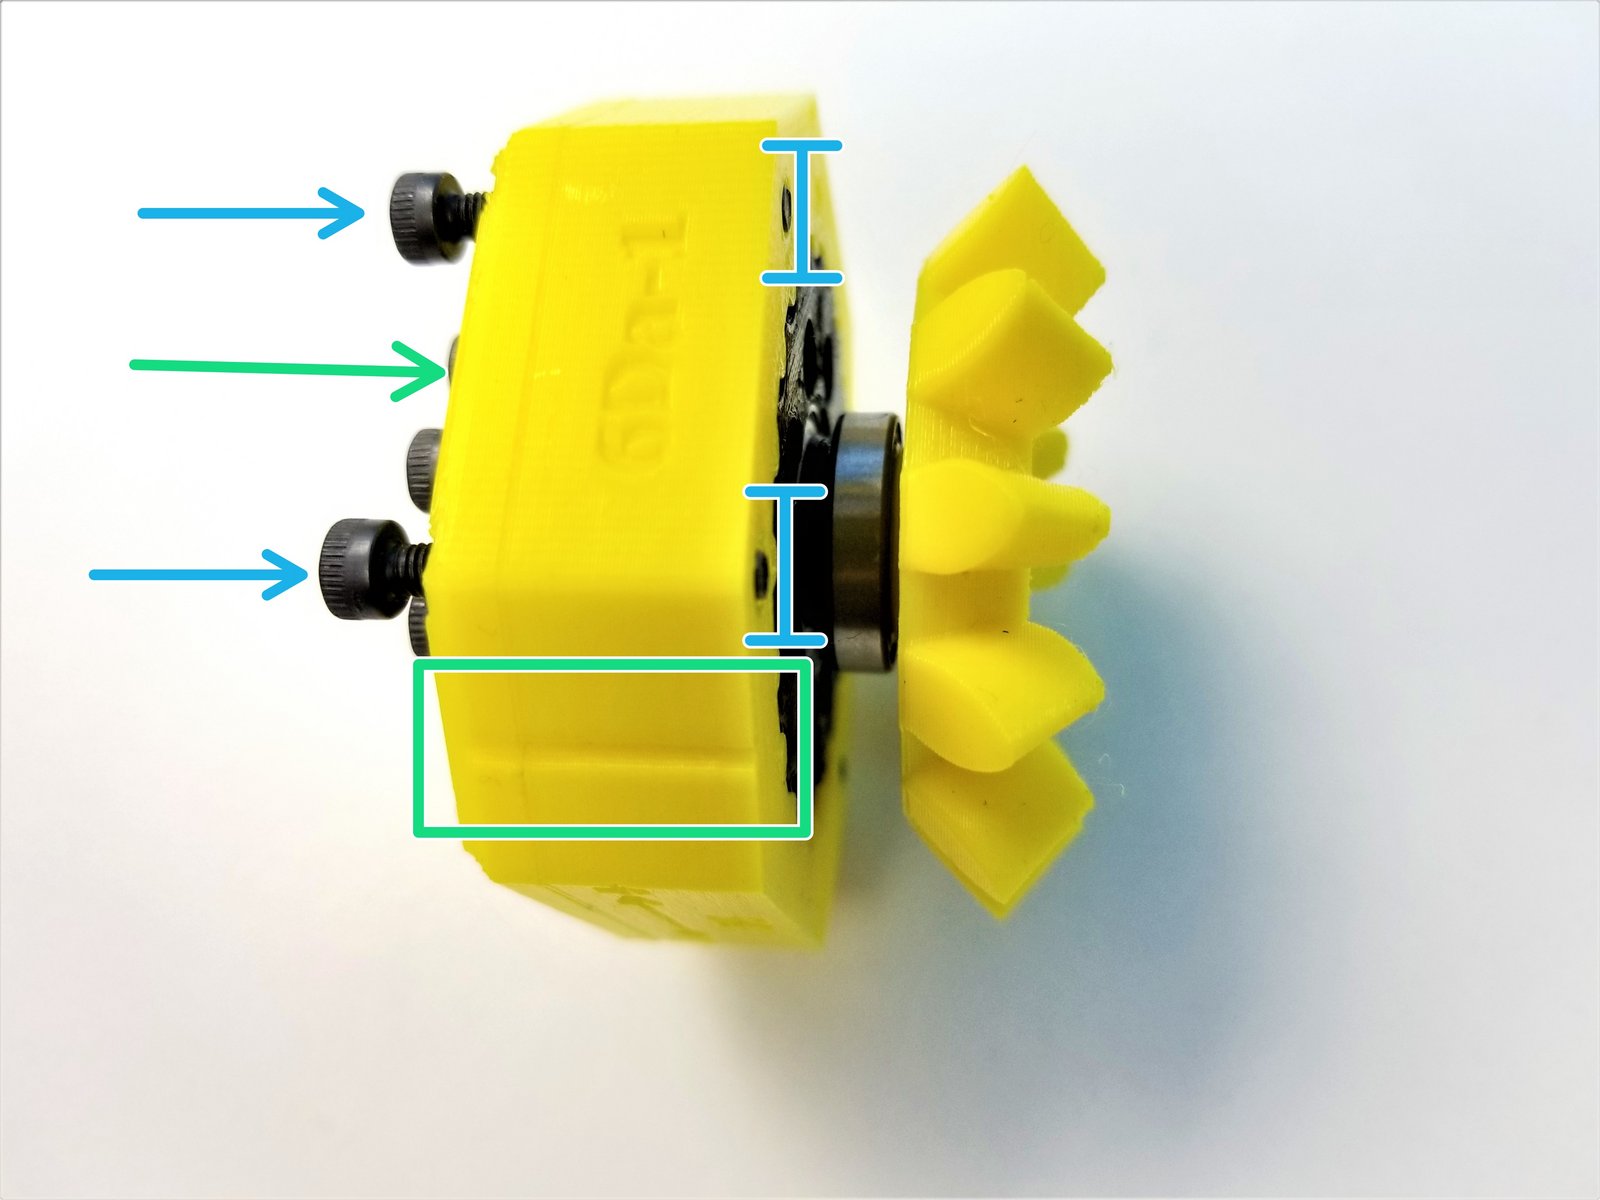
Slide in the Top Housing to 6706 Bearings on the Output Disk and align the Top & Main Housings along the alignment markers
Secure its position using M3x20mm Screws. ONLY screw in until it's flushed to the face of the housing
Step 11 Hand Gearbox Sensor Magnet
Click the large image to open full size.
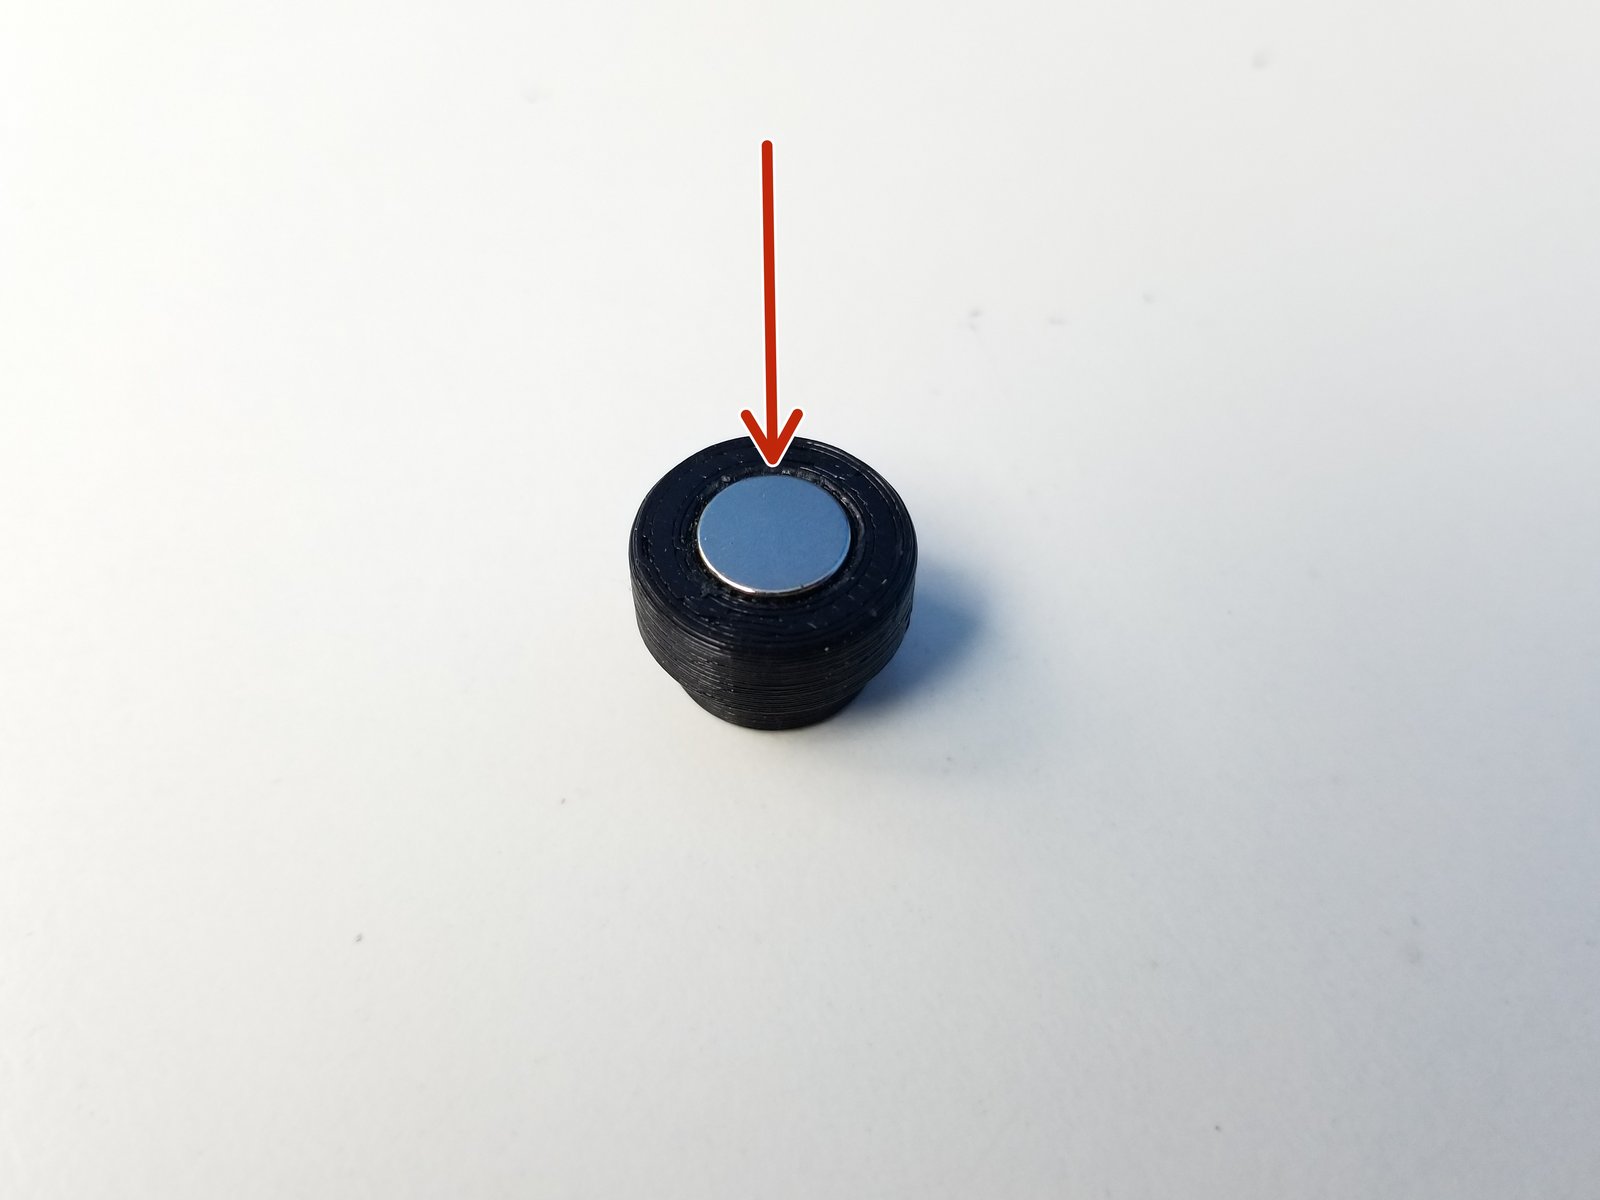
Insert the Neodymium Magnet in the Hand Sensor Magnet Holder, if you haven't yet.
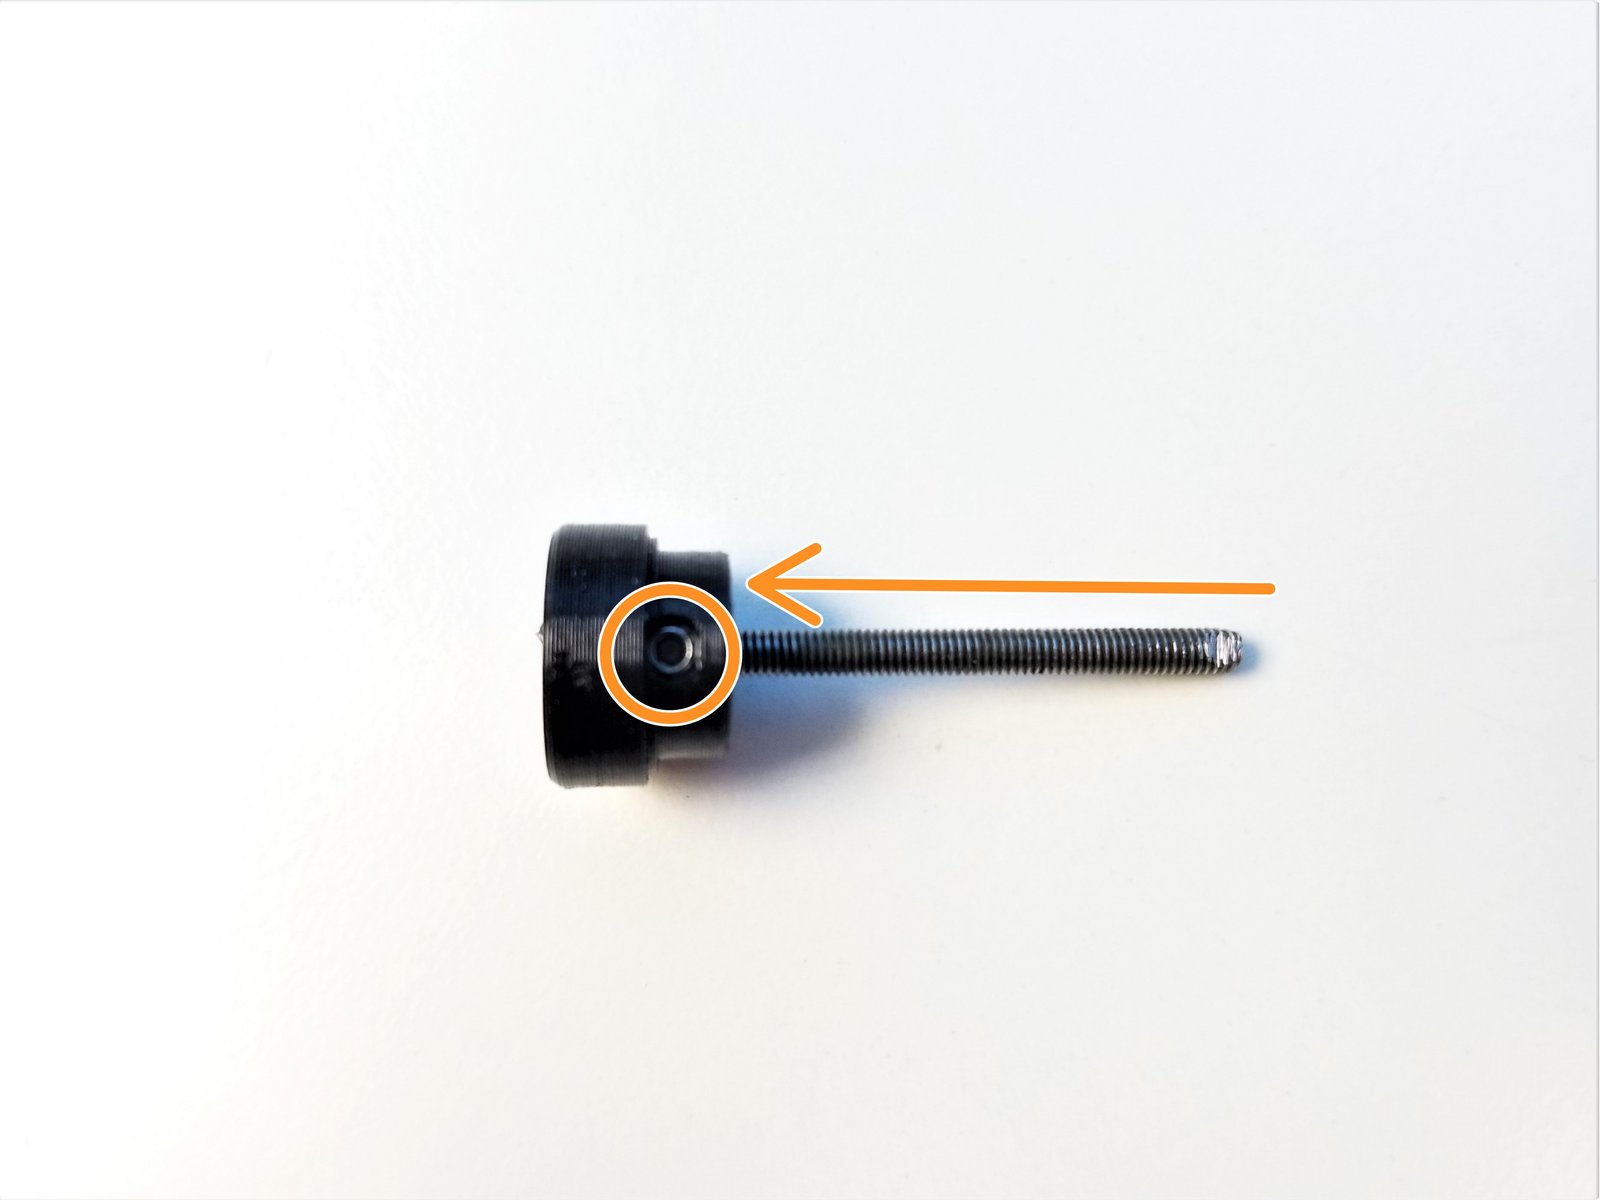
Insert M3 Threaded Rod in the Magnet Holder. Secure the Rod using the M3 Set Screw
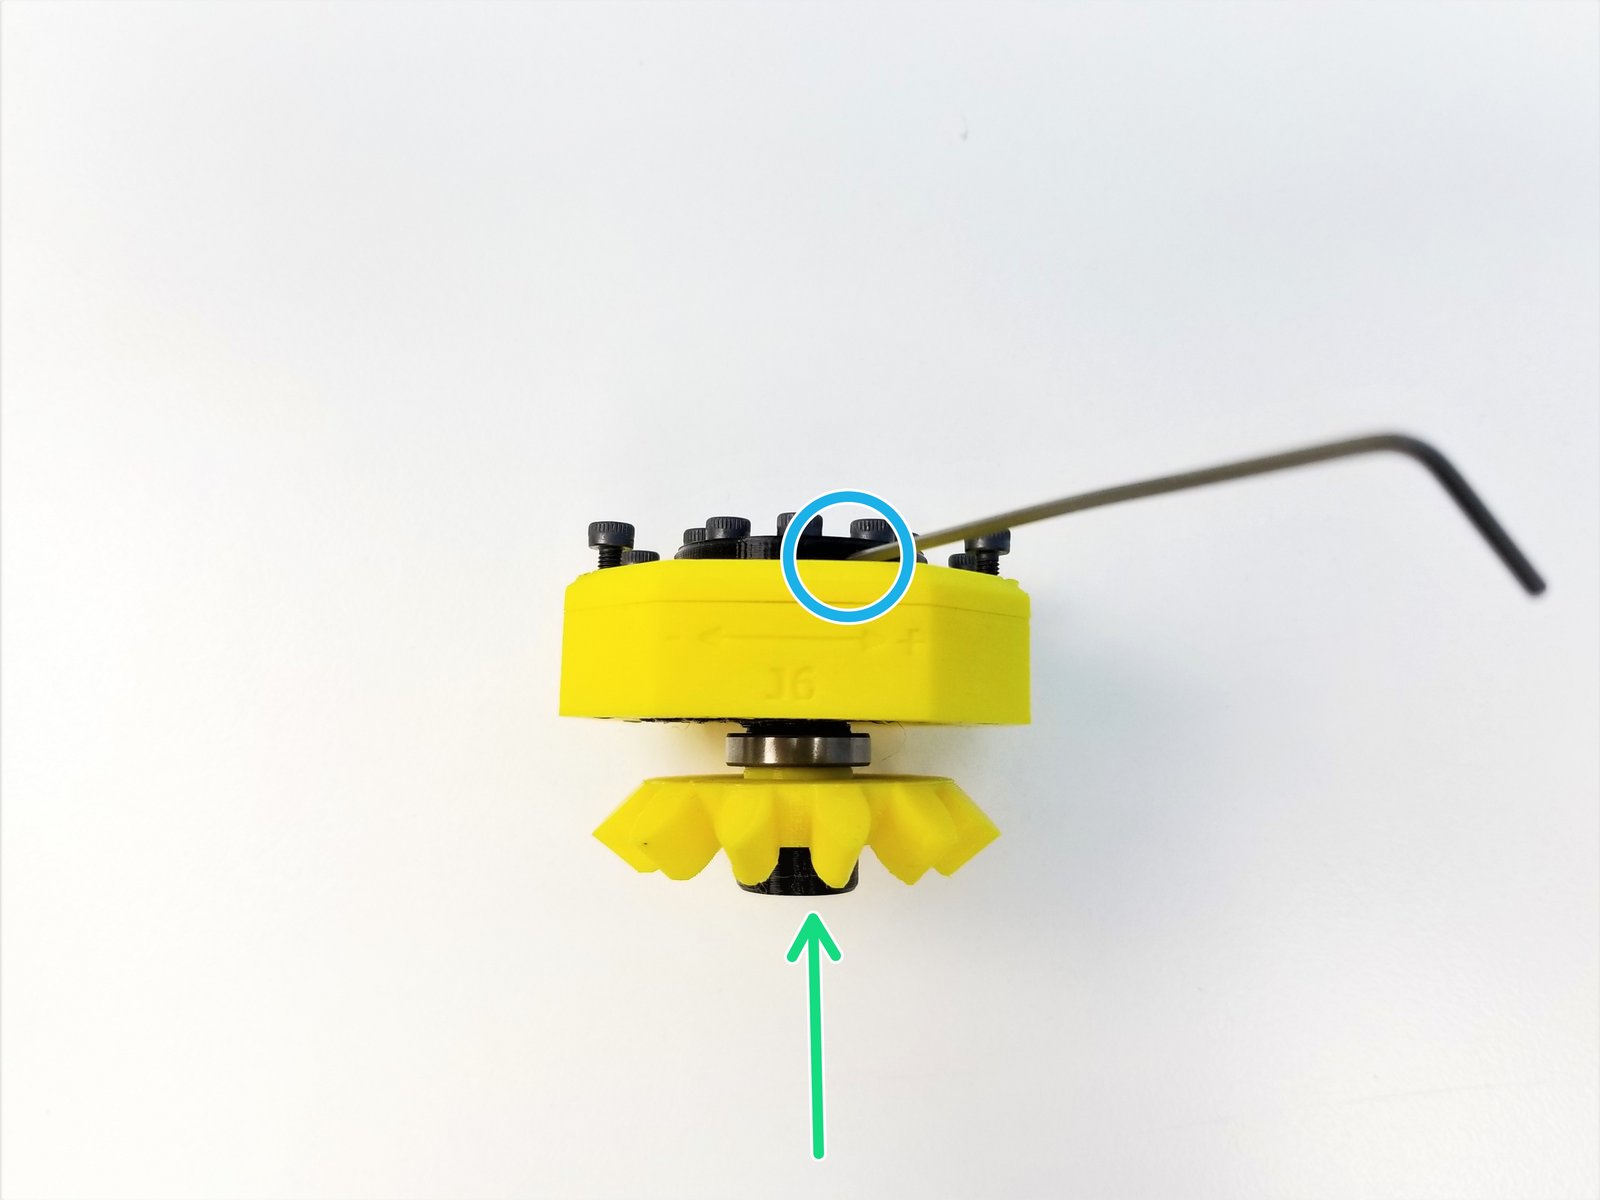
Feed the other end of the Rod to through the Input Shaft Tube all the way to Output Disk
Secure that end with a M3 Set Screw in the Output Disk
Step 12 Side Bevel Gear - Parts
Click the large image to open full size.
- Note:
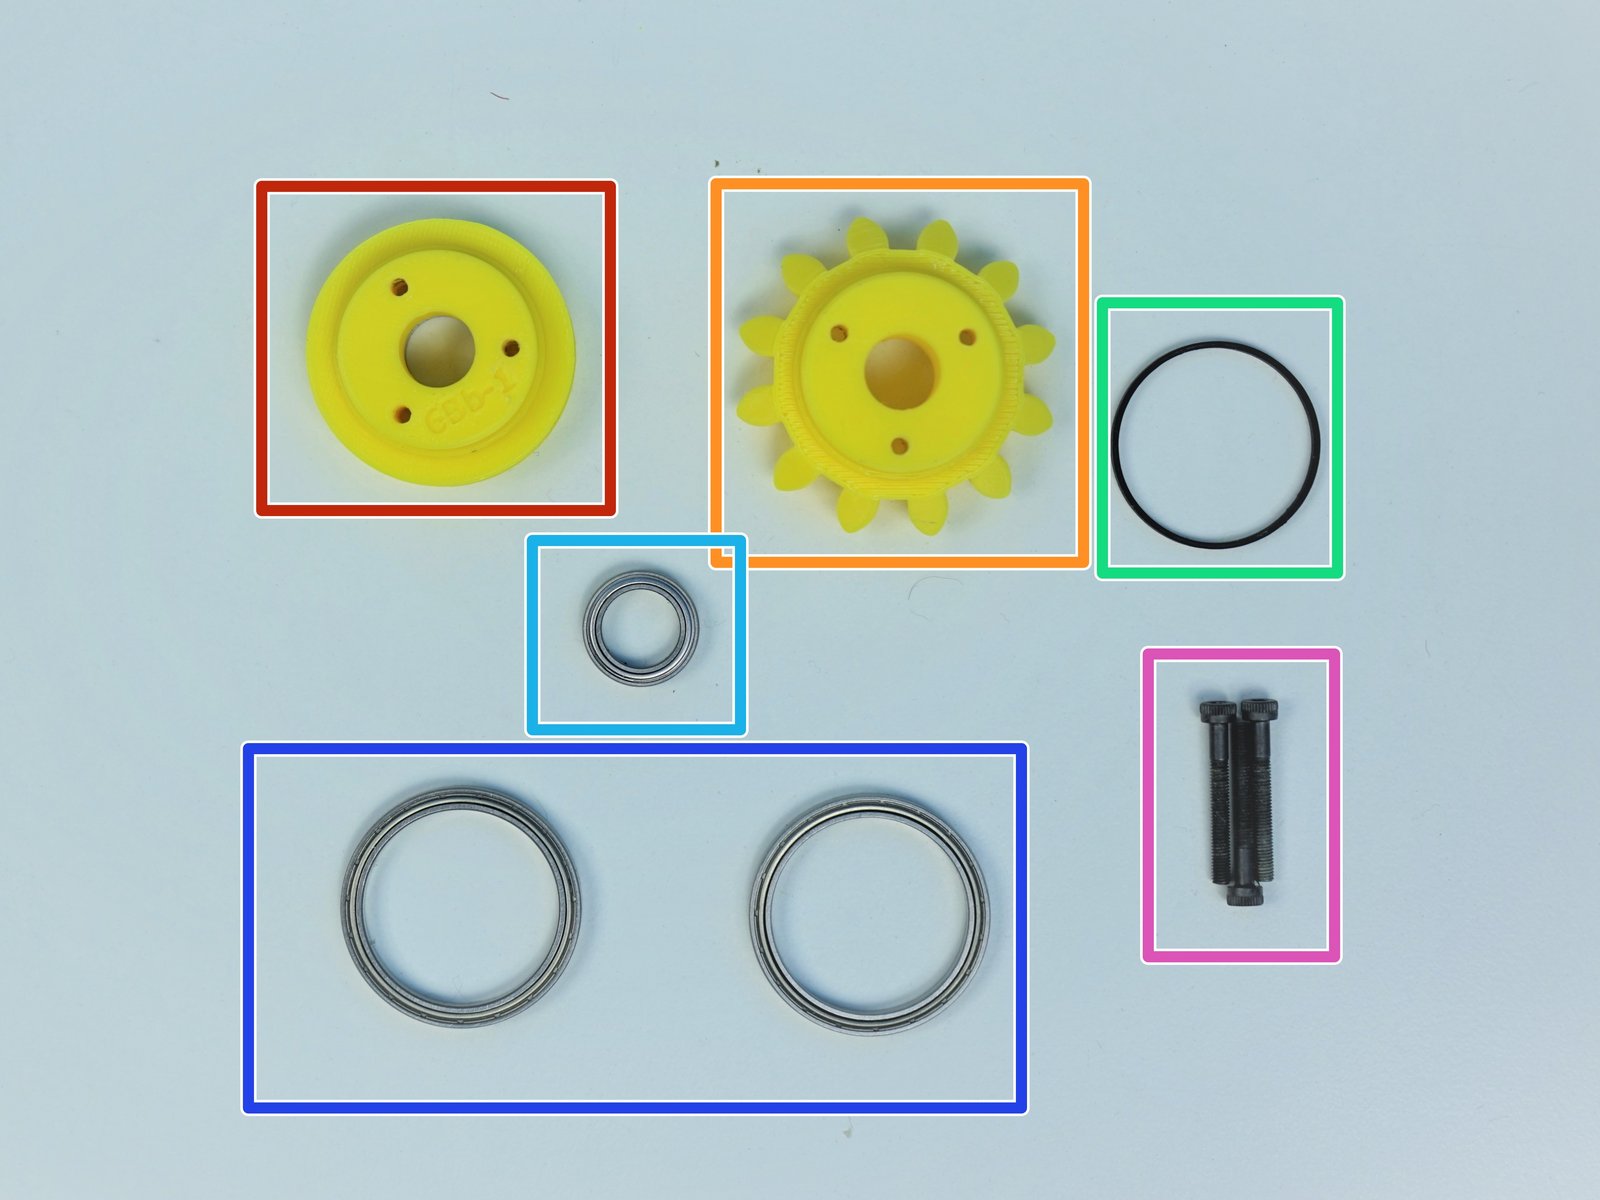
Prepare the following parts:
[3D] - 6PI Pulley Gear
[3D] - 6Ba Bevel Gear
[3D] - 6Bc Bearing Spacer
6701 Bearing [12x18x4mm] (x1)
6706 Bearing [30x37x4mm] (x2)
M3x25mm Screws (x3)
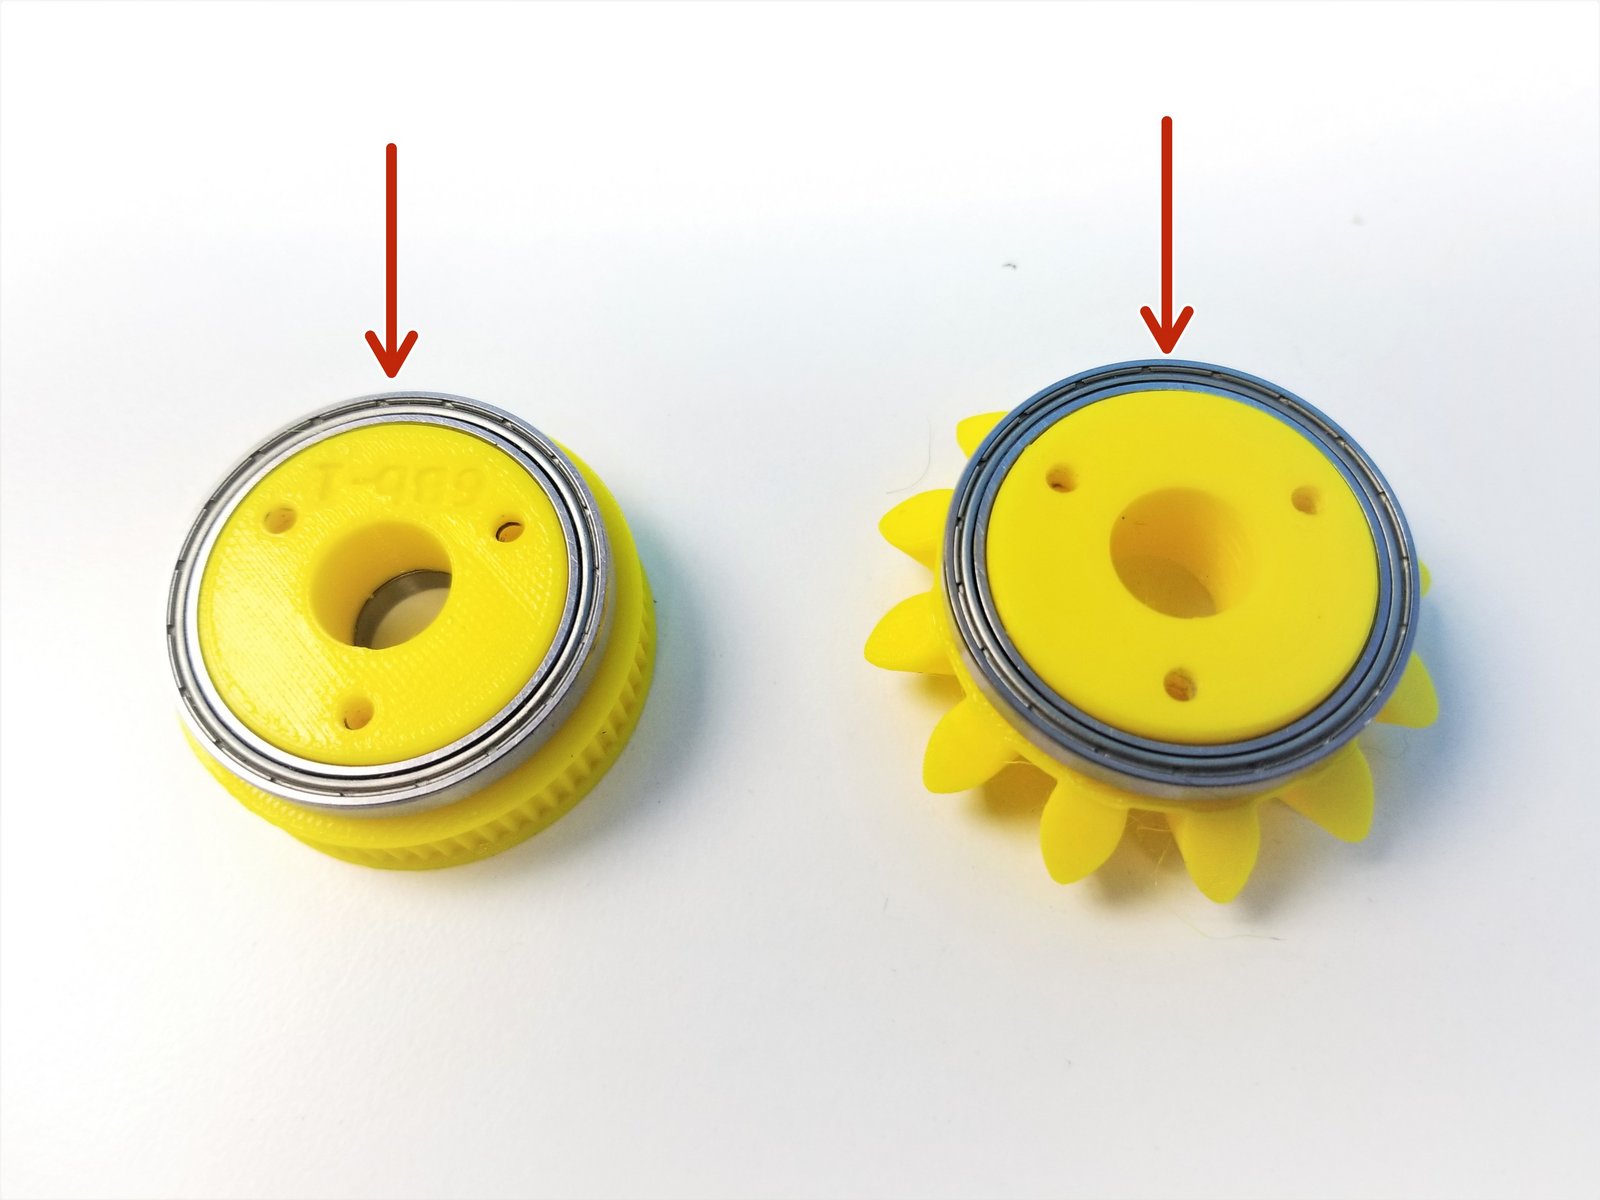
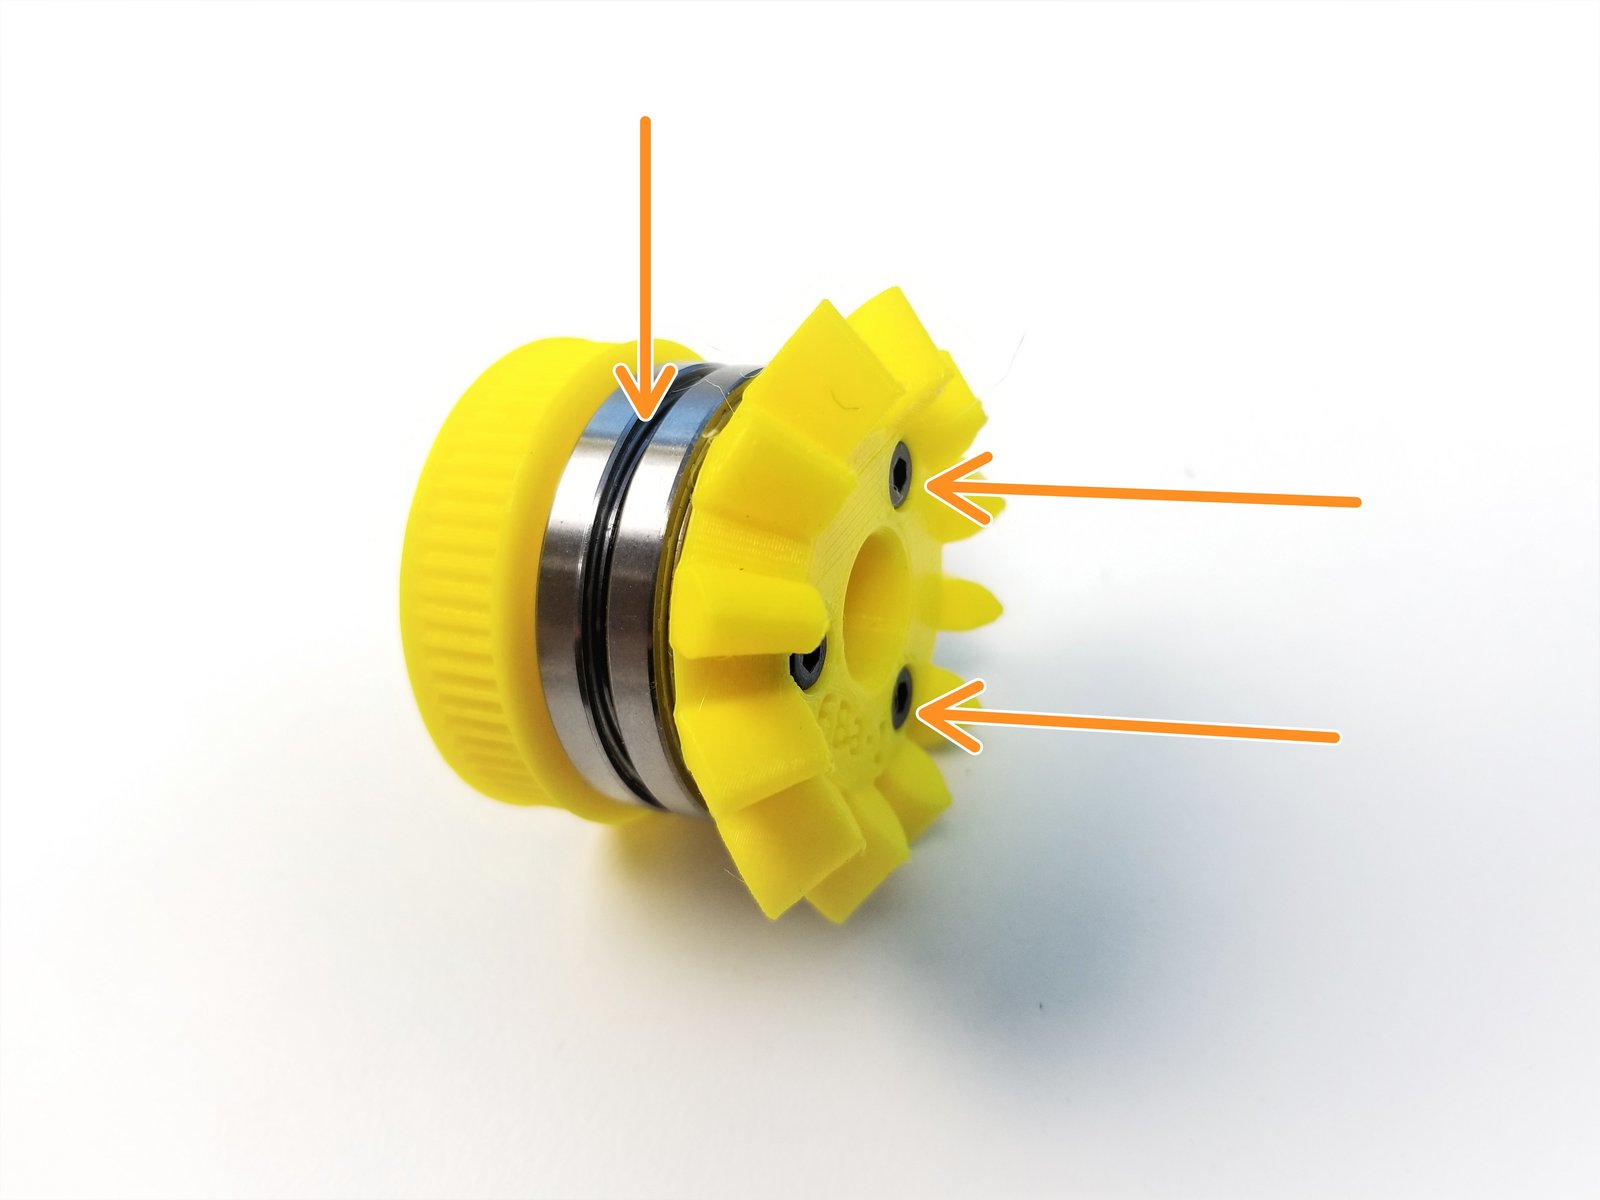
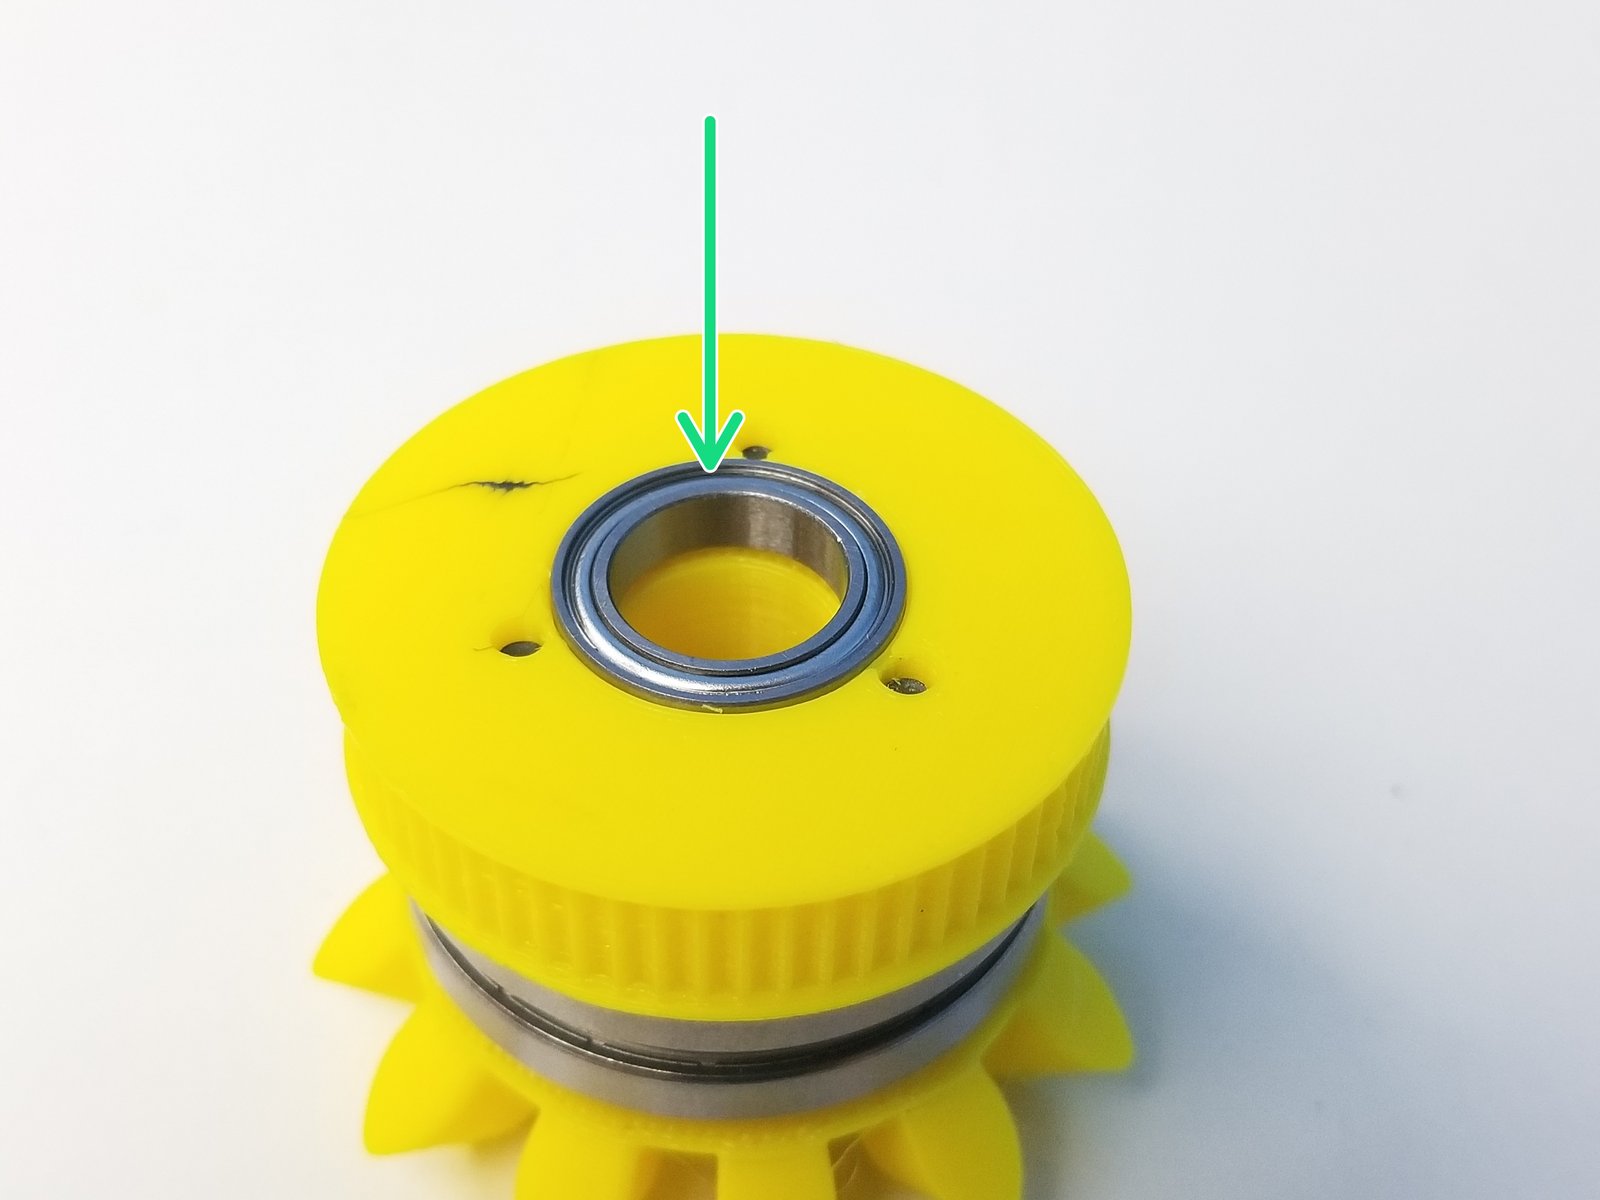
Step 13 Side Bevel Gear
Click the large image to open full size.
Slide in 6706 Bearings on the Pulley and Bevel Gear
Clamp the Bearing Spacer between the Pulley and the Bevel Gear using M3x25mm Screws
Insert the 6701 Bearing in the Pulley Gear
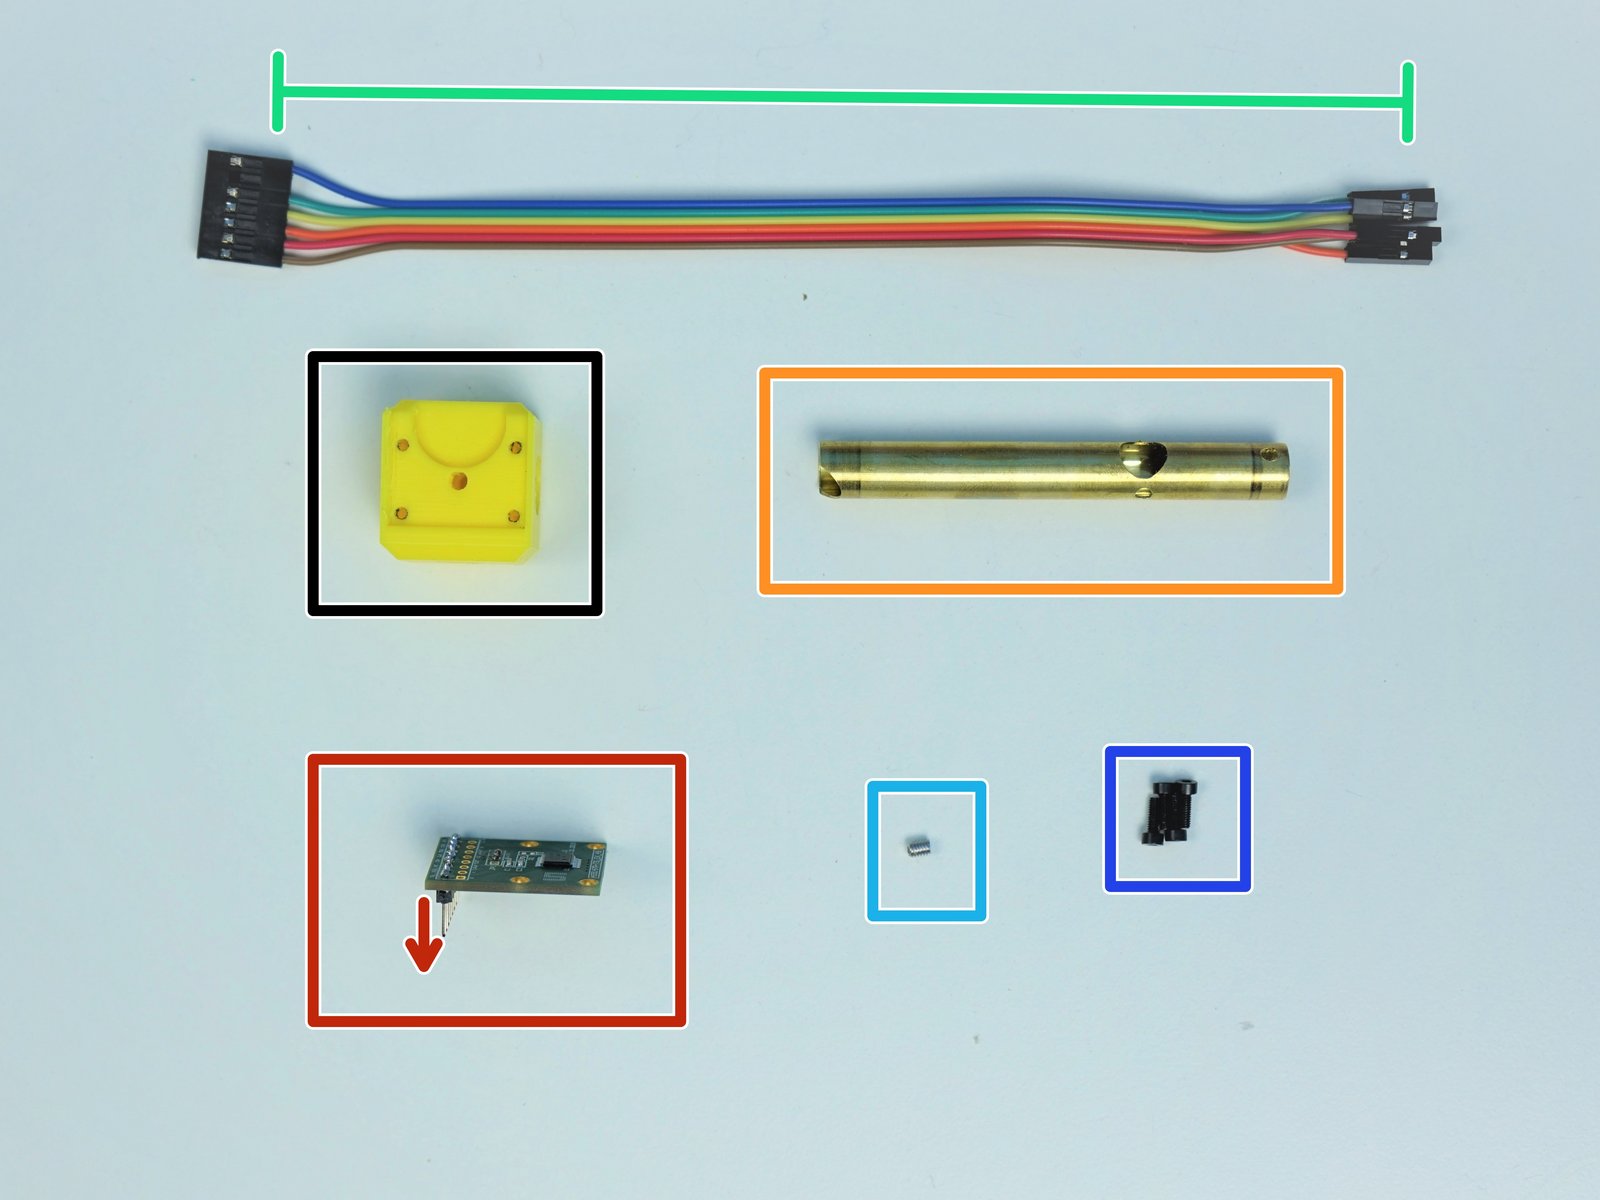
Step 14 Sensor Shaft - Parts
Click the large image to open full size.
- Note:
Prepare the following parts
[3D] - 6Ae Hand Sensor Holder
AS5147 Sensor {straight header on the label side}
Brass Tube [3/8'x76.5mm]
6-pin Ribbon Cable F/F - Brown to Blue {sensor 5 Hand Ext.} - [210mm]
M3x4mm Set Screws (x1)
M2x6mm Screws (x4)
Step 15 Sensor Shaft - Hand Sensor Holder
Click the large image to open full size.
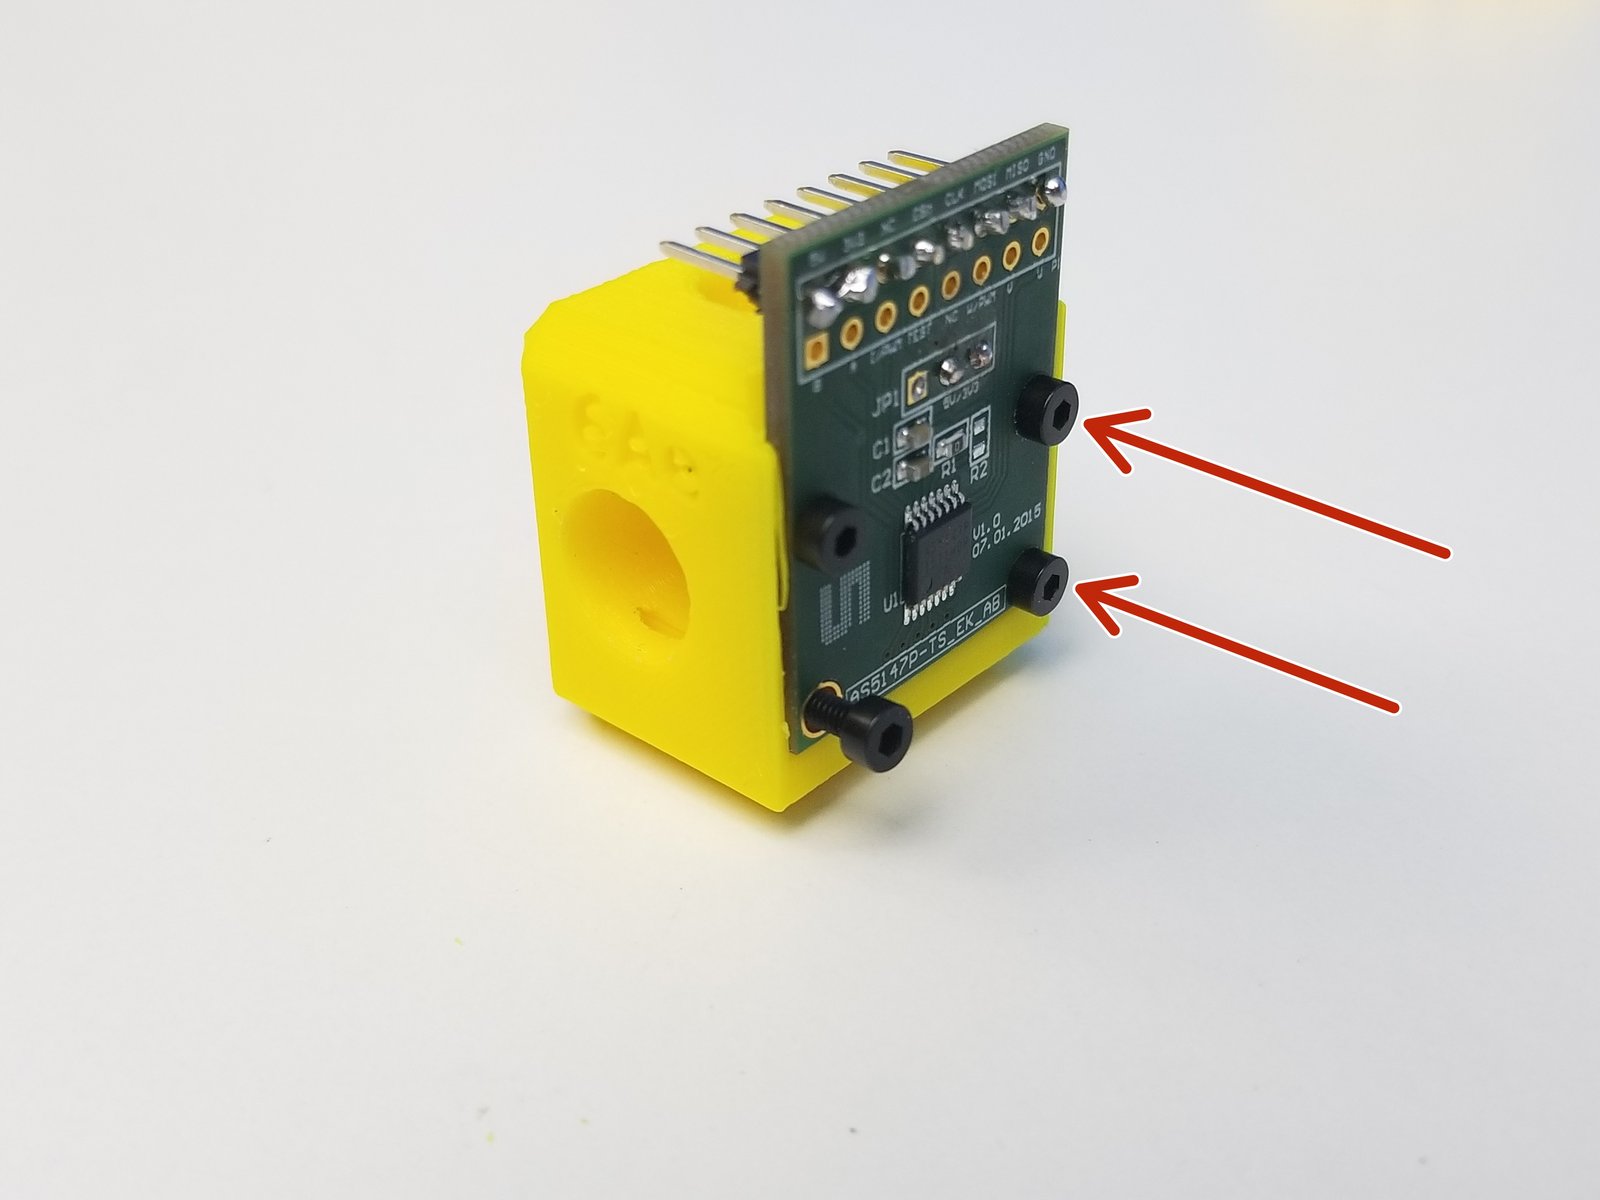
Mount the AS5147 Sensor on the Sensor Holder using the M2 Screws
- Warning:
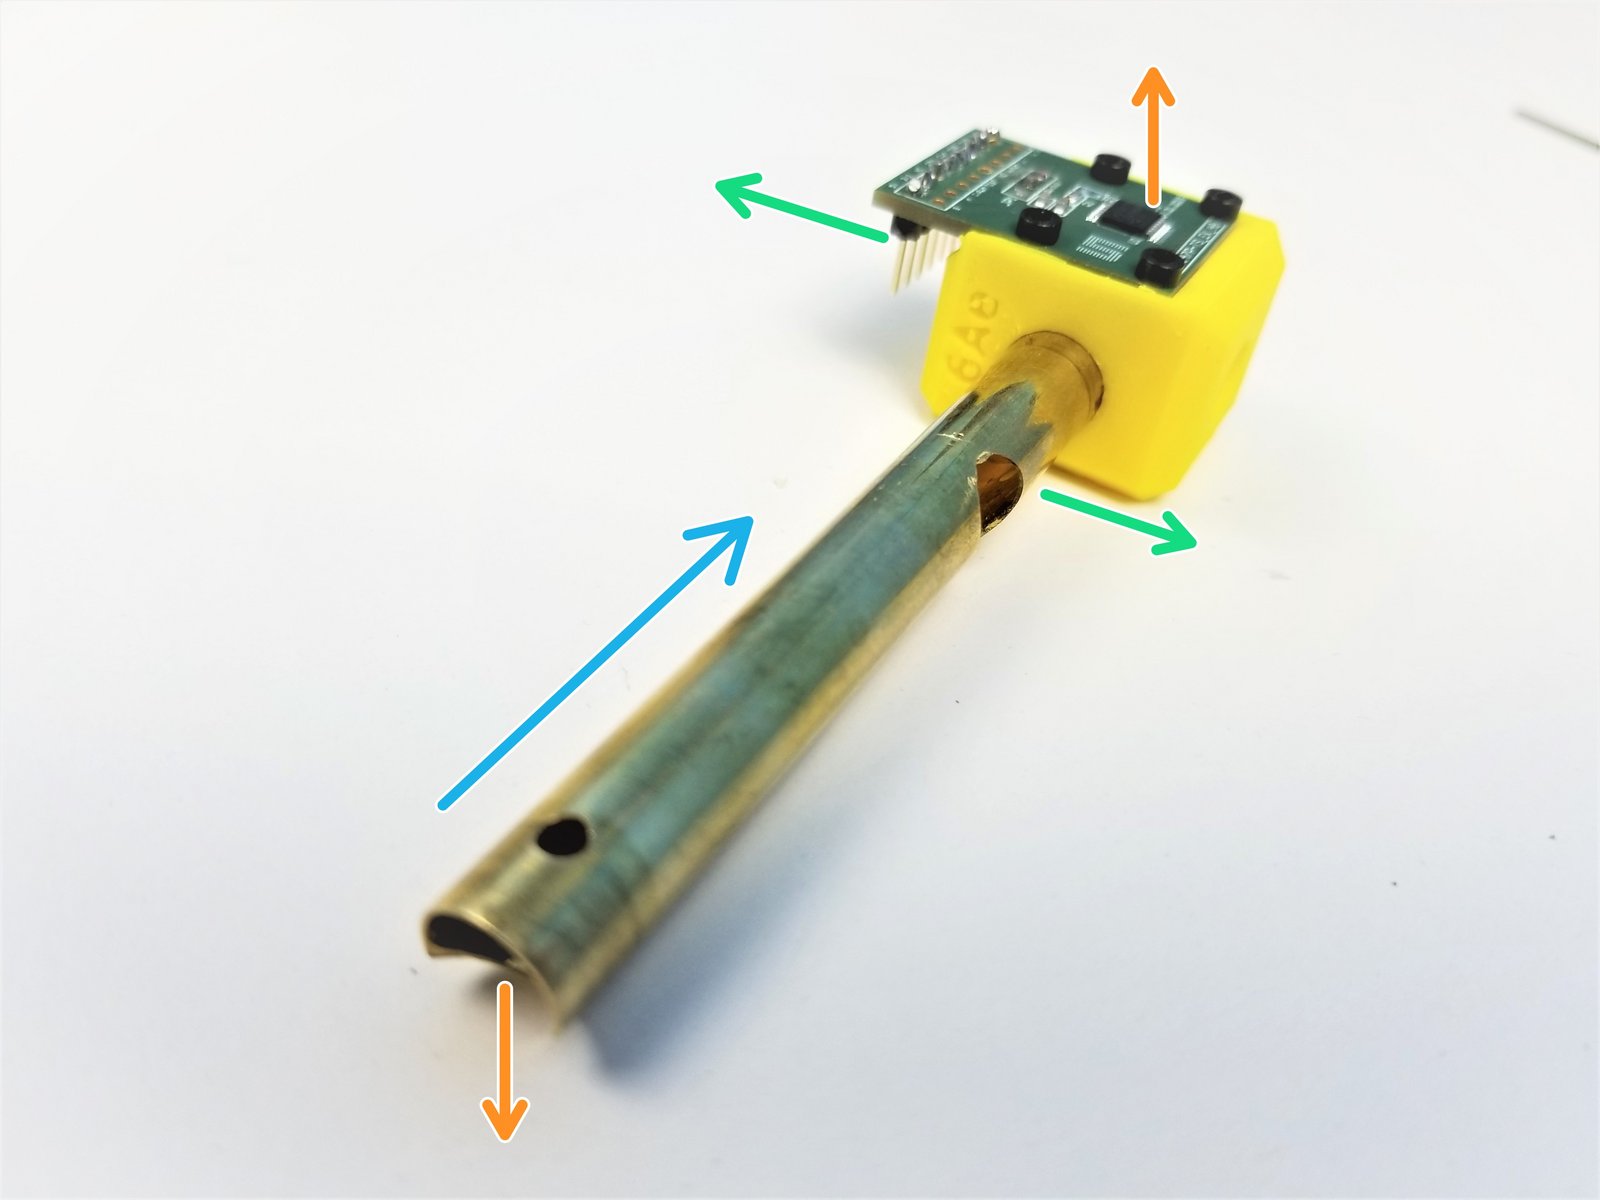
Alignment of the Brass Tube is important!!
Moon Cut is facing away from the Sensor Chip
Sensor Cable Hole is away from the Headers
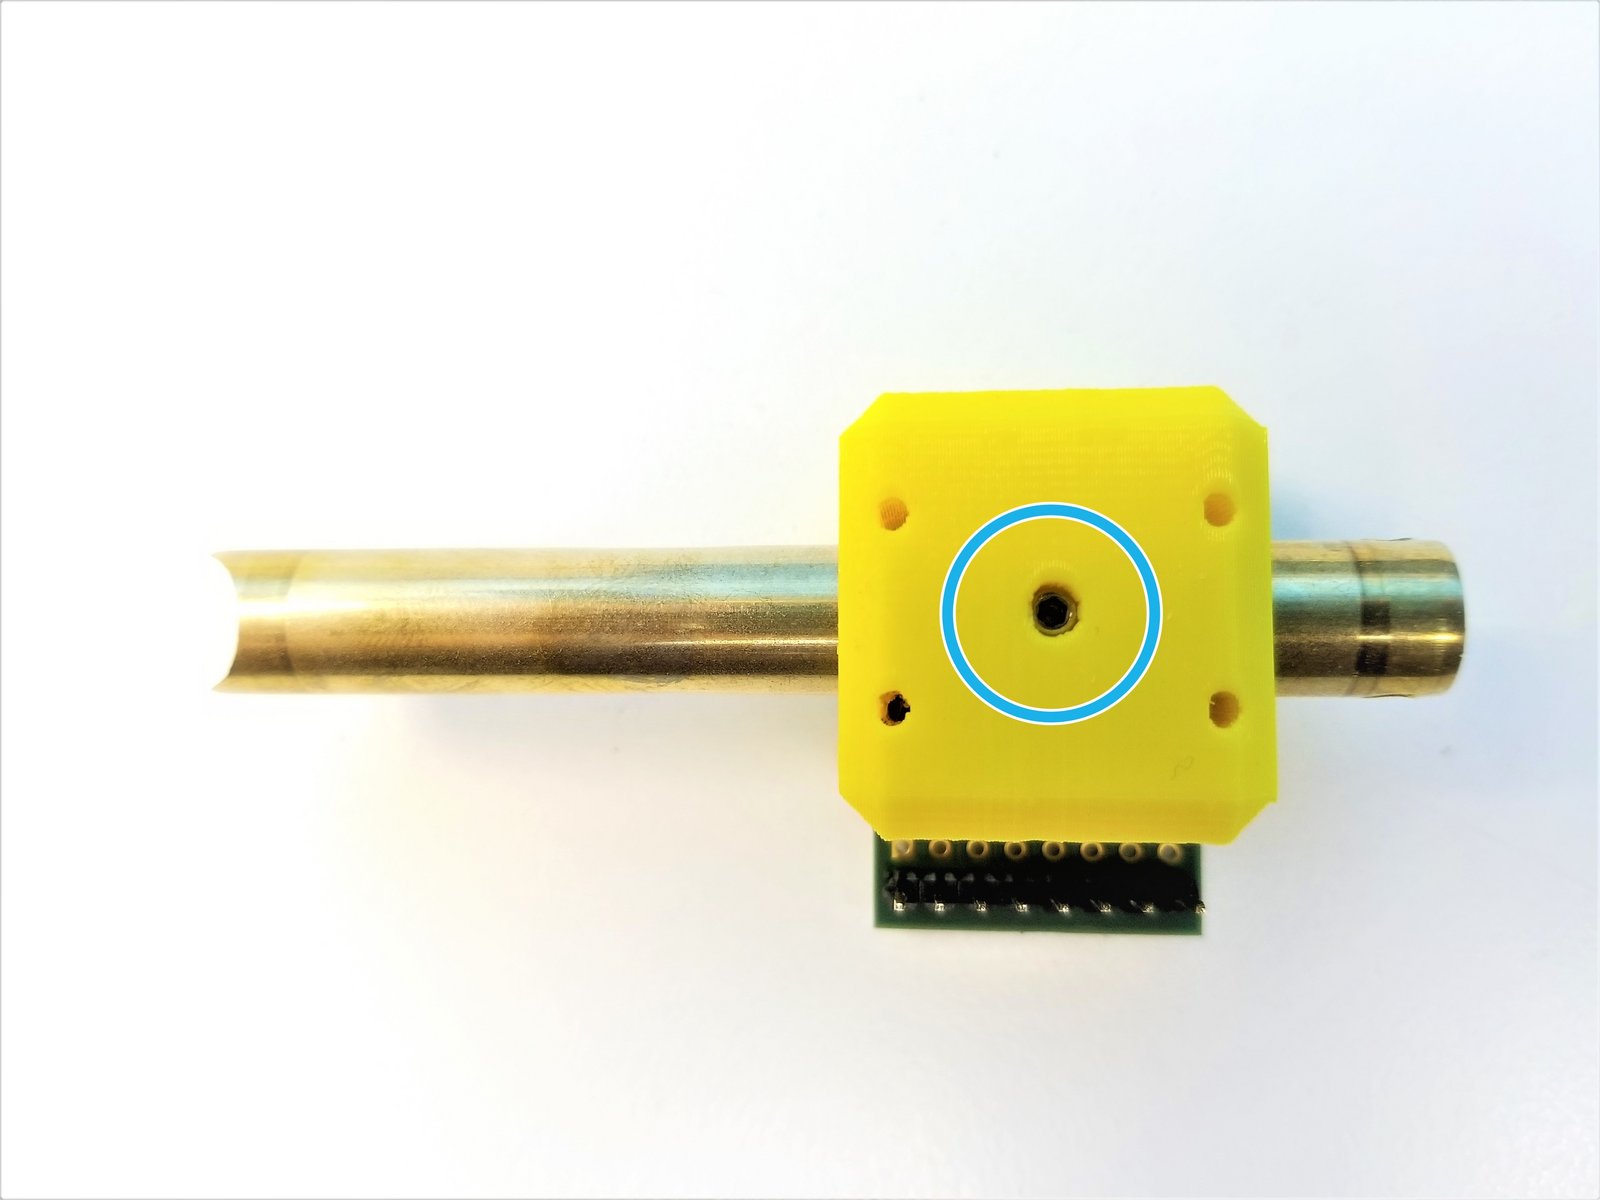
Insert the Brass Tube through the Sensor Holder Use M3 Set Screw to secure the Sensor Holder
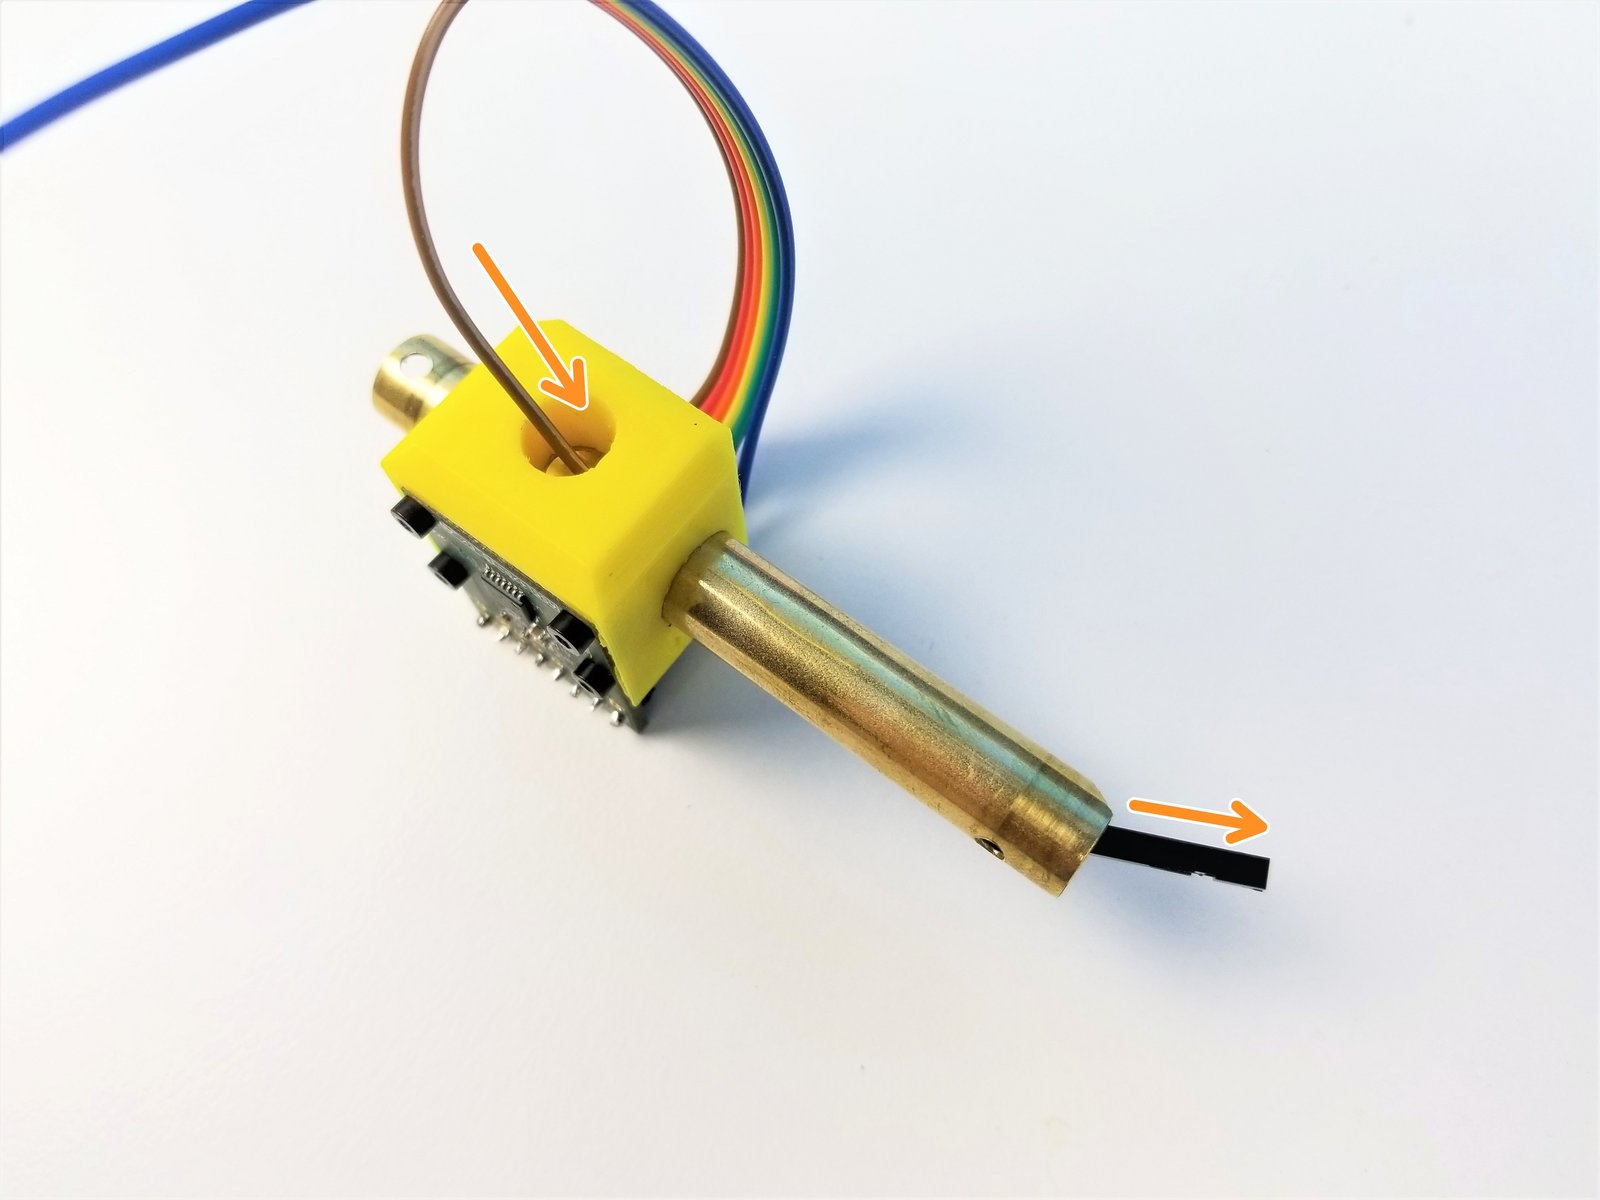
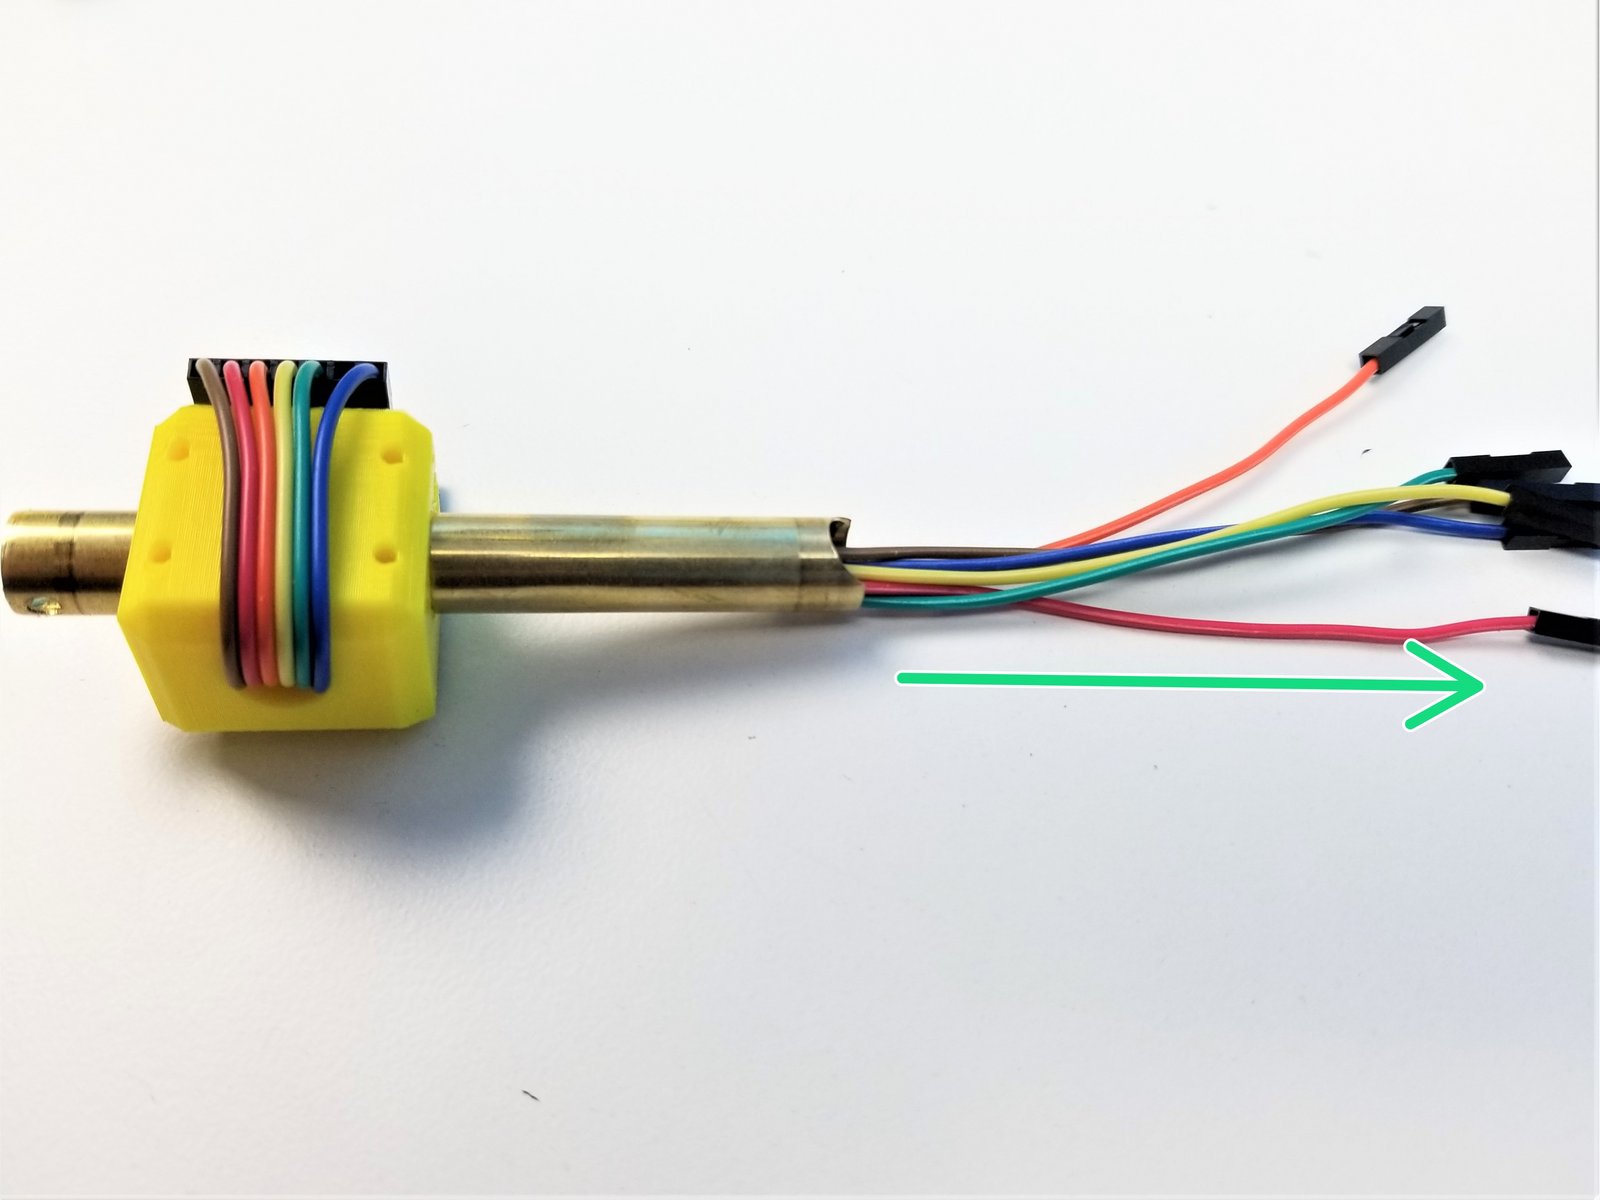
Step 16 Sensor Shaft - Hand Sensor Cable
Click the large image to open full size.
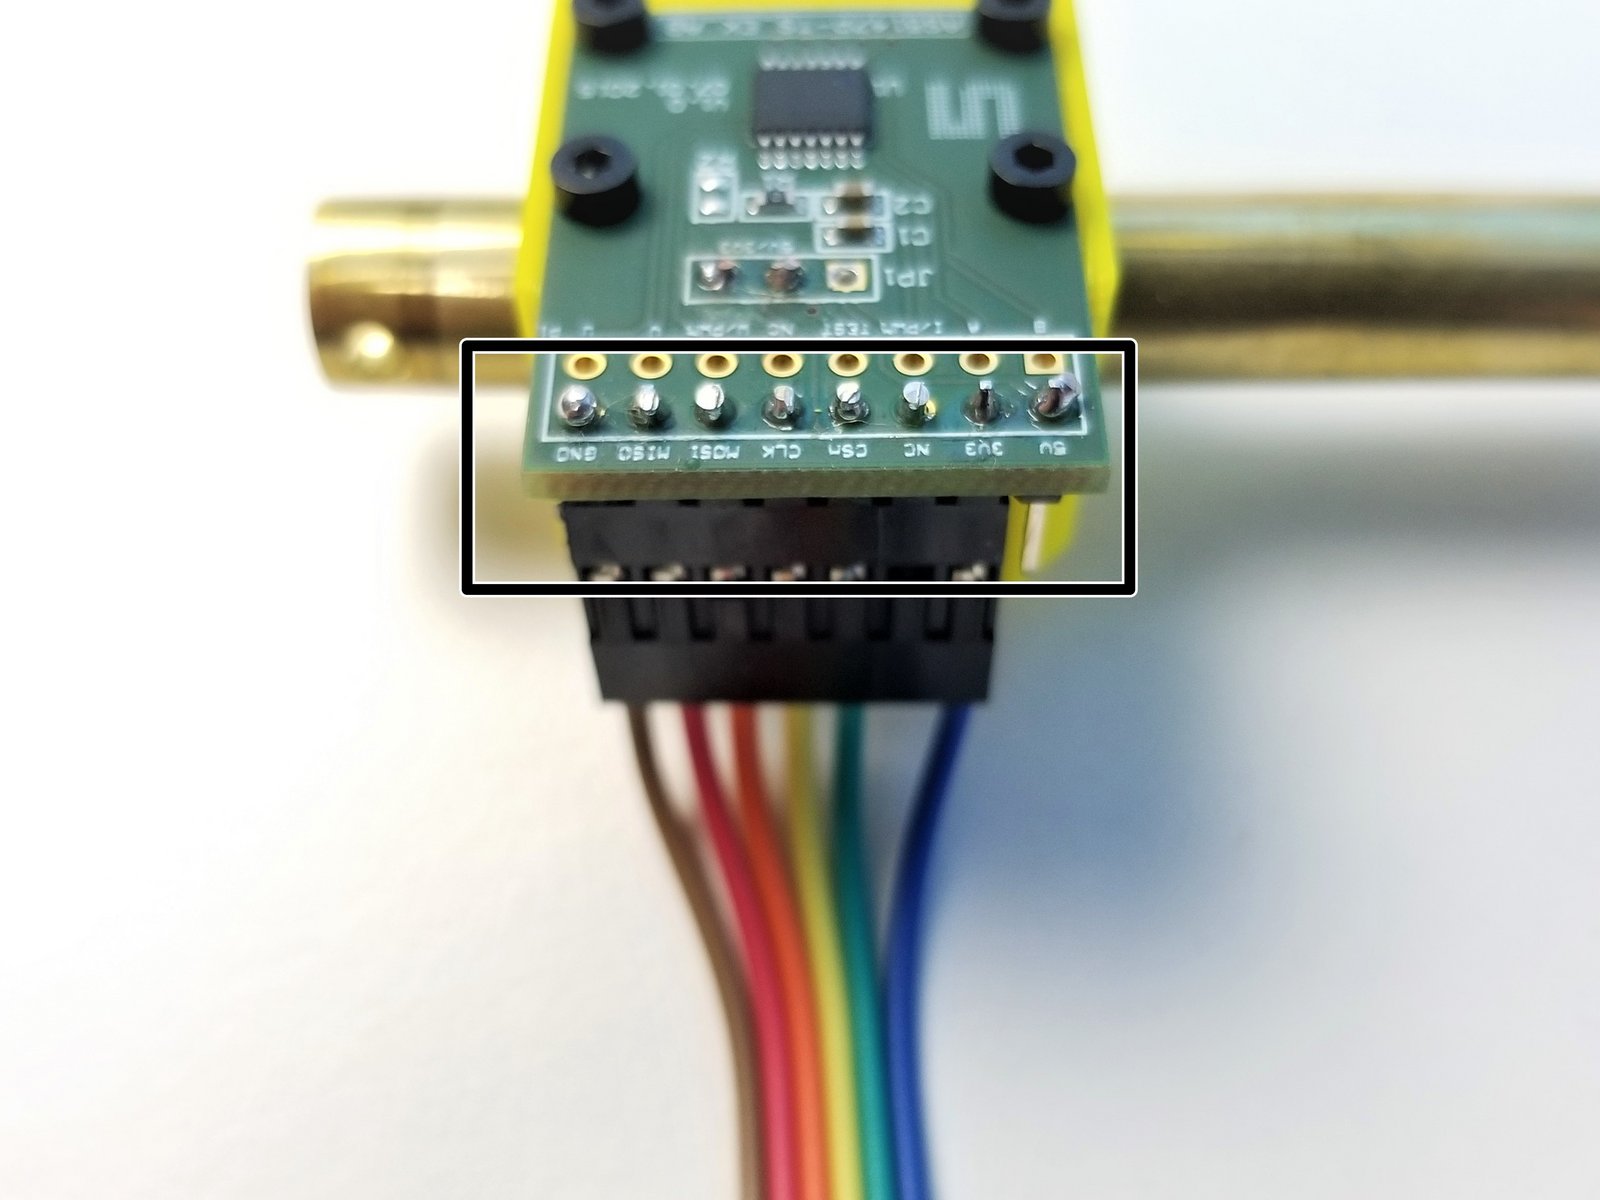
Connect the Cable to the AS5147 Sensor as shown in the picture
- Warning:
COLOR CODE MATTERS!!
One wire at a time, feed the jumper wires through the Brass Tube
Make sure the Jumper Wires comes out of the Brass Tube as far as it can. NO LOOSE Cables
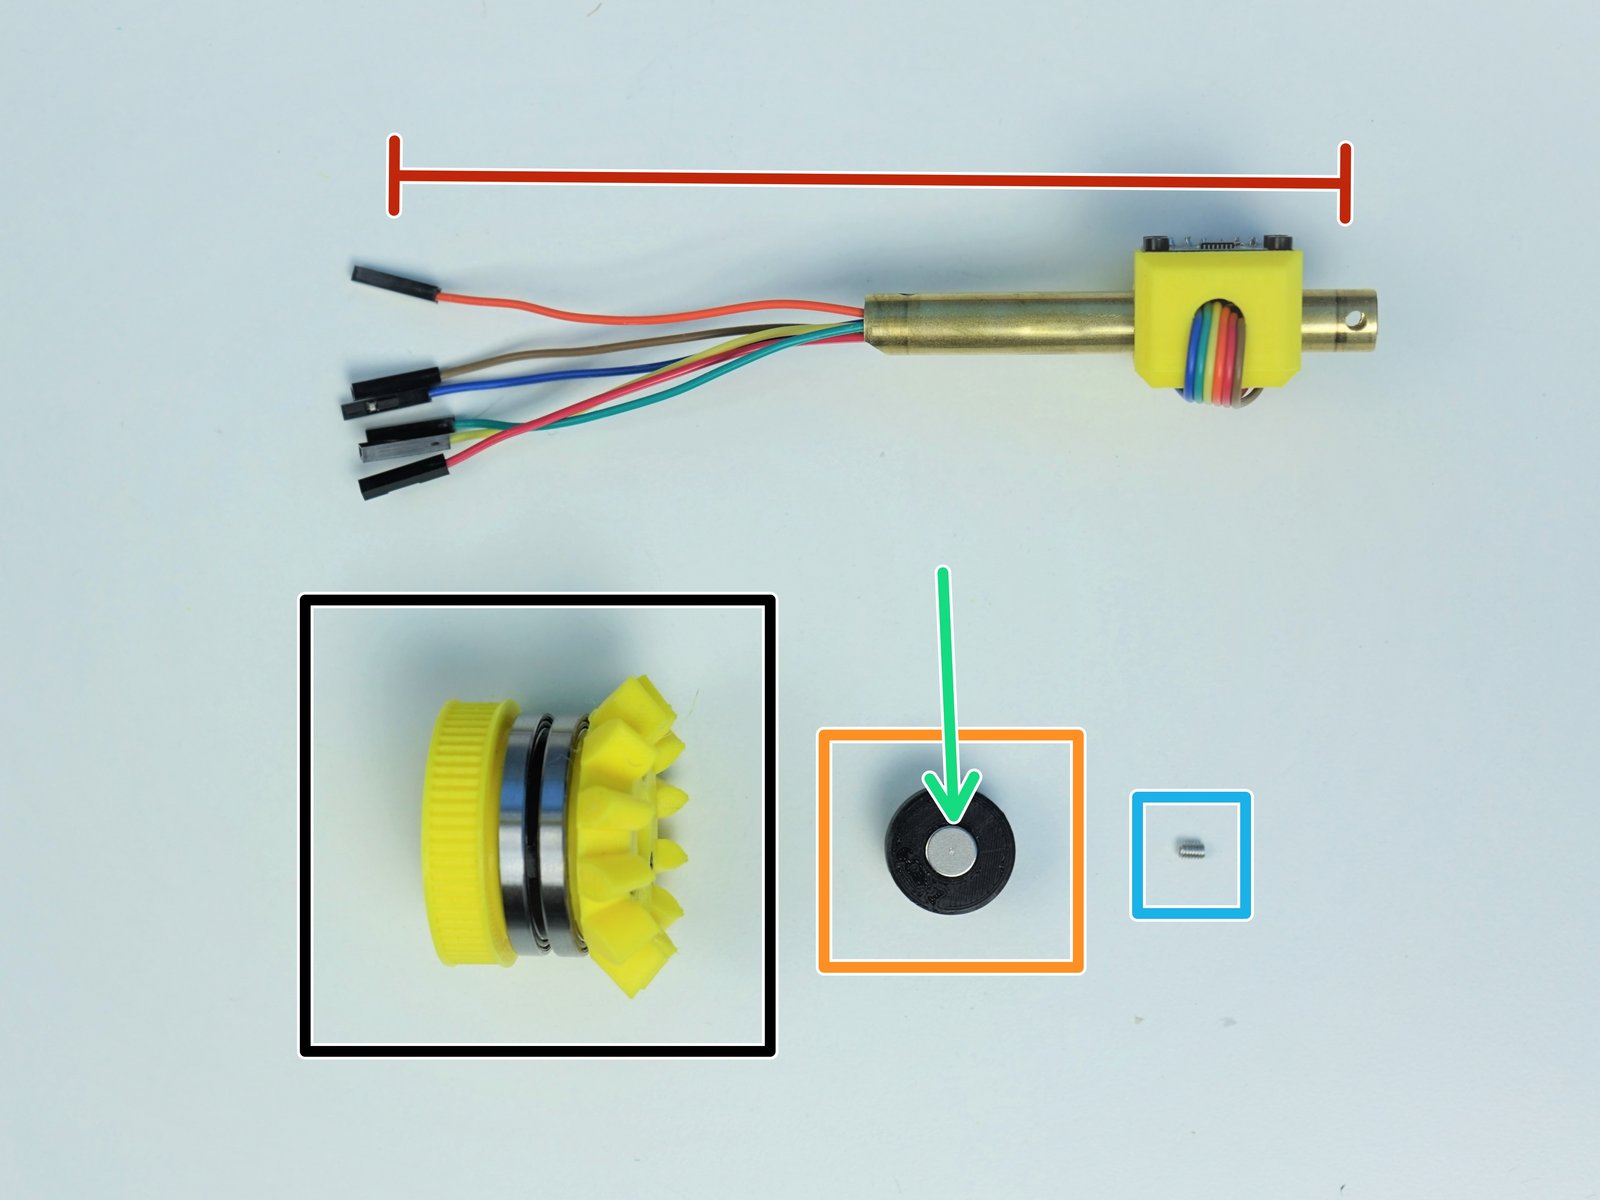
Step 17 Picasso Wrist Magnet Holder - Parts
Click the large image to open full size.
- Note:
Prepare the following components:
Assembled Side Bevel Gear
Assembled Sensor Shaft
[3D] - 6Mc Picasso Magnet Holder
8x2.5mm Neodymium Magnet (x1)
M3x4mm Set Screw (x1)
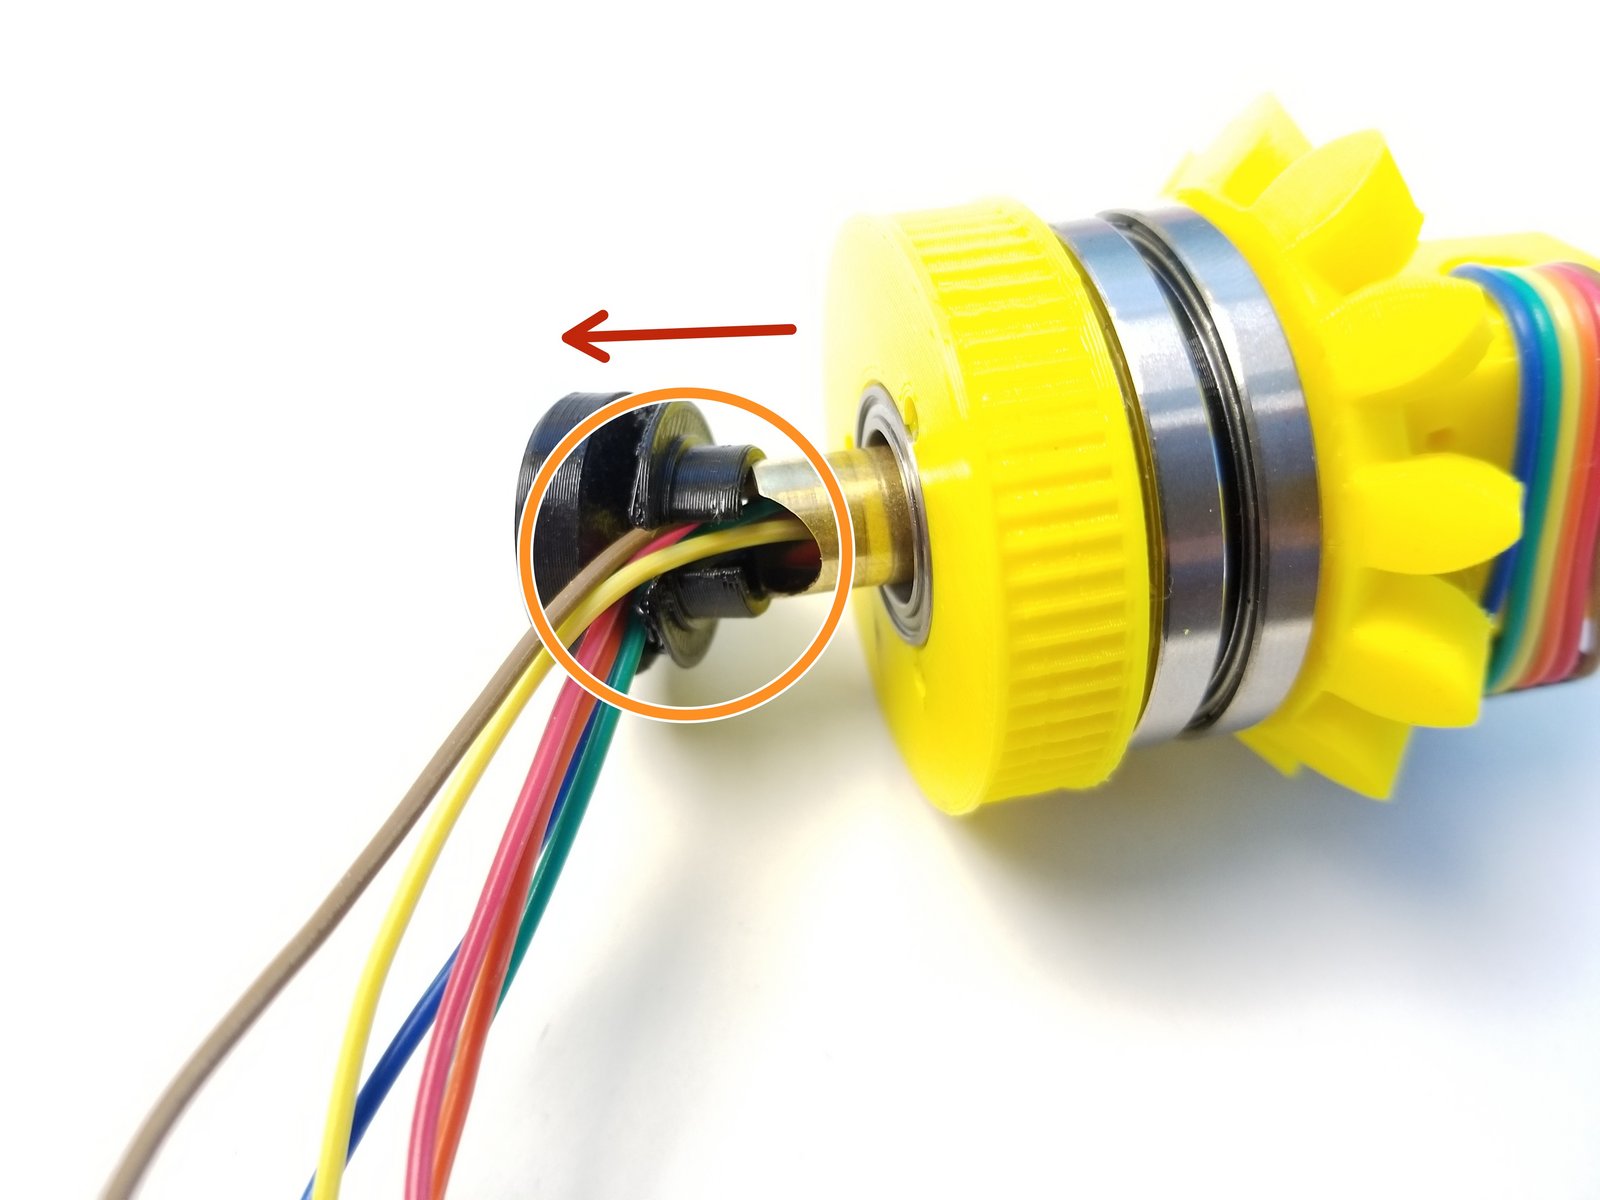
Step 18 Picasso Wrist Magnet Holder
Click the large image to open full size.
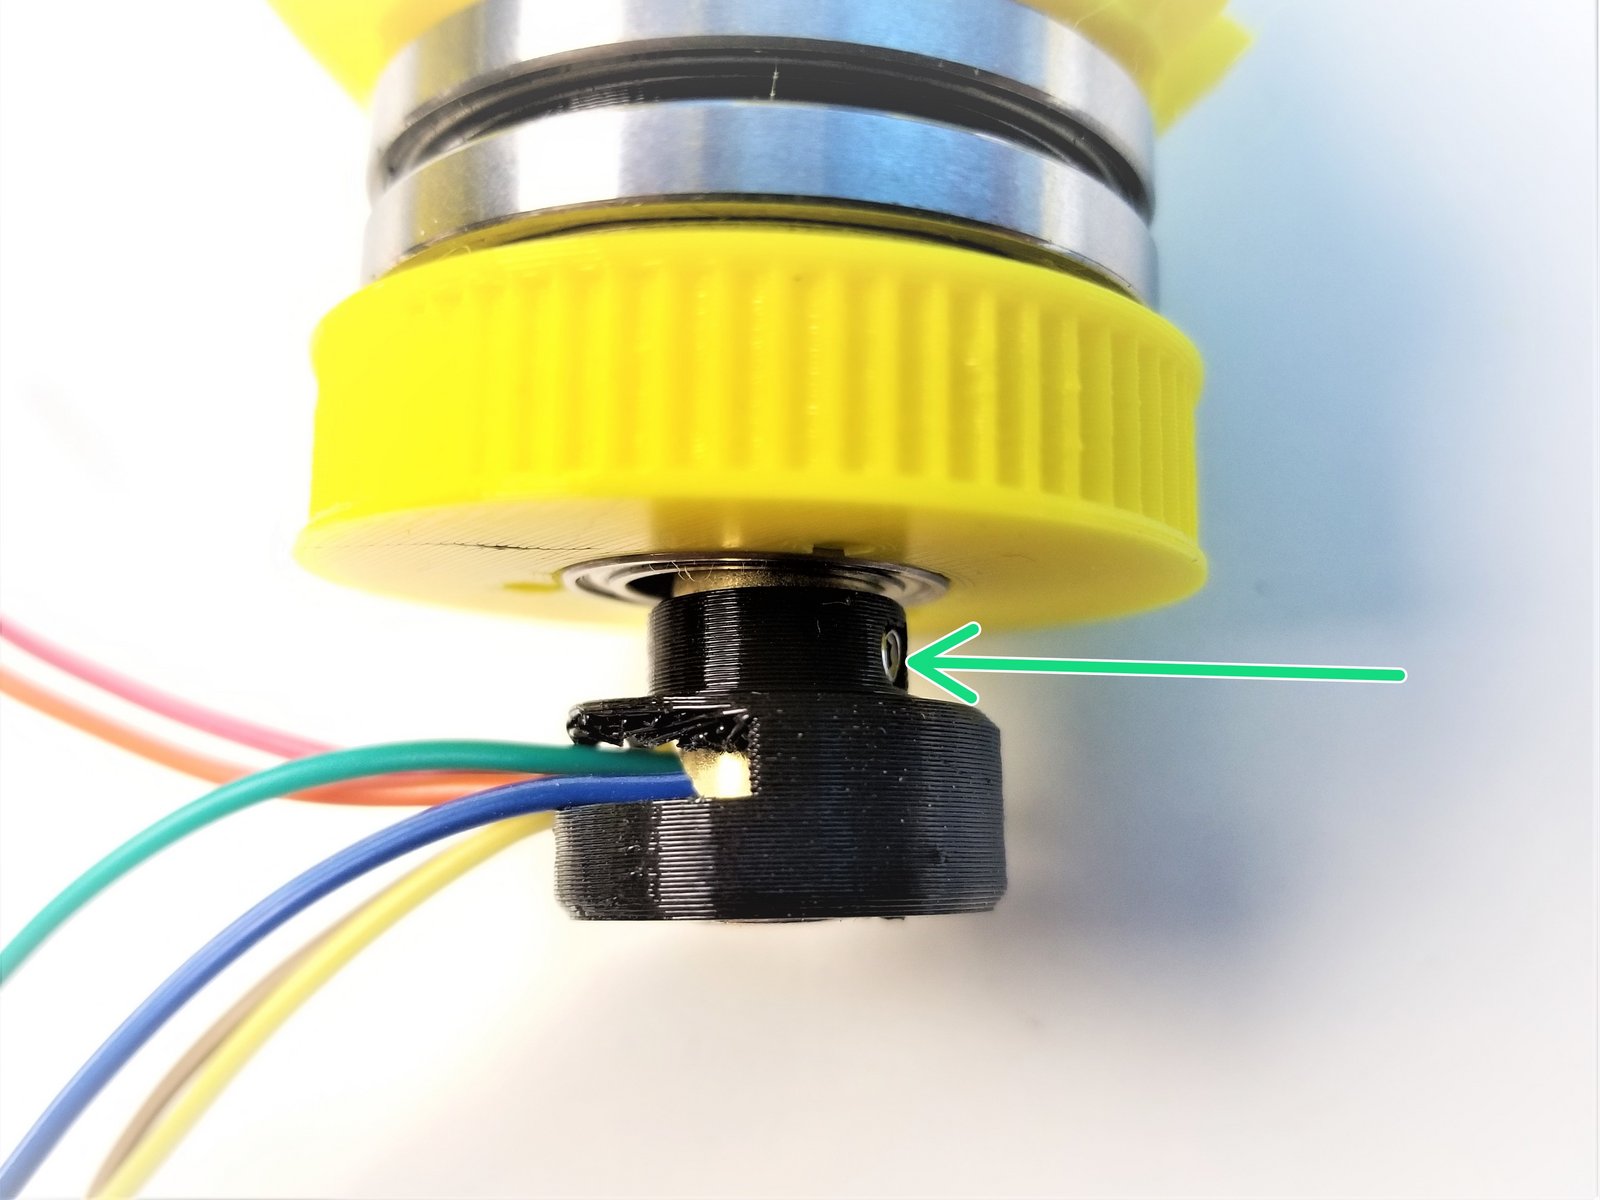
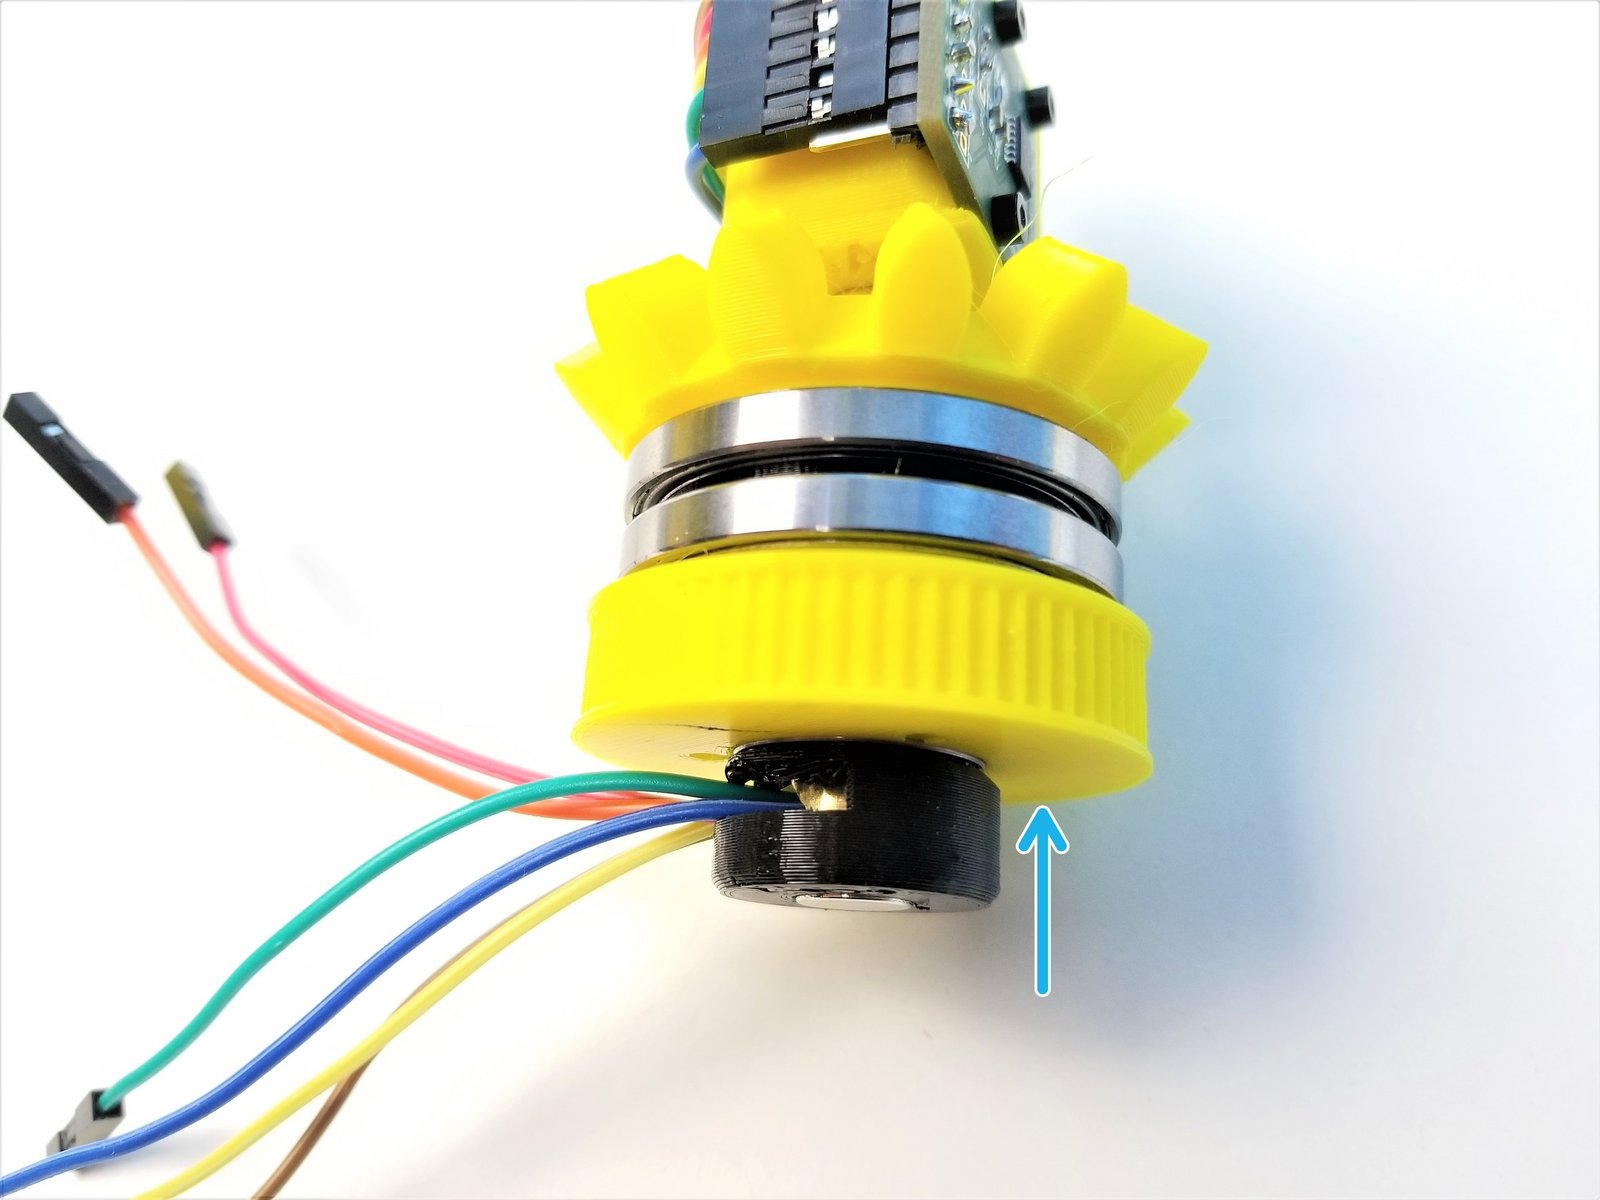
Insert the the cable end of the Brass Tube {Sensor Shaft} through the Assembled Side Bevel Gear
Insert Picasso Magnet Holder on the Brass Tube and align the set screw holes
- Warning:
When aligned properly, "Half Moon Cut" on the Brass Tube should line up with the opening on the Magnet Holder
Secure the Magnet Holder using M3 Set Screw
Push the Magnet Holder into the 6701 Bearing that's in the Pulley Gear
Step 19 Picasso Box Clamp - Parts
Click the large image to open full size.
- Note:
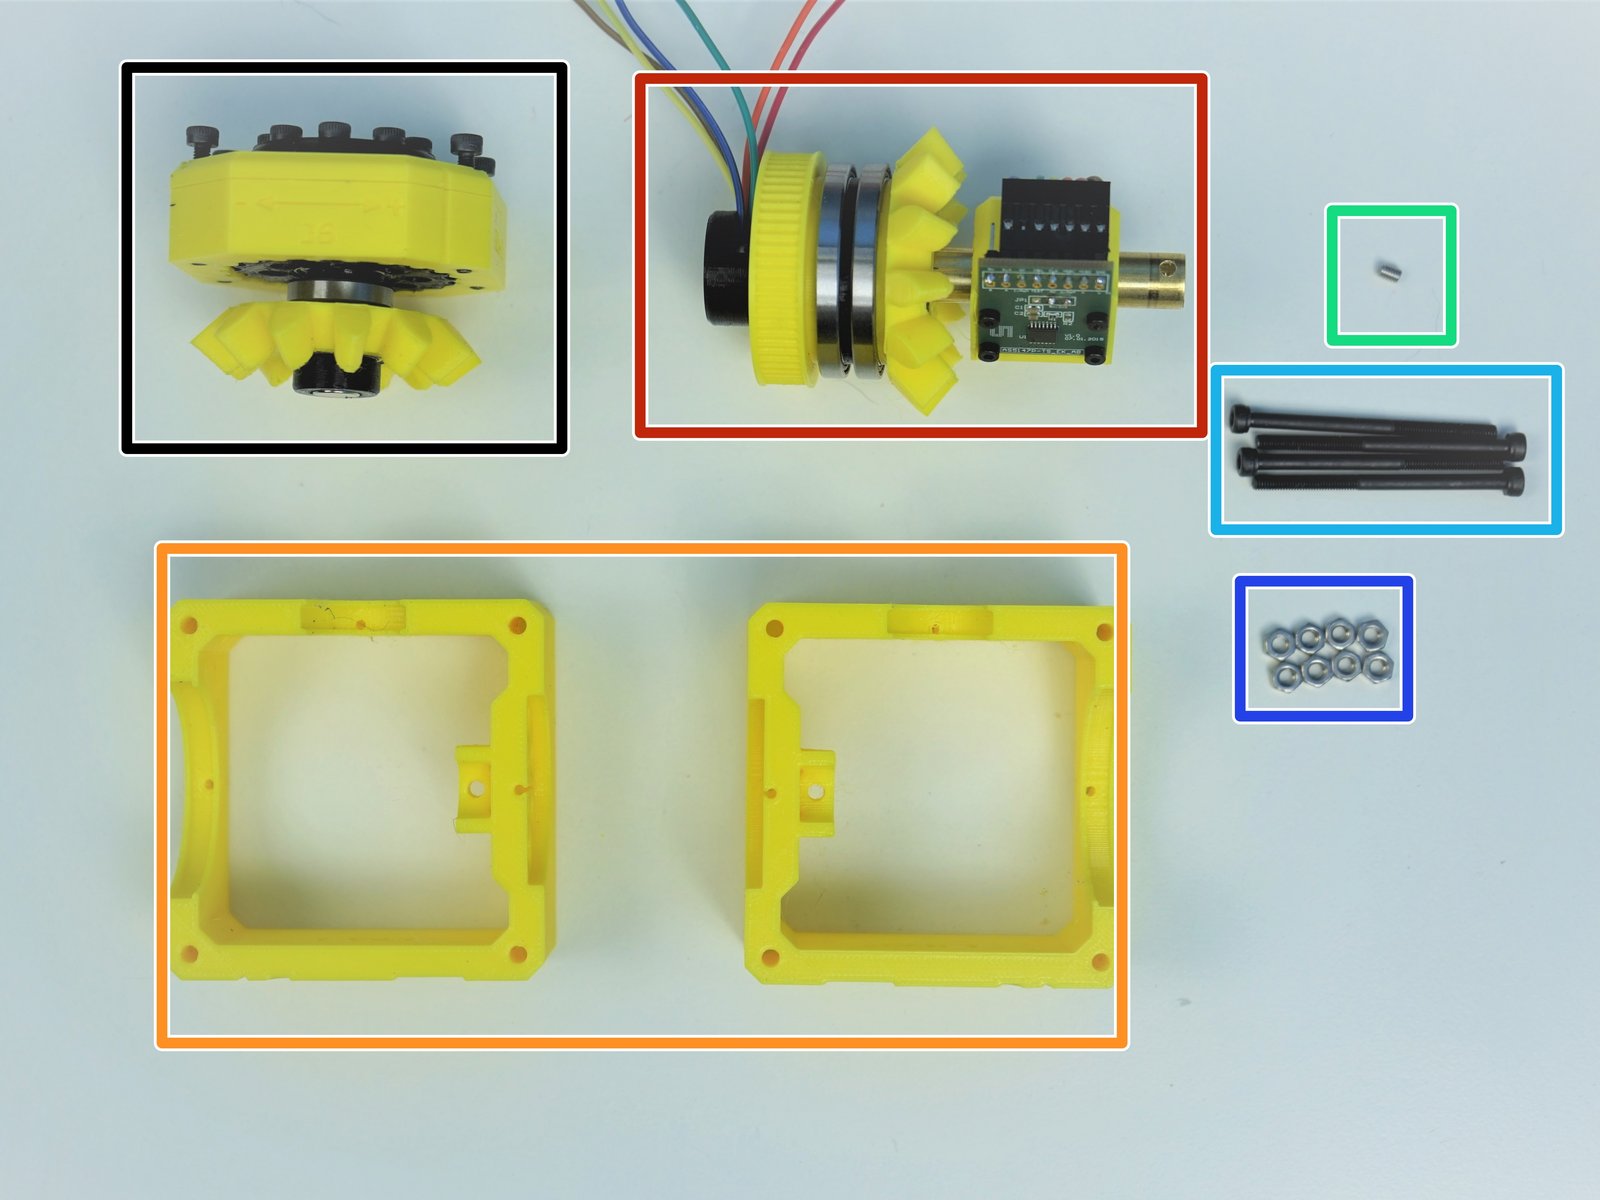
Prepare the following components:
Assembled Hand Gearbox
Assembled Side Bevel Gearbox and Sensor Holder
[3D] - Picasso Box {Top = 6Aa & Bottom = 6Ab}
M3x4mm Set Screws (x1)
M3x45mm Screws (x4)
M3 Hex Nuts (x8)
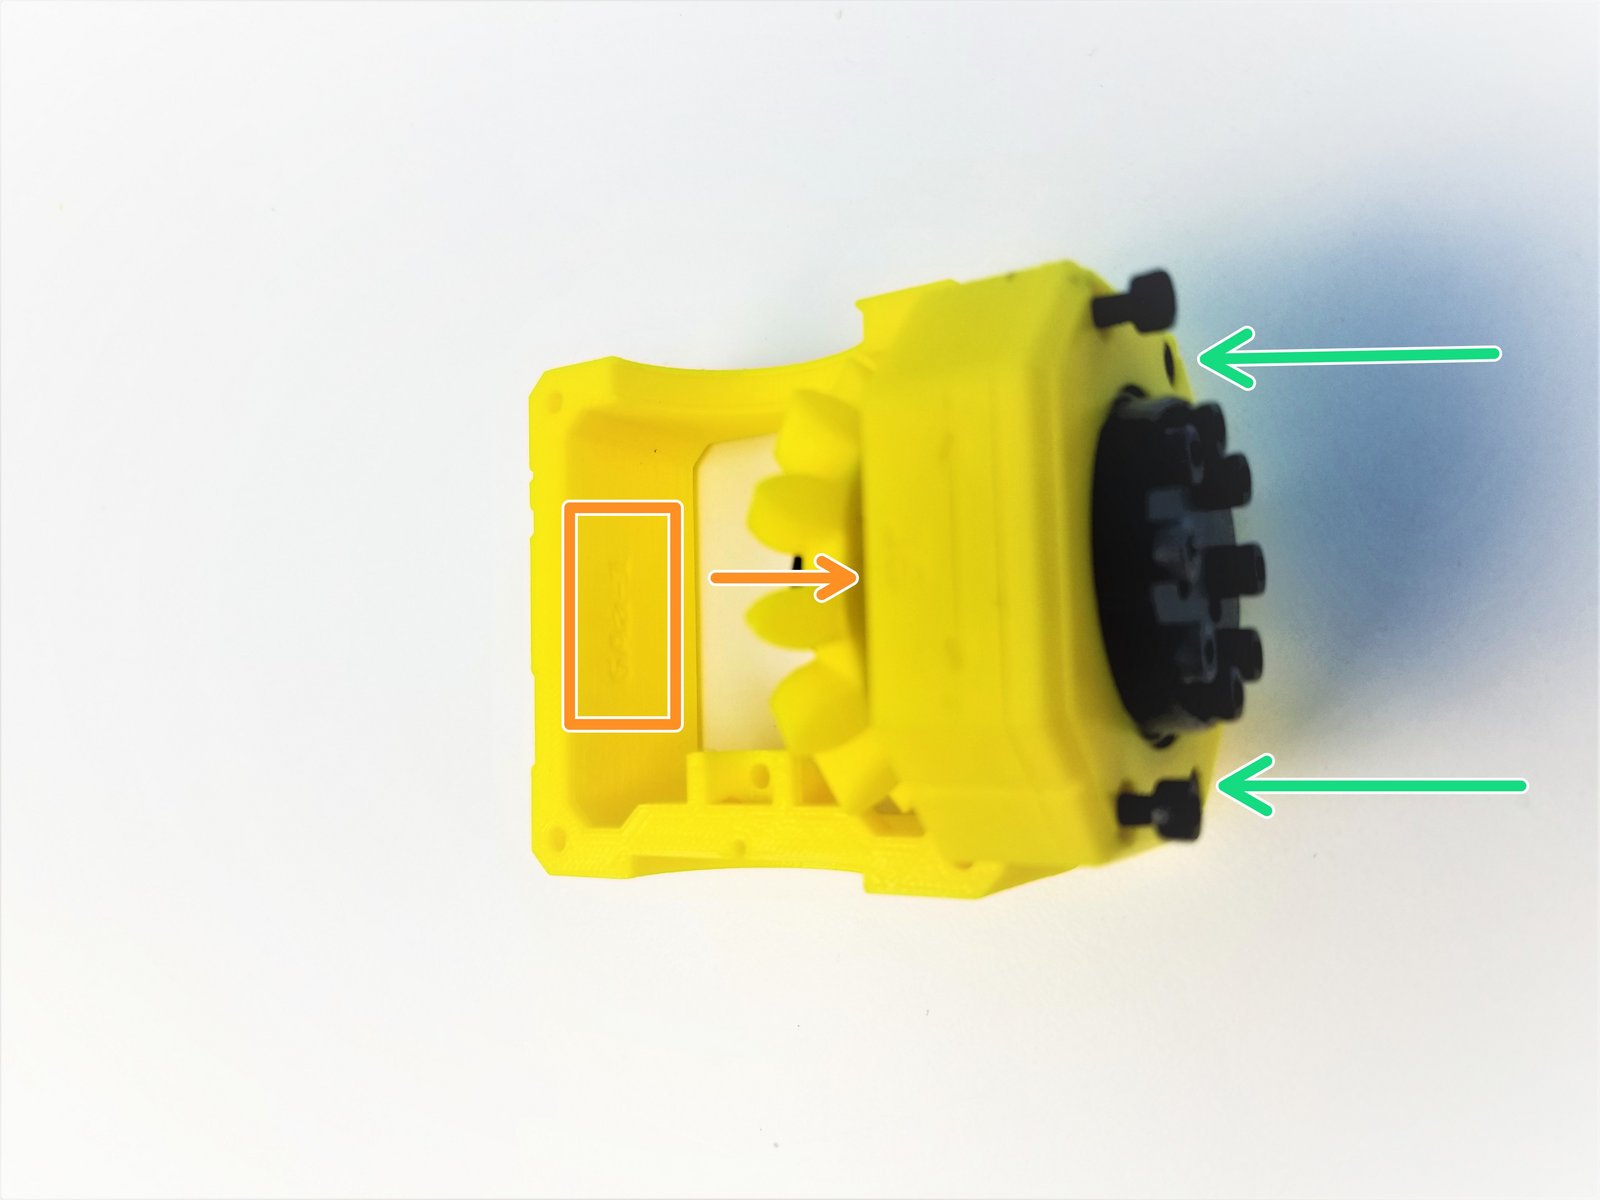
Step 20 Picasso Box Clamp - Hand Gearbox
Click the large image to open full size.
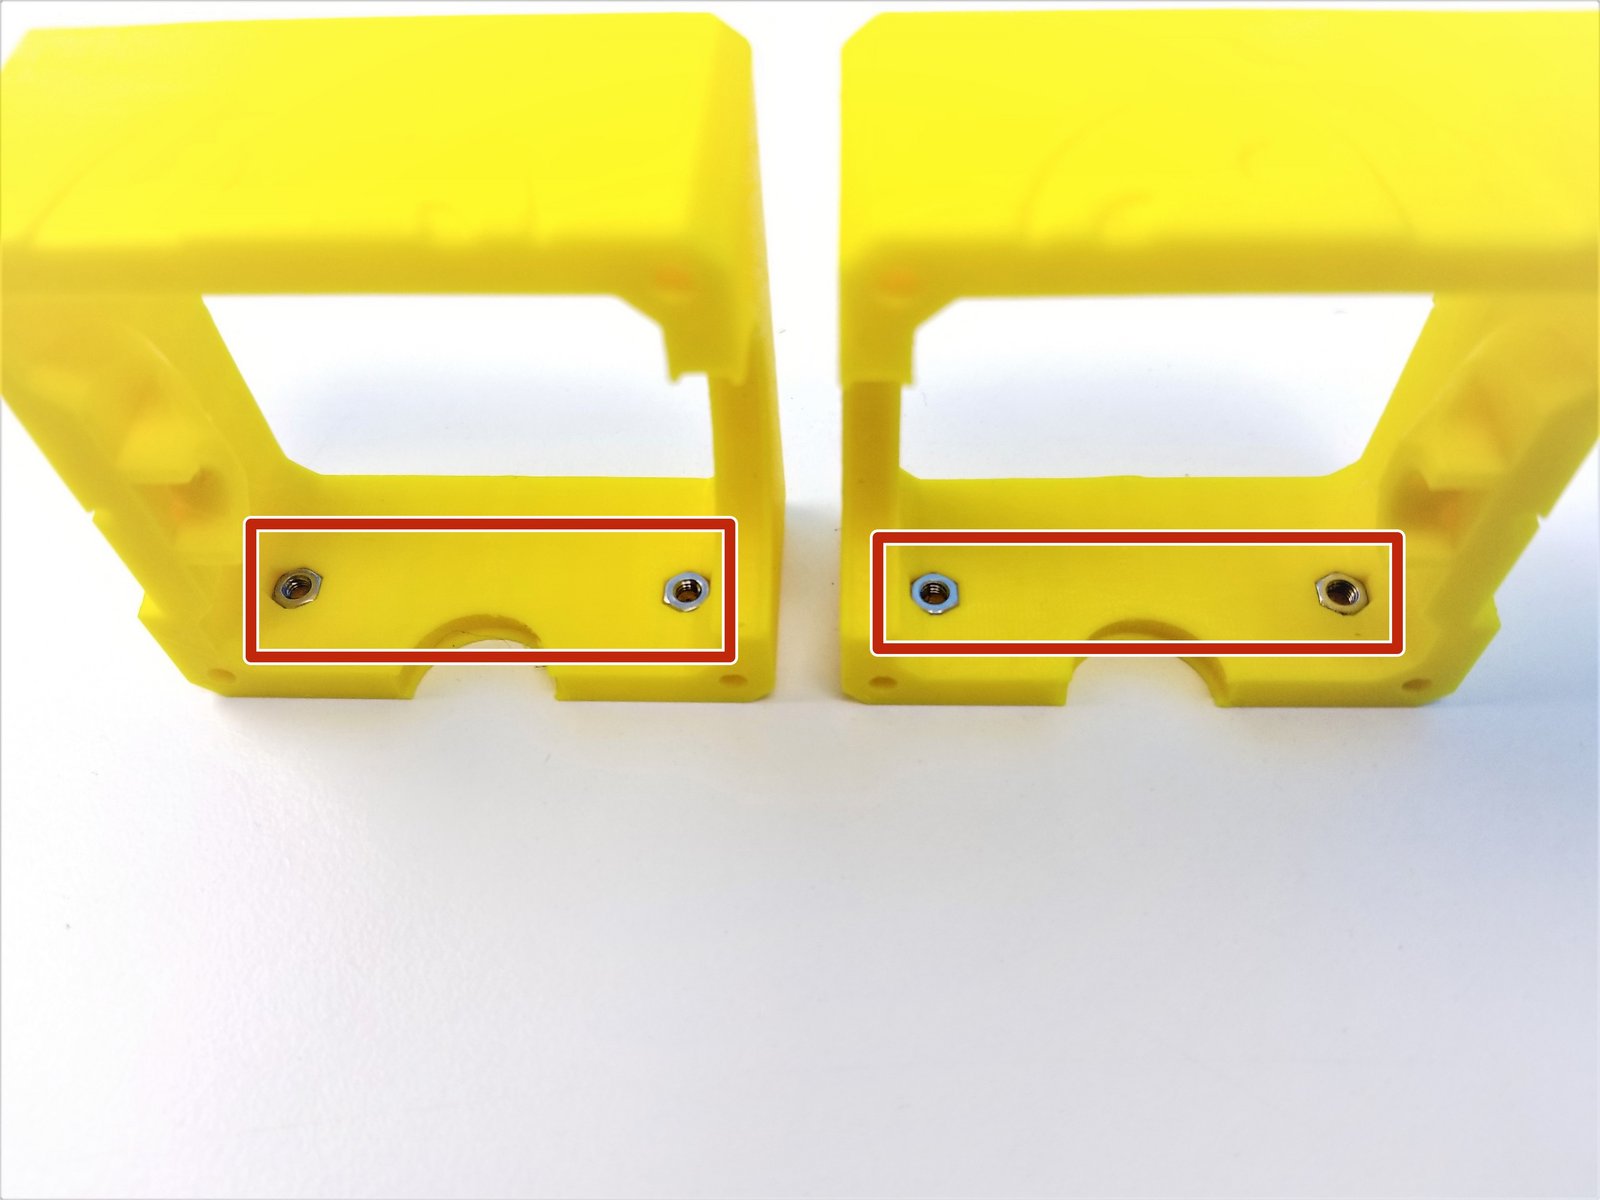
Insert M3 Nuts on both Picasso Box Parts
Insert 6701 Bearing of the Hand Gearbox into the small bearing insert of the 6Aa Picasso Box
Secure the Hand Gearbox using the M3x20mm Screws
Step 21 Picasso Box Clamp - Side Bevel Gear
Click the large image to open full size.
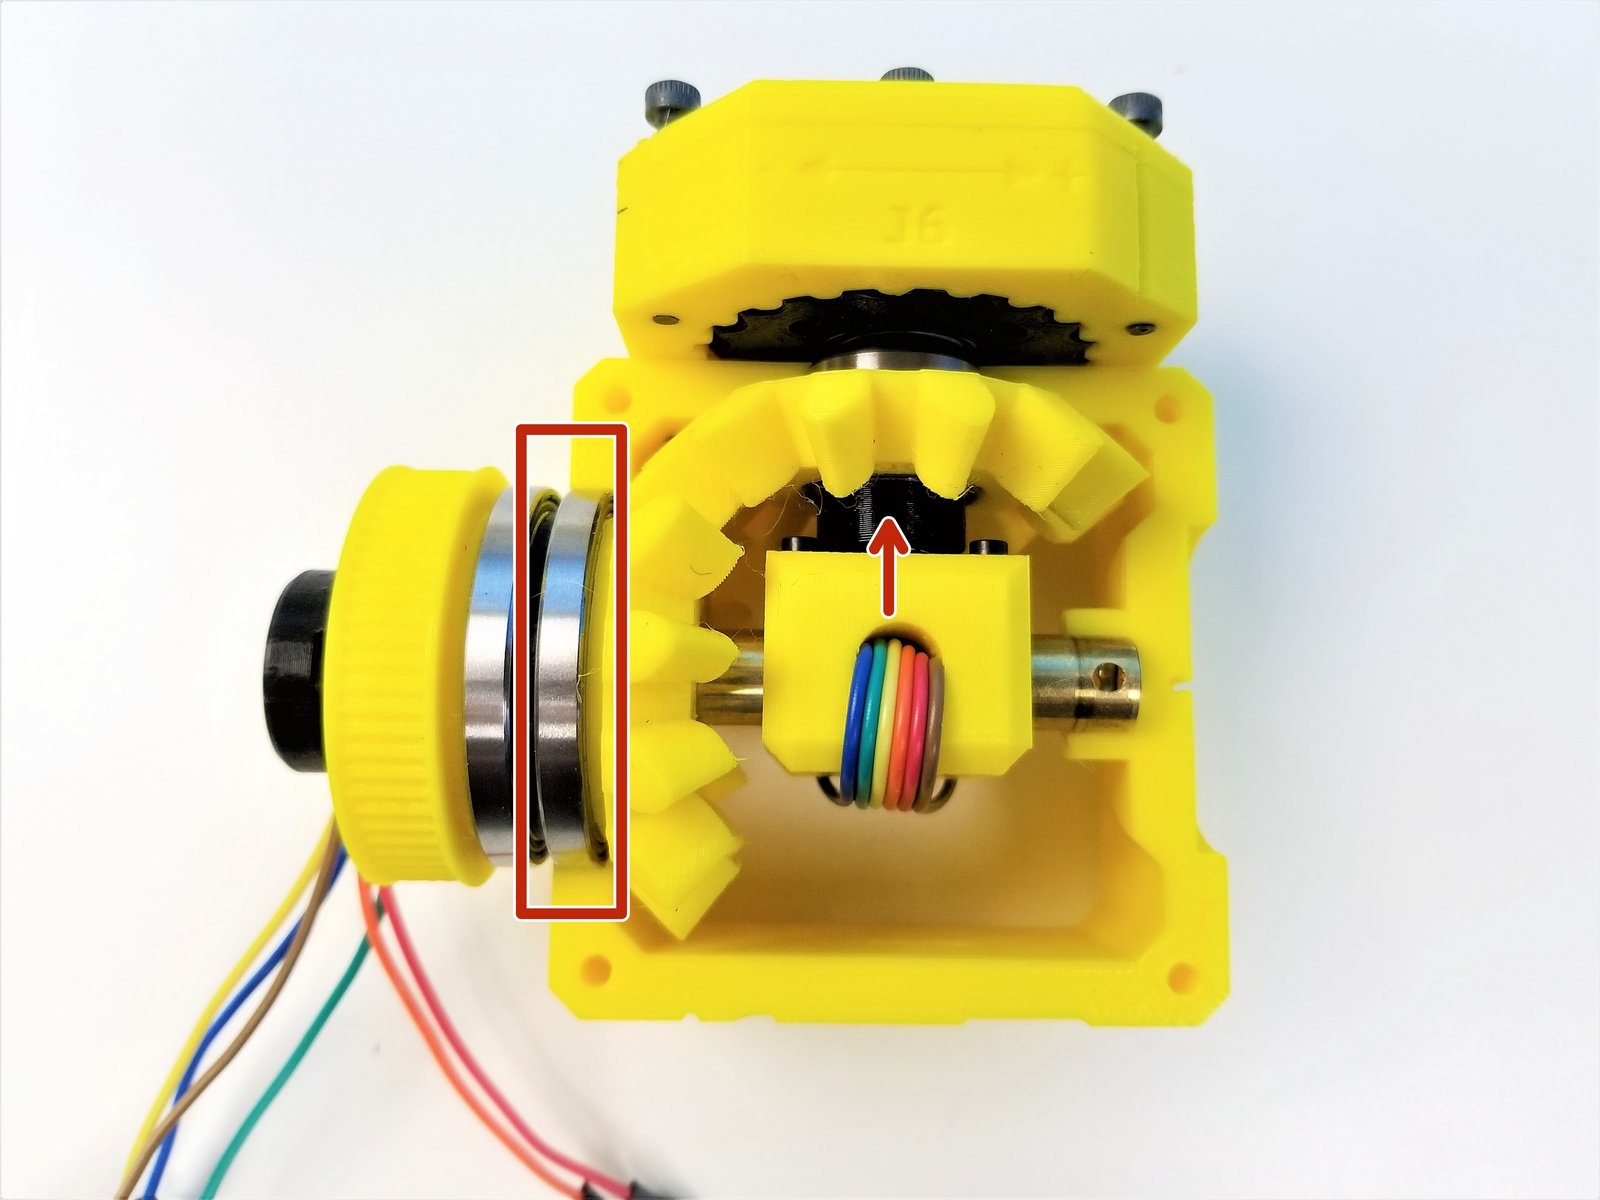
Align the 6706 Bearing closer to Bevel Gear to the Picasso bearing insert of 6Aa Picasso
- Warning:
Hand Sensor Chip should be facing the Hand Gearbox
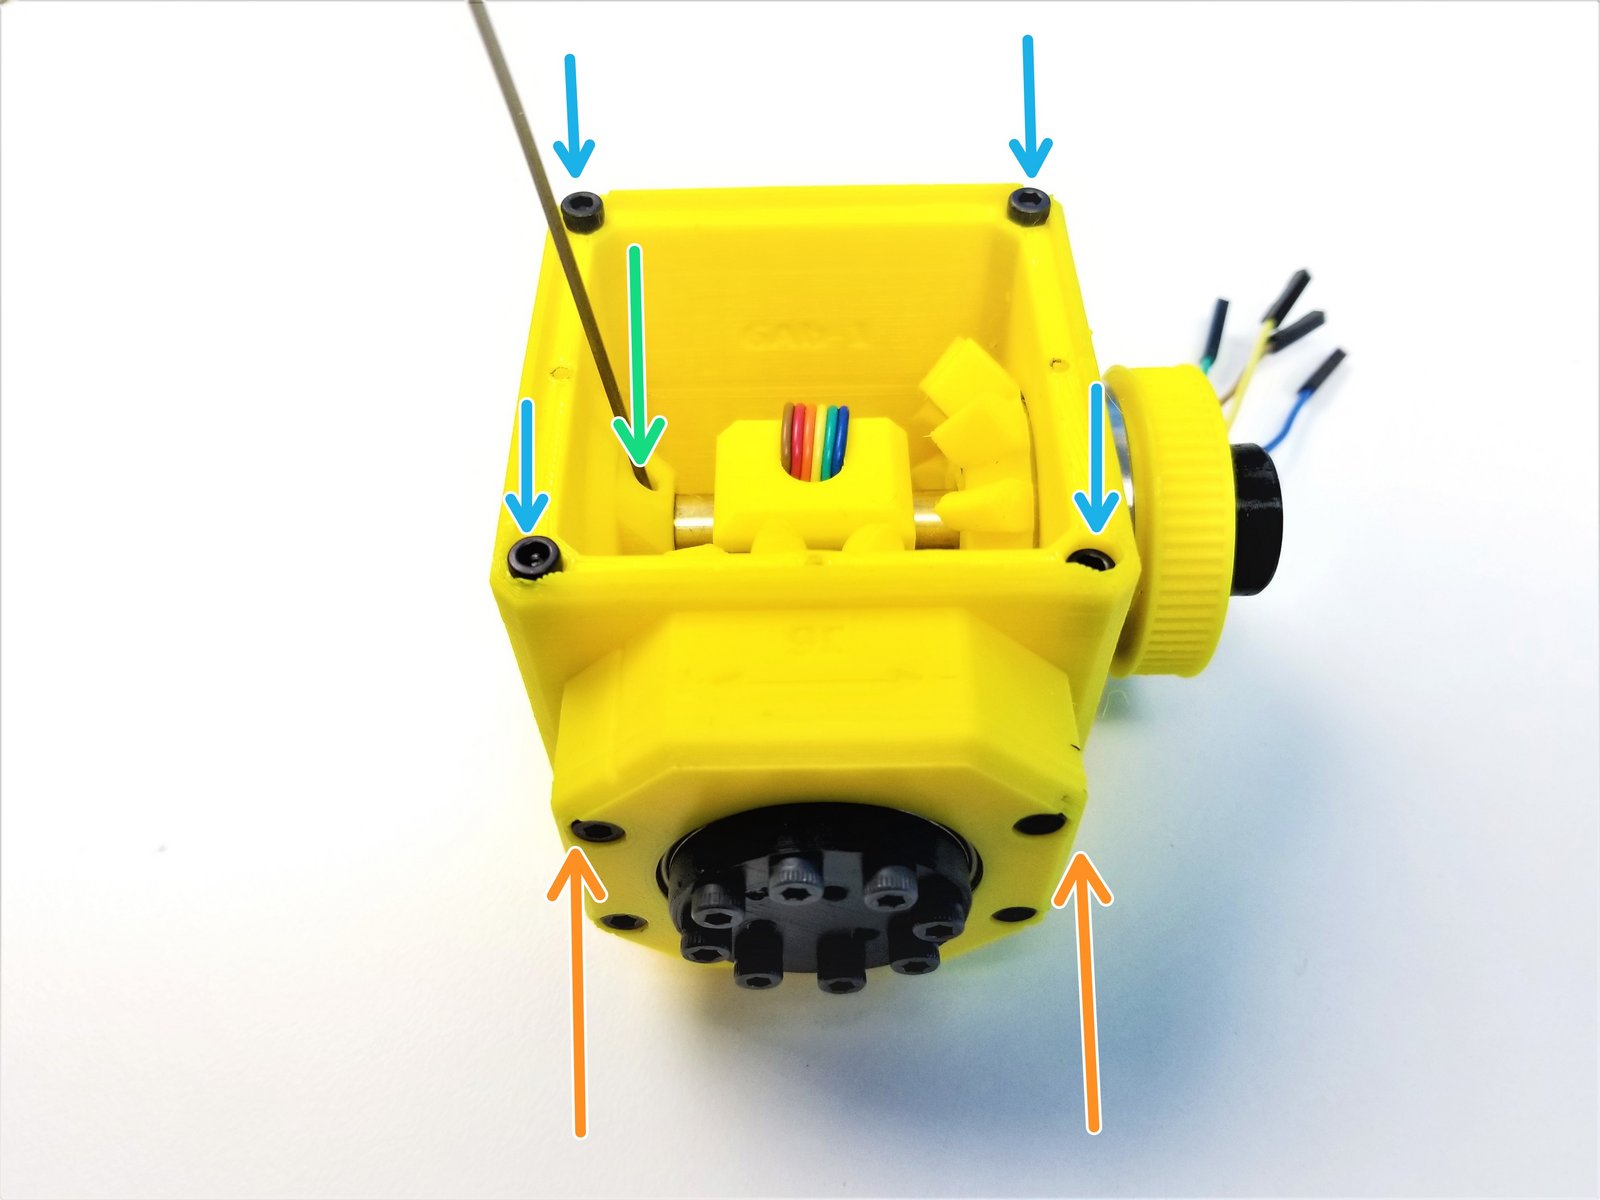
Clamp the 6Ab Picasso and secure it by tightening the M3x20mm Screws on the Hand Gearbox
Use M3 Set Screw to secure the Sensor Shaft to the Picasso Box
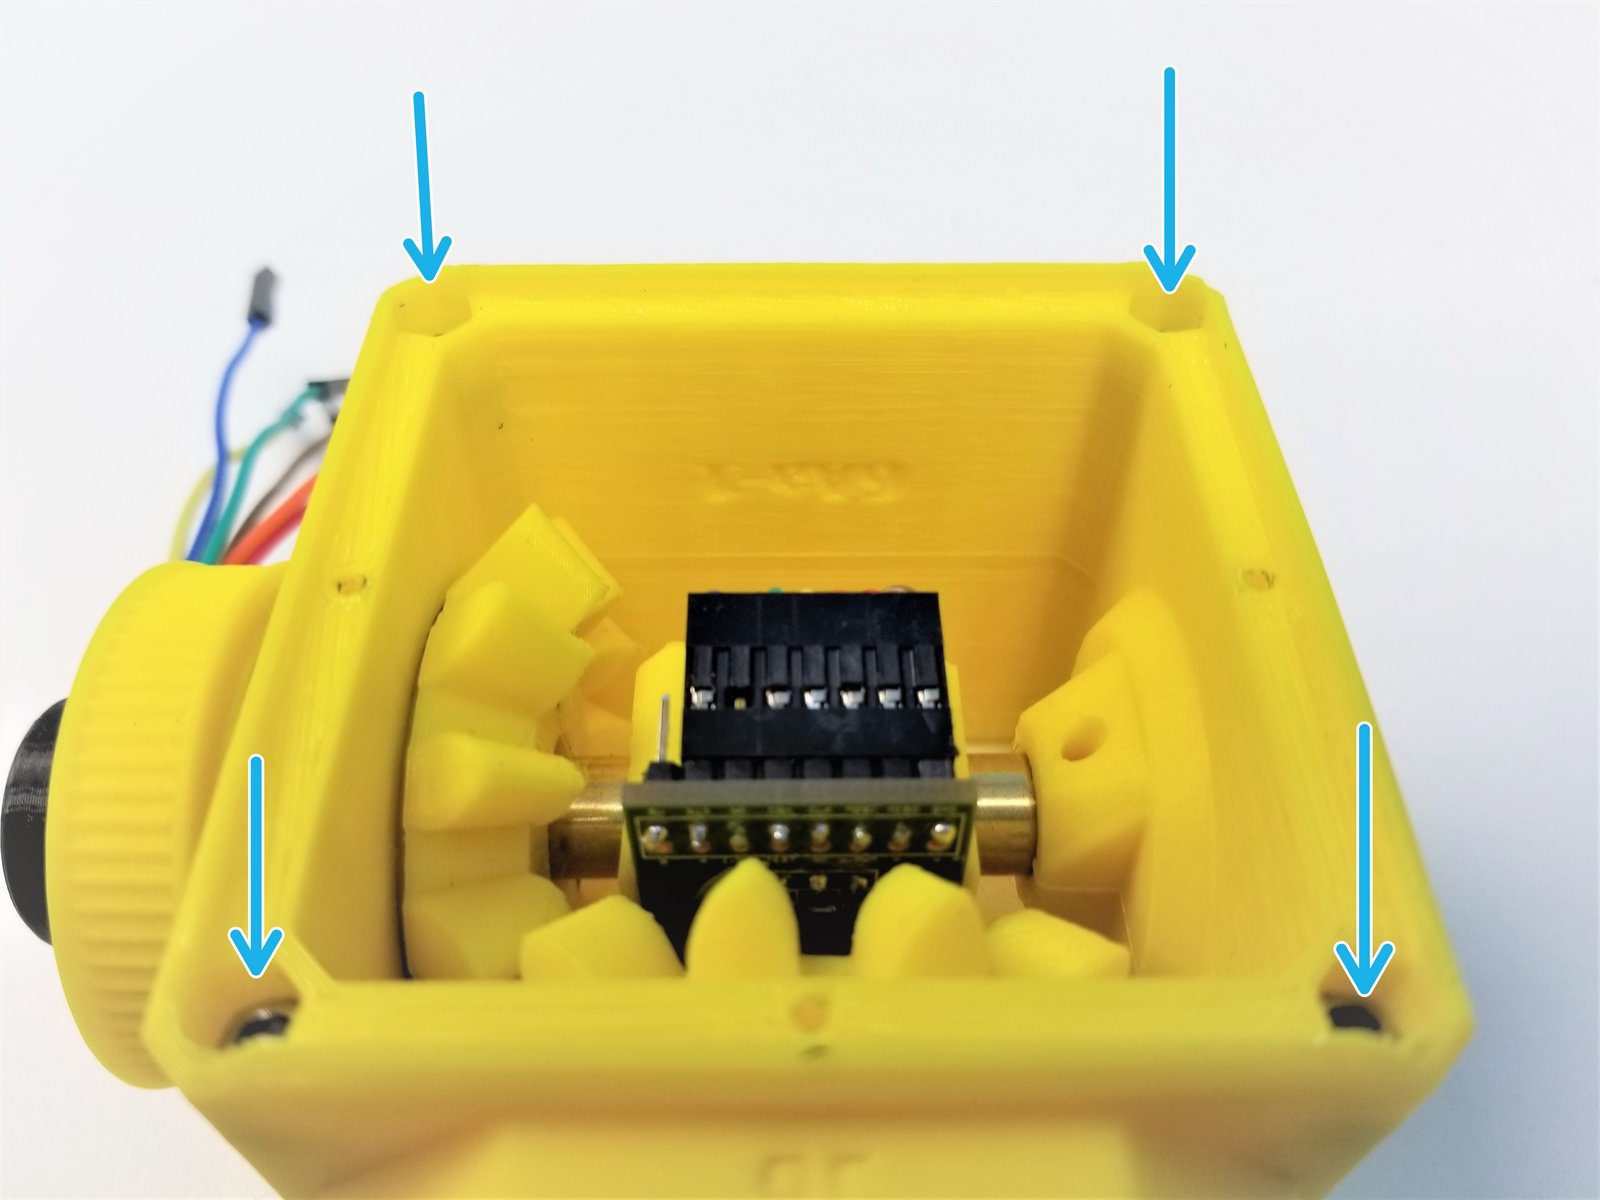
Insert M3x45mm Screws on one side and M3 Nuts on the other, to clamp the Picasso Box
Step 22 Gearbox test
Hold the picasso box with one hand and turn the input pulley of the Side Bevel Gearbox with the other.
The input pulley and the hand should turn smoothly at different ratios, with little or no play.
If the gearbox refuses to turn, it is very likely the 3D printed gears are too tight. Now is the time to reprint them before continuing with assembly.
Step 23 Picasso Box - Finishing Touches 1
Click the large image to open full size.
- Note:
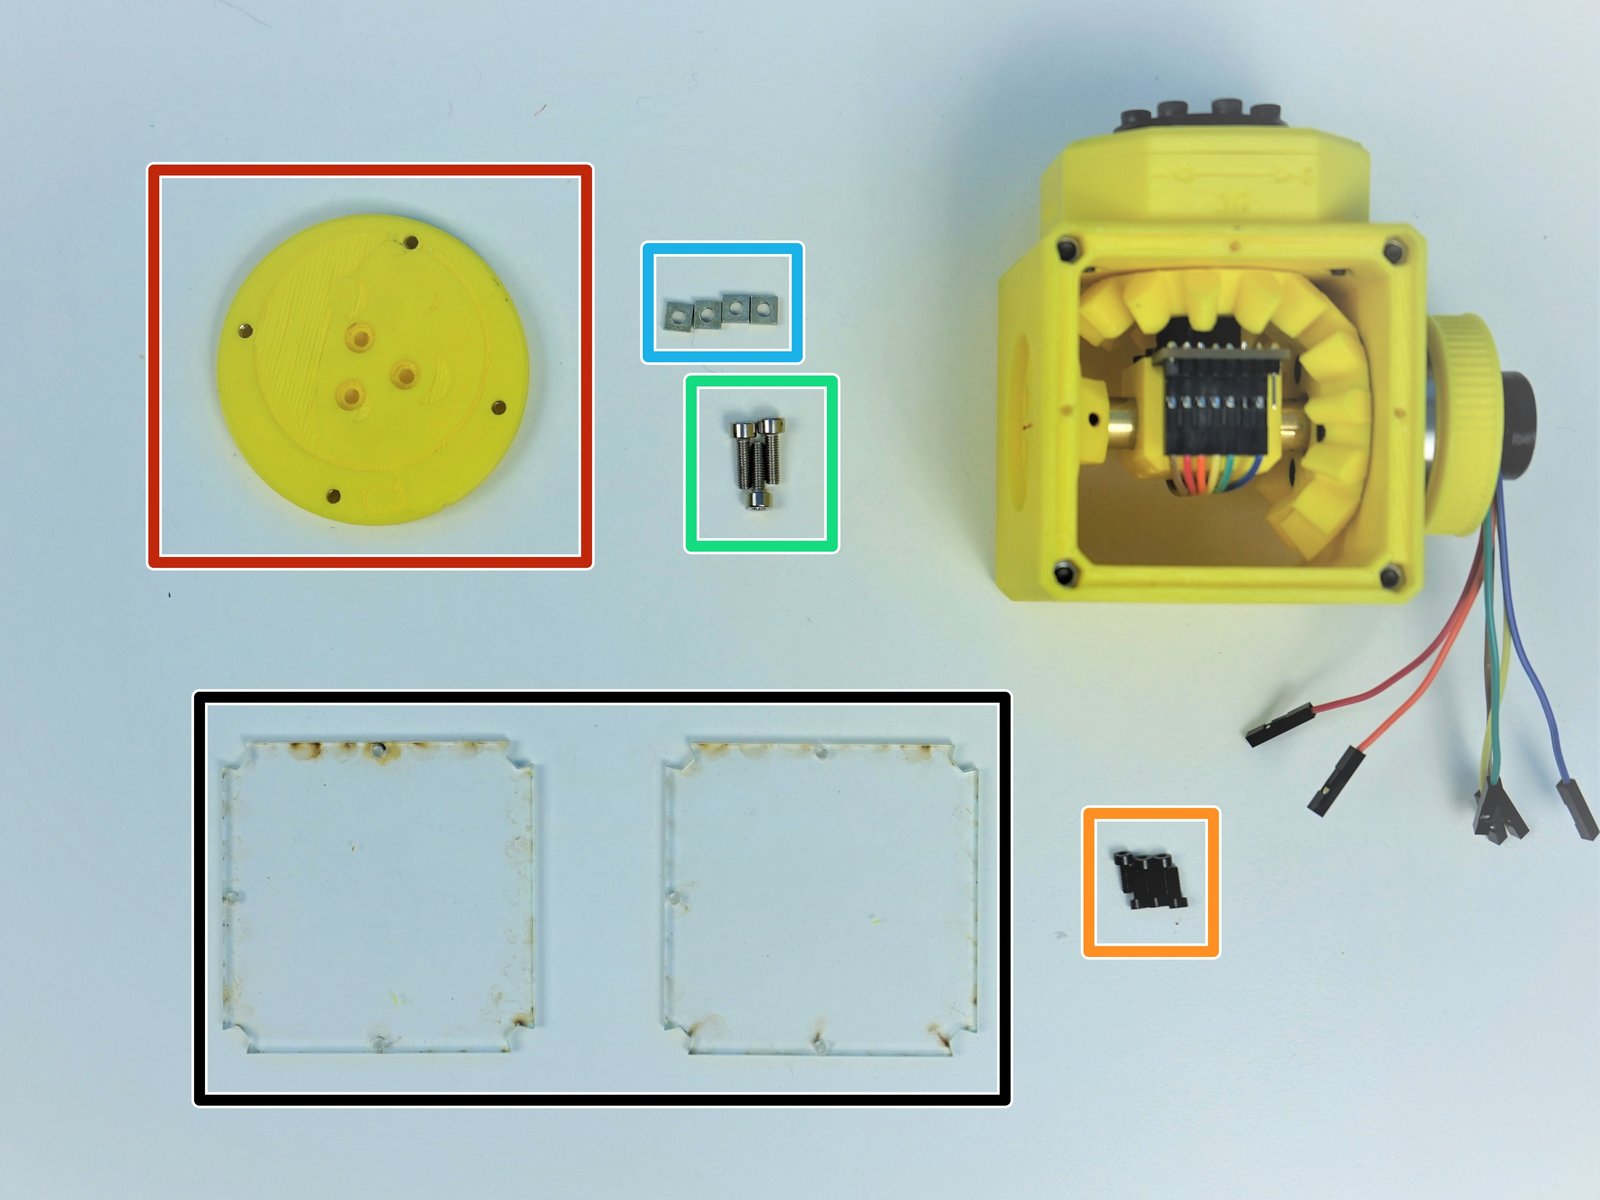
Prepare the following parts:
[LSR] - Acrylic Picasso Cover Plates (x2)
[3D] - 6Da Hand Face
M2x6mm Screws (x6)
M3x10mm Screws (x3)
M3 Square Nuts (x4)
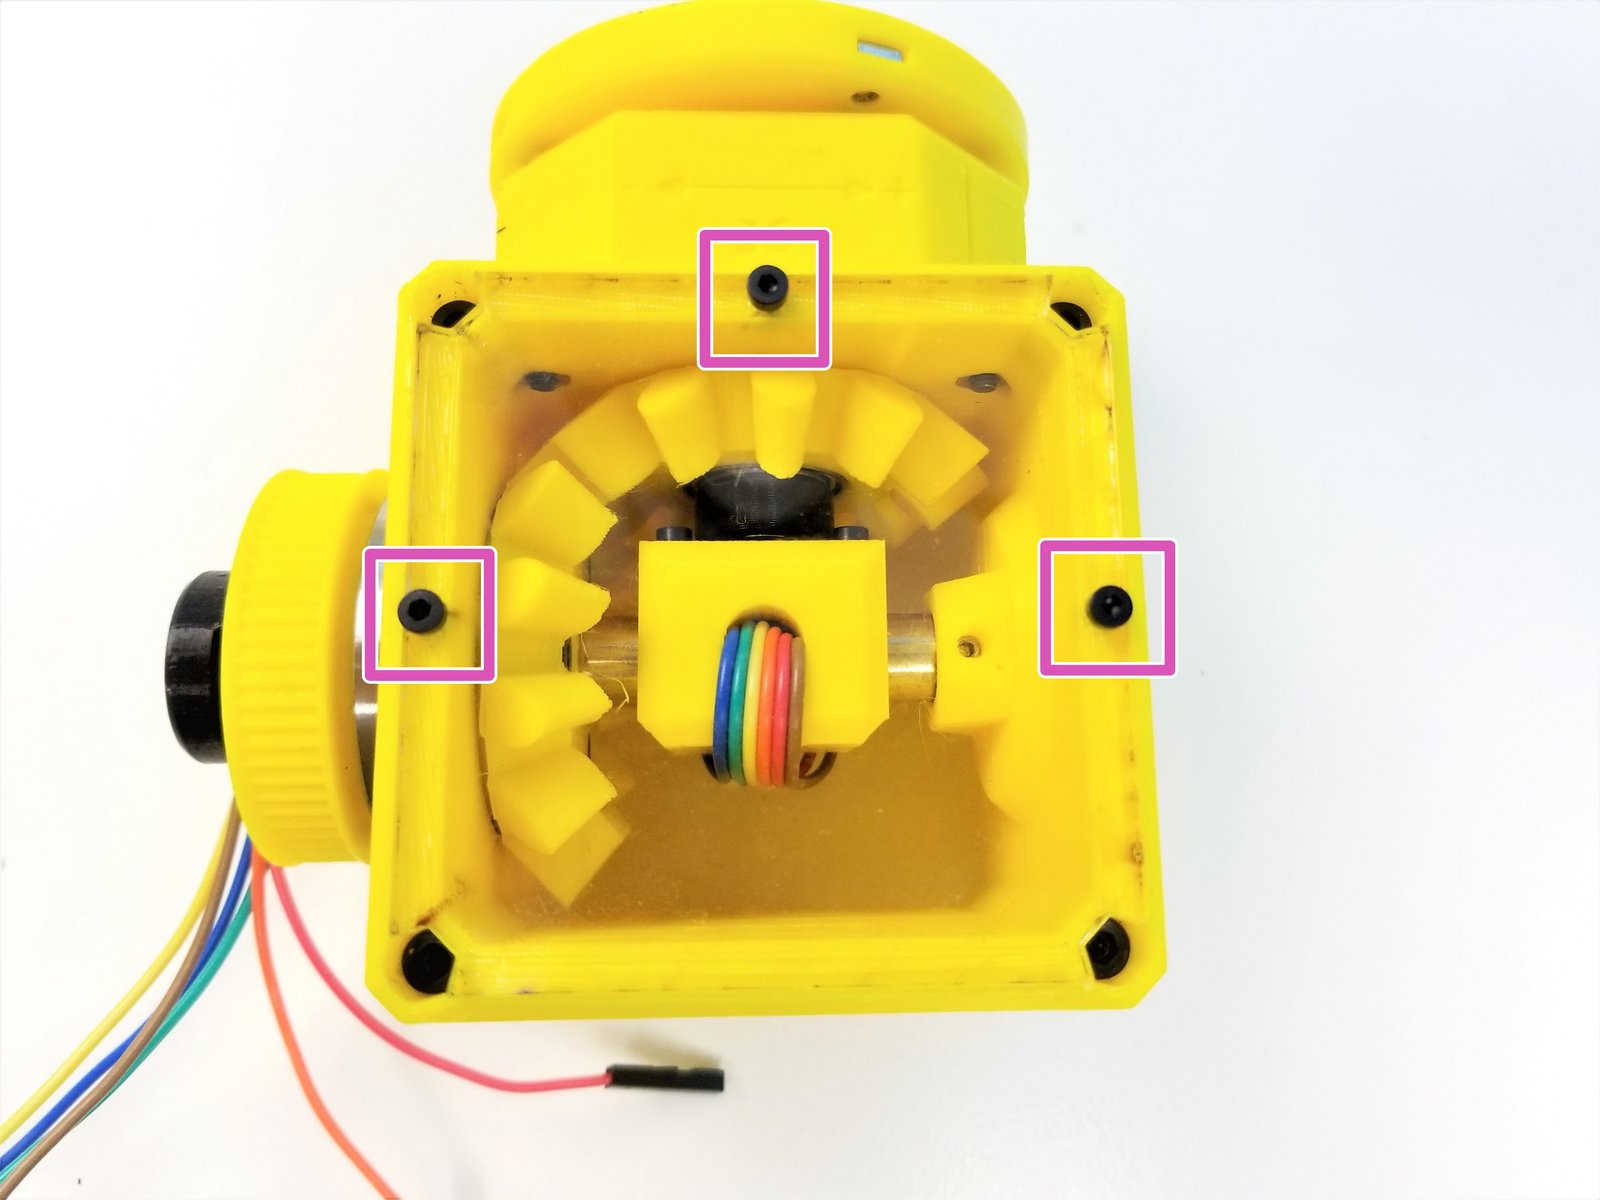
Screw the Acrylic Plates to Top AND Bottom of Picasso Box with M2 Screws
Step 24 Picasso Box - Finishing Touches 2
Click the large image to open full size.
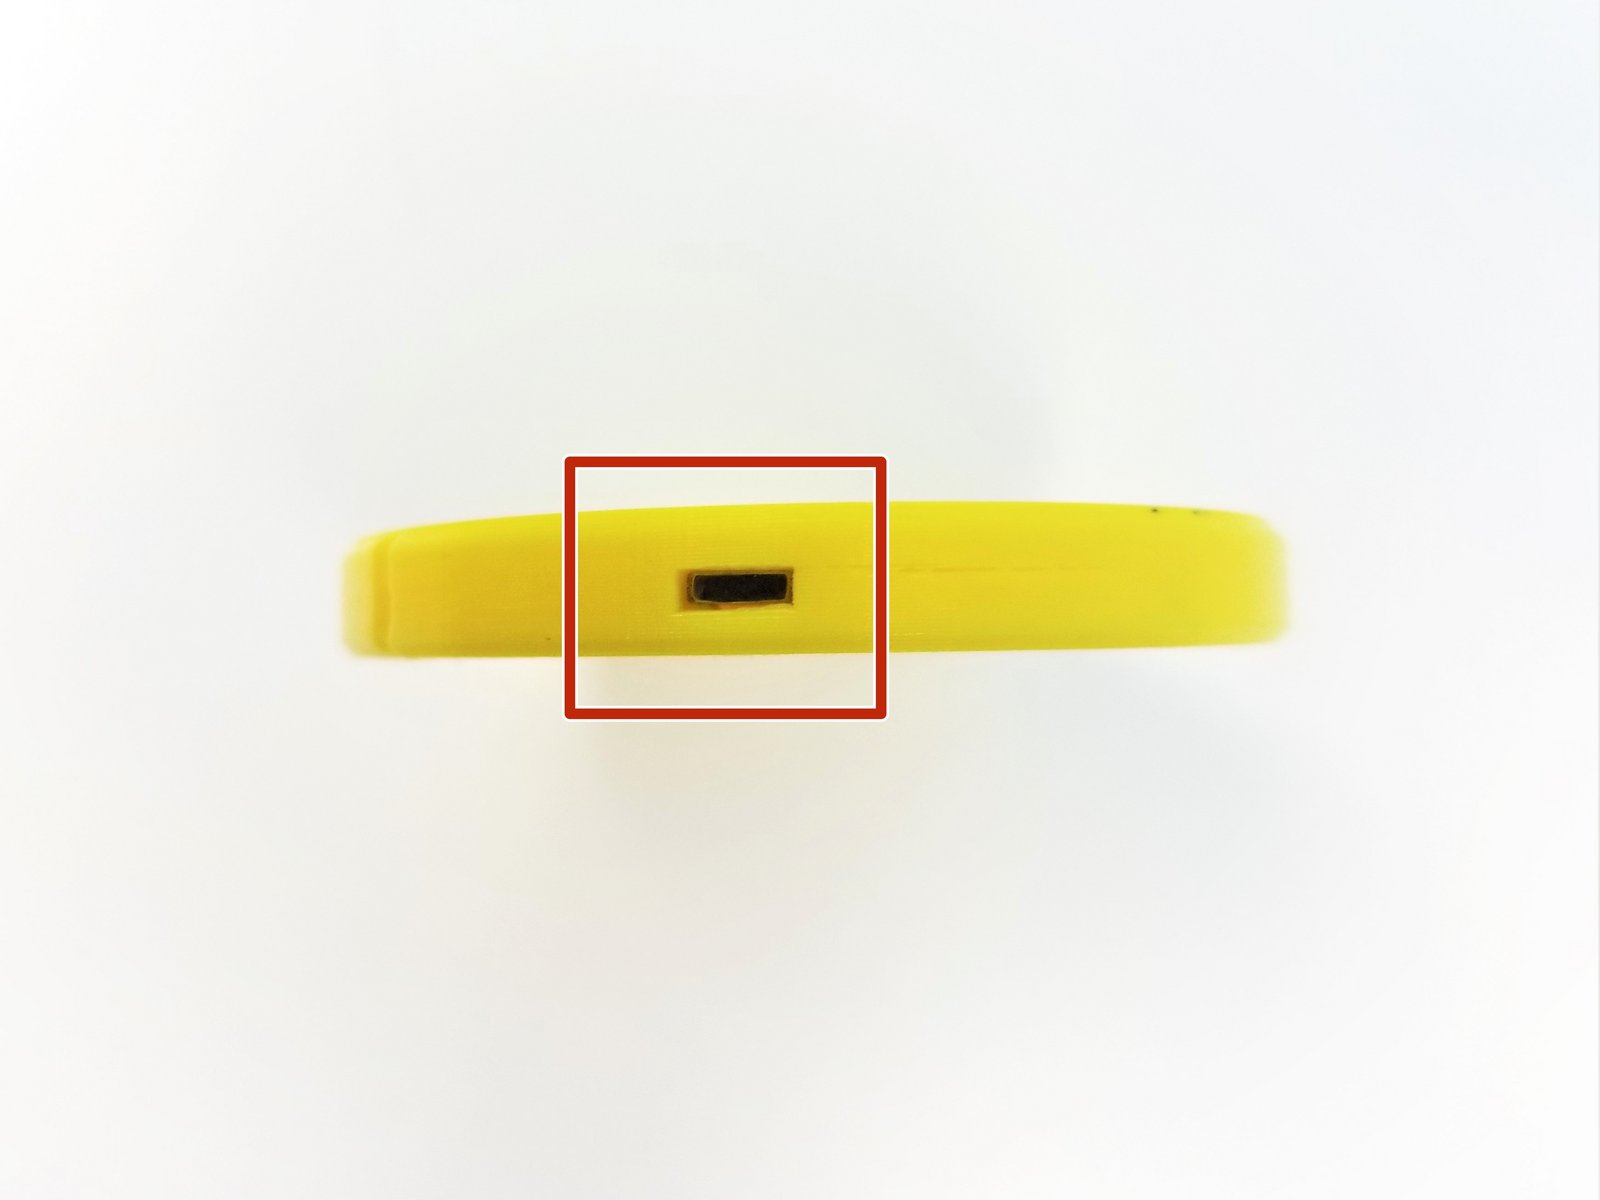
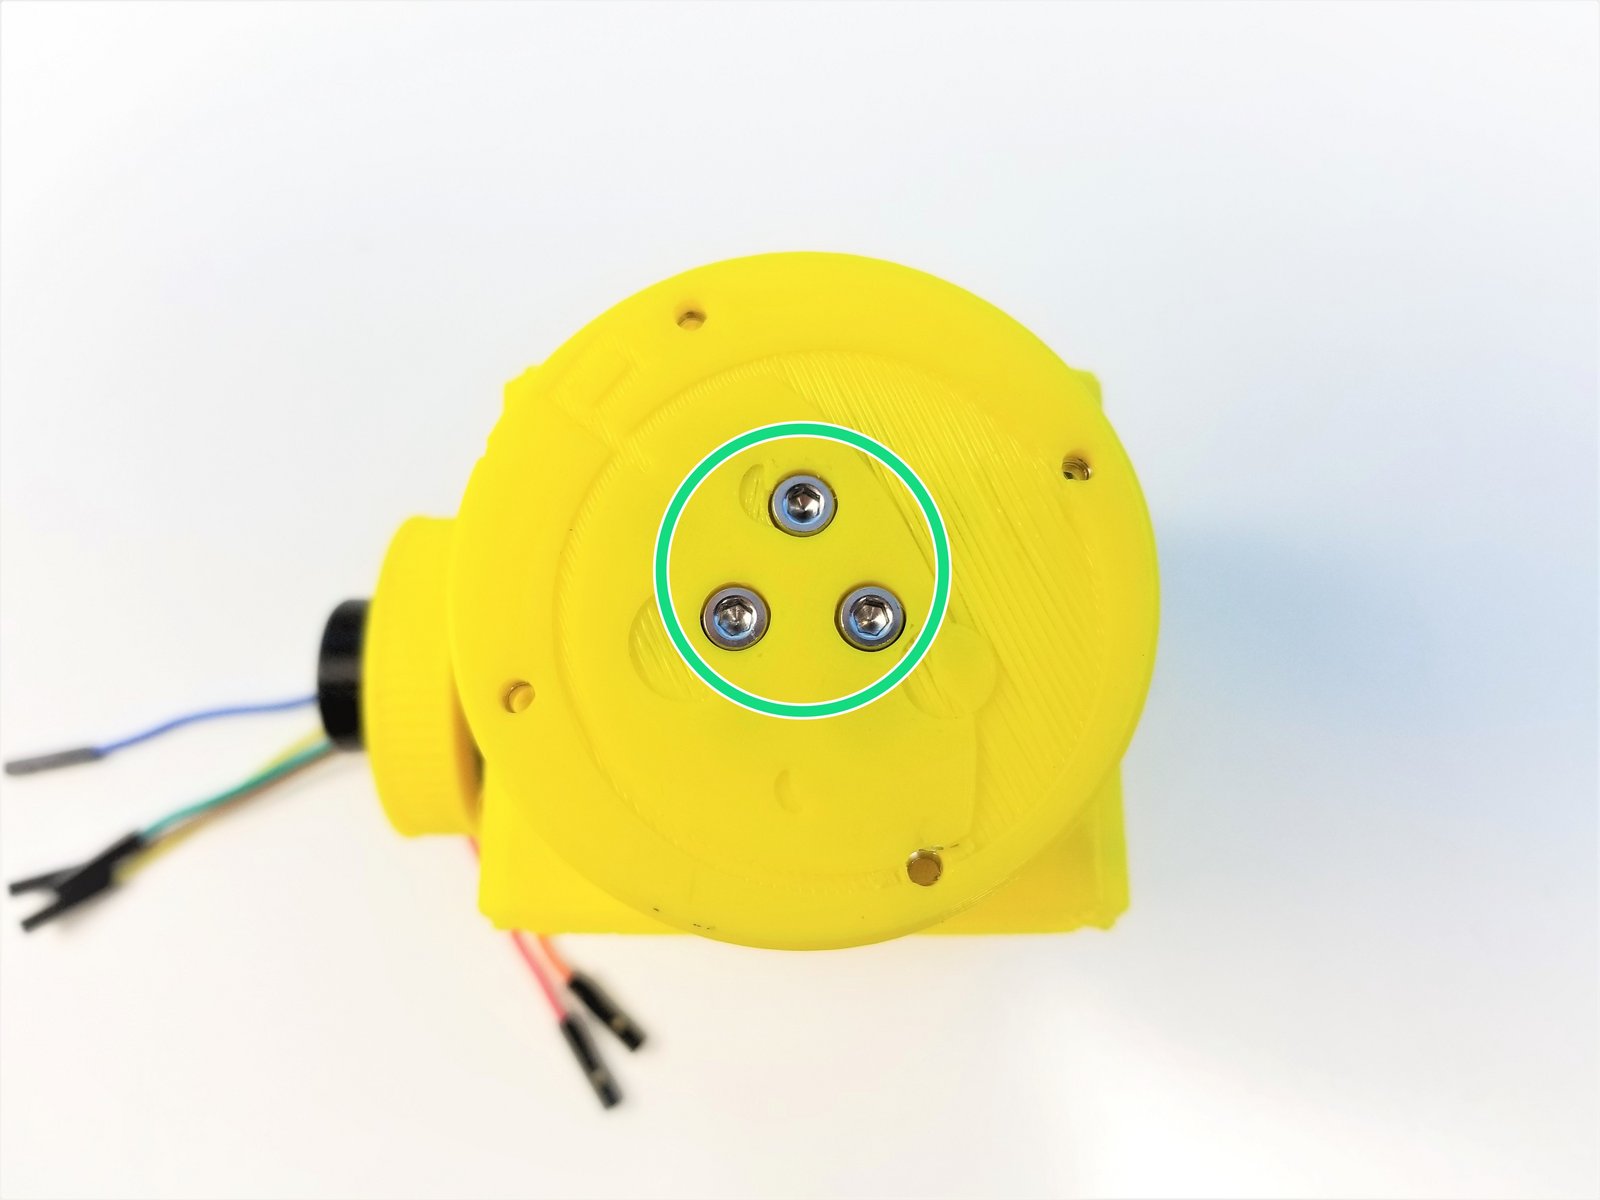
Insert M3 Square Nuts on the side of the Hand Face
- Warning:
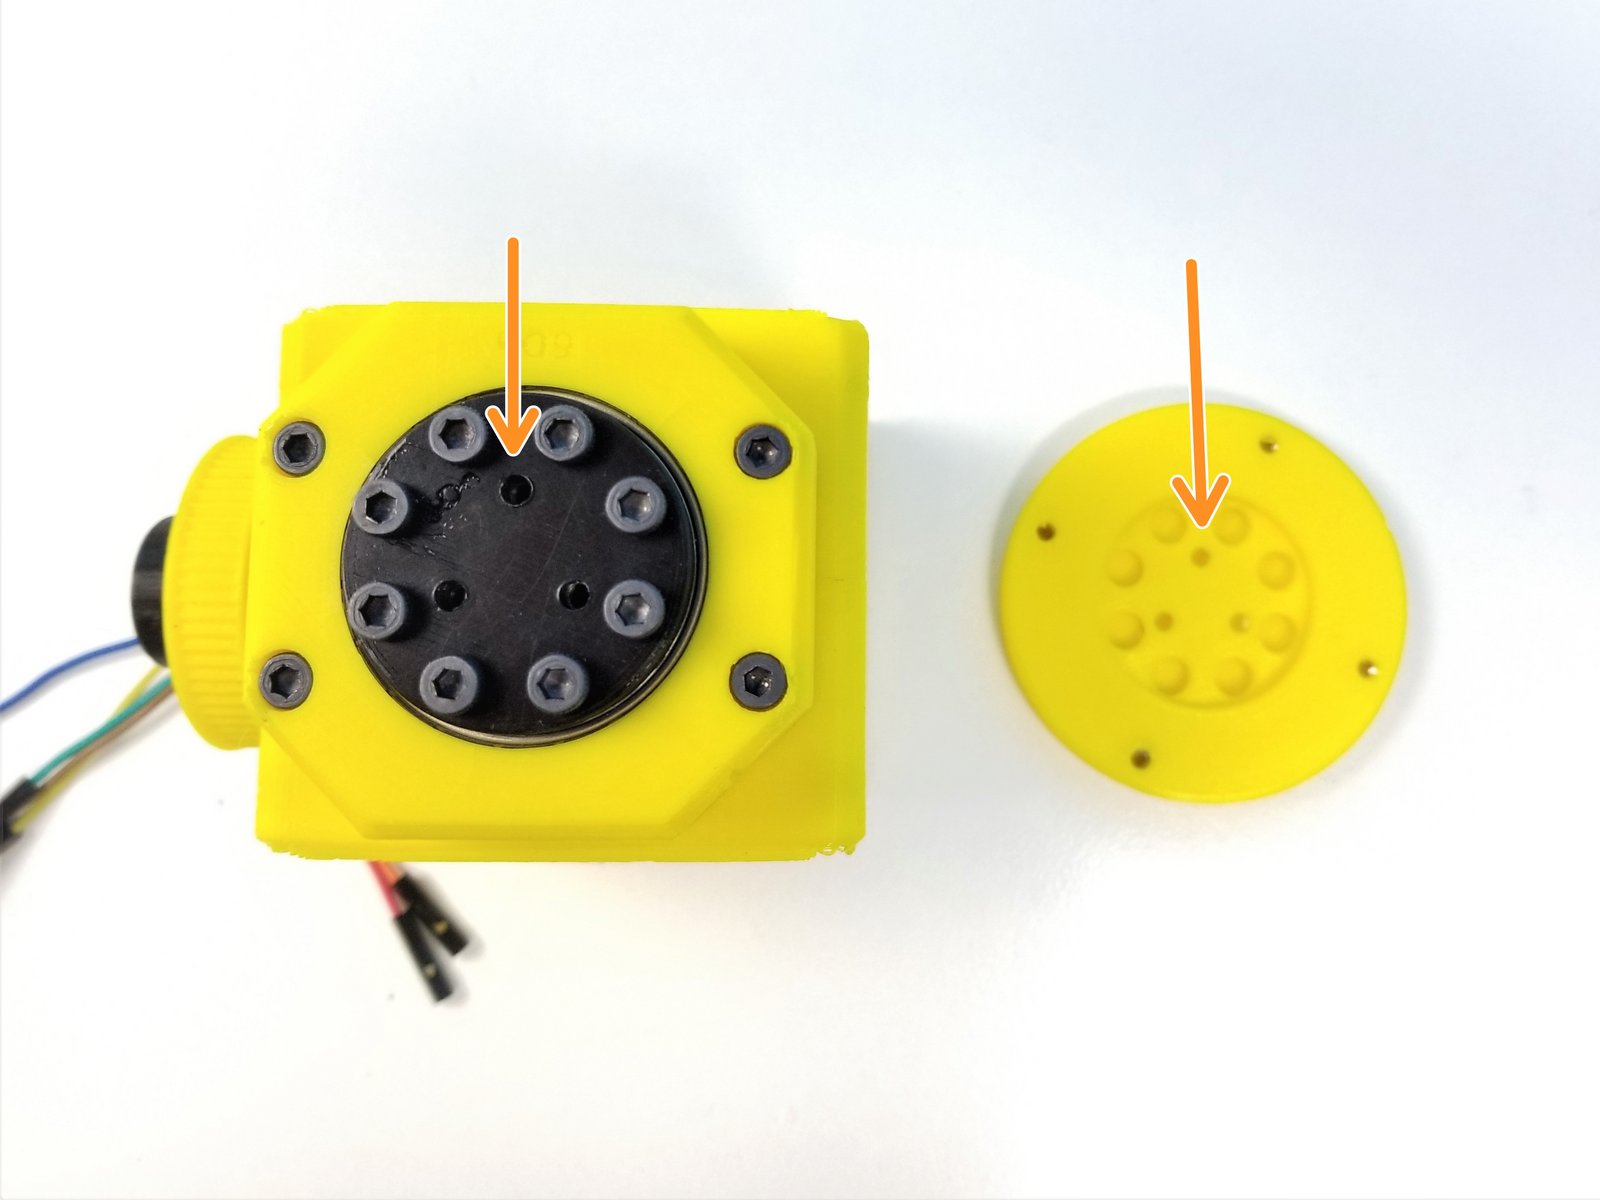
Align the Screw Hole on the ++Hand Gearbox Output and Hand Face++
One of three holes are in between the Screw Head
Secure the Face to the Output Disk using M3x10mm Screws
Step 25 Finish!
Click the large image to open full size.
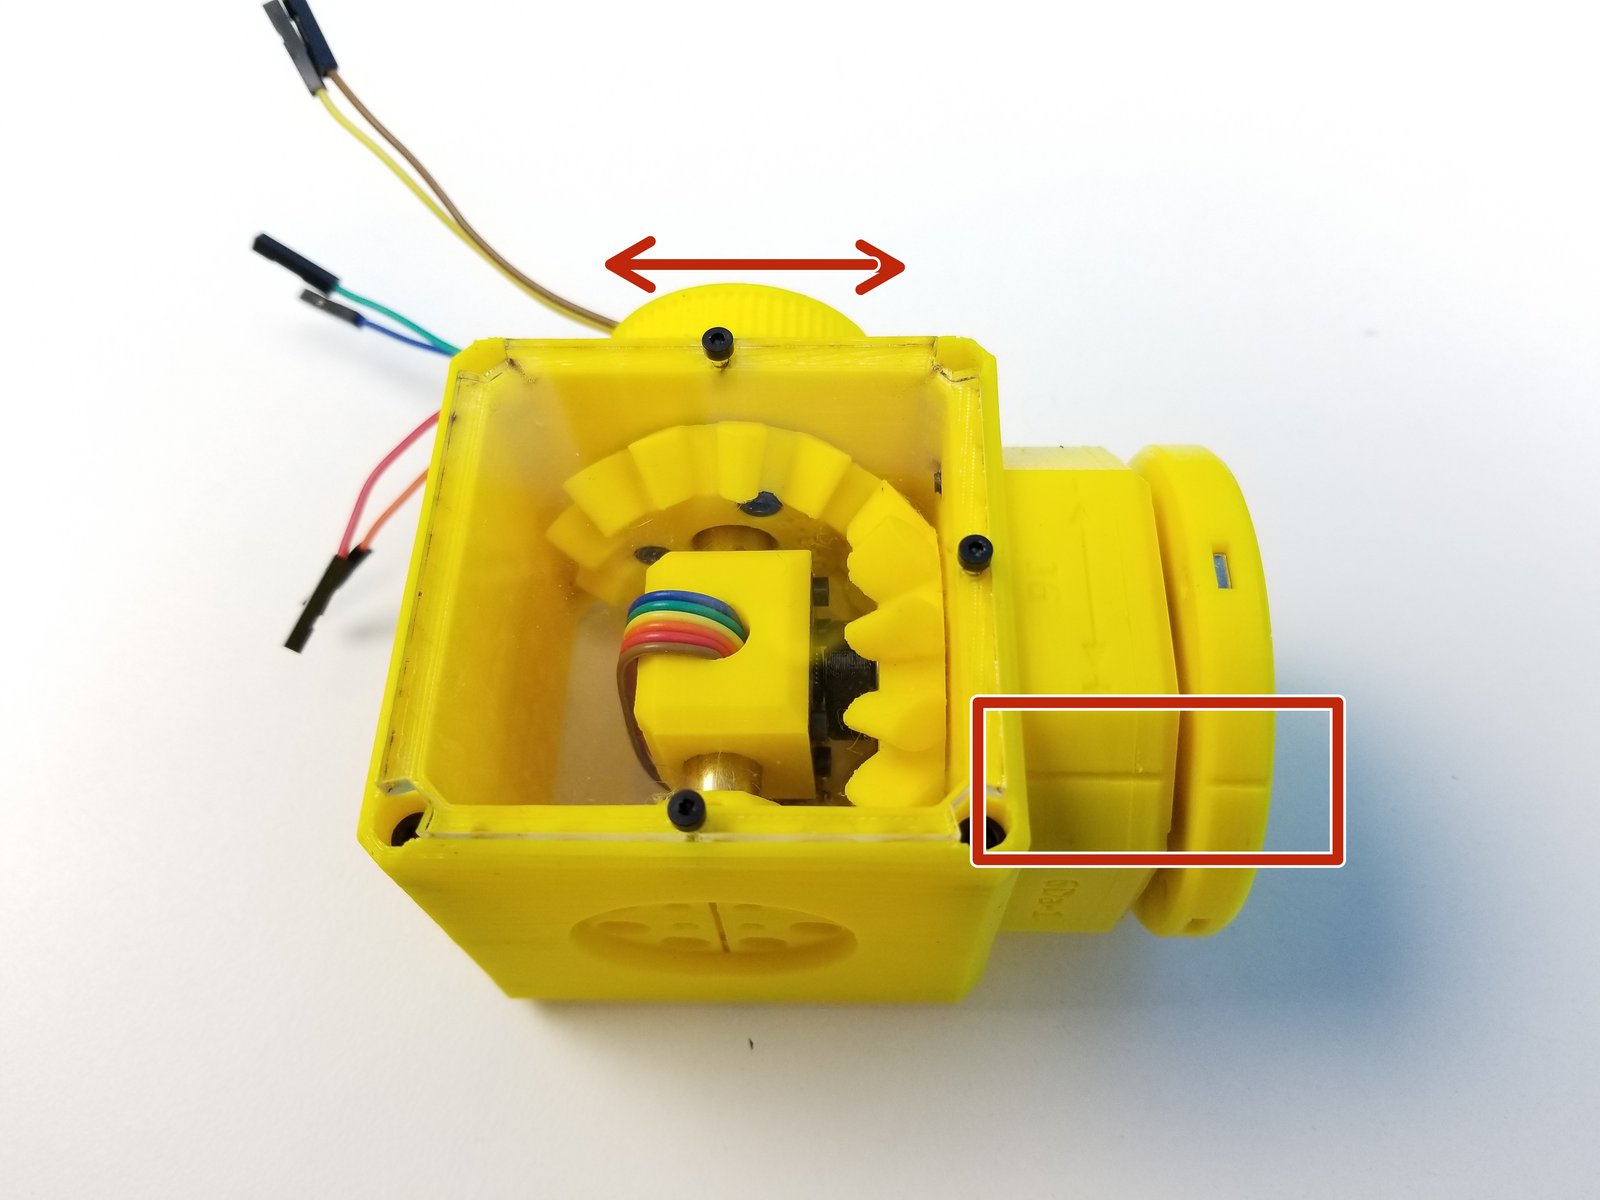
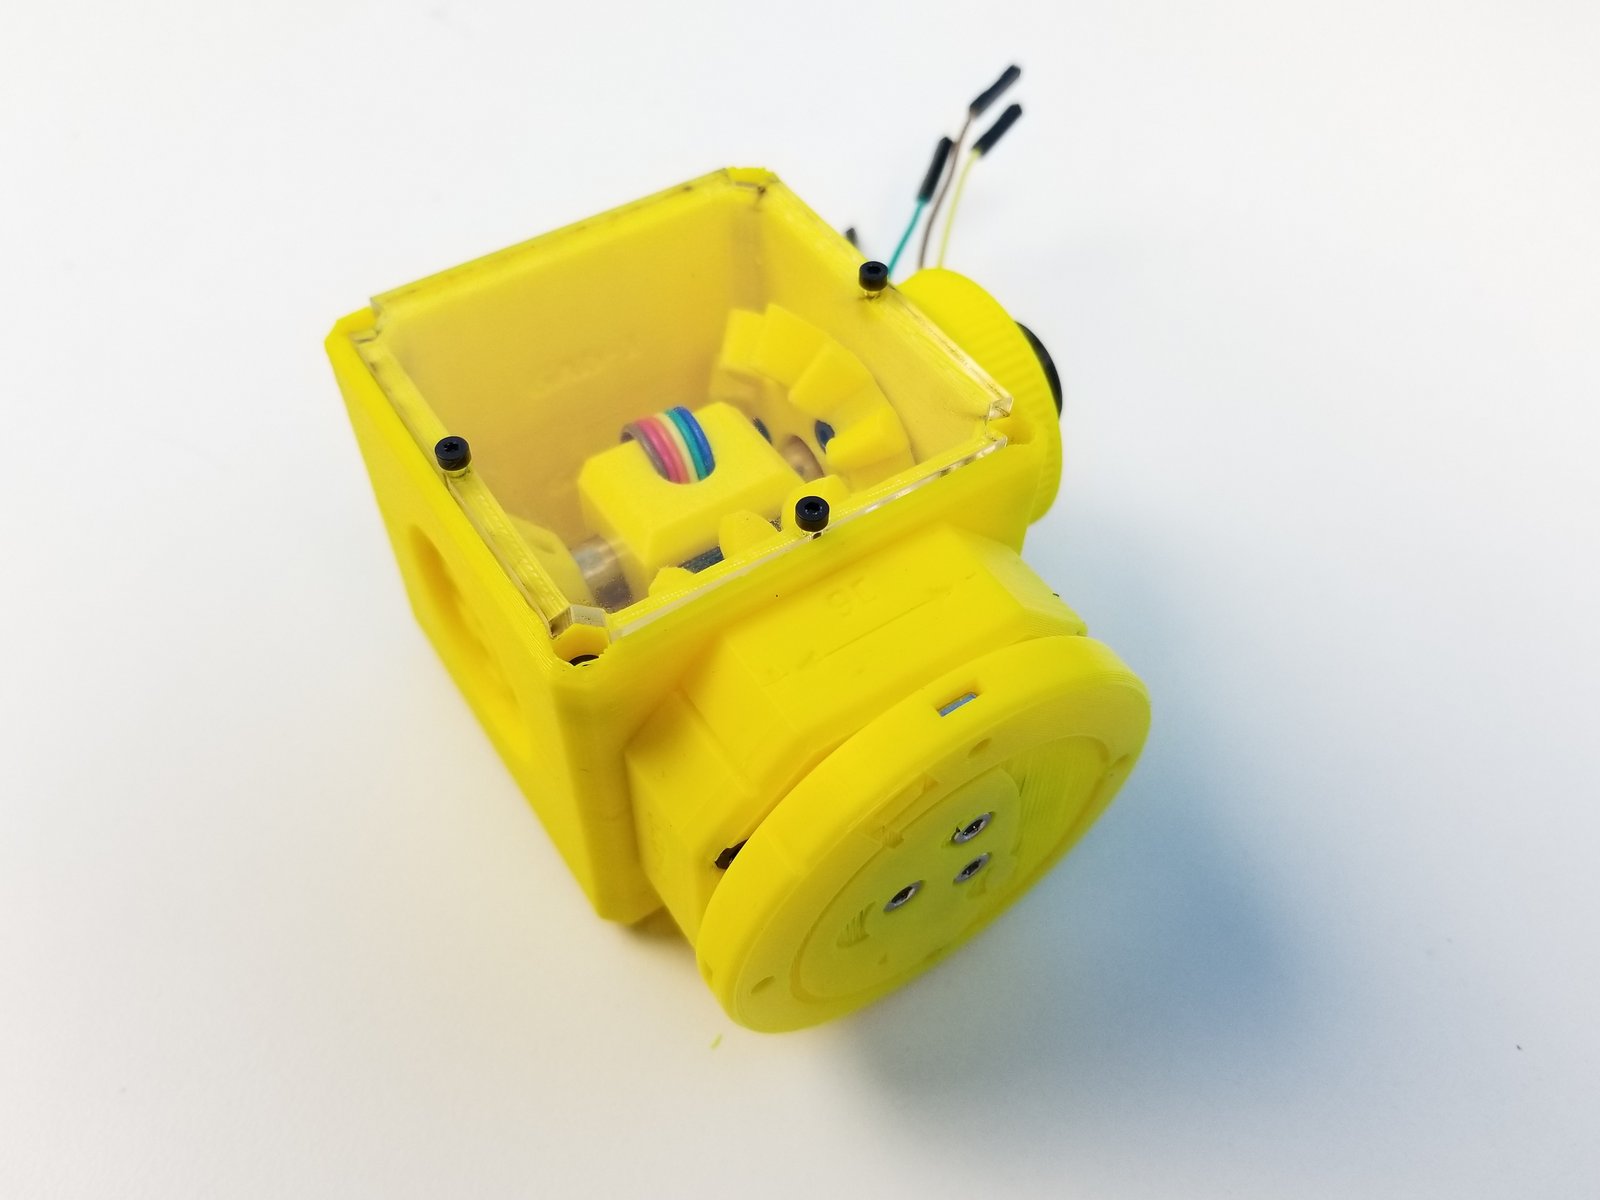
Align the Hand Face to the Hand Gearbox Housing by rotating the Pulley Gear
- Note:
Congratulation! you have your Picasso Box assembled!!!