Sixi 2 robot arm
4. Fork Assembly
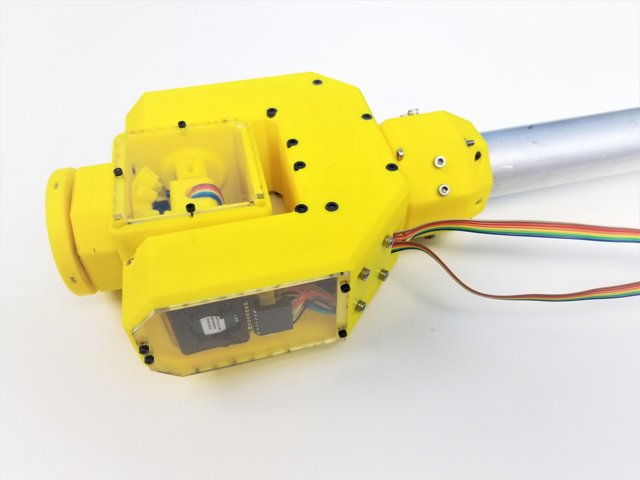
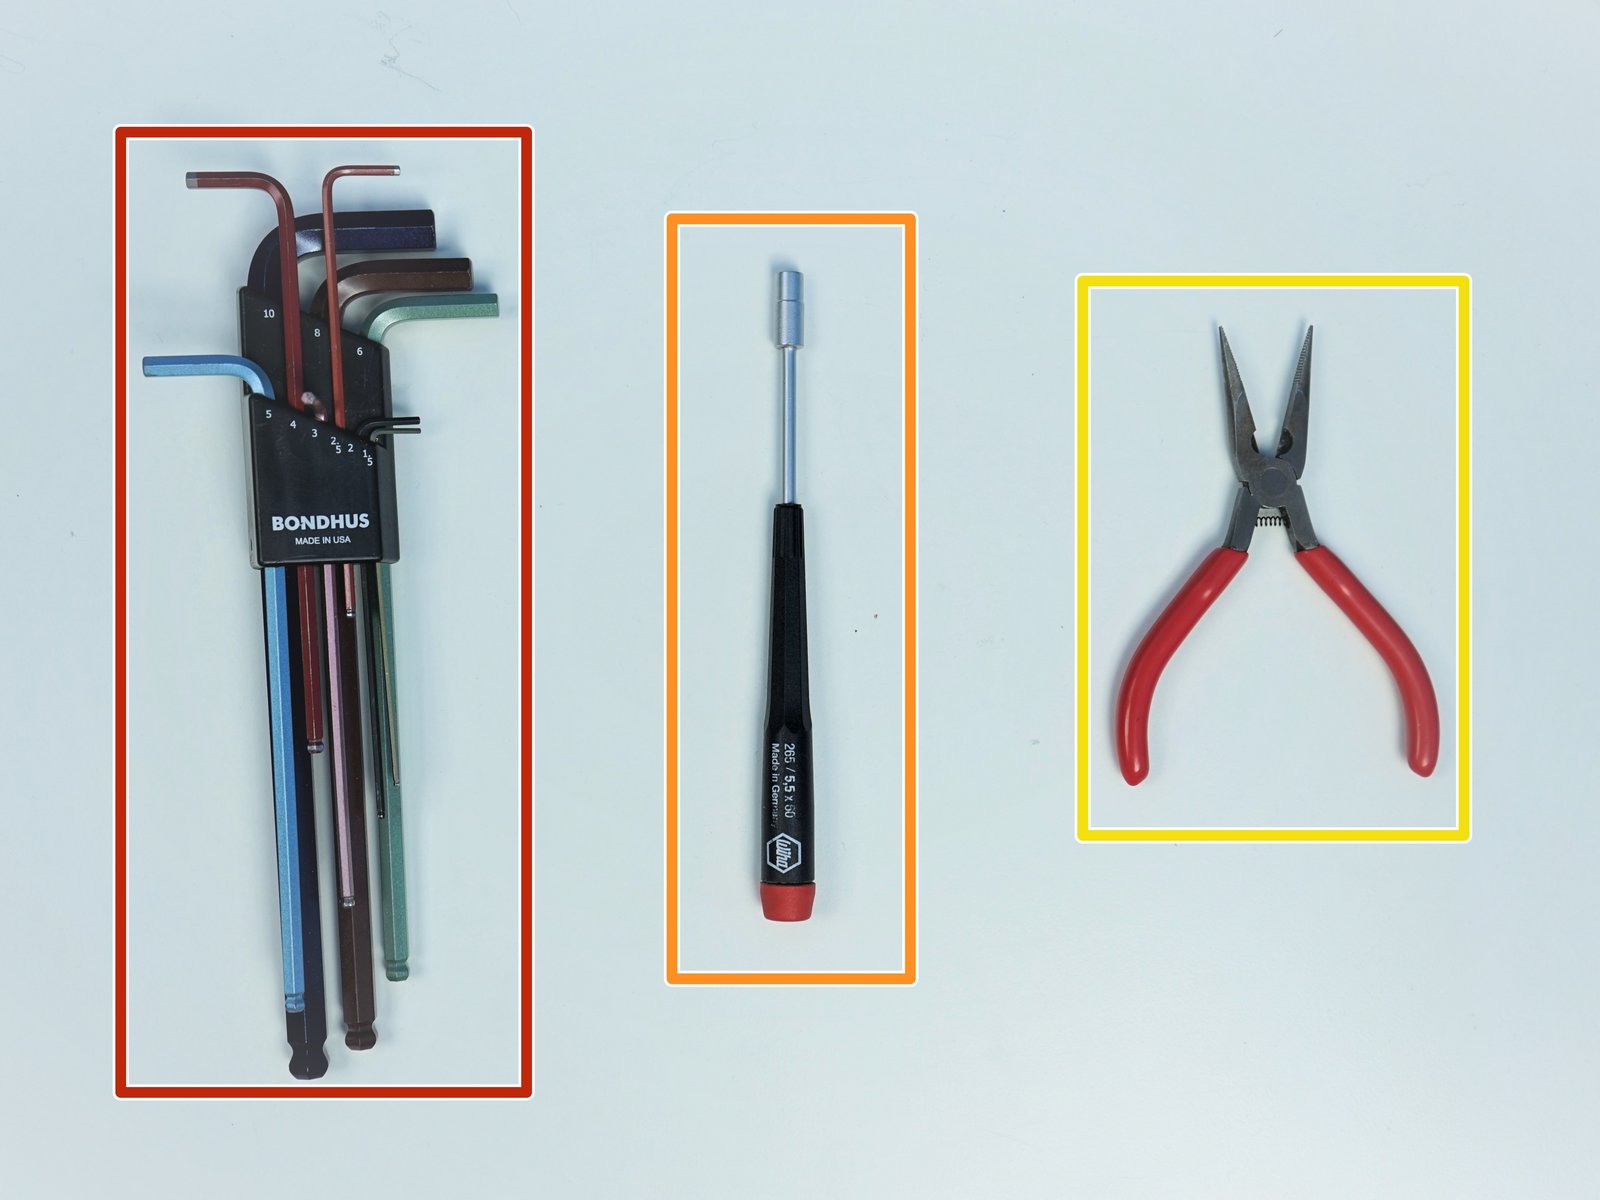
Step 1 Tools and Parts Required for This Chapter
Click the large image to open full size.
Assembled Picasso Box
Assembly Ulna Gearbox & Elbow Tail
[3D] - 6E Picasso Wrist Gearbox Components
[3D] - 5A Fork Components
Alan Keys
Socket Head Driver
Plier [Opt.]
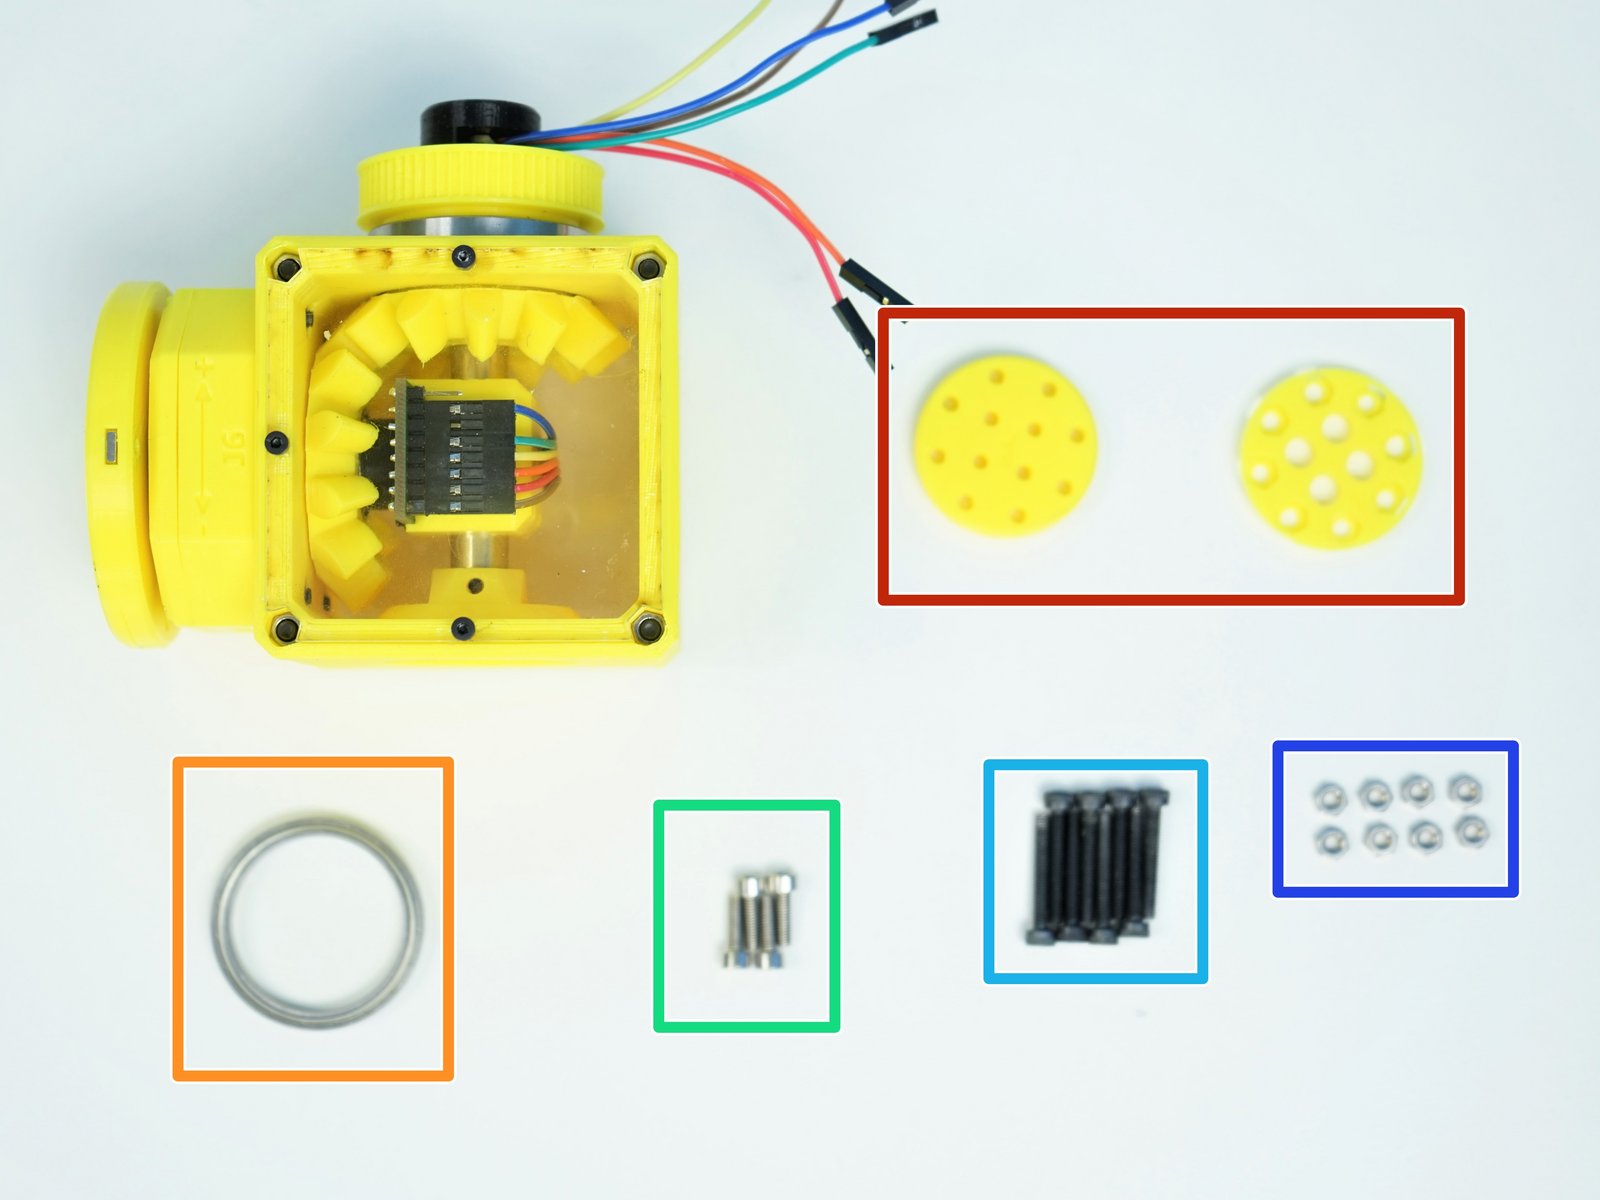
Step 2 Picasso Wrist Gearbox Output - Parts
Click the large image to open full size.
- Note:
Prepare the following components:
Assembled Picasso Box
[3D] - 6Ea Picasso GB Output Disks
6706 Bearing [30x37x4mm] (x1)
M3x10mm Screws (x4)
M3x20mm Screws (x8)
M3 Hex Nuts (x8)
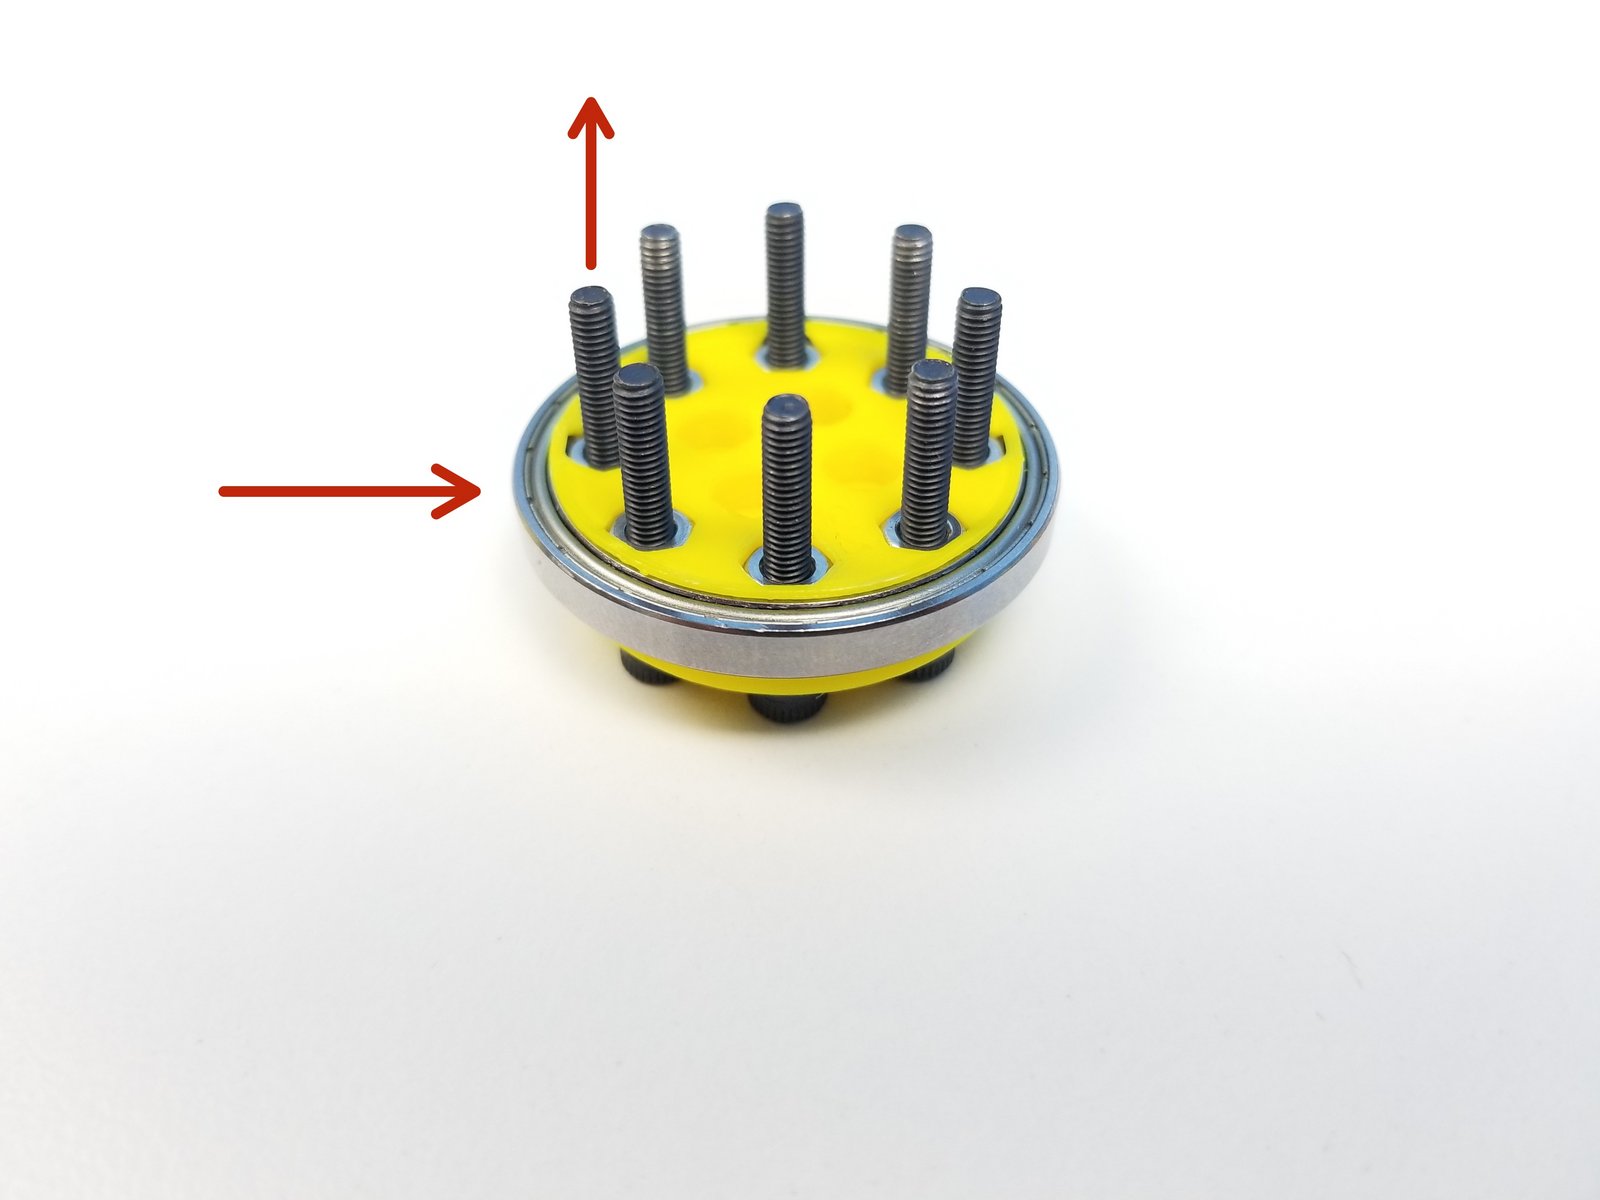
Step 3 Picasso Wrist Gearbox Output
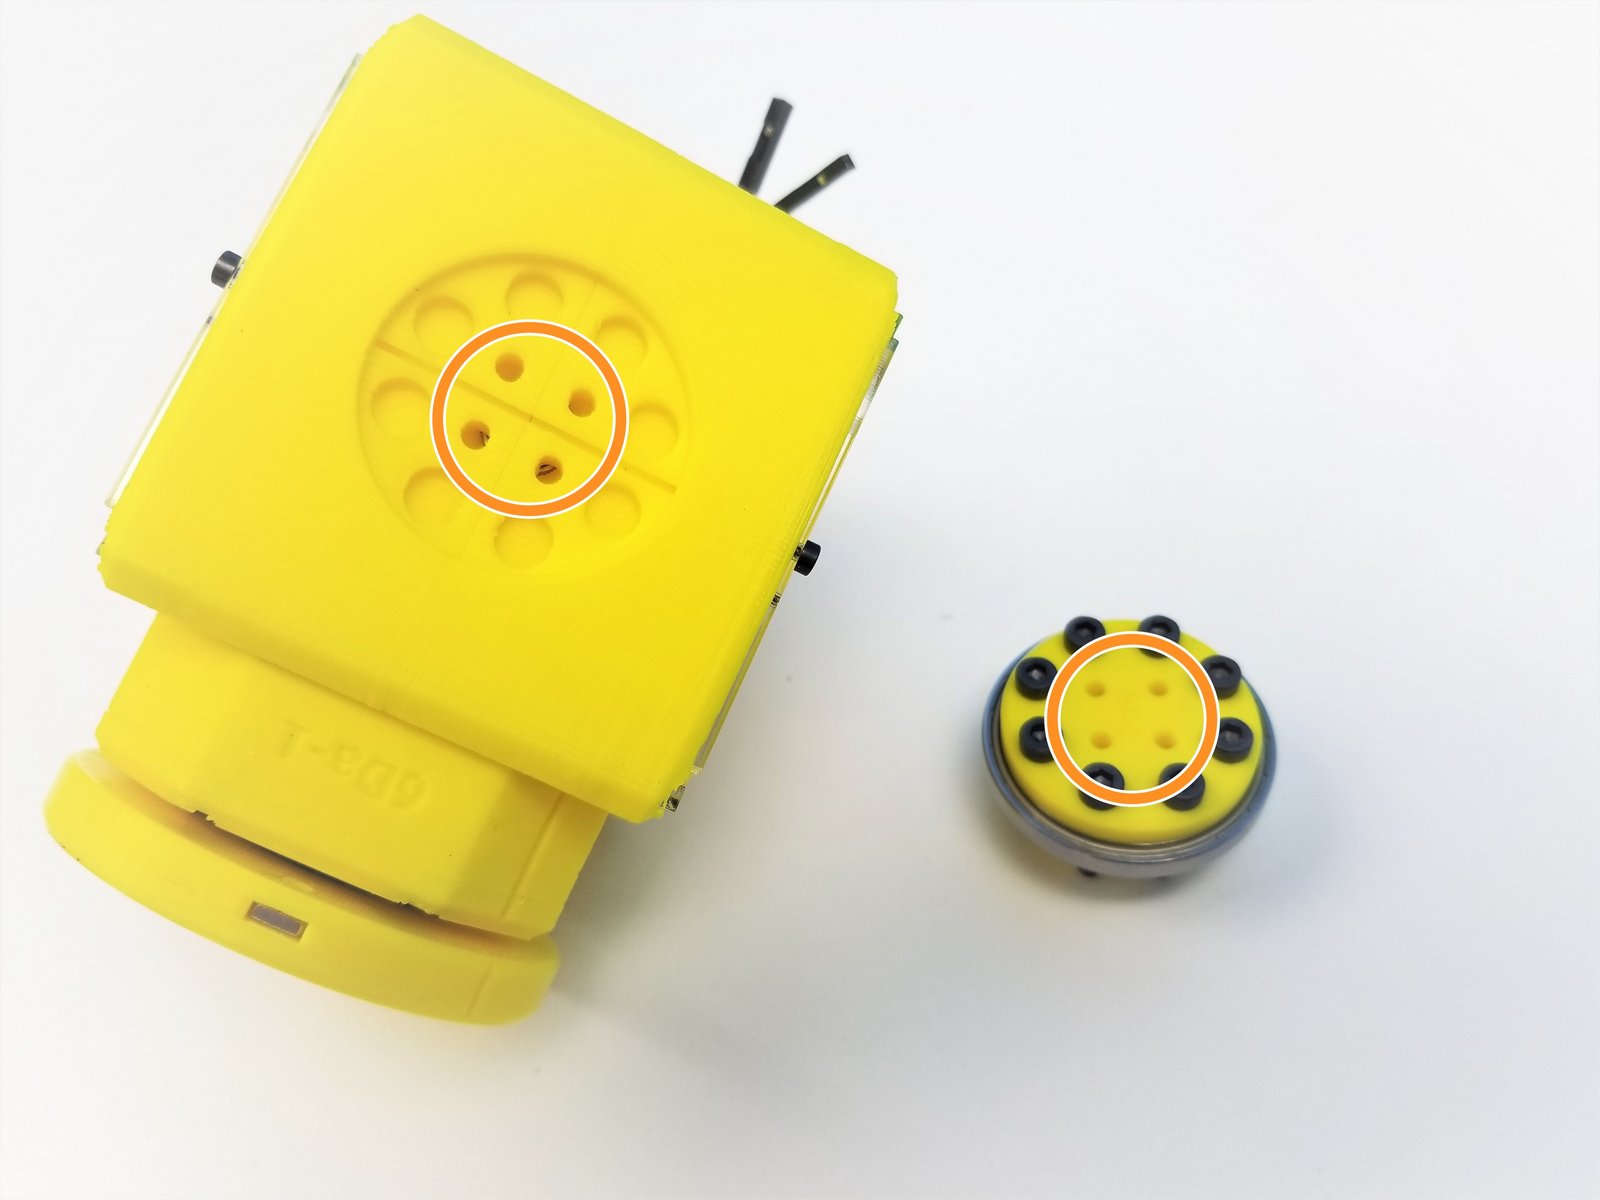
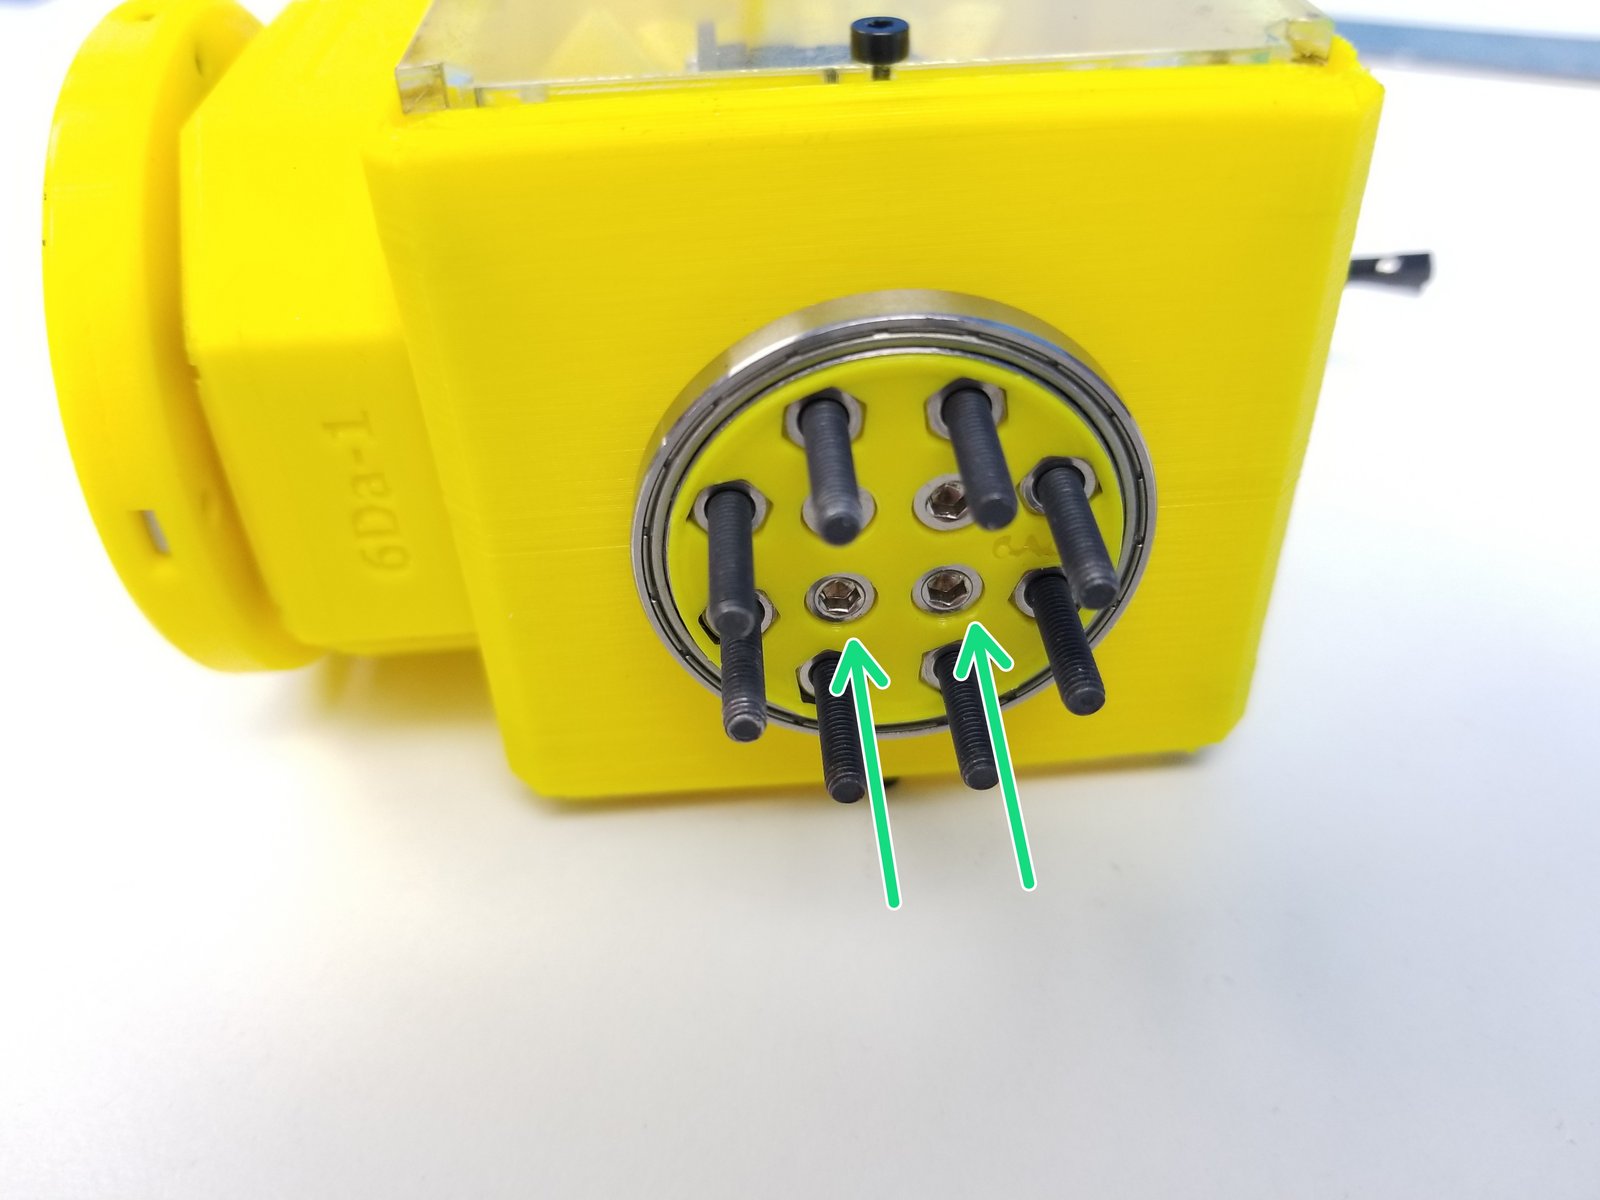
Click the large image to open full size.
Clamp 6706 Bearings with two Output Disk components using M3x20mm screws and Hex Nuts
- Note:
Tighten these nuts as well
Align the 4 Middle Holes of Clamped Output Disk to the side of the Picasso Box
Secure the clamped output disk to the side of the Assembled Picasso Box using M3x10mm Screws
Step 4 Picasso Wrist Gearbox Input - Parts
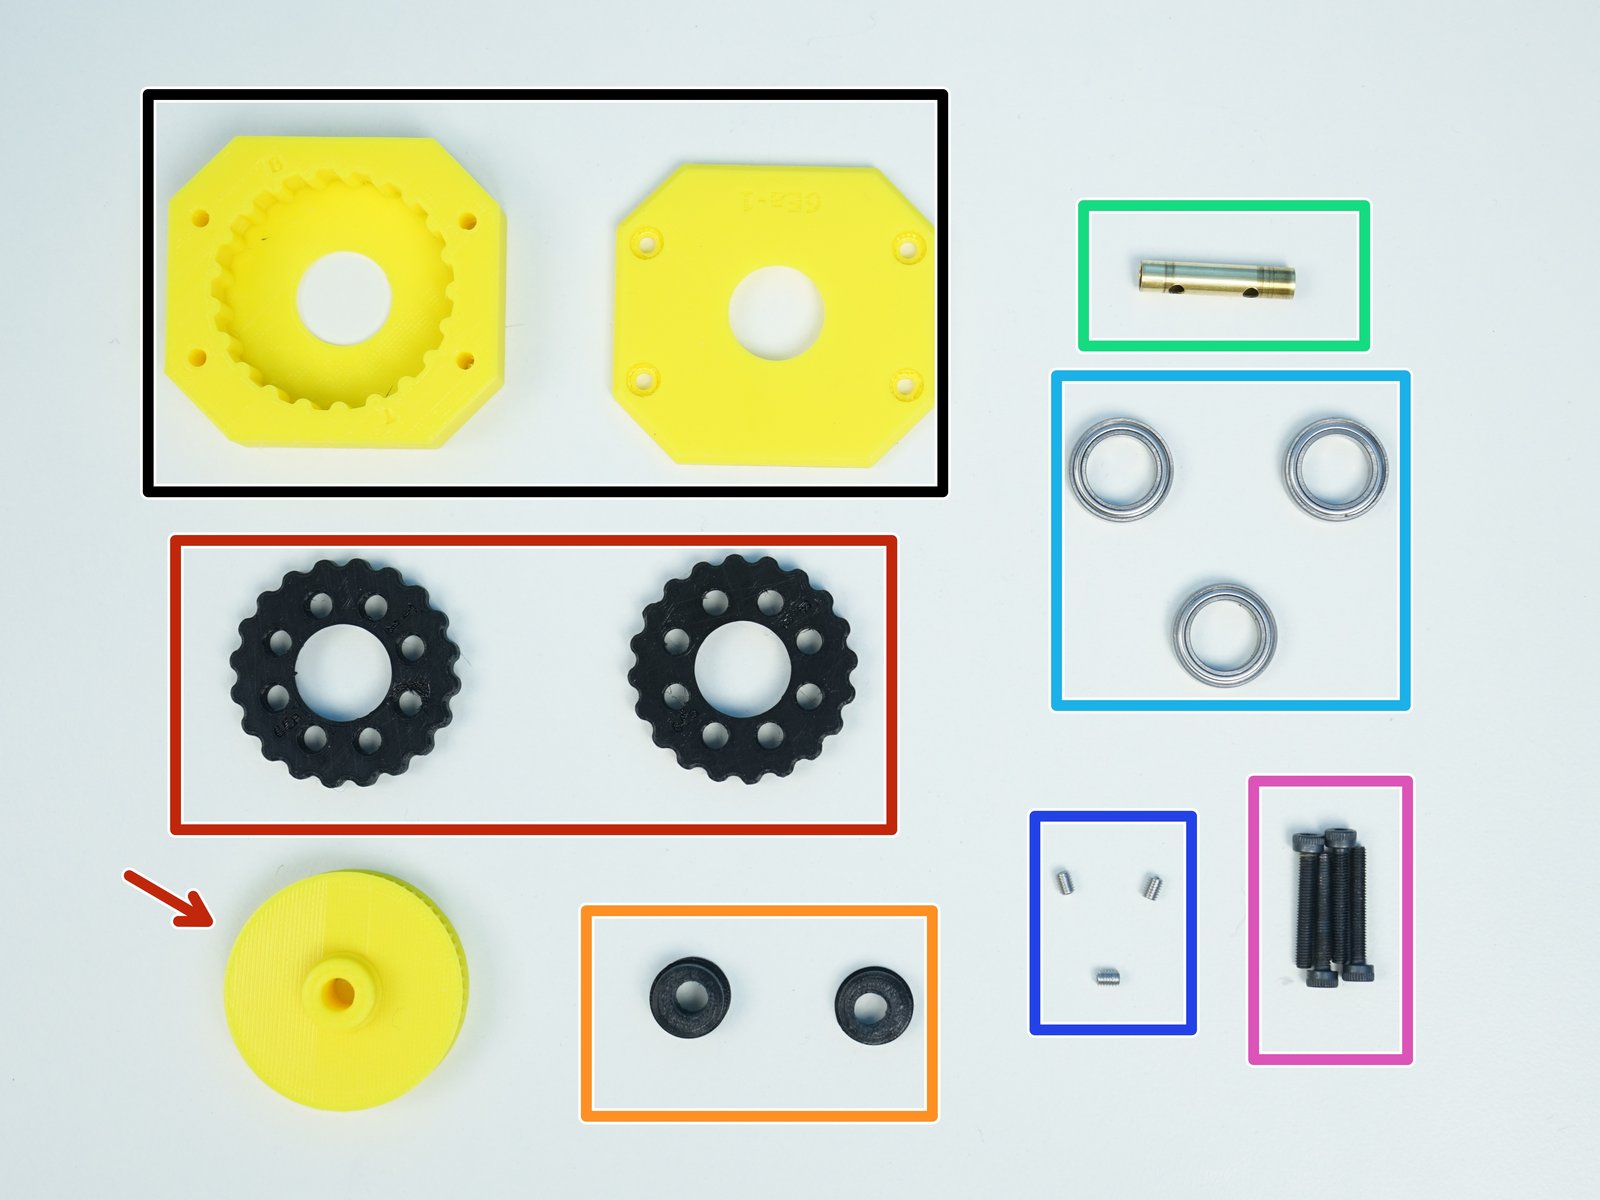
Click the large image to open full size.
- Note:
Prepare the following components:
[3D] - 6Ea Picasso GB Housing
[3D] - 6Ea Picasso GB Rotors & 6PE Pulley Gear
[3D] - 6Ea Picasso GB Eccentric Cams
Brass Tube [7/32' x 25.95mm]
6701 Bearings [12x18x4mm] (x3)
M3x4mm Set Screws (x3)
M3x20mm Screws (x4)
Step 5 Picasso Wrist Gearbox Input - Note
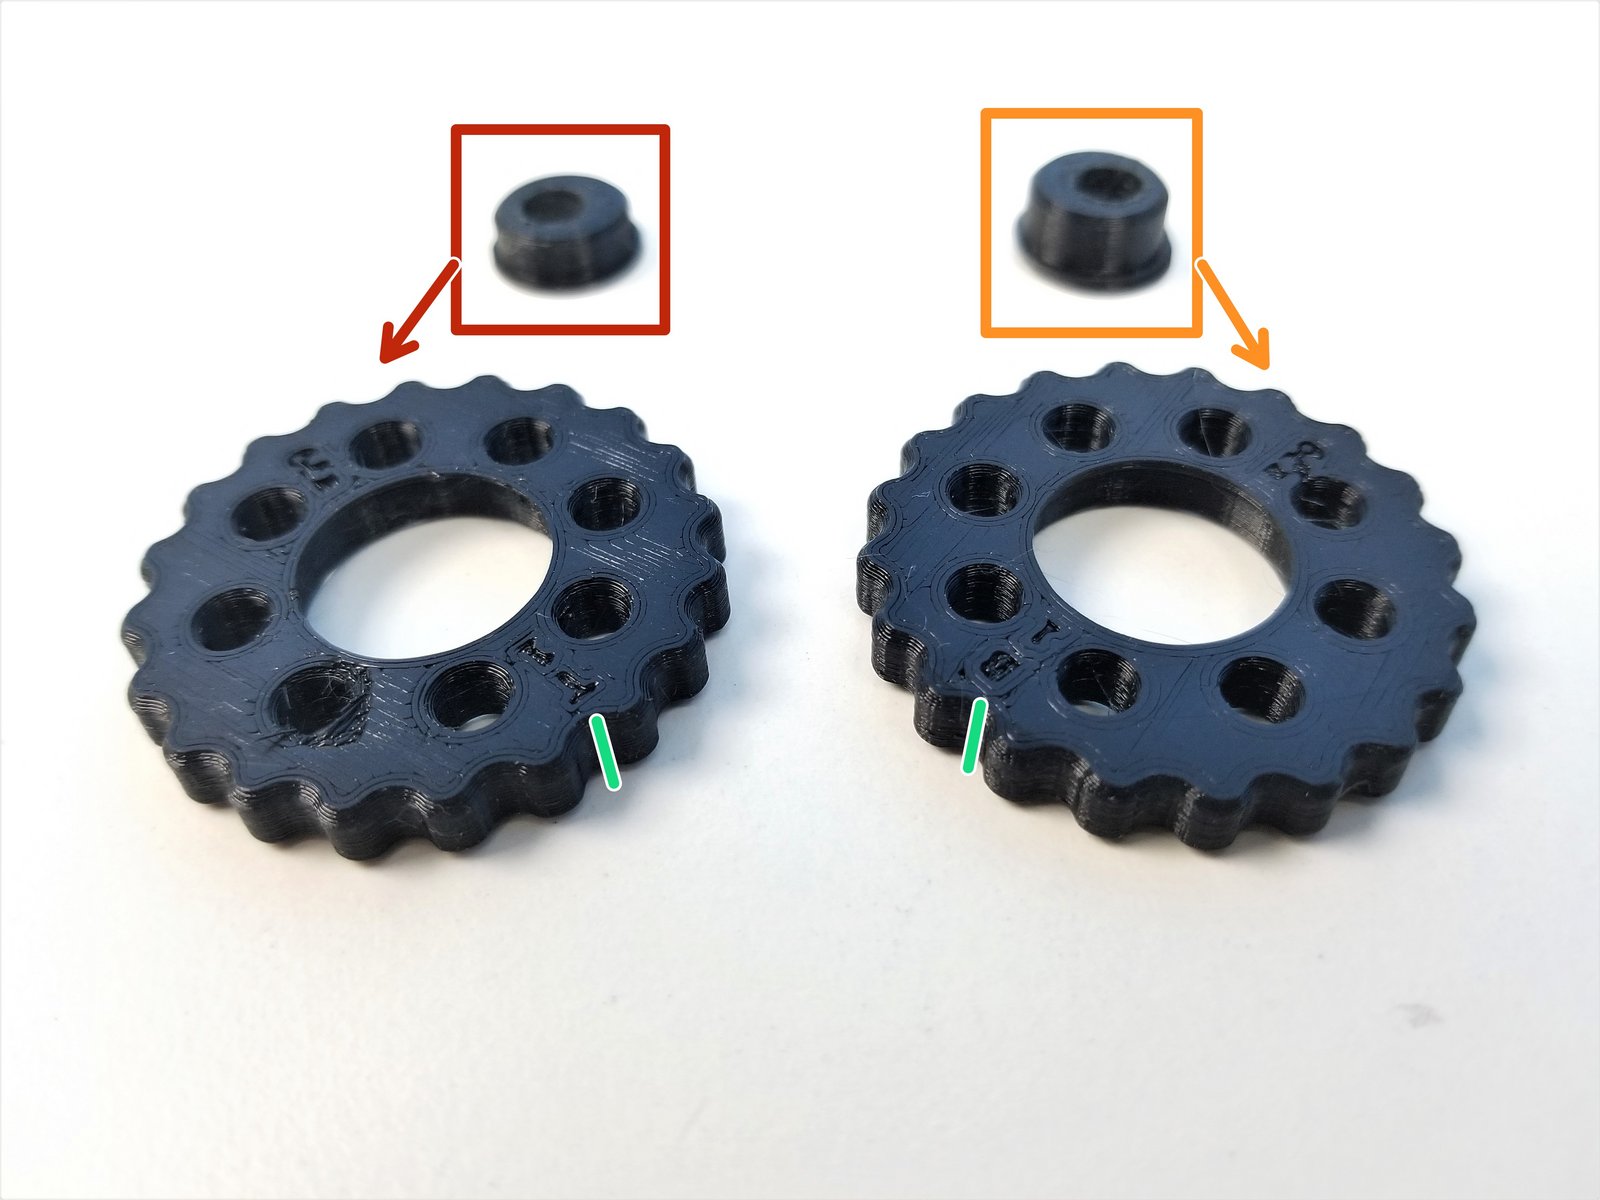
Click the large image to open full size.
- Note:
Eccentric Cams
"Thin/Top" Eccentric Cam
"Thick/Bottom" Eccentric Cam
- Note:
Rotors
Make a sharpie mark on the side of the Rotor where it lines up with the B and T label on each Rotors
- Note:
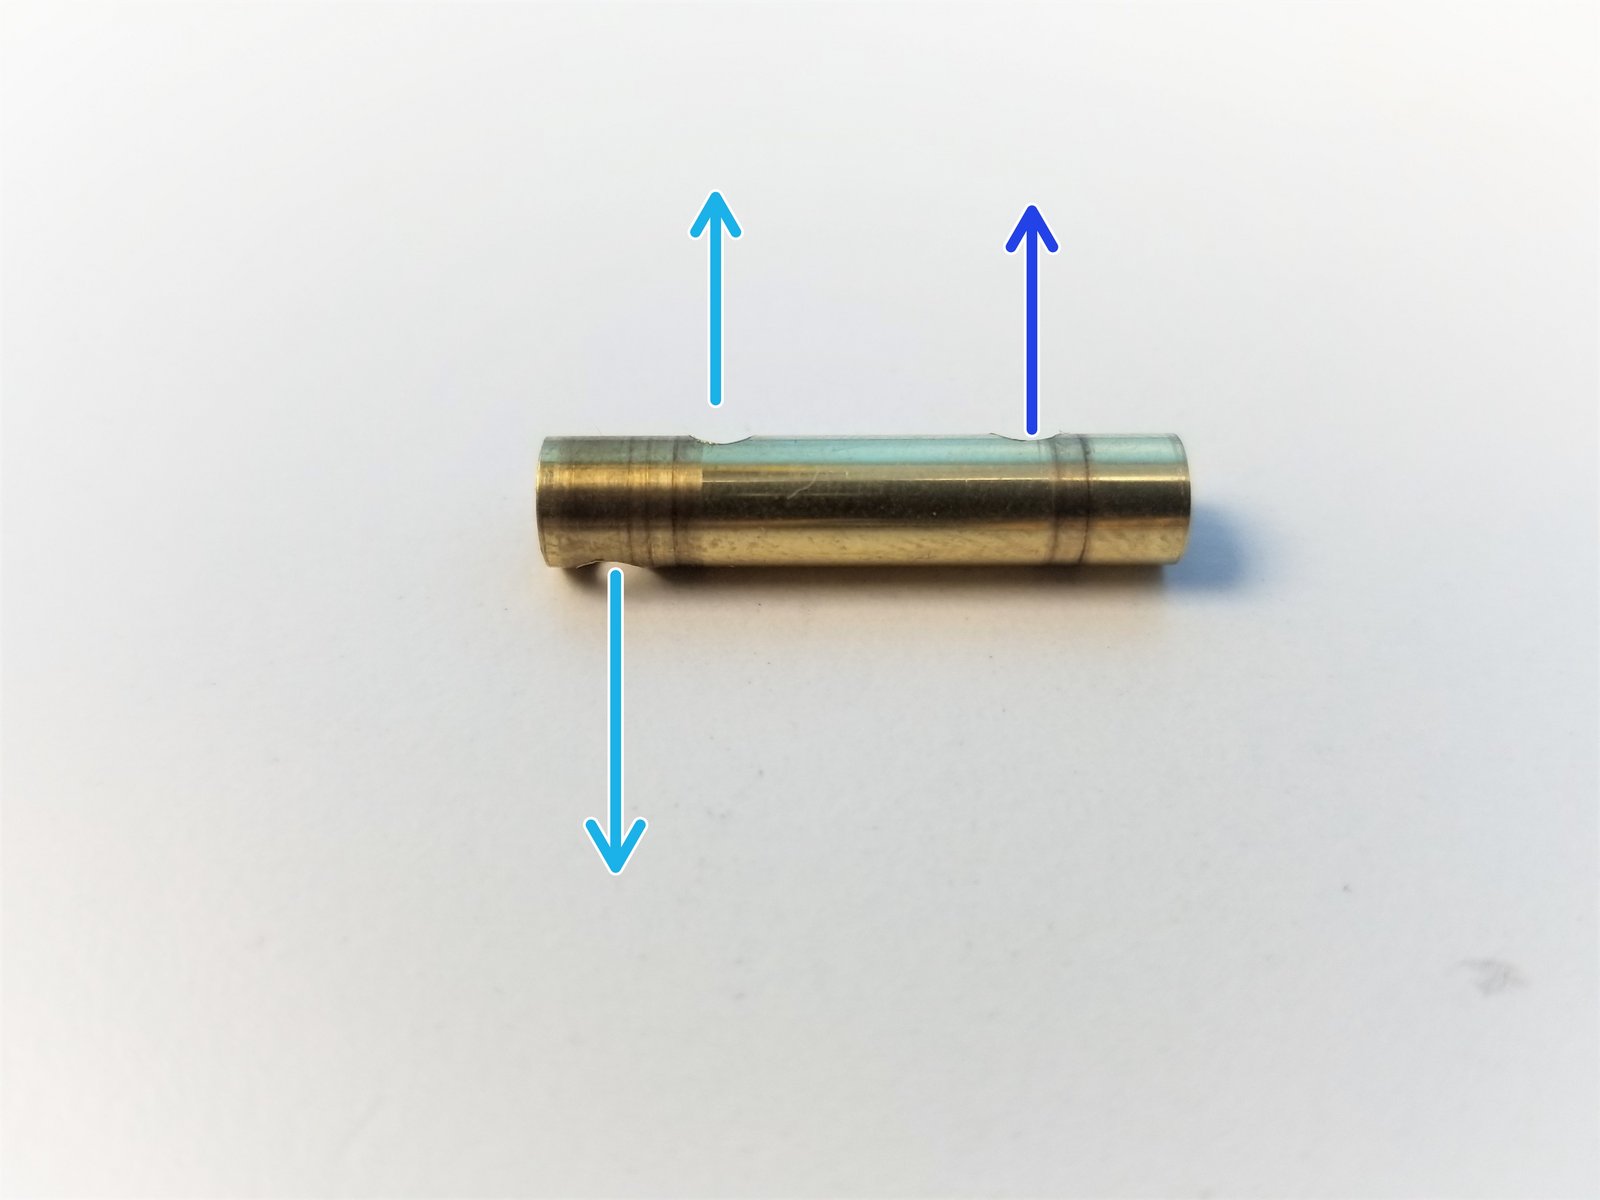
Brass Tube
Tube end with the two drilled holes = Cam End
Tube end with the one drilled hole = Pulley End
Step 6 Picasso Wrist Gearbox Input - 1
Click the large image to open full size.
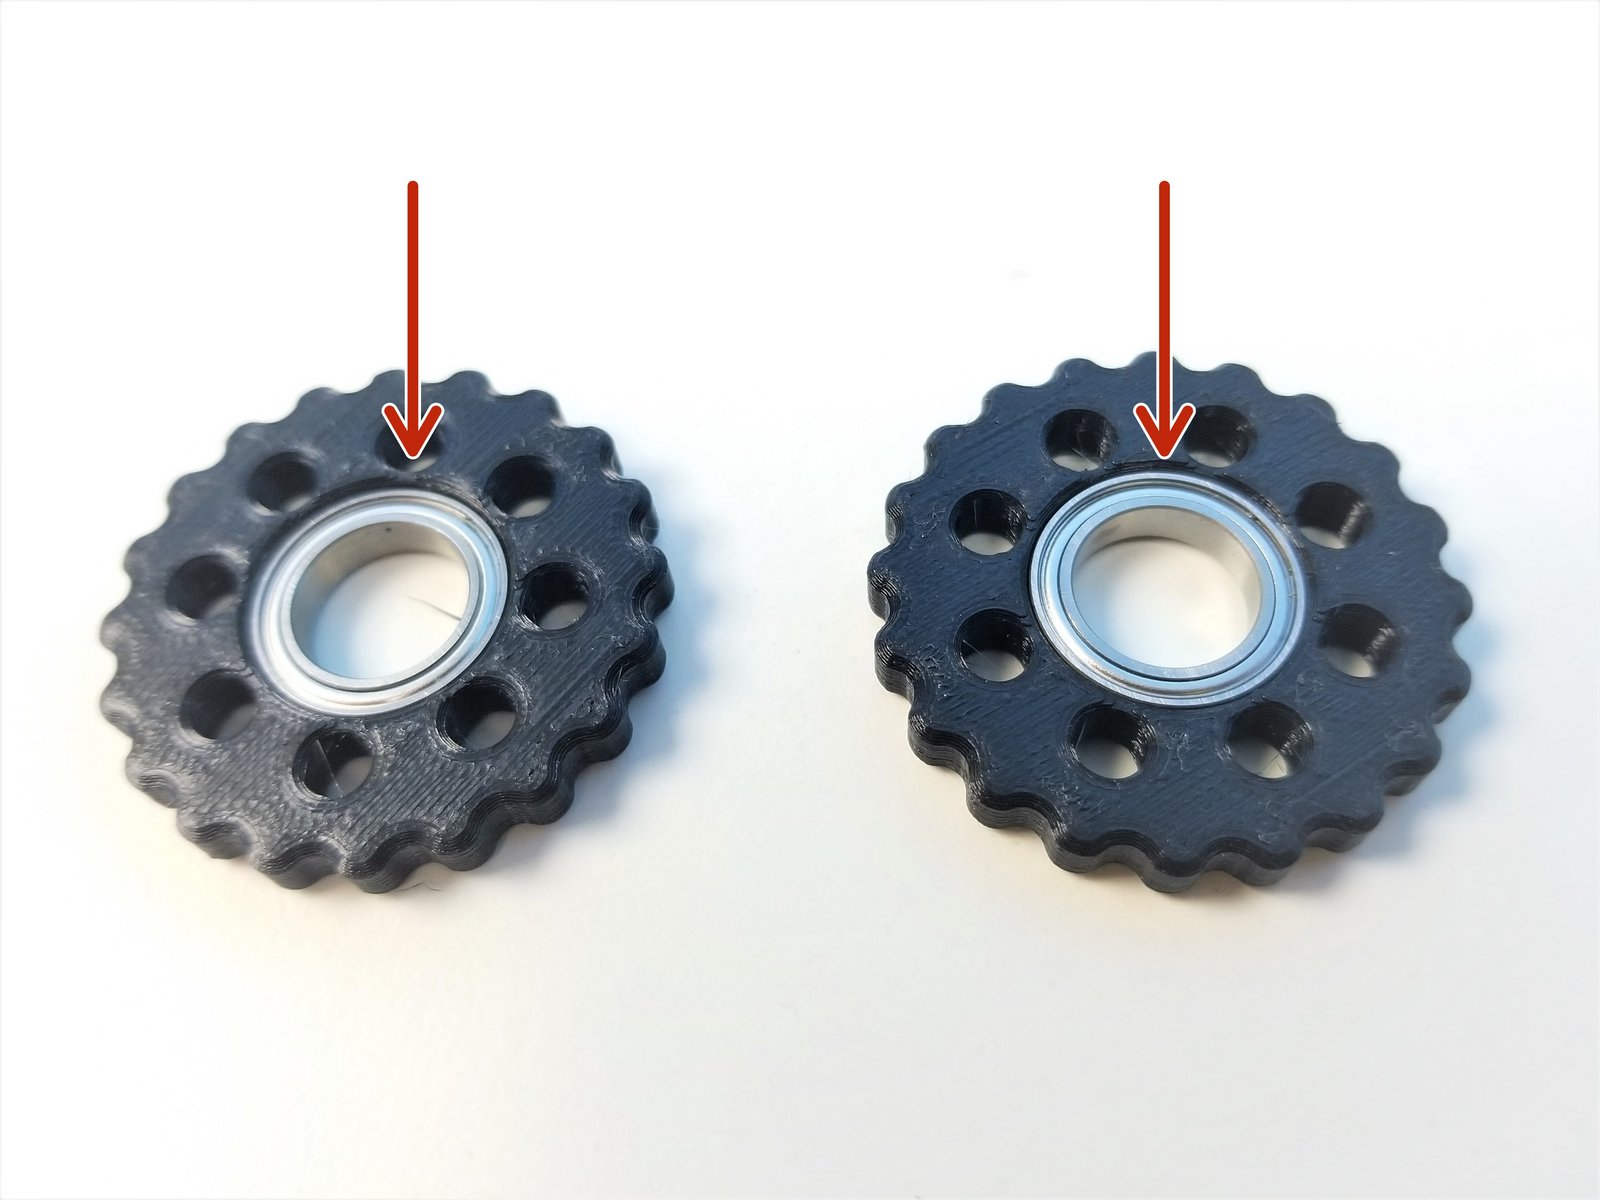
Insert 6701 Bearings to both Top and Bottom Rotors as well as the Top Housing
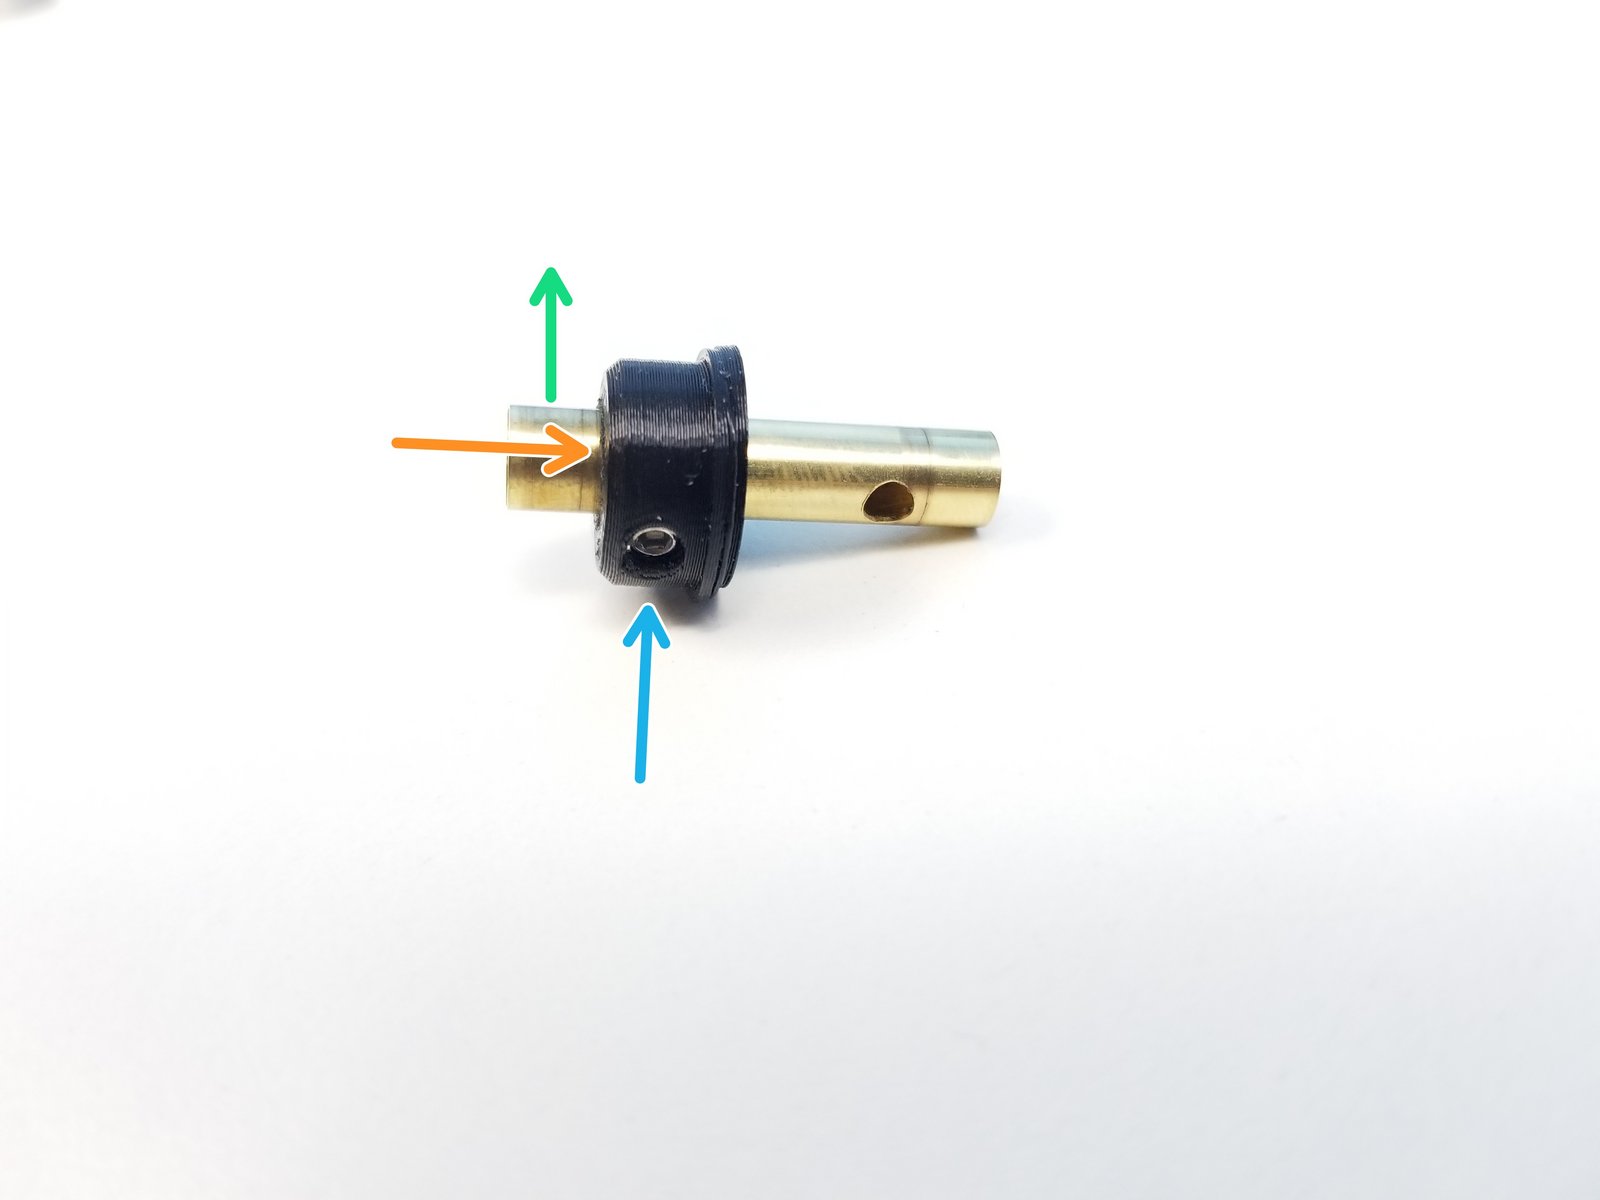
Slide the Bottom Eccentric Cam to the 2nd hole from the edge in the Cam End of the Brass Tube
First hole is on the other side of the Tube
Align the set screw holes and screw its place using the M3x4mm Set Screw
Step 7 Picasso Wrist Gearbox Input - 2
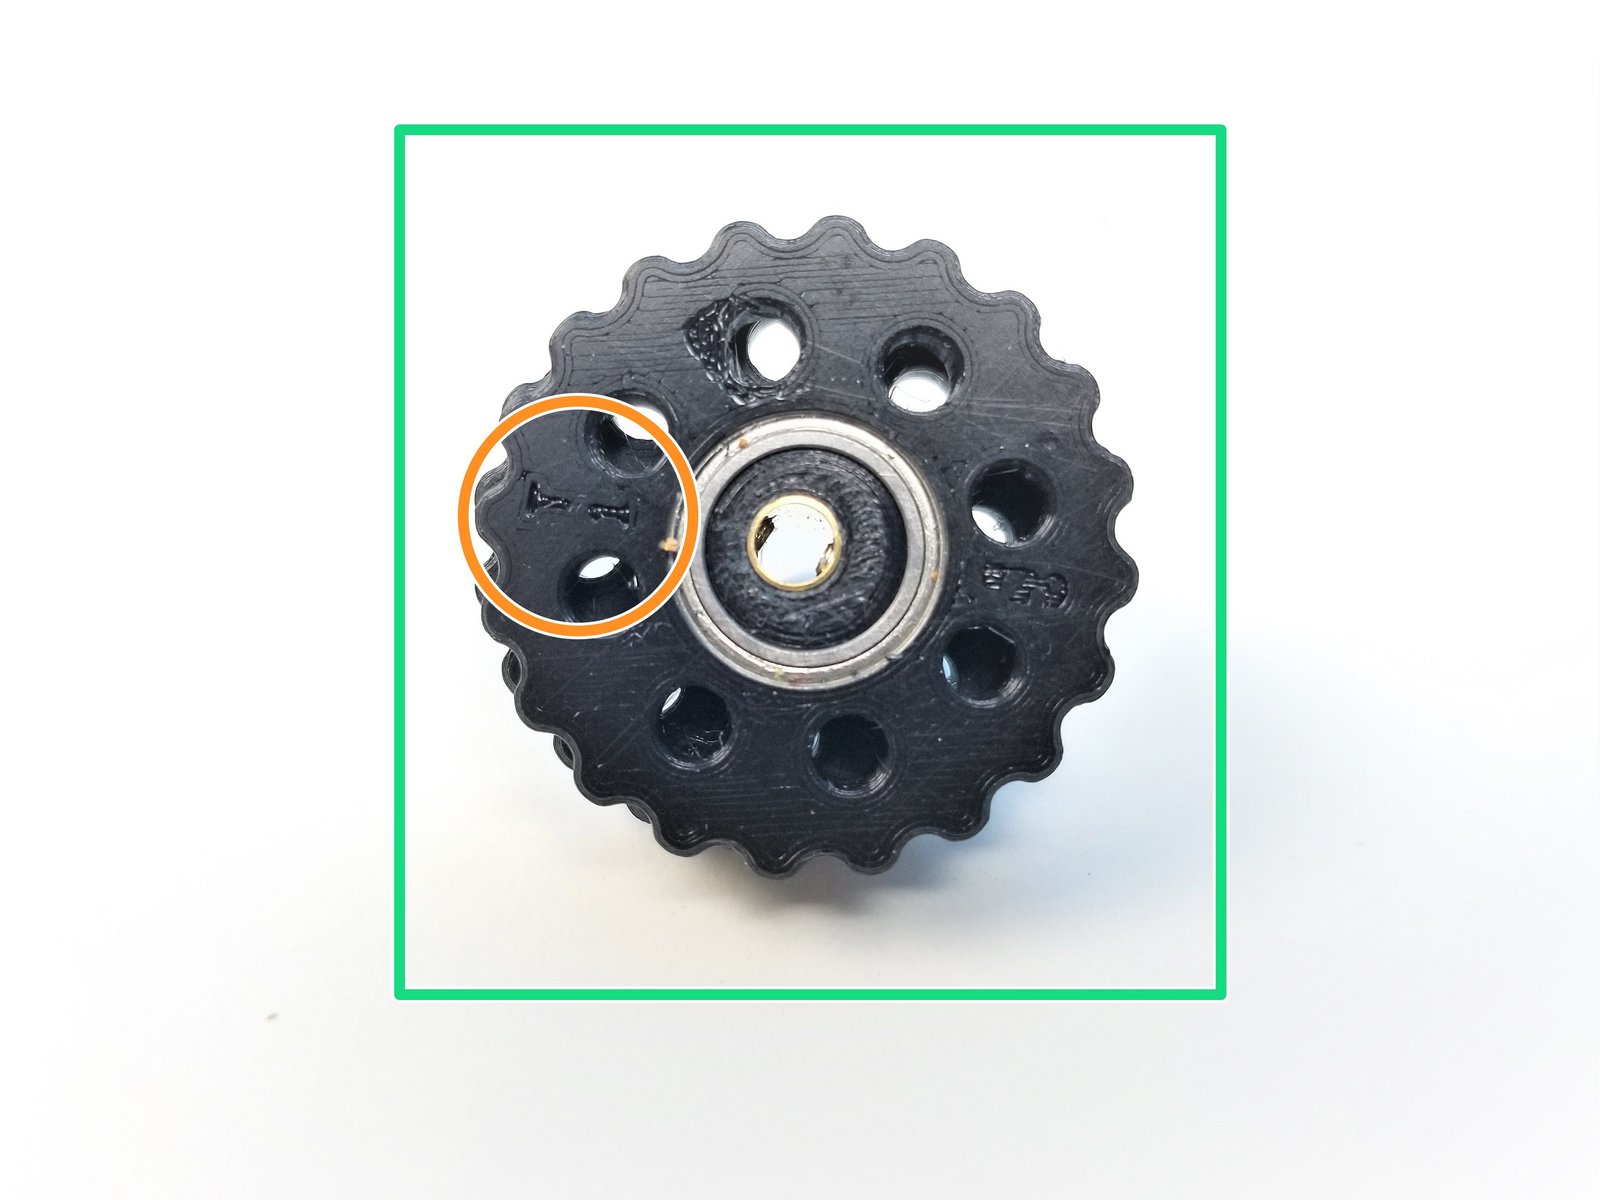
Click the large image to open full size.
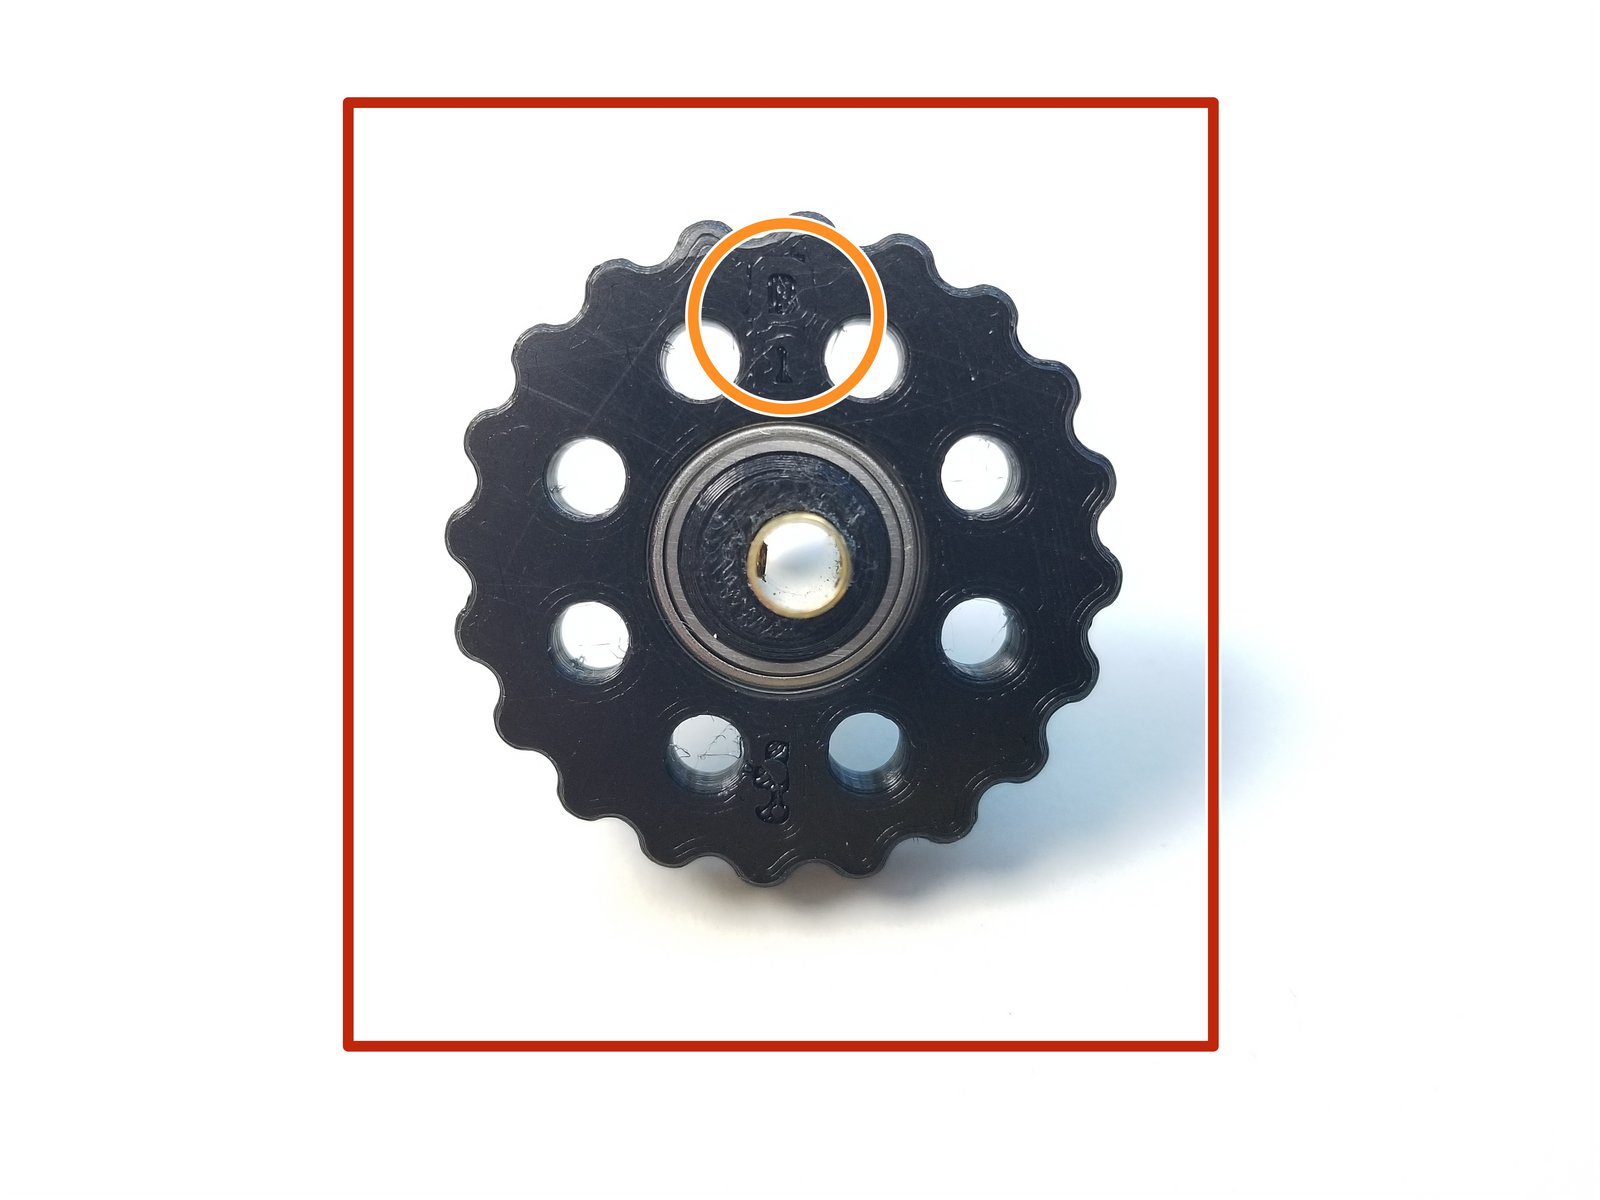
Slide the Bottom Rotor to the Bottom Eccentric Cam
Label Side of the Rotor is facing the Cam End
Repeat the process with the Top Eccentric Cam and Rotor
Label Side of the Rotor is facing the Cam End
Step 8 Picasso Wrist Gearbox Rotor Alignment
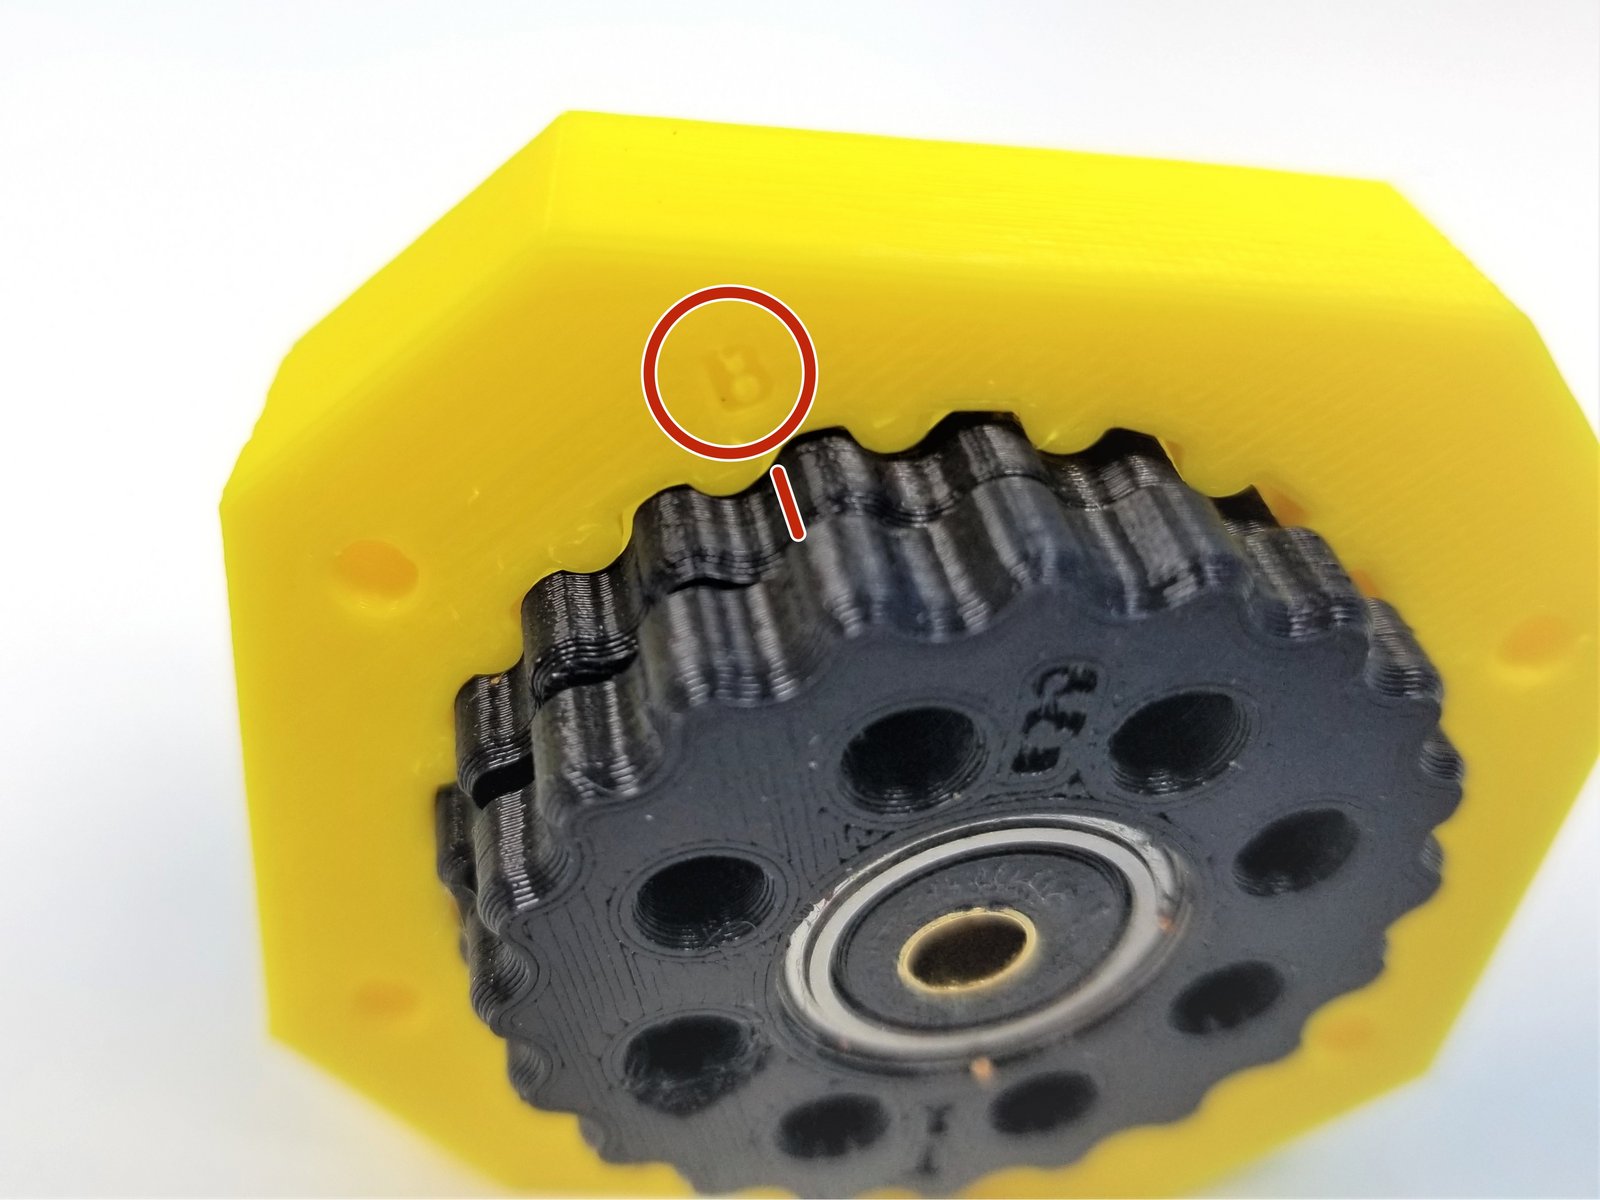
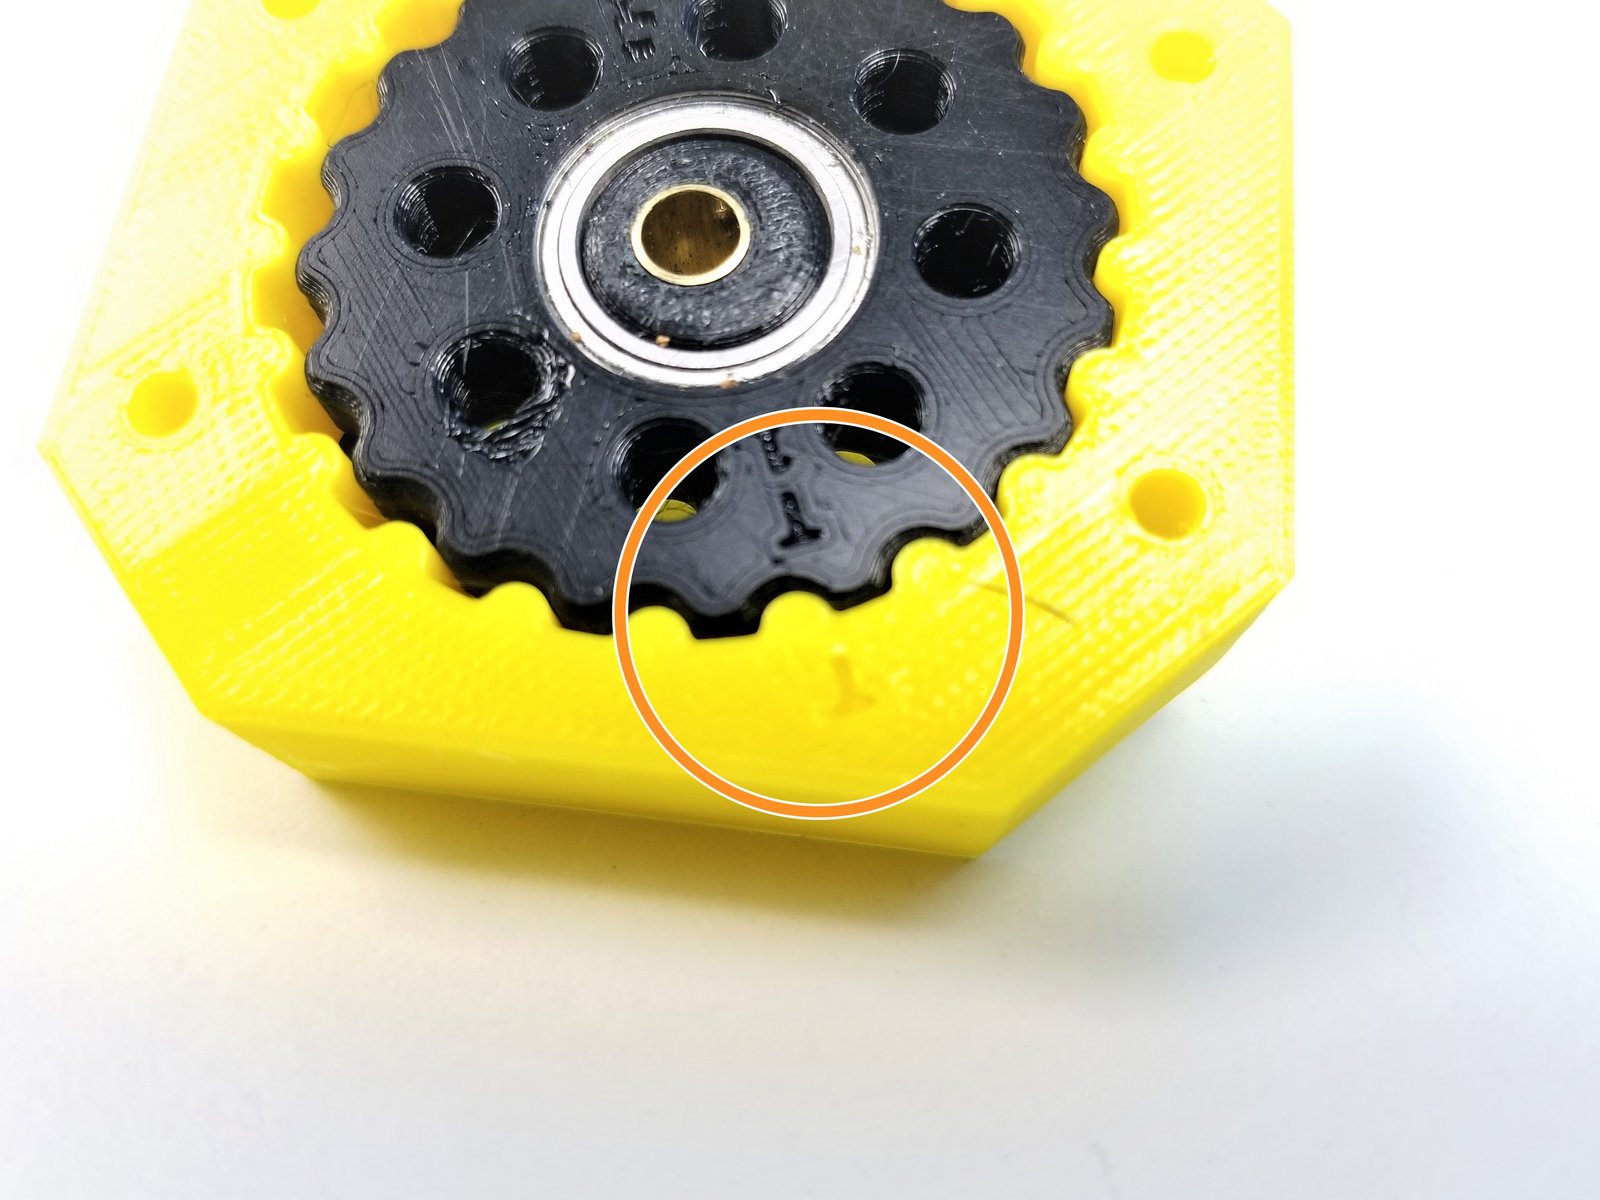
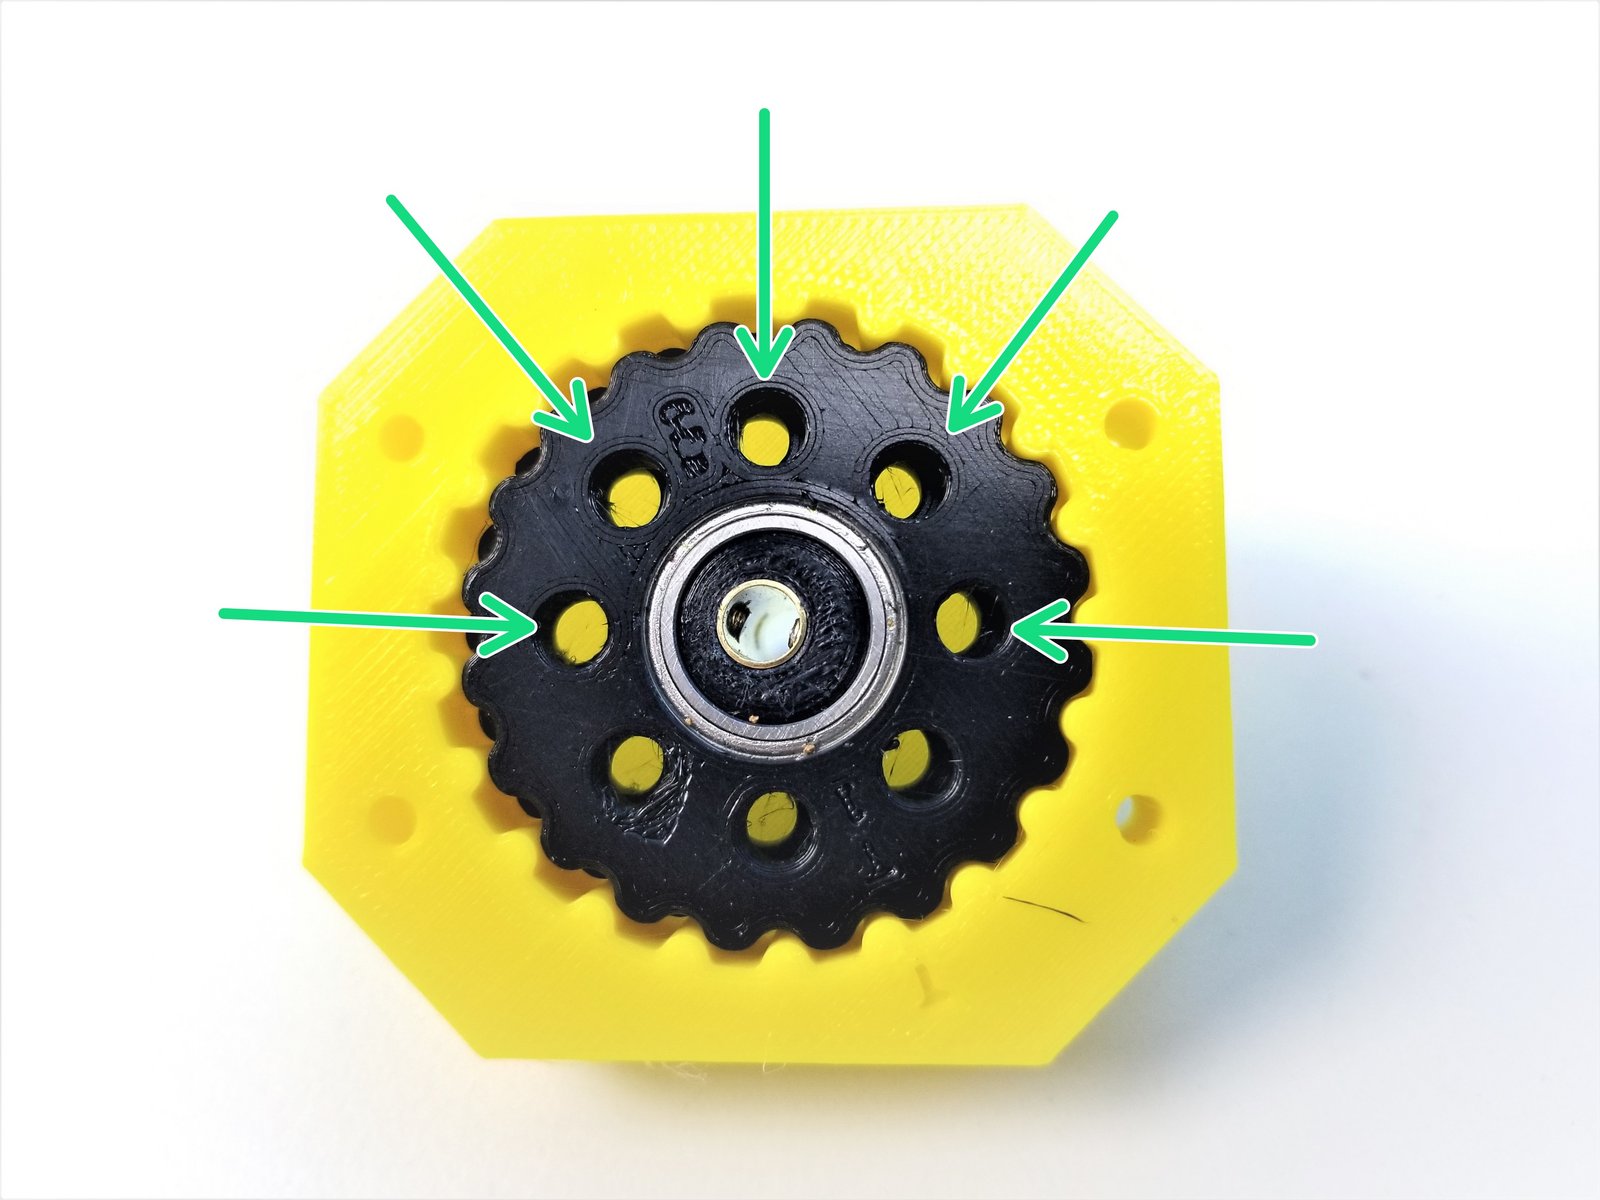
Click the large image to open full size.
Align the Side Sharpie mark on the Bottom Rotor to the "B" label on the Housing and slide only the Bottom Rotor into the Housing
Align the Side Sharpie mark on the Top Rotor to the "T" labelled on the Housing and slide the rest of the Rotor in.
If everything went smoothly, the gap between 8 holes on each rotor should be equally spaced
- Note:
Verify that you can manually turn the eccentric shaft in the center and that the rotors smoothly turn inside the housing. Tight printing and misaligned rotors can cause the gearbox to jam.
Step 9 Picasso Wrist Gearbox Input Pulley
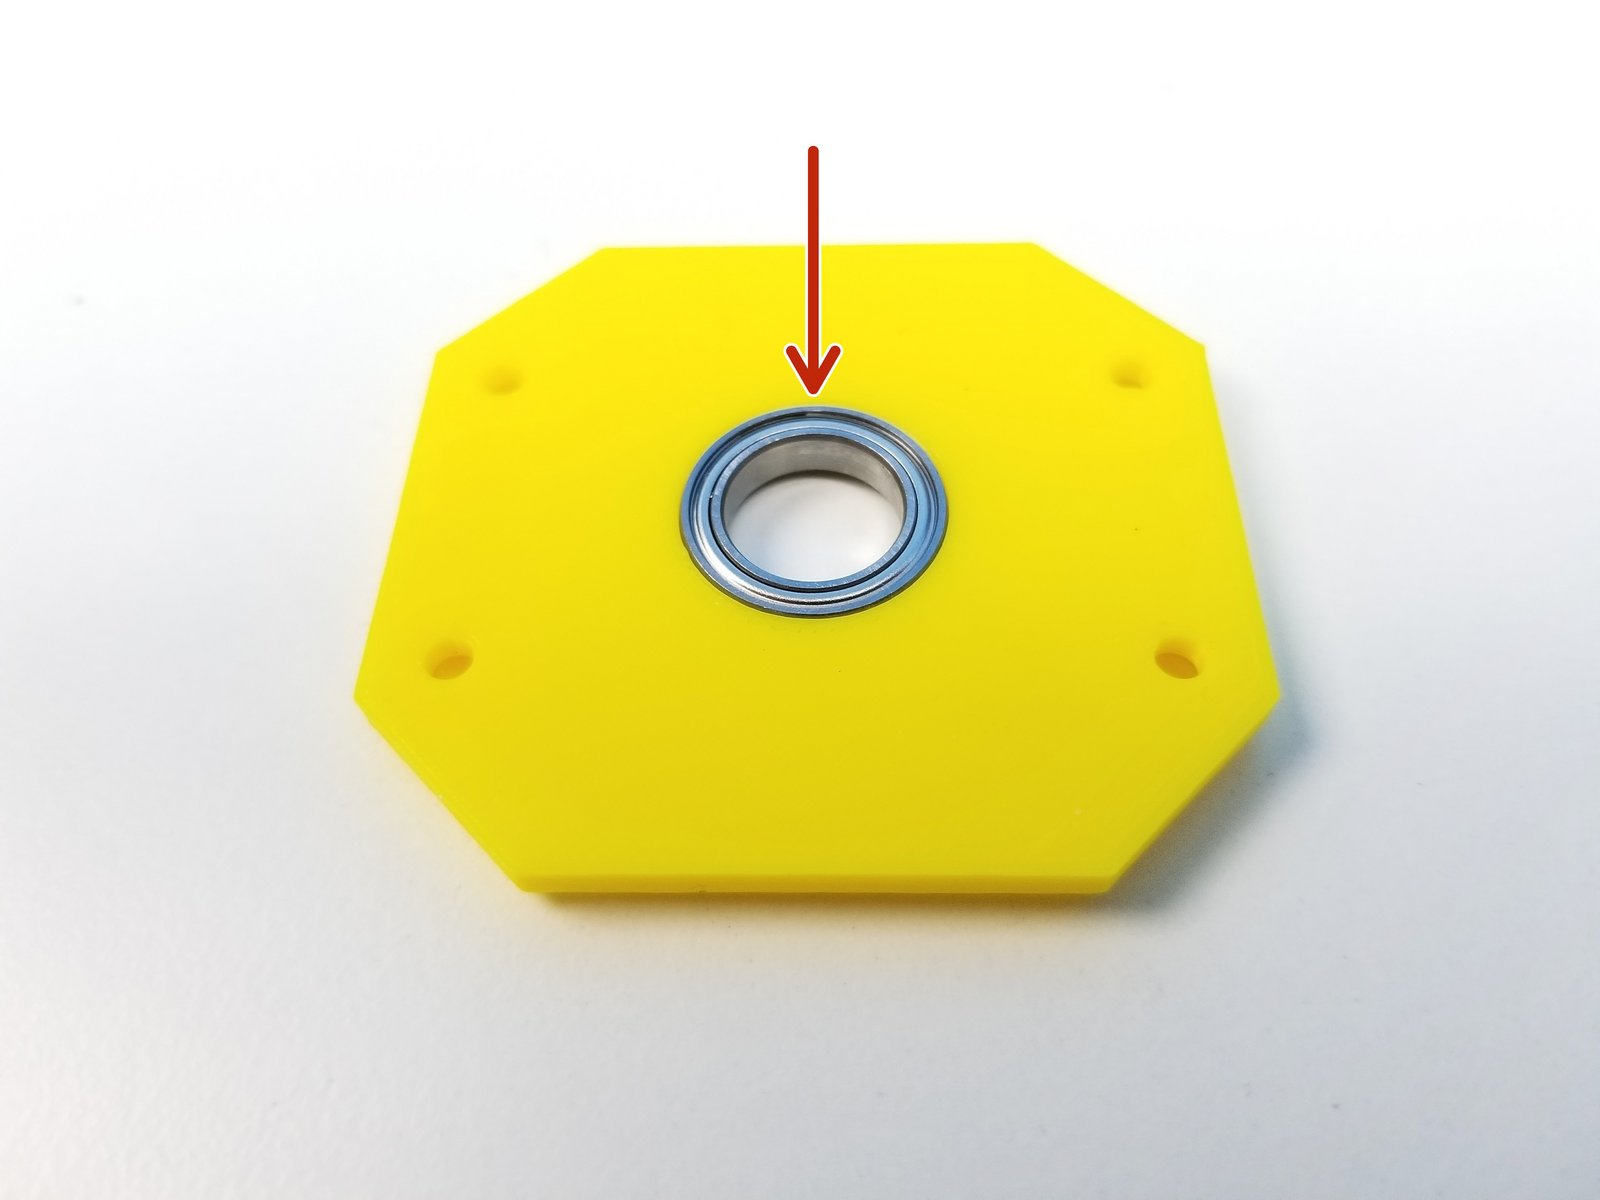
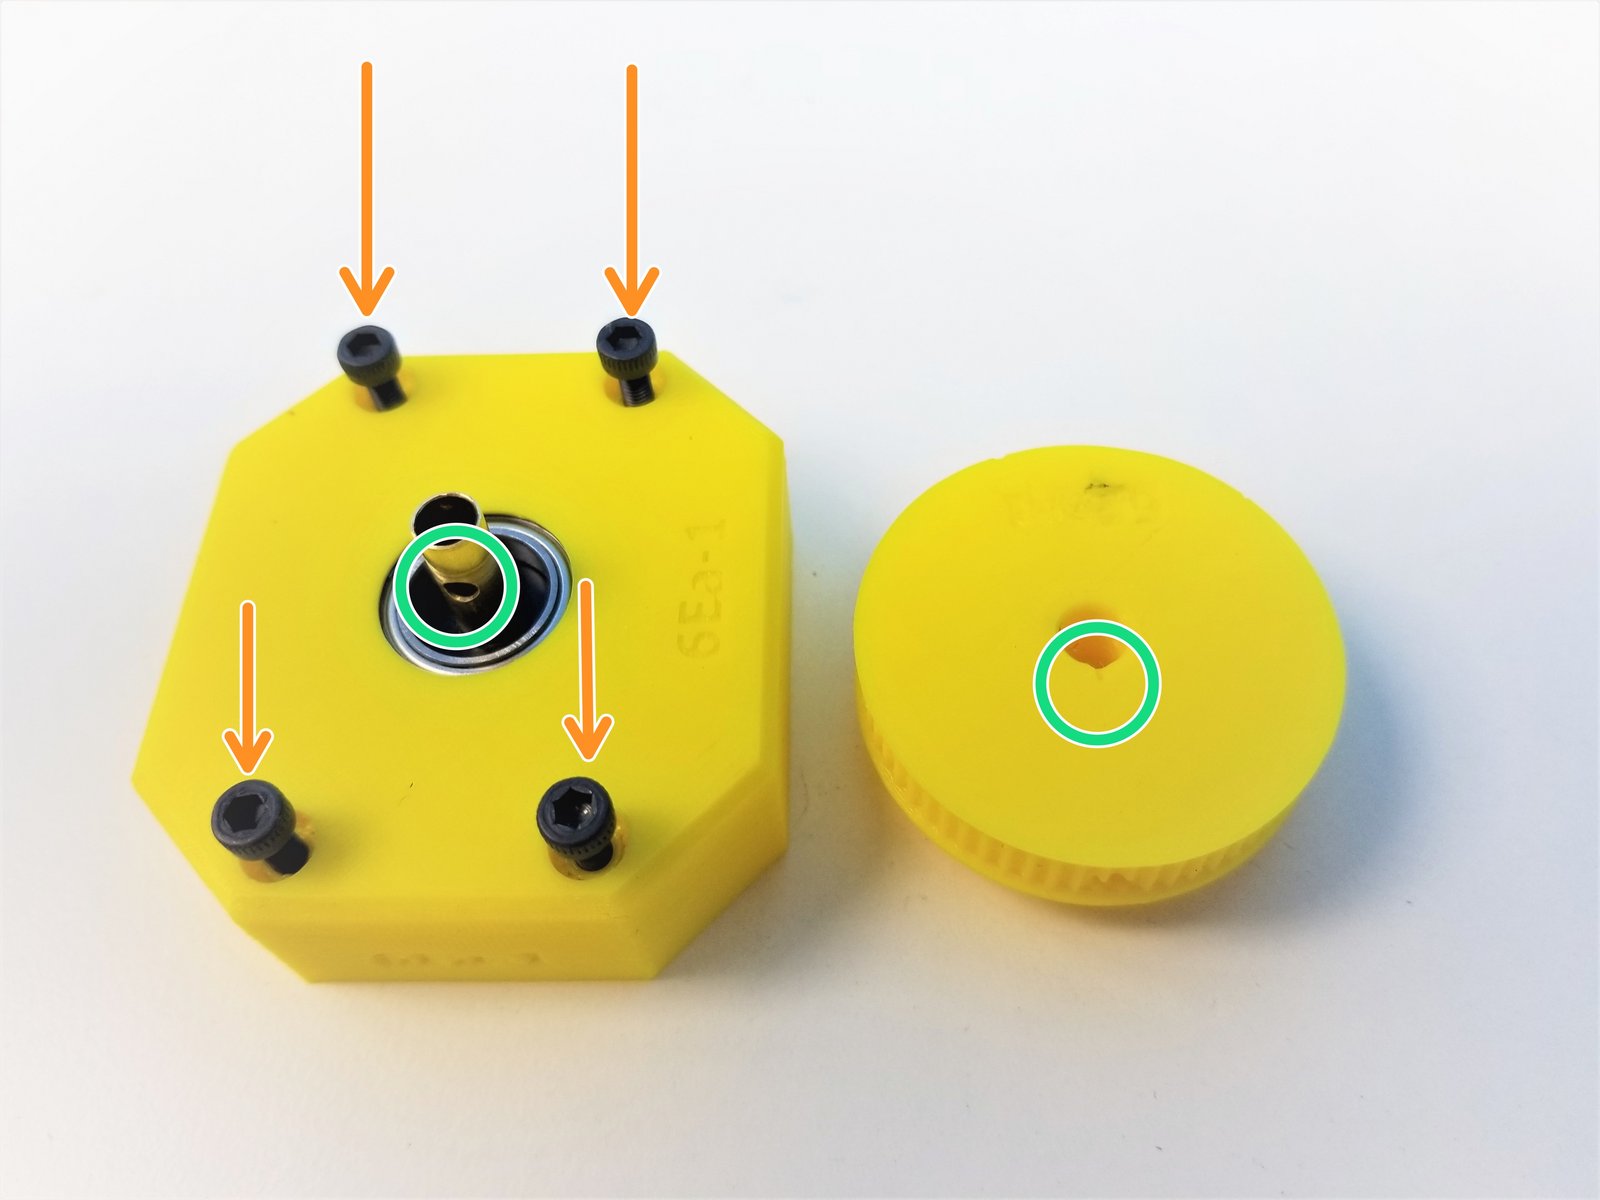
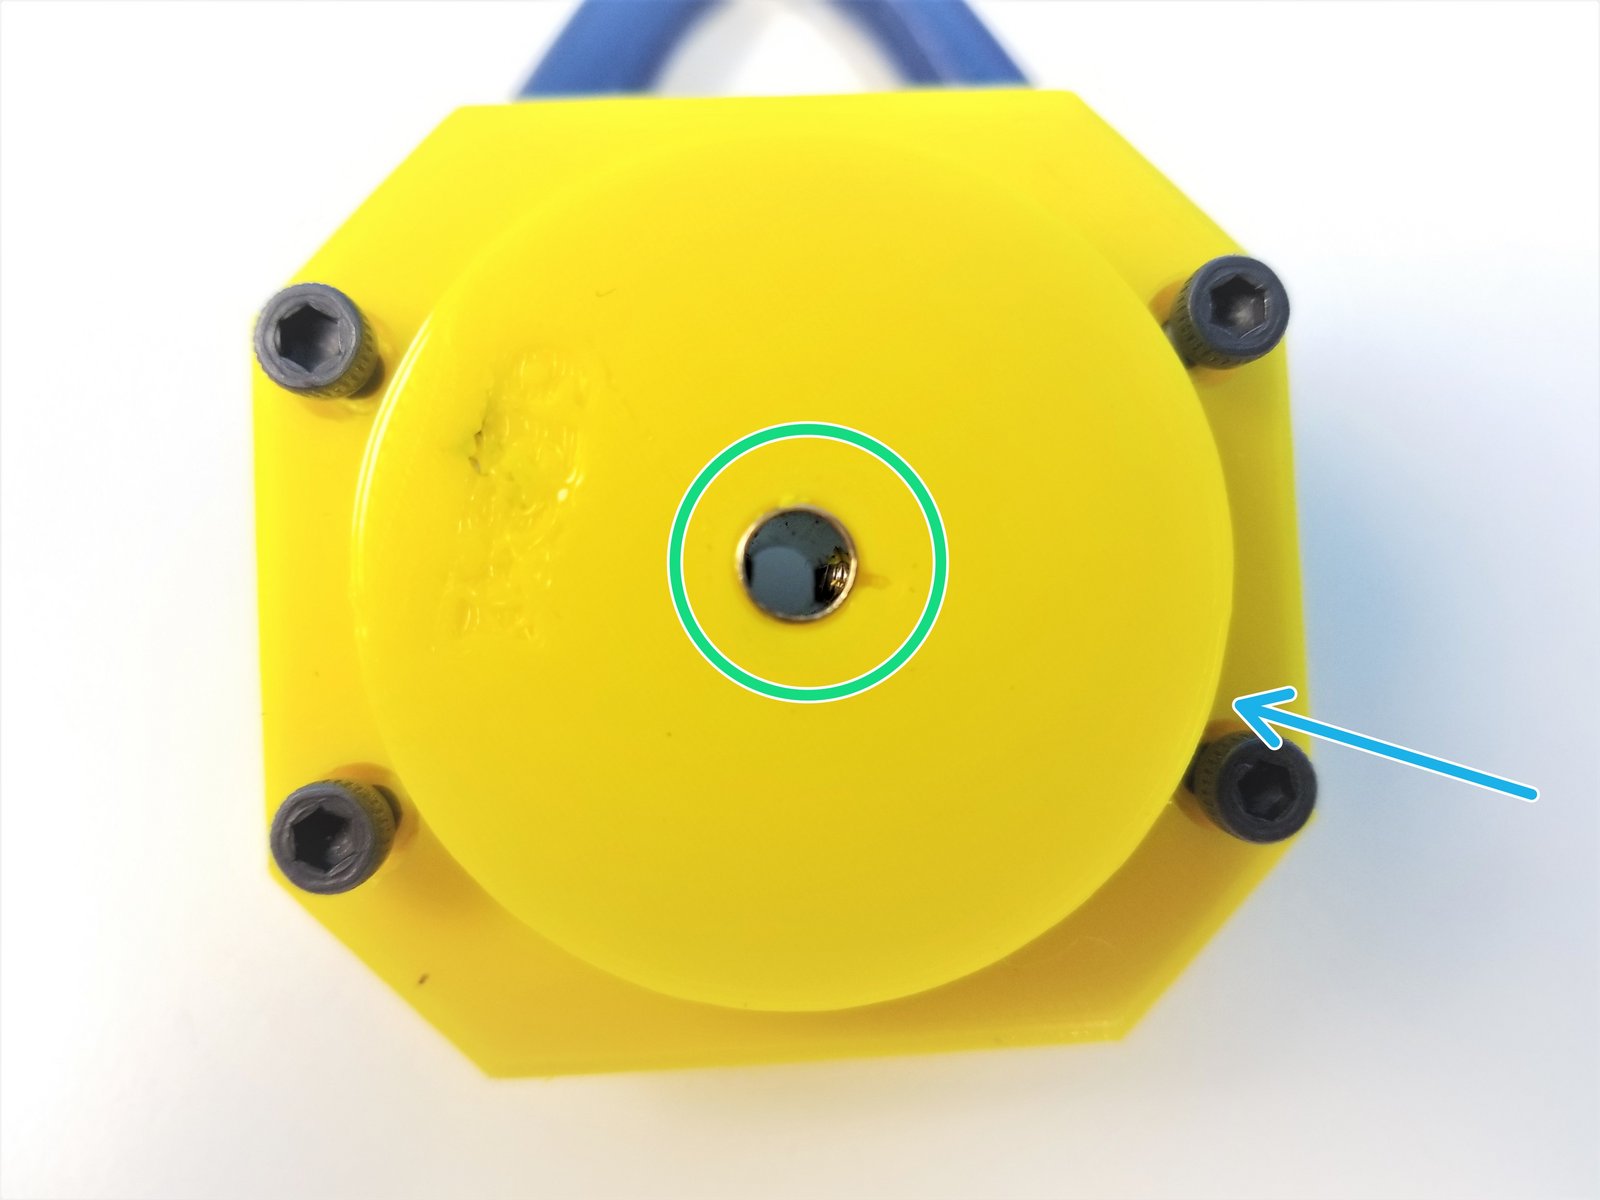
Click the large image to open full size.
Insert 6701 Bearing on the Top Housing
Secure the Top Housing to the Rotor Housing using the M3x20mm Screws
- Warning:
DON't screw all the way in. Just to the flushed to the bottom of the Main Housing
Align the Pulley Gear to the Set Screw and slide in the Pulley gear to the Brass Tube
Secure it using M3x4mm Set Screw
Step 10 Fork Idler - Parts
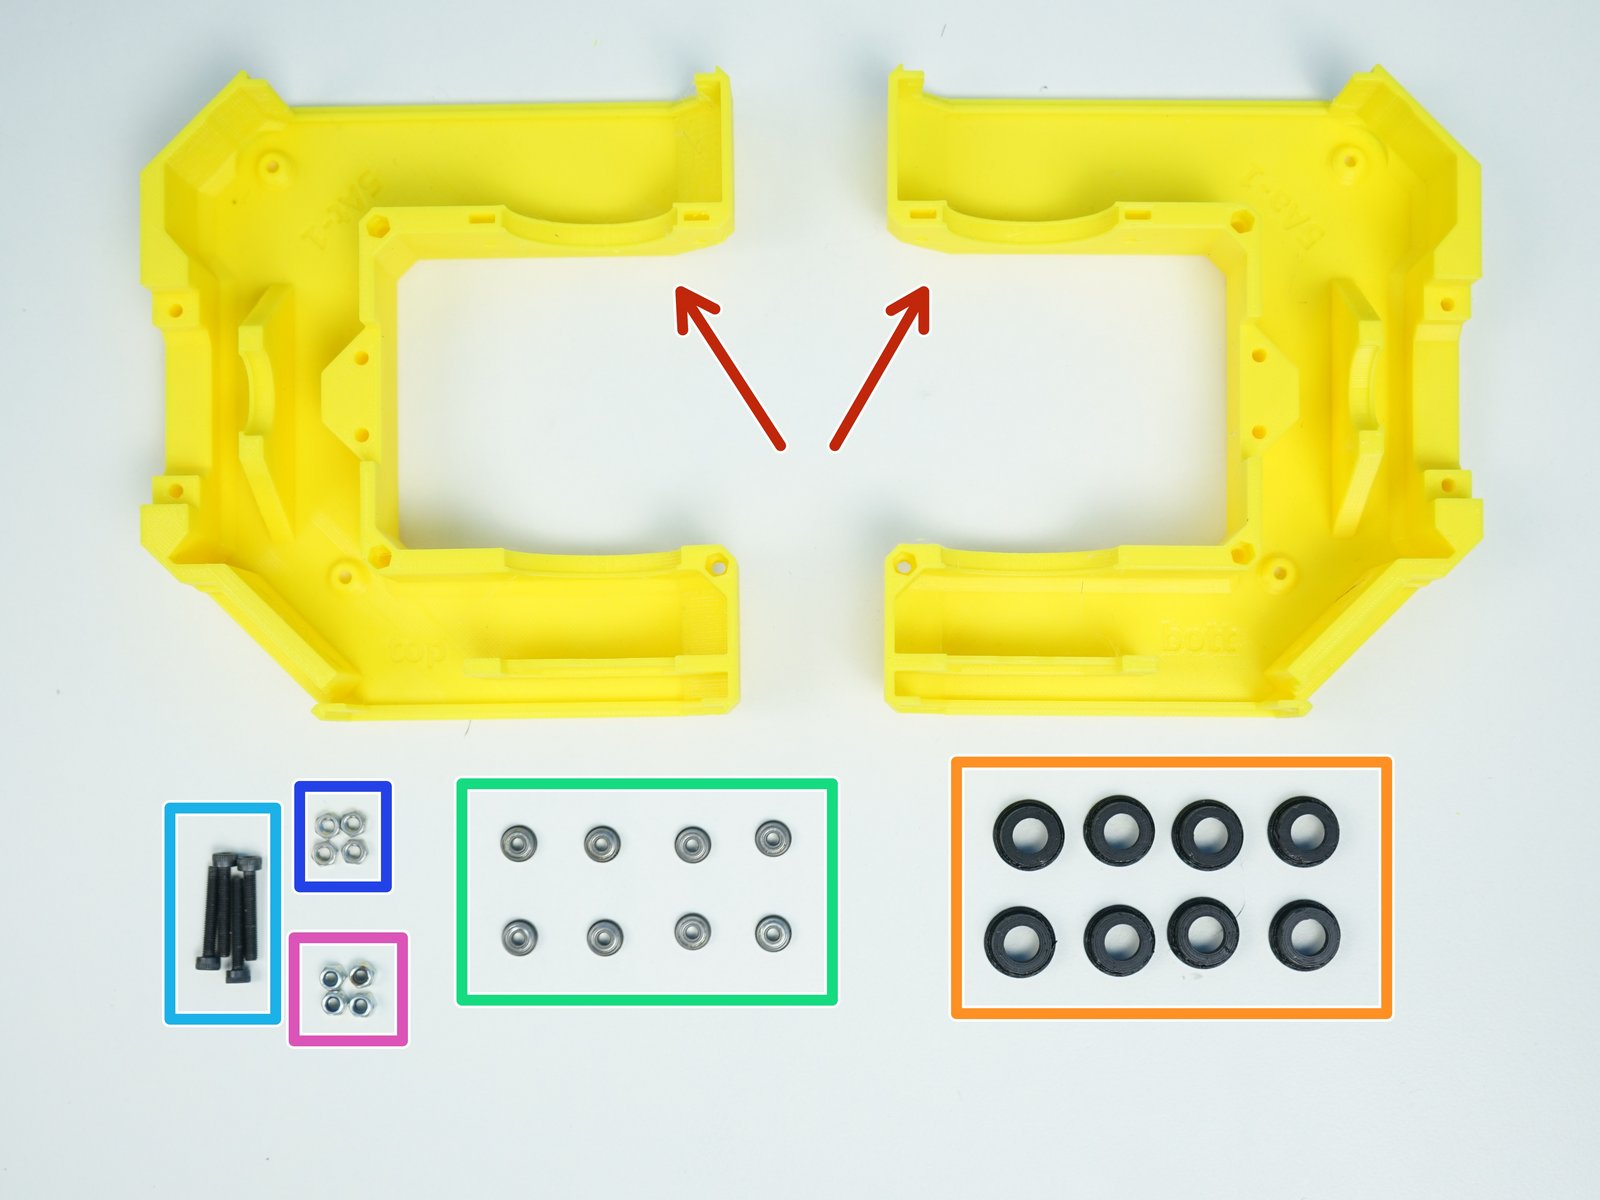
Click the large image to open full size.
- Note:
Prepare the following components:
[3D] - 5Aa Fork {Bottom & Top}
[3D] - 5I Idler Bearing Cover (x8)
MF83 Flanged Bearings [3x8x4mm] (x8)
M3x20mm Screws (x4)
M3 Hex Nuts (x4)
M3 Nylock Nuts (x4)
Step 11 Fork Idler - 1
Click the large image to open full size.
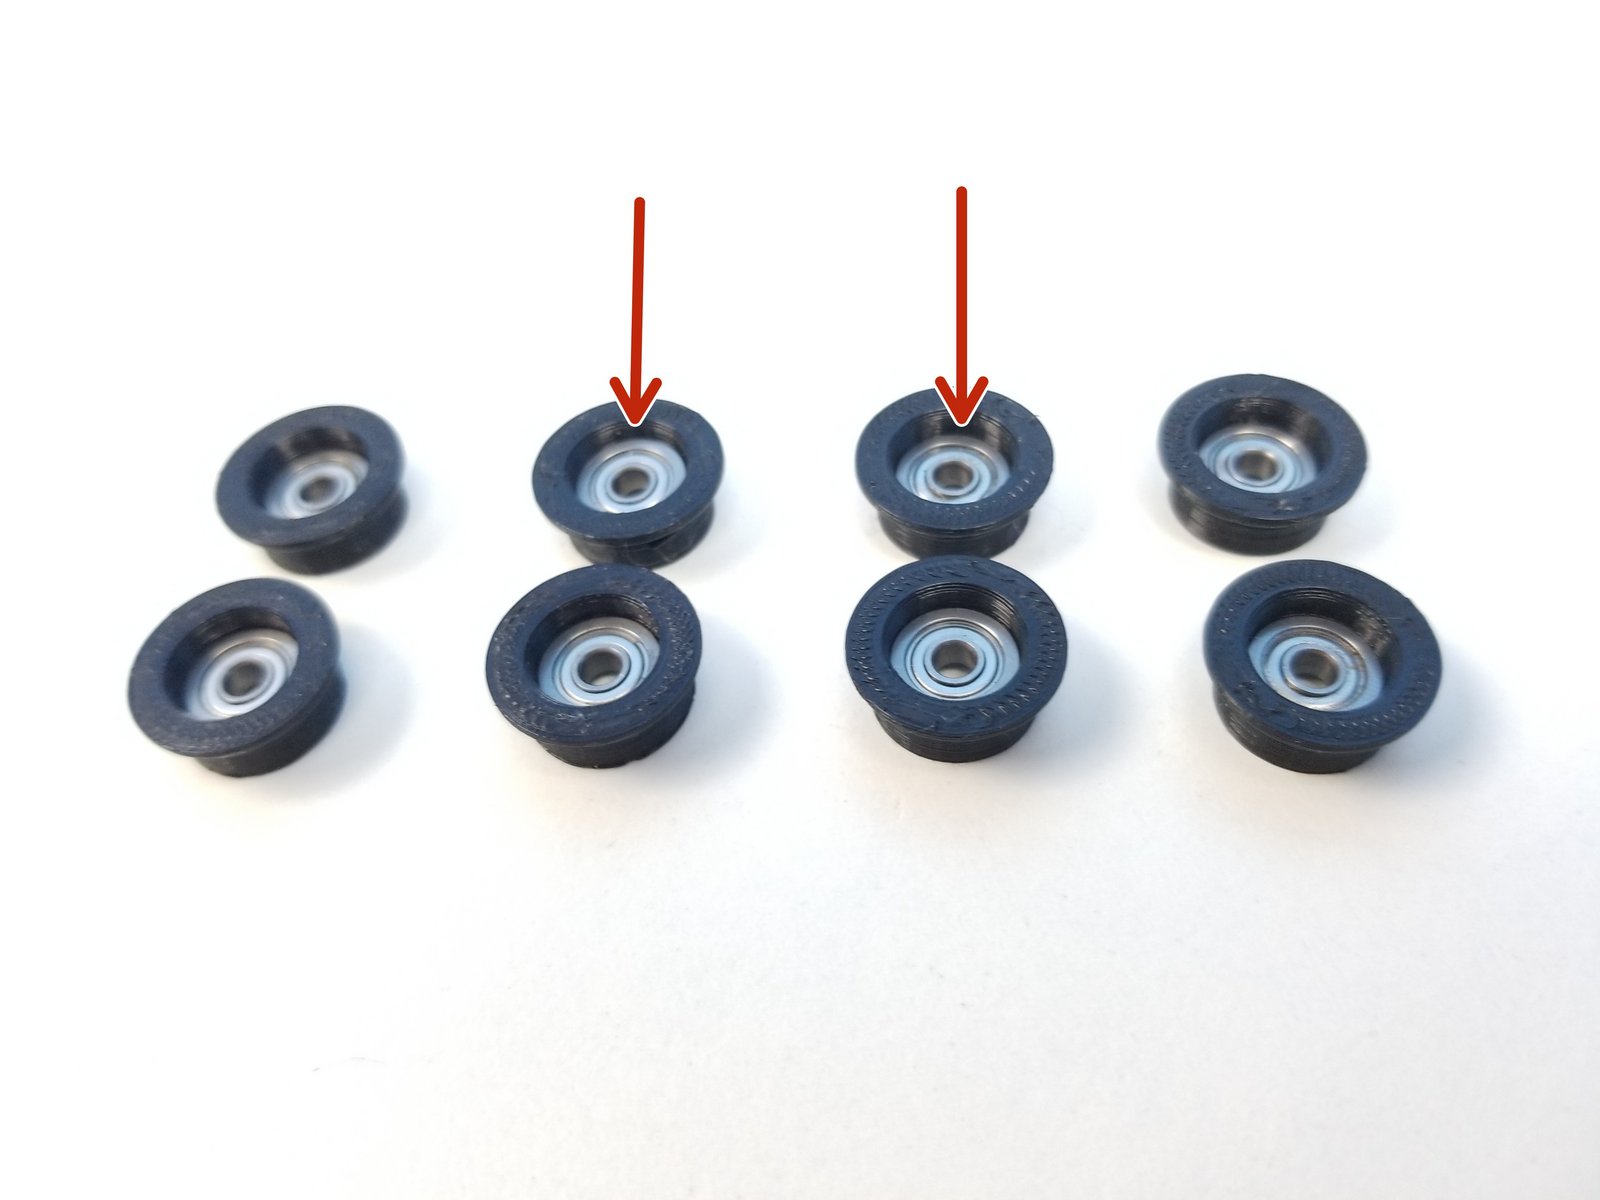
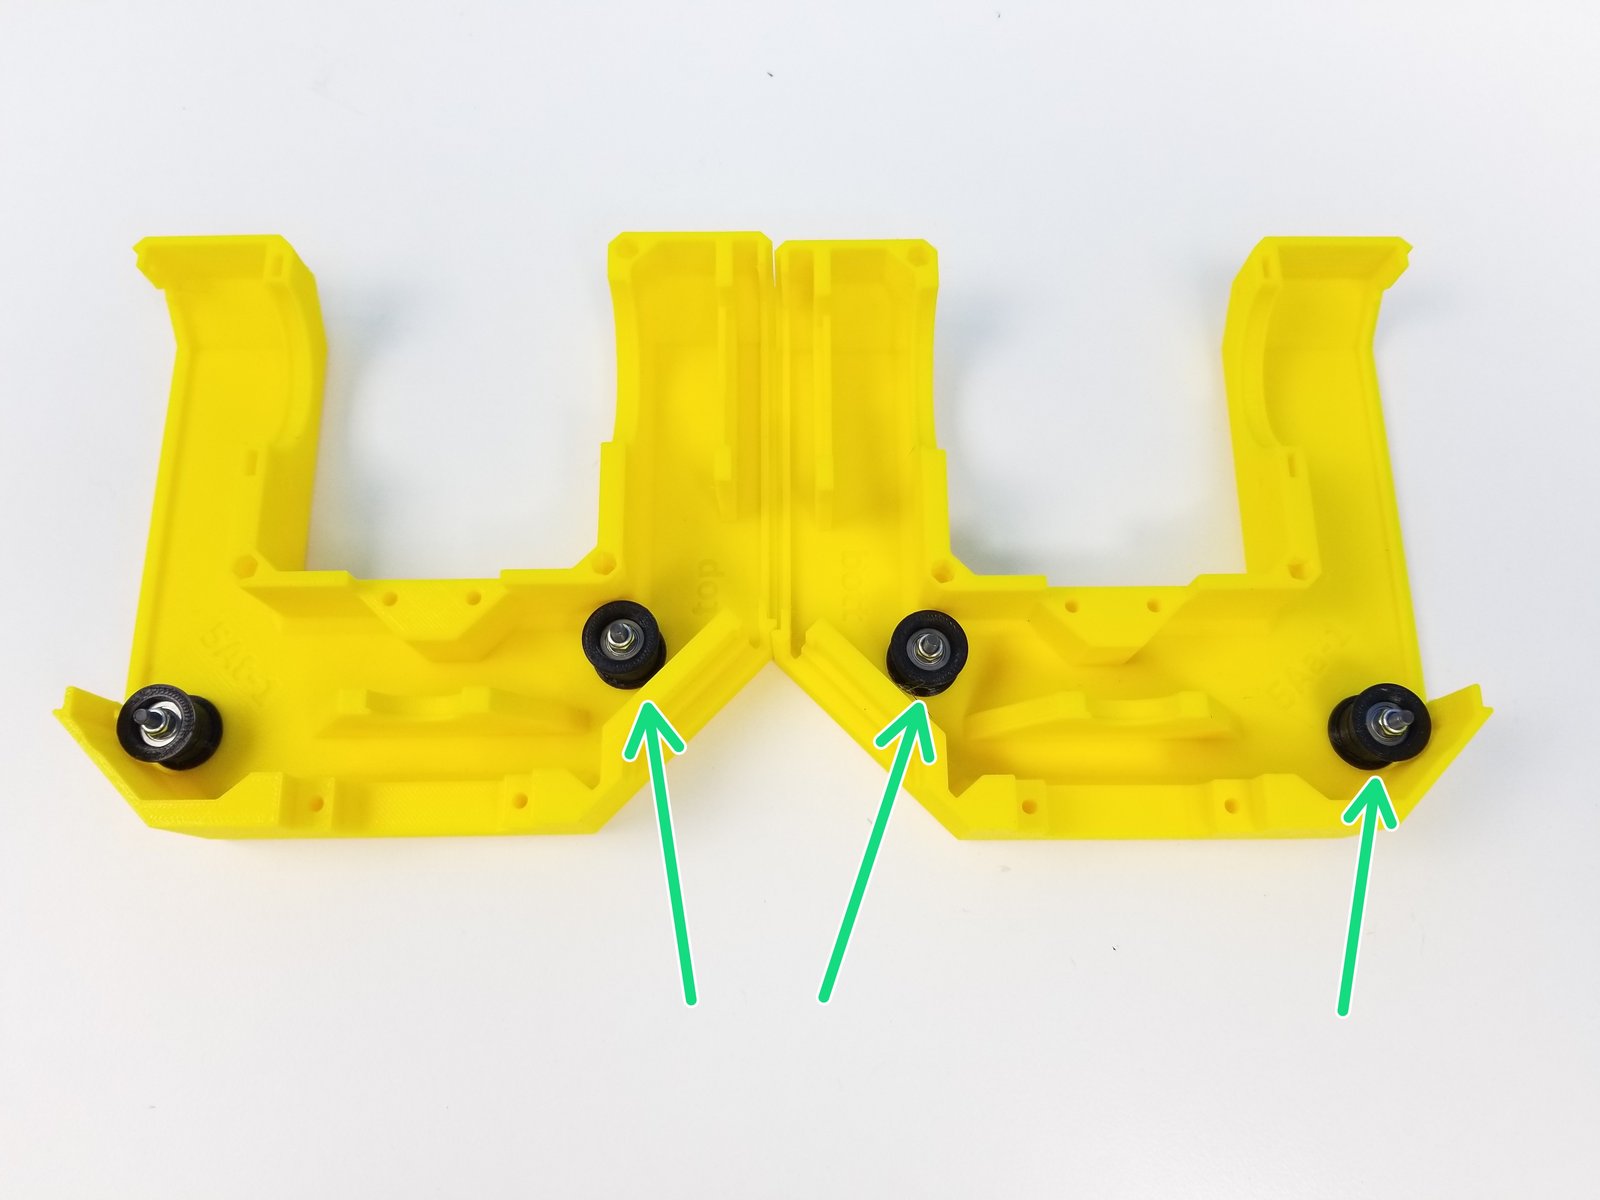
Insert MF83 Bearings into the Bearing Sleeves
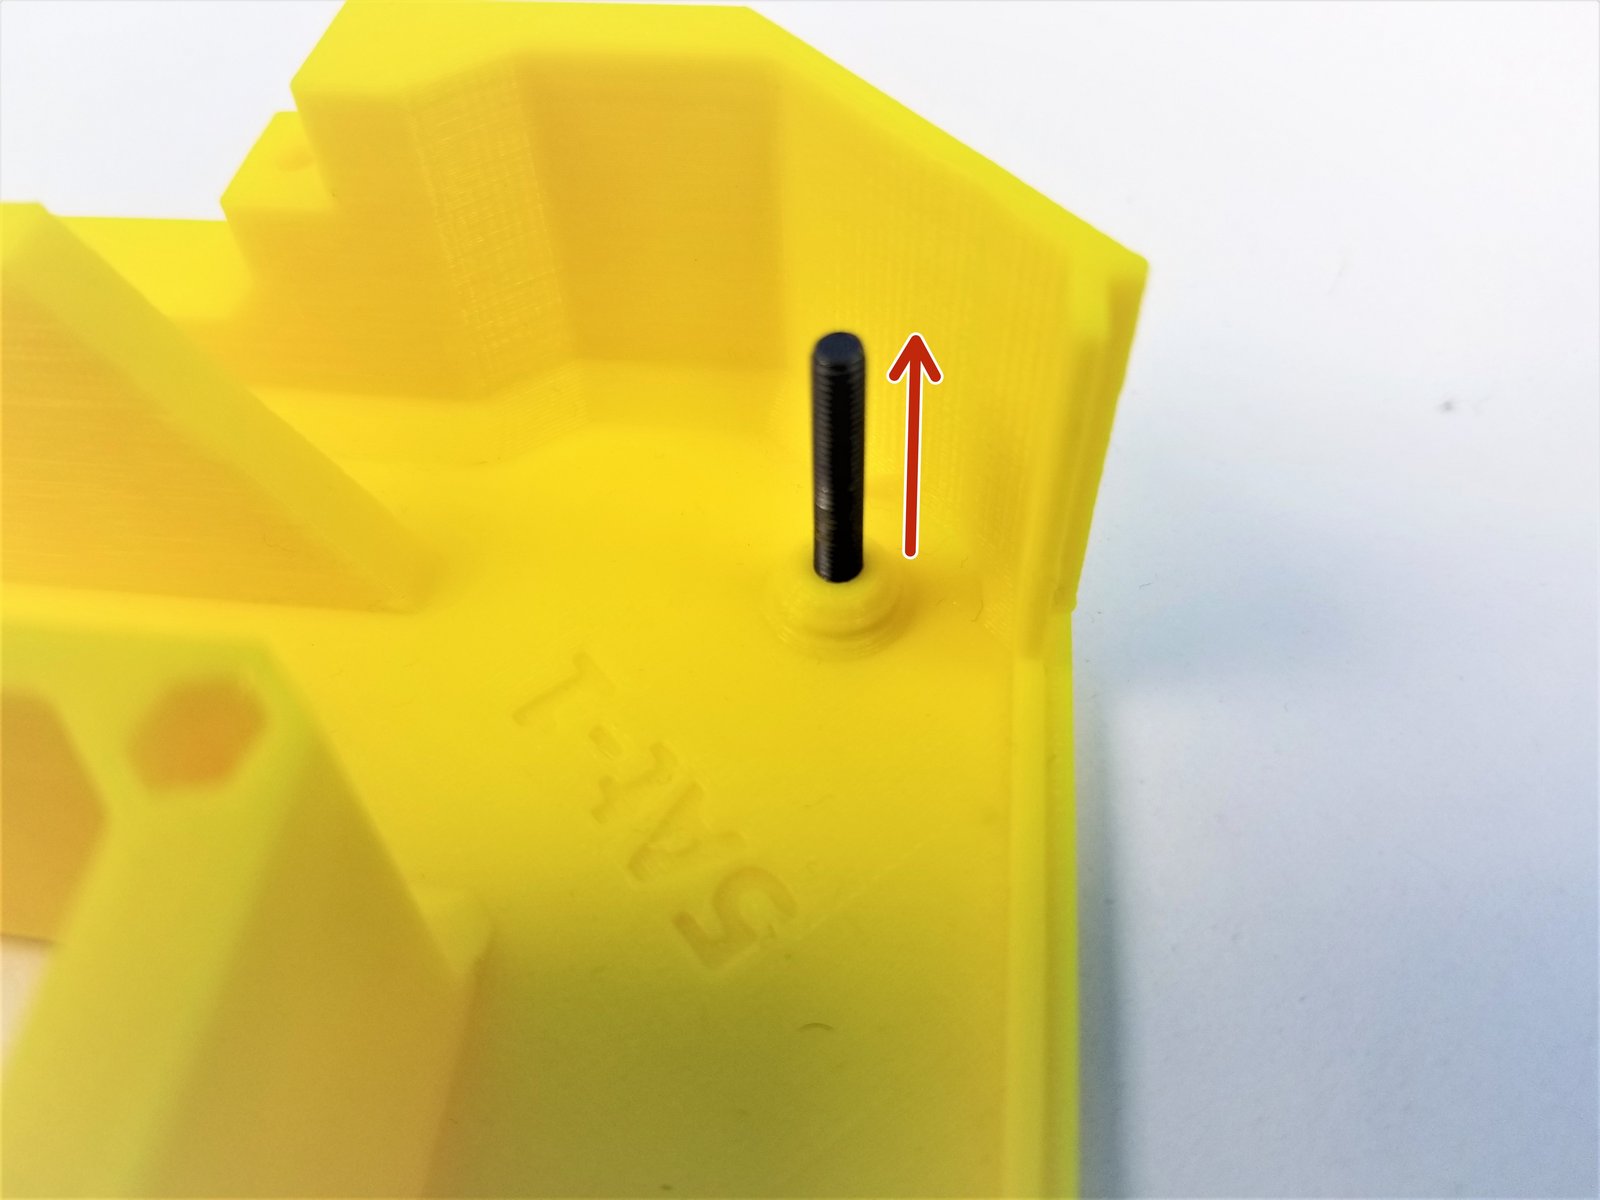
Insert the M3x20mm Screw in to the Fork Half where there's a chamfered peg on the inner face
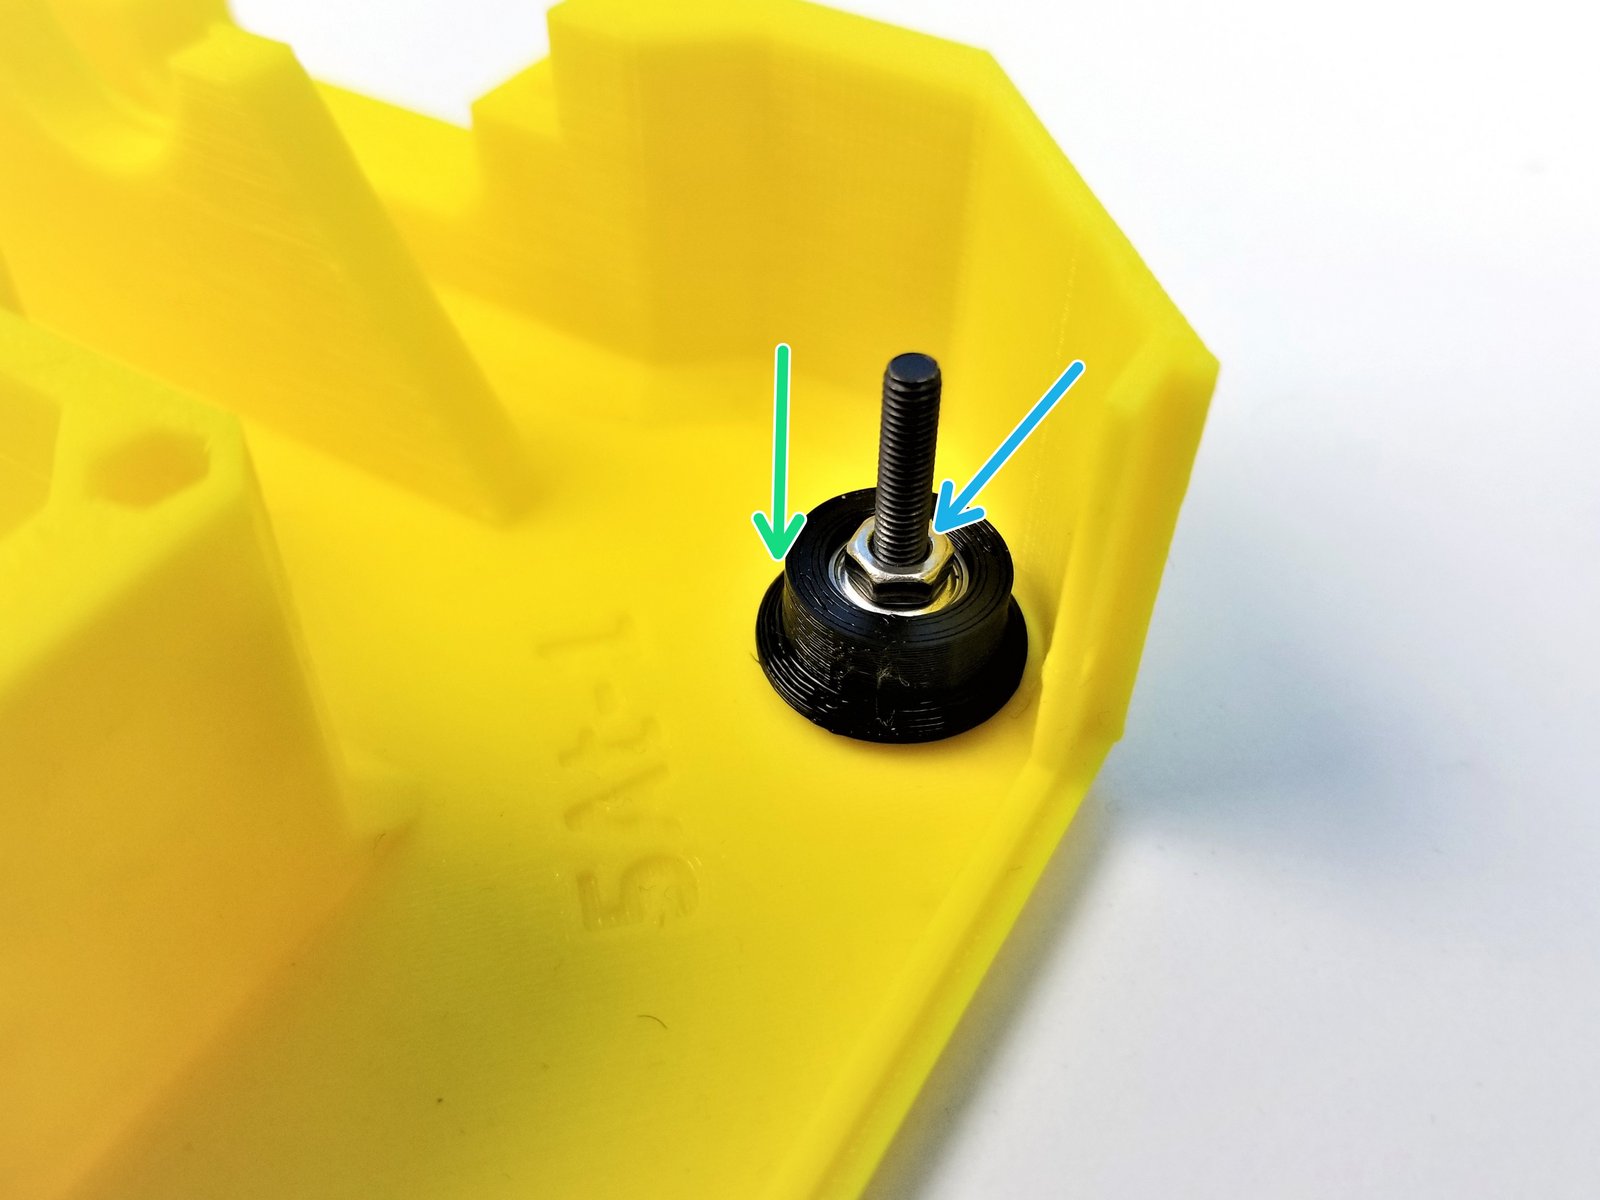
Slide one of the Bearing Sleeves to the M3x20mm Screwss with the flanged part on the bottom
Use M3 Hex Nut to secure the Bearing Sleeve in place
Step 12 Fork Idler - 2
Click the large image to open full size.
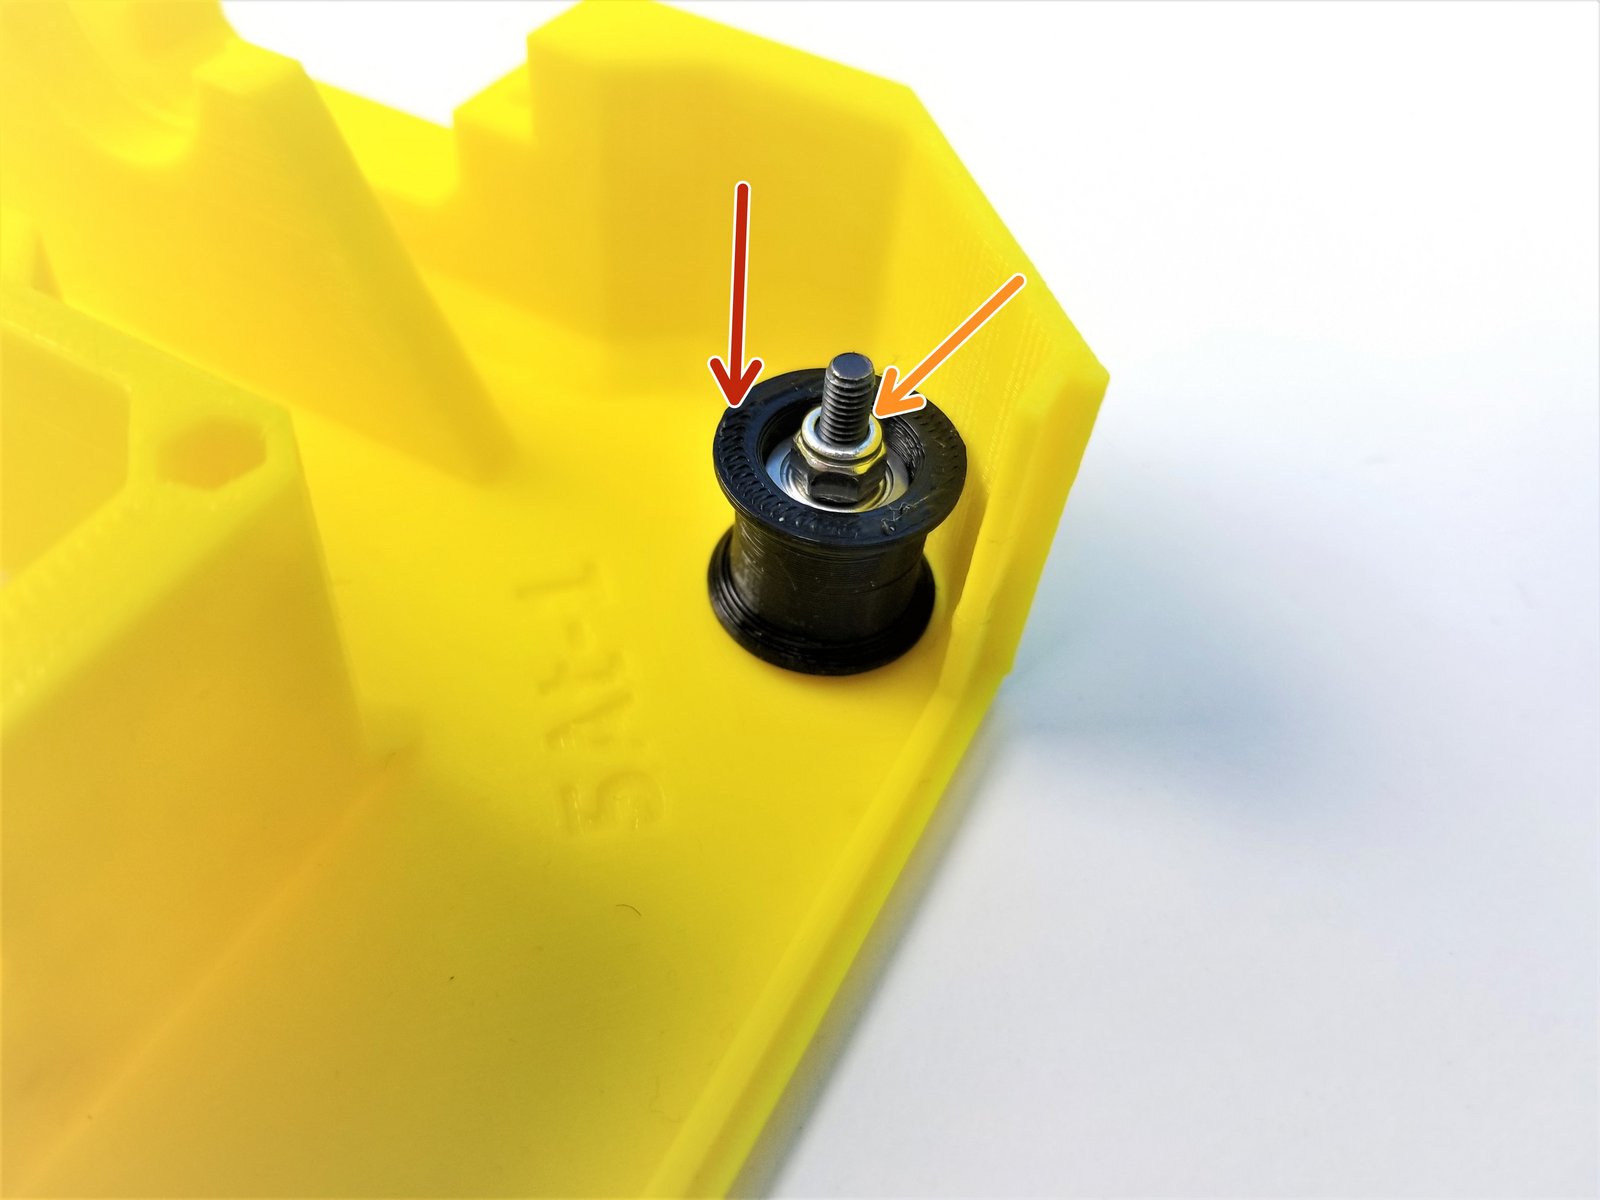
Insert another one of the Bearing Sleeves on the M3x20mm Screws but this time with the flanged part facing up
Use M3 Nylock Nuts to secure it in place
Repeat the procedure for 3 other locations.
Step 13 Fork Bottom Preparation - Parts
Click the large image to open full size.
- Note:
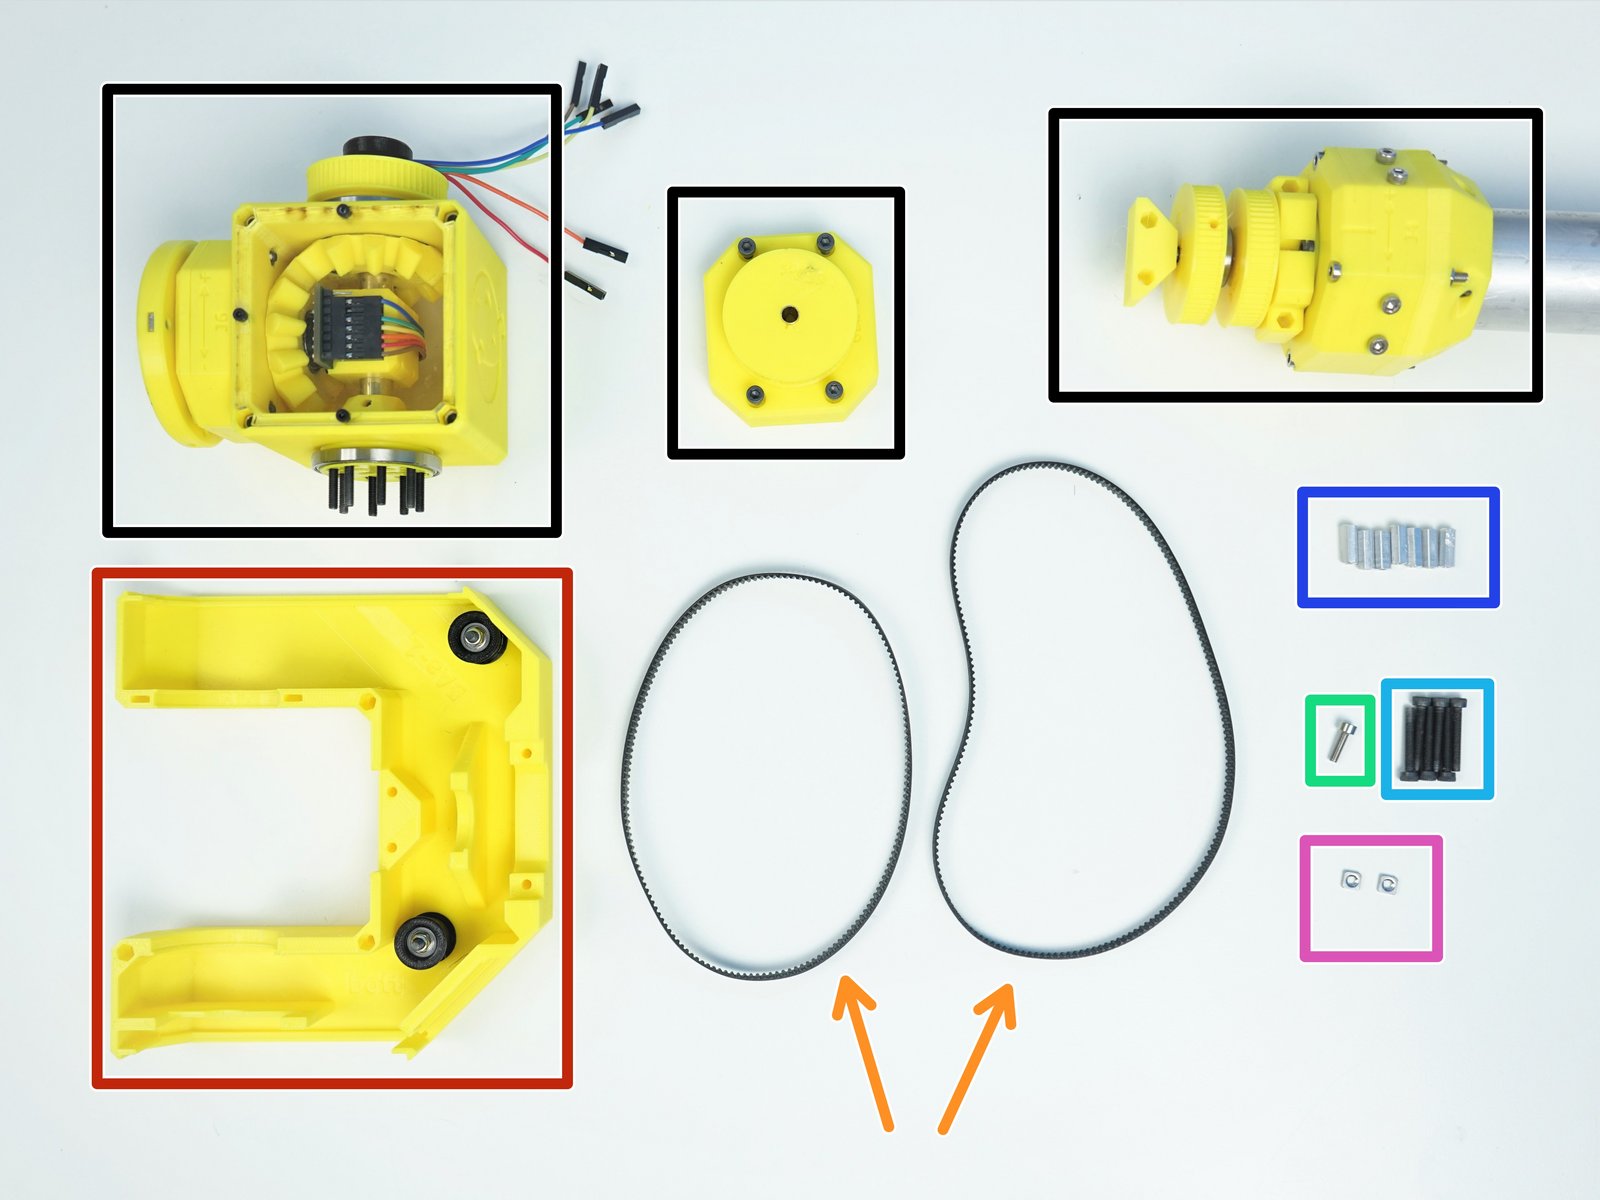
Prepare the following components:
Assembled Ulna Gearbox, Picasso Box and Wrist Gearbox
Fork Bottom {w/ Idler installed}
Timing Belt GT2-336mm & GT2-400mm
M3x10mm Screw (x1)
M3x22mm Screws (x6)
M3x4.5x12mm Hex Standoffs (x7)
M3 Square Nuts (x2)
Step 14 Fork Bottom Preparation - 1
Click the large image to open full size.
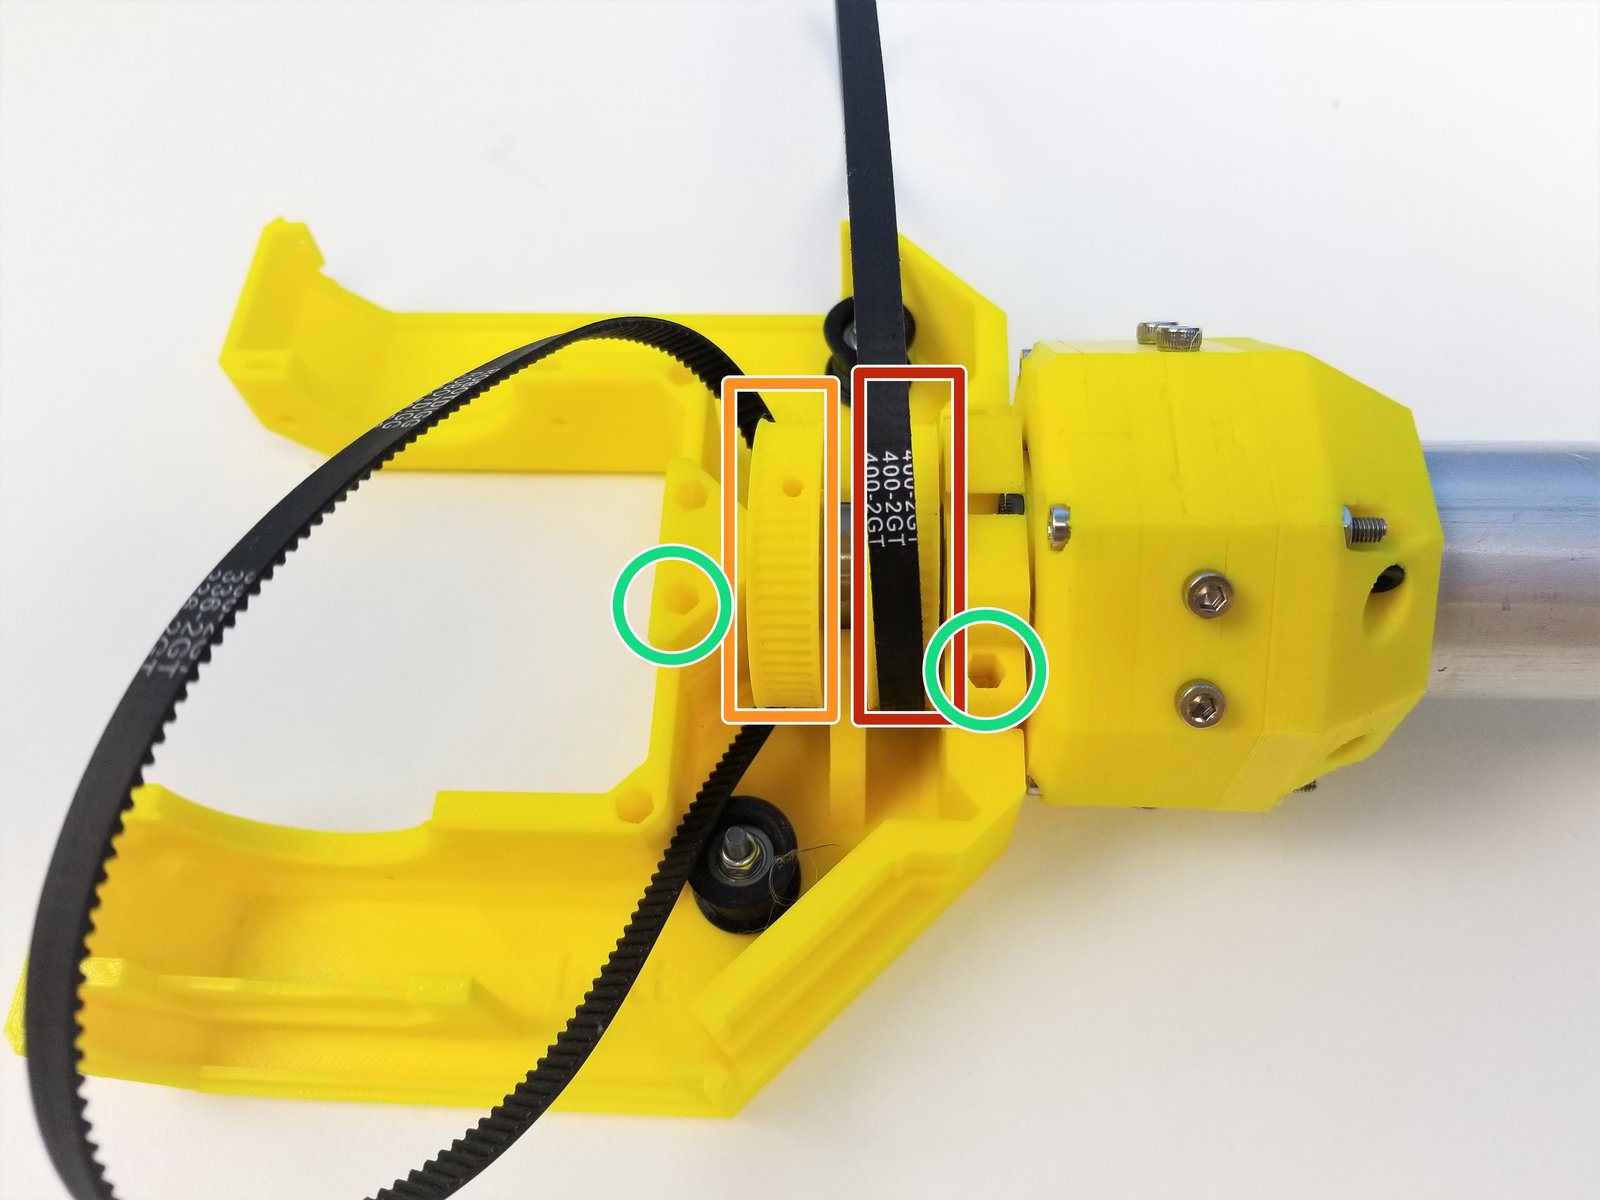
Place the GT2x400mm Timing Belt on the outer pulley on Assembled Ulna Gearbox
Place the GT2x336mm Timing Belt on the inner pulley
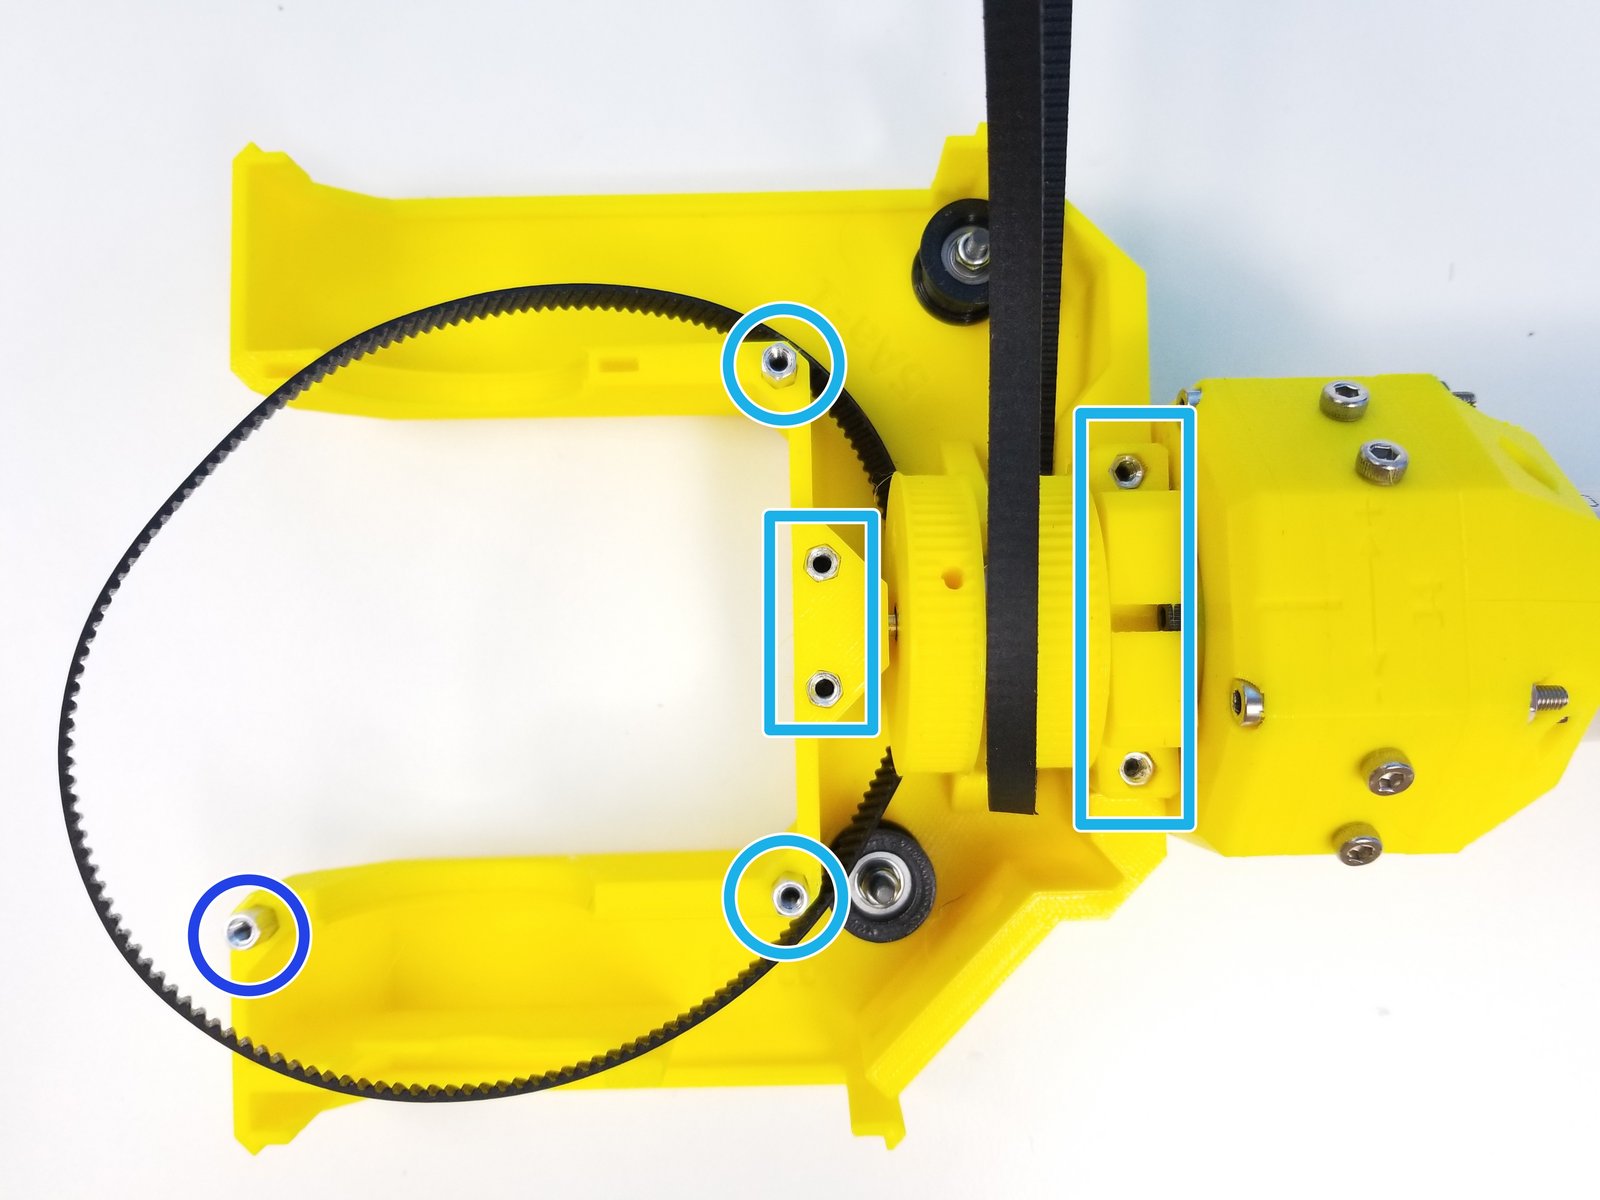
Align the Ulna Sensor Plate and Ulna Output Gearbox to the Fork Bottom with the Hex Standoff insert pointing upward
Insert M3x4.5x12mm Hex standoffs and secure its place using M3x22mm Screws
Use M3x10mm Screw in this location
Step 15 Fork Bottom Preparation - 2
Click the large image to open full size.
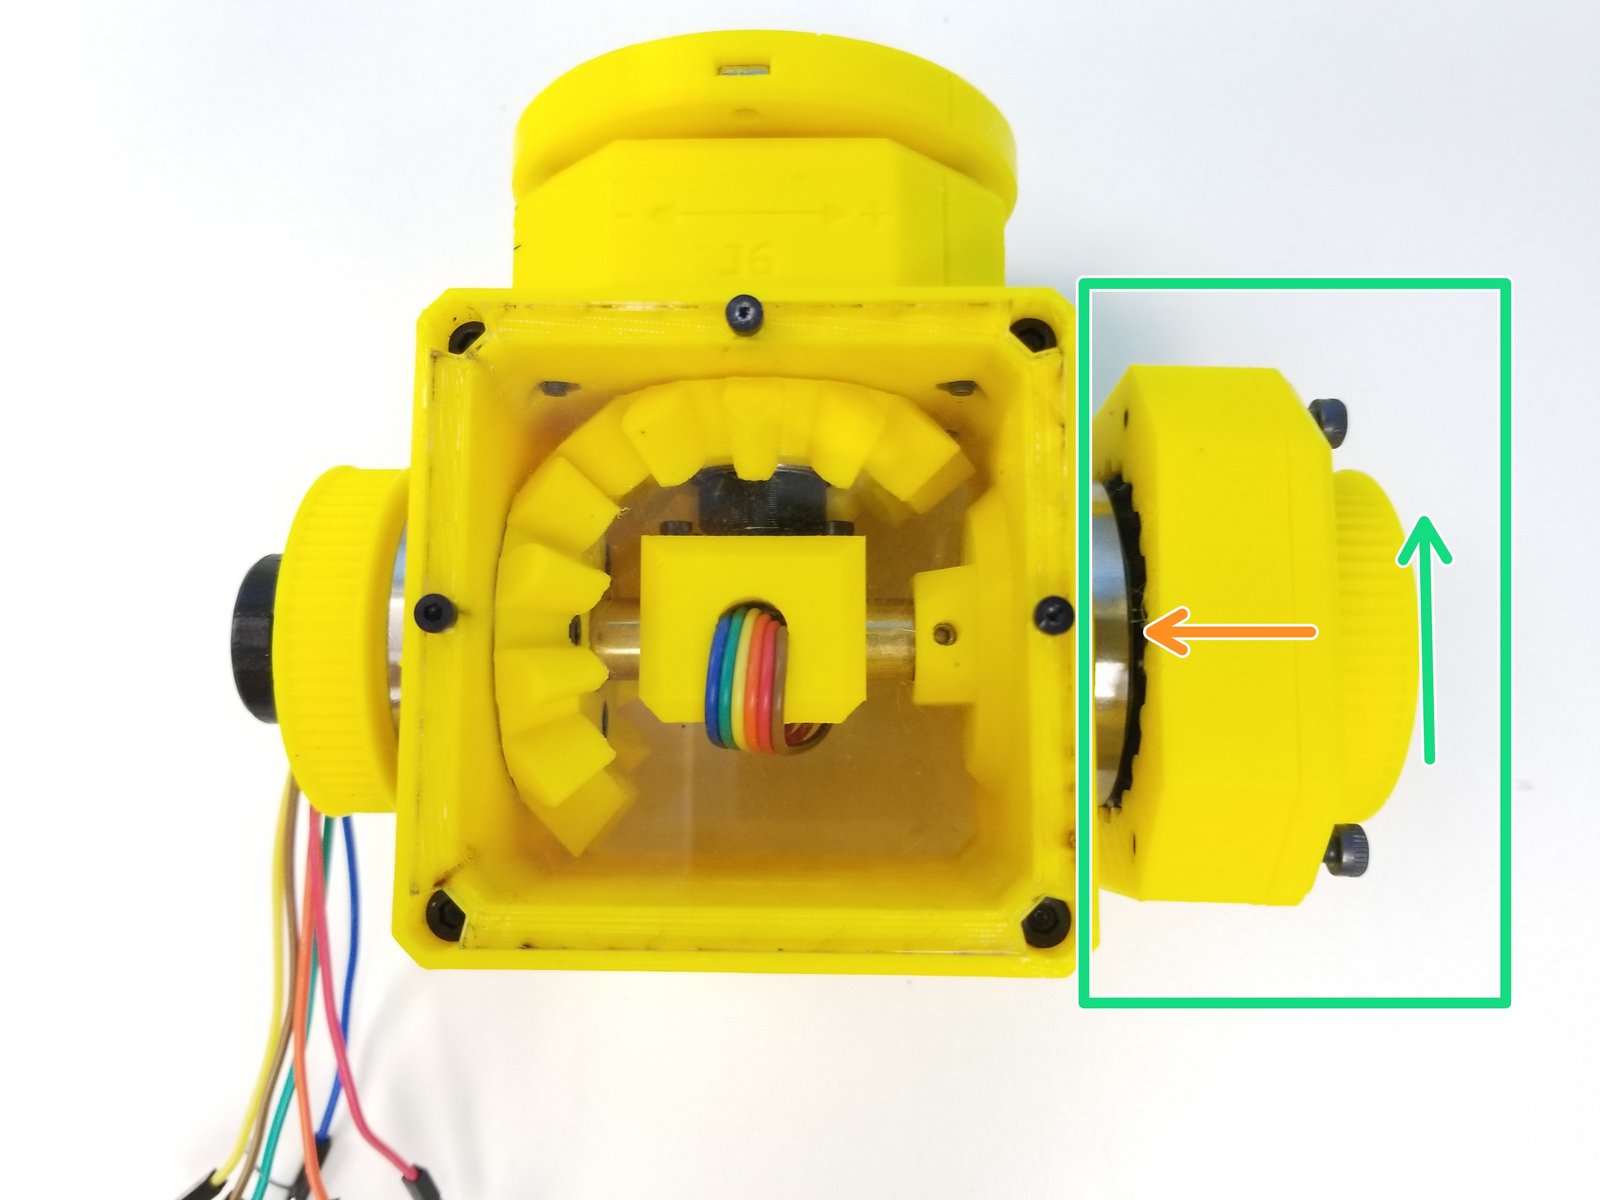
Insert the Picasso Output pins to the Picasso Gearbox
Rotate the Input Pulley of the Picasso Gearbox to align the gearbox housing
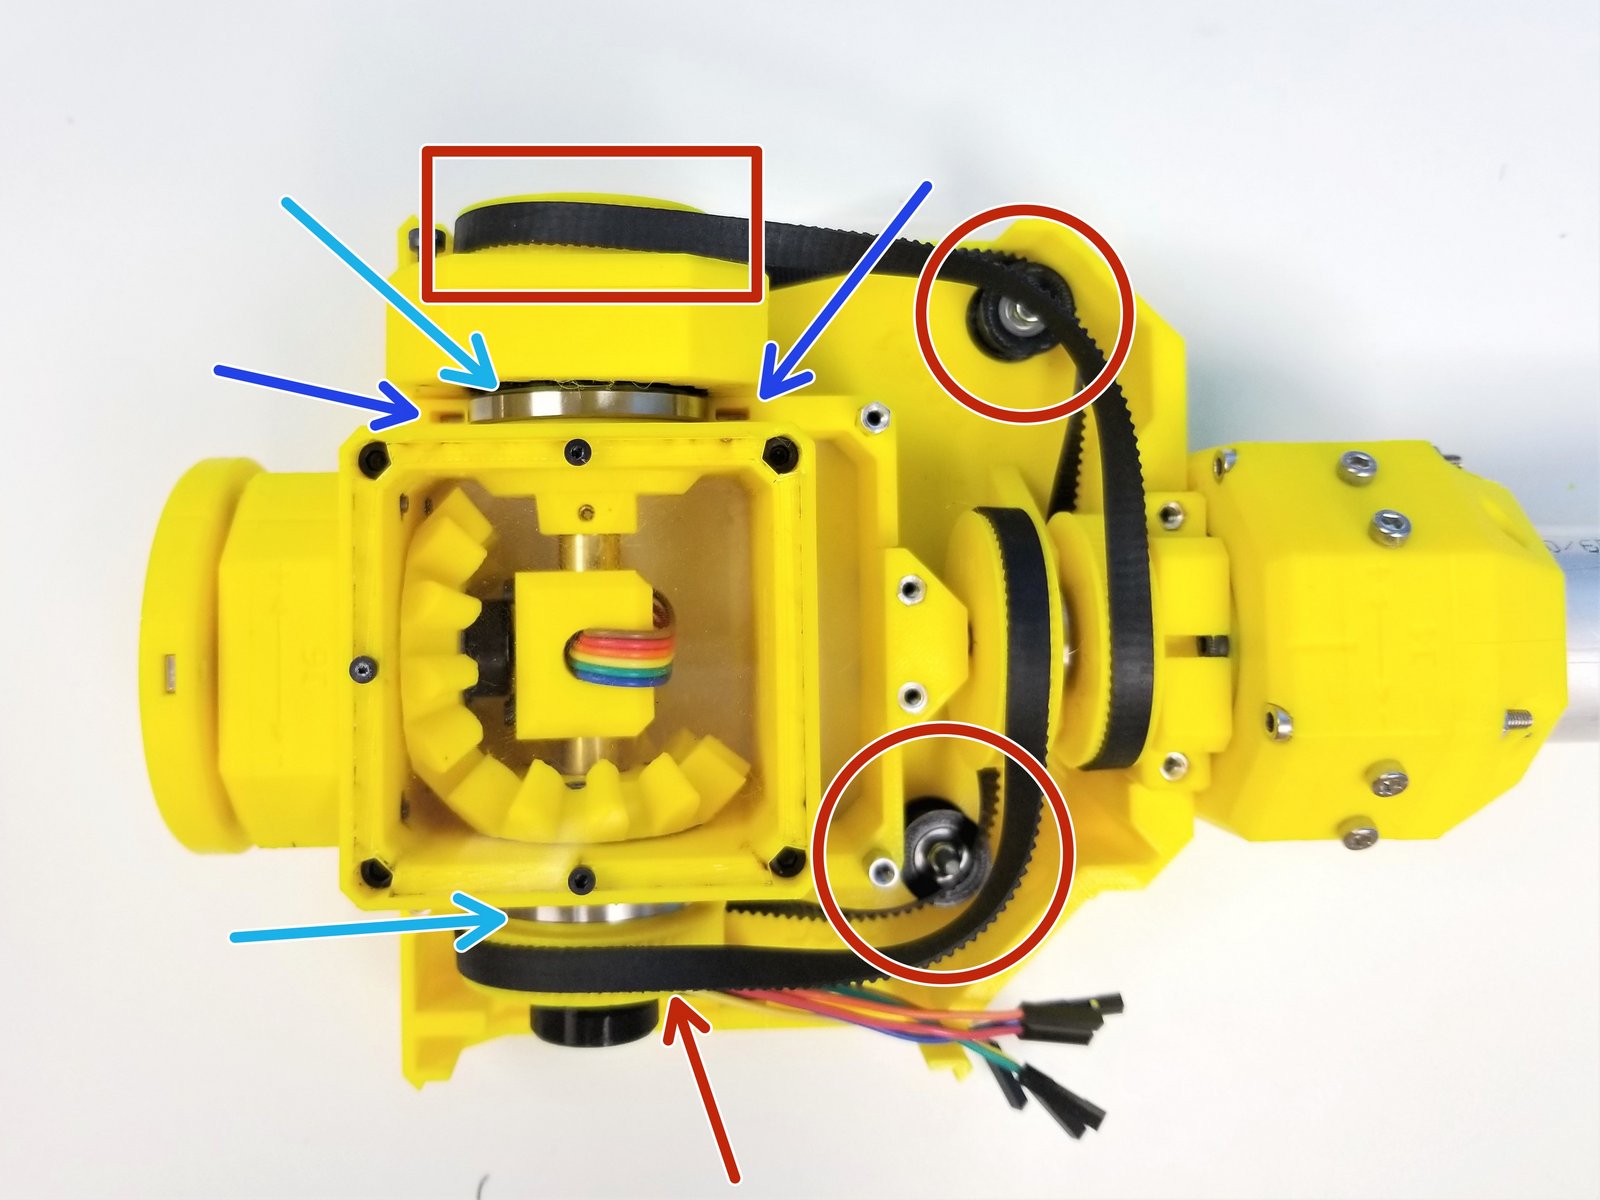
Insert the assembled Picasso Box into the Bearing Slots of the Fork Bottom
- Warning:
Make sure to wrap the Timing Belts on both Pulley Gears AND the Bottom Idlers
- Note:
The SMOOTH SIDE of the Belt on the IDLERS
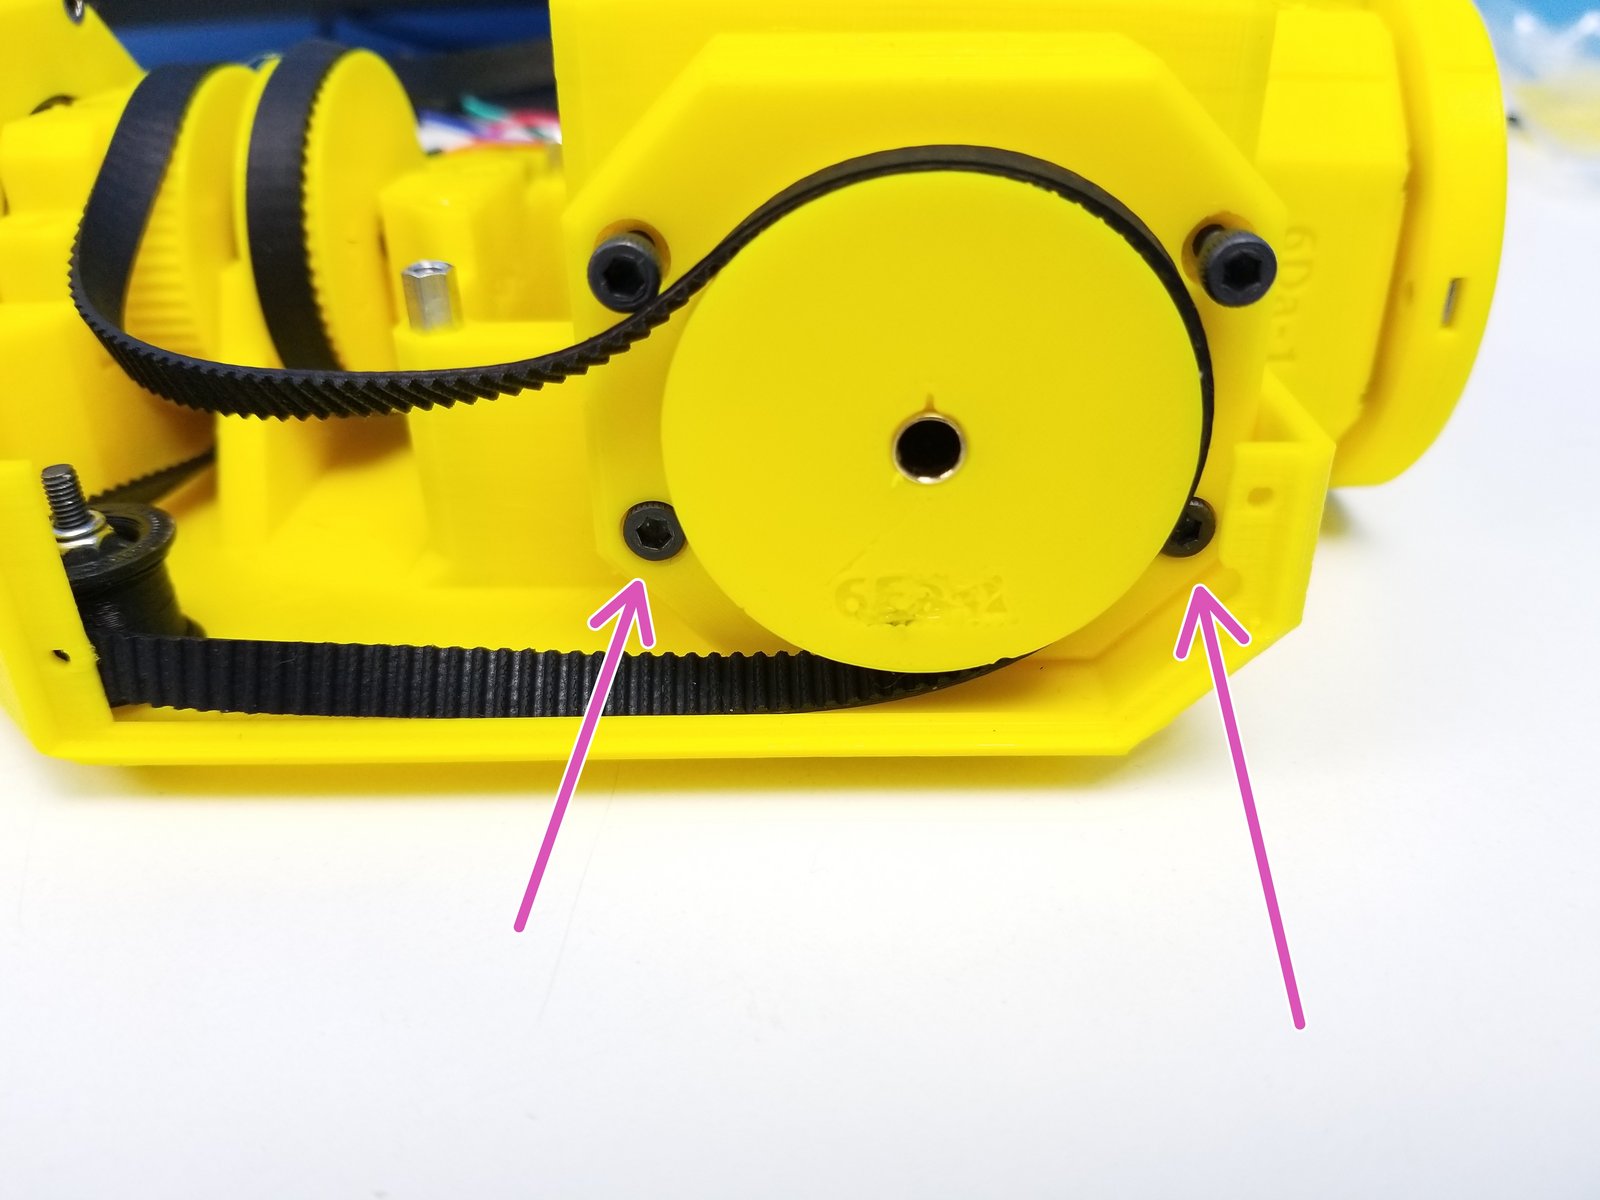
Insert M3 Square Nuts in the Square Nut insert on the Fork Bottom
Secure the Picasso Gearbox by tightening the bottom screws on the Gearbox Housing
Step 16 Fork Clamp - Parts
Click the large image to open full size.
- Note:
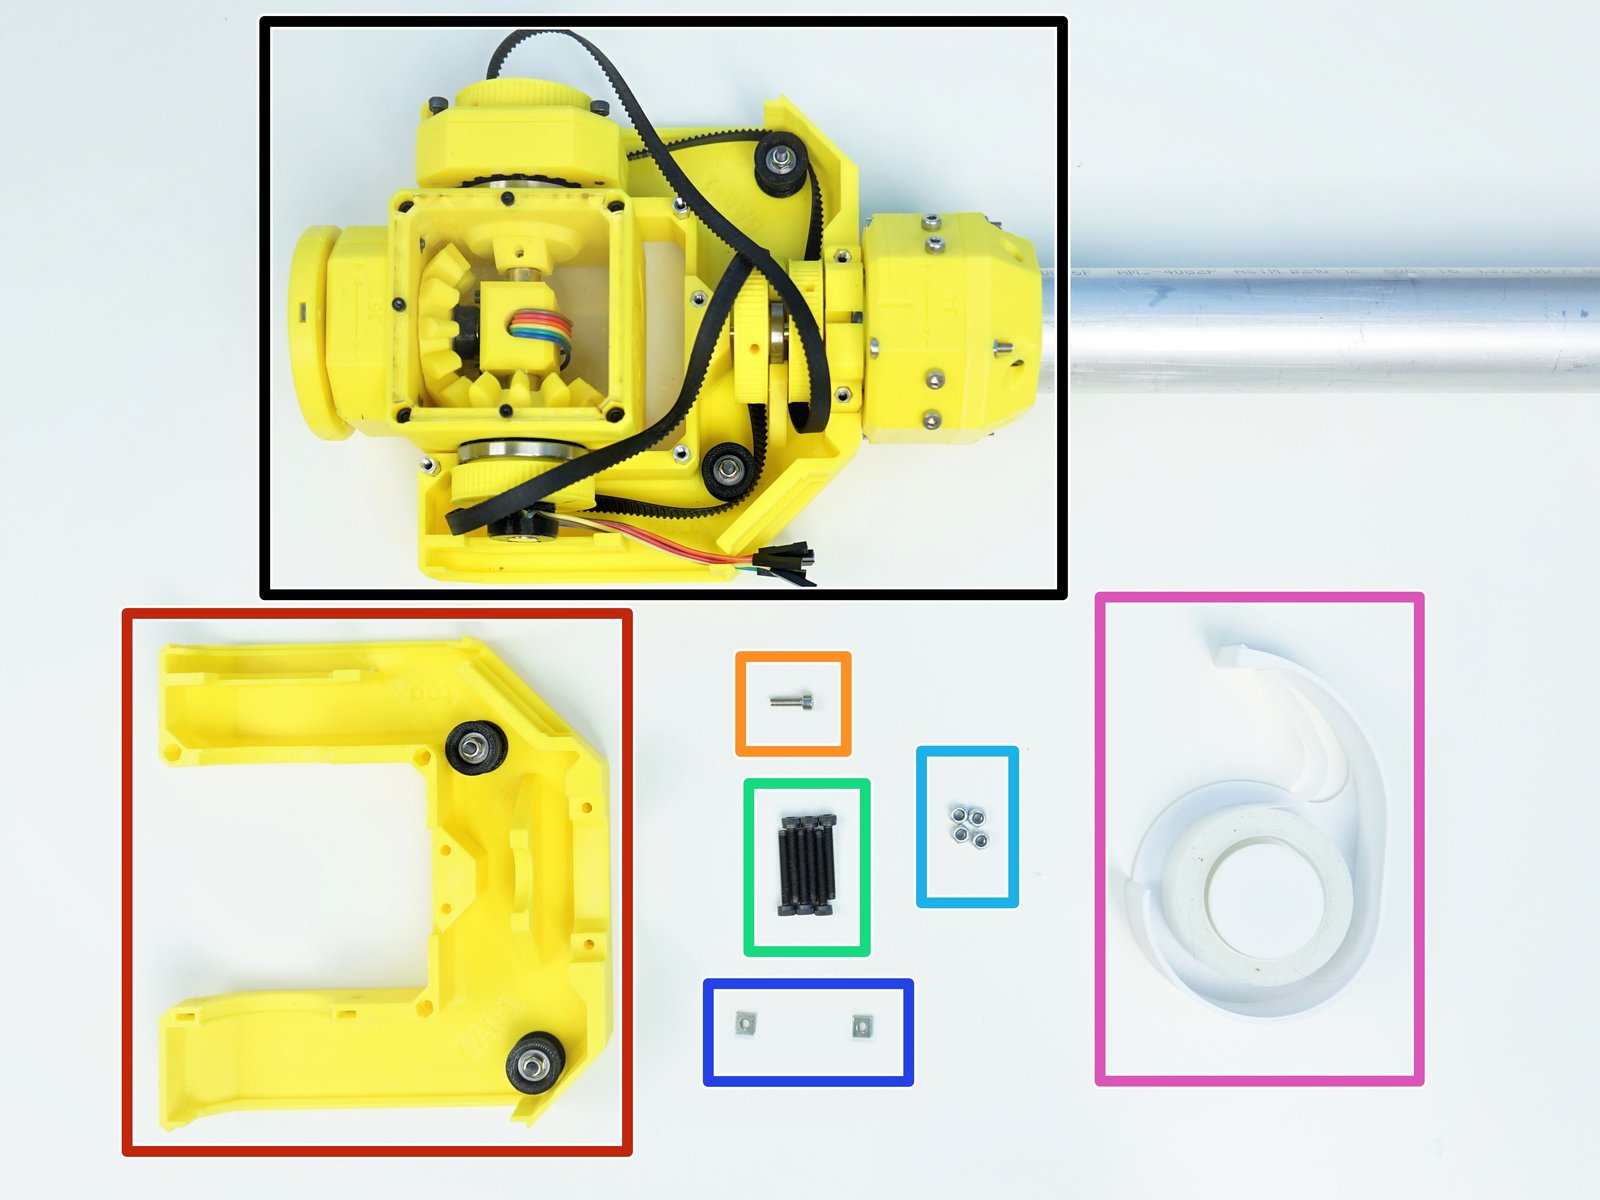
Prepare the following components:
Fork Bottom Prepared
Fork Top {w/ Idlers Installed}
M3x10mm Screw (x1)
M3x25mm Screws (x6)
M3 Nylock Nuts (x4)
M3 Square Nuts (x2)
[Opt.] - Tape
Step 17 Fork Clamp - Final Fork Preparation
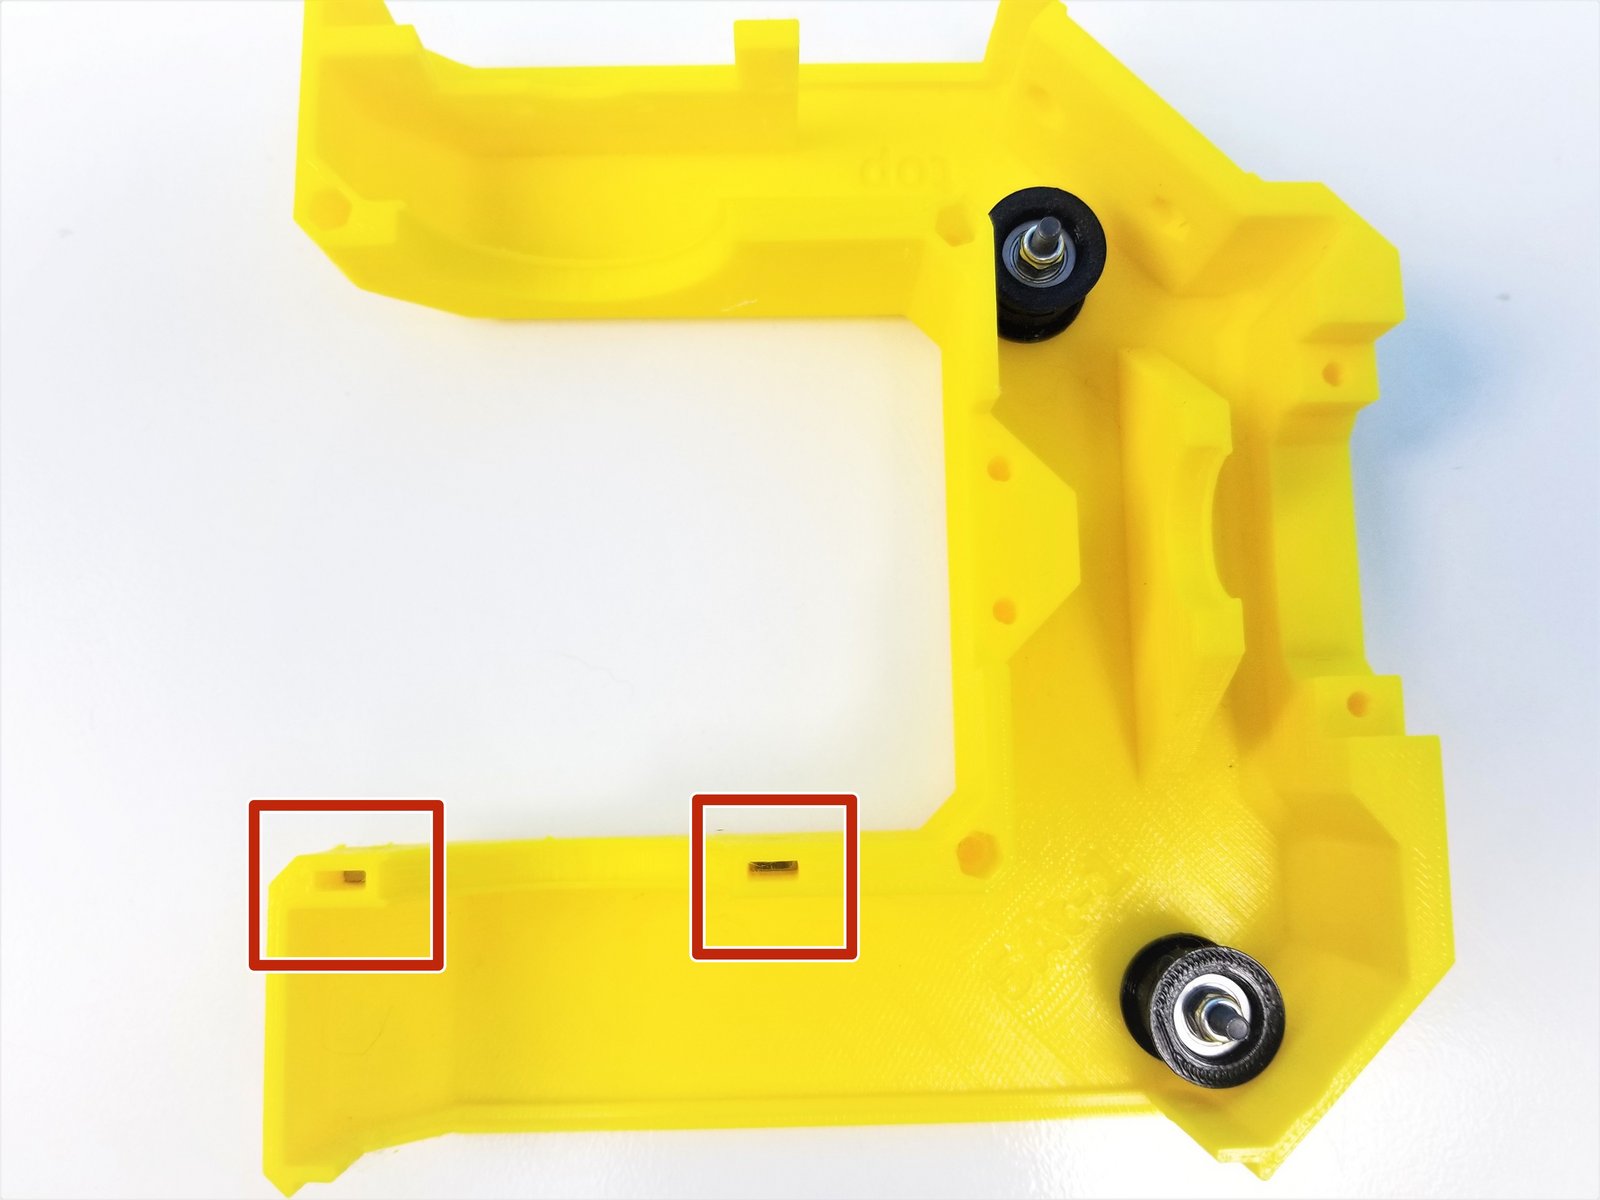
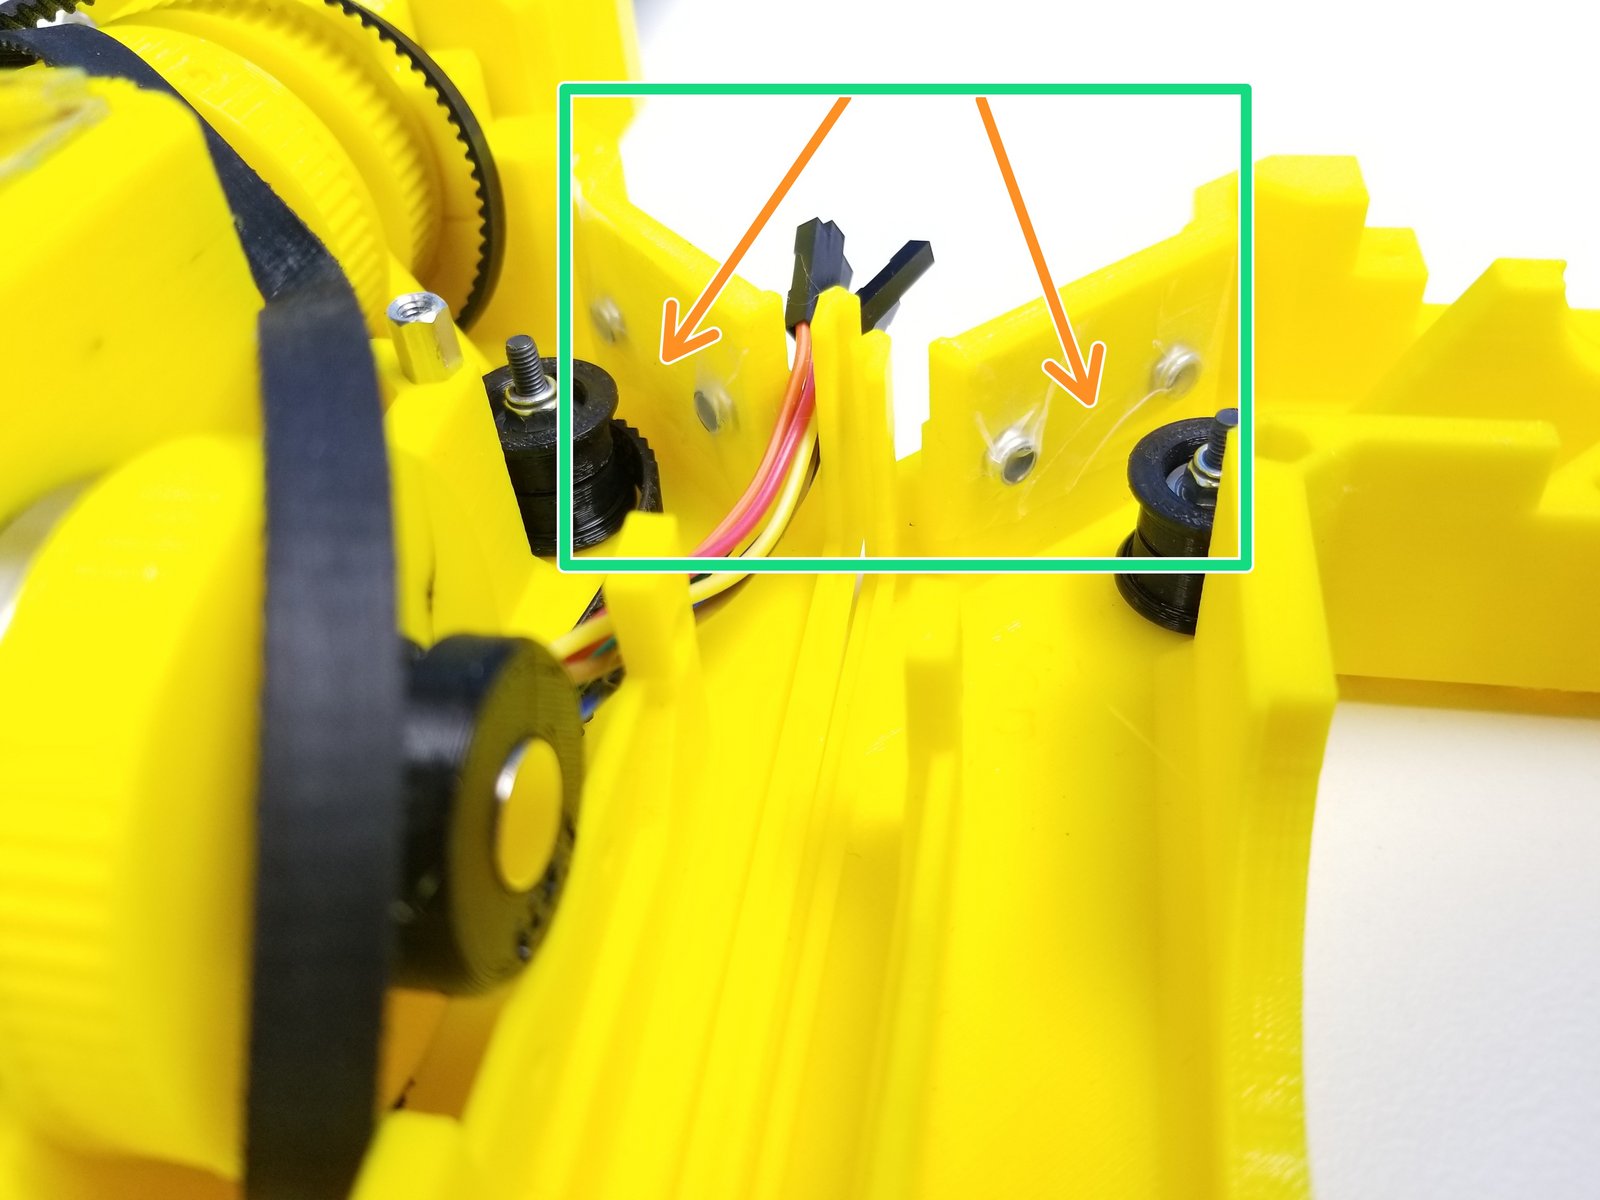
Click the large image to open full size.
Insert the M3 Square Nuts in the Fork Top
Insert the M3 Nylock Nuts in both Fork Top and Bottom on the side wall
Optionally, put tape over the nuts as the friction fit alone may not be enough to keep them on.
Step 18 Fork Clamp - Top Idler Belts 1
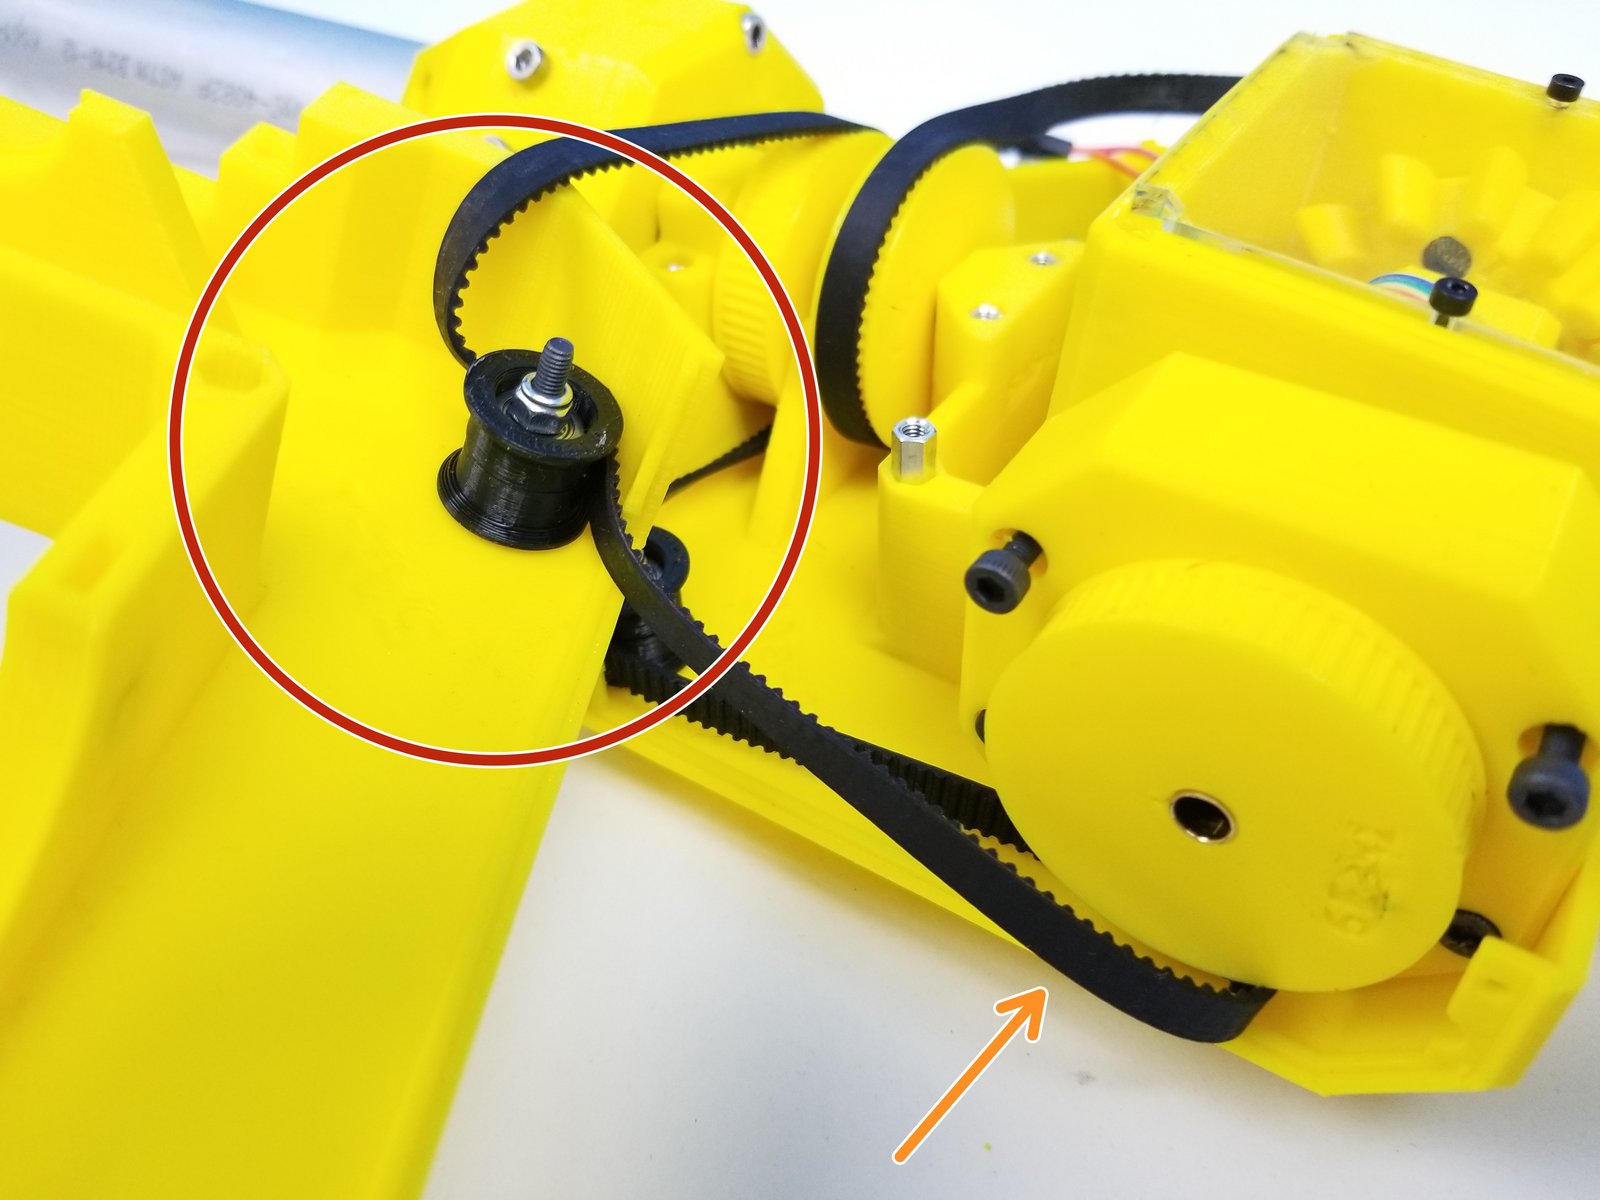
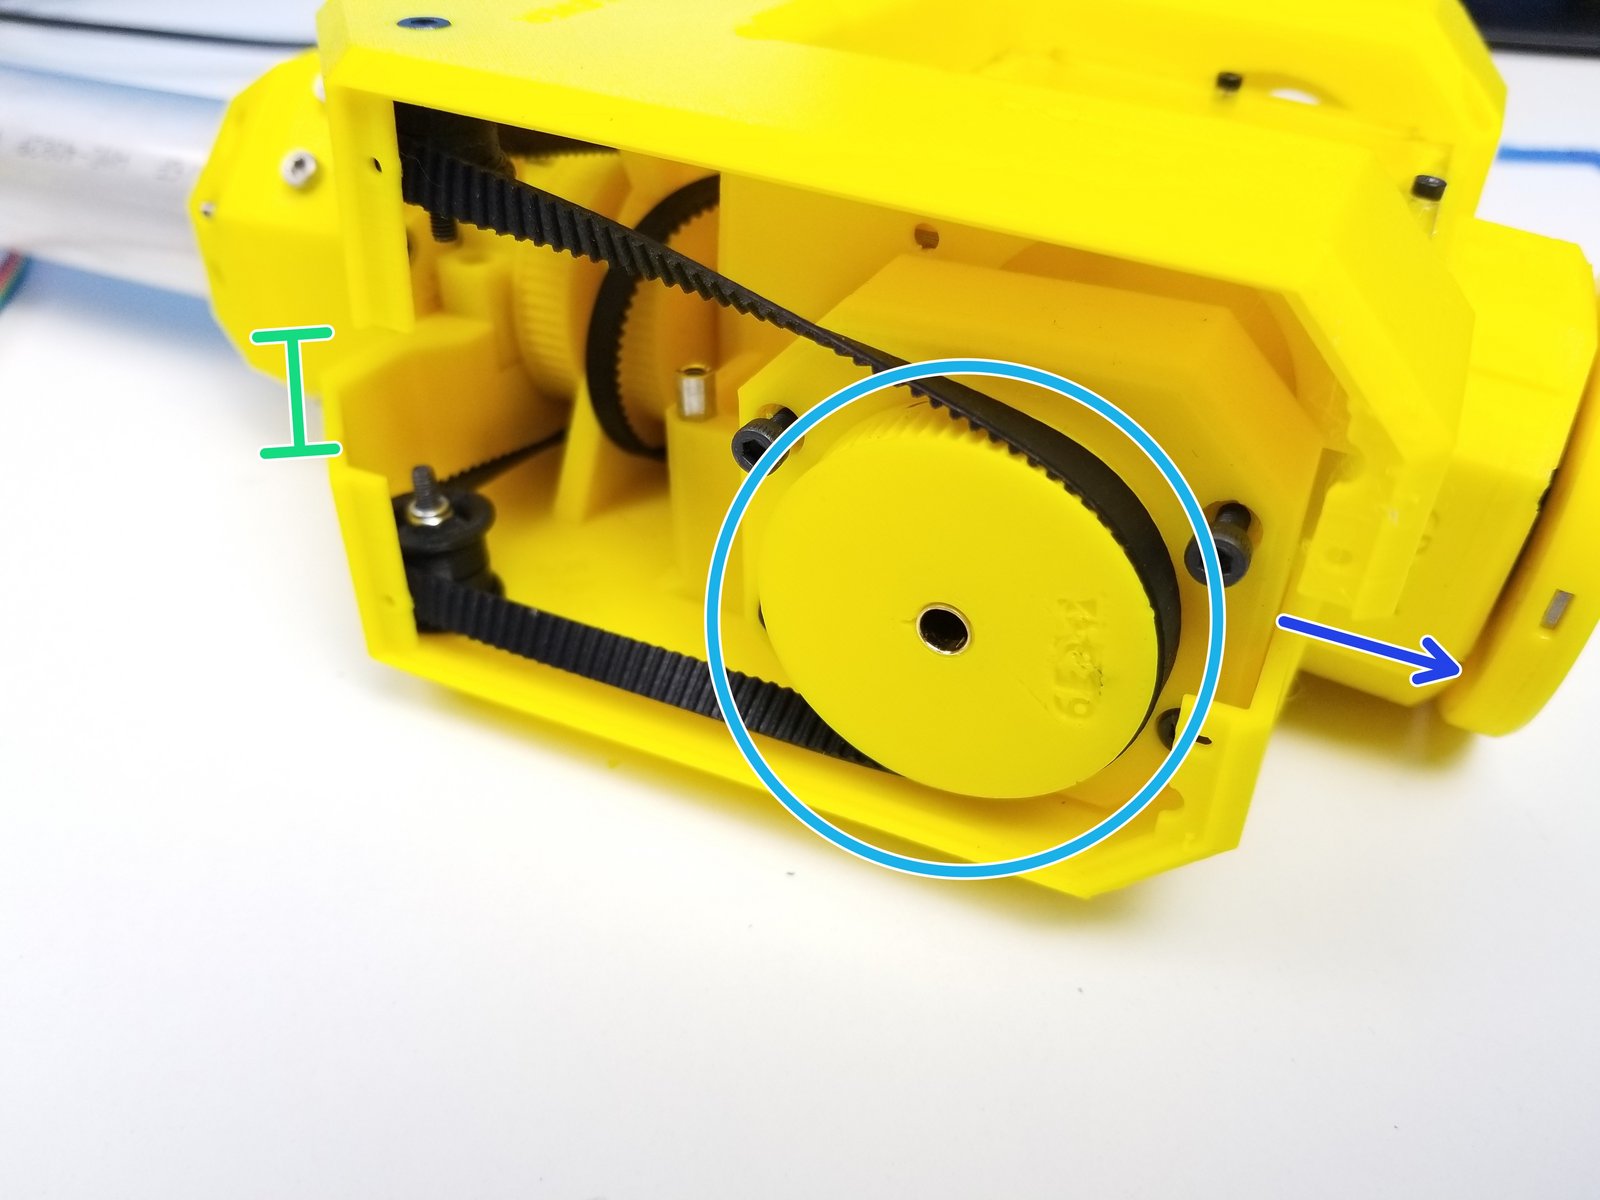
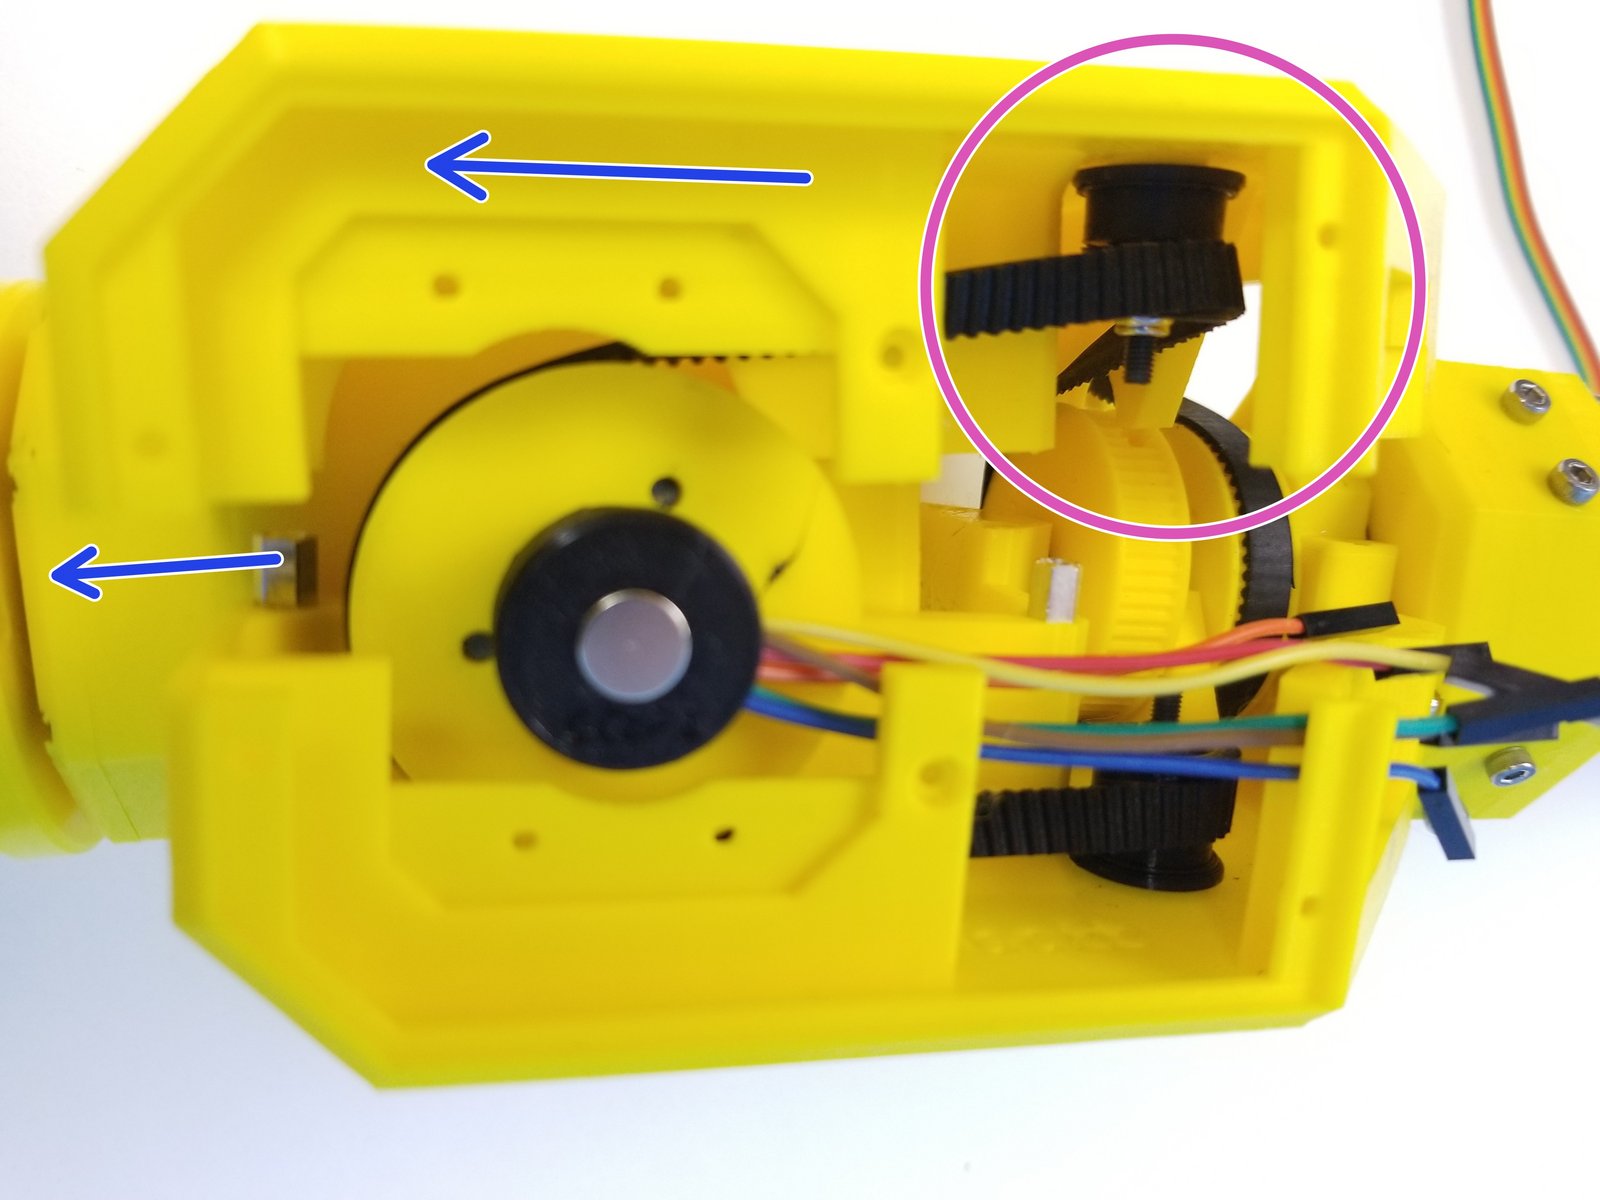
Click the large image to open full size.
- Warning:
This step may be the hardest to execute so follow through carefully. Use Alan Key as a "hook" if you need to
Align the 400mm GT2-Timing Belt {outer belt} to the Top Idler
Take the Belt off of the Gearbox Pulley if you need to.
- Note:
Make sure the SMOOTH side of the belt is on the Idler
Rotate the Top Fork and let it FLOAT over the Bottom Fork
Put the 400mm Belt back on the Pulley
Notice that the Top Fork is shifted forward relative to the Bottom Fork
While the Fork is shifted forward, put the 336mm GT2-Timing Belt on the Inner Pulley on the other side
Step 19 Fork Clamp - Top Idler Belts 2
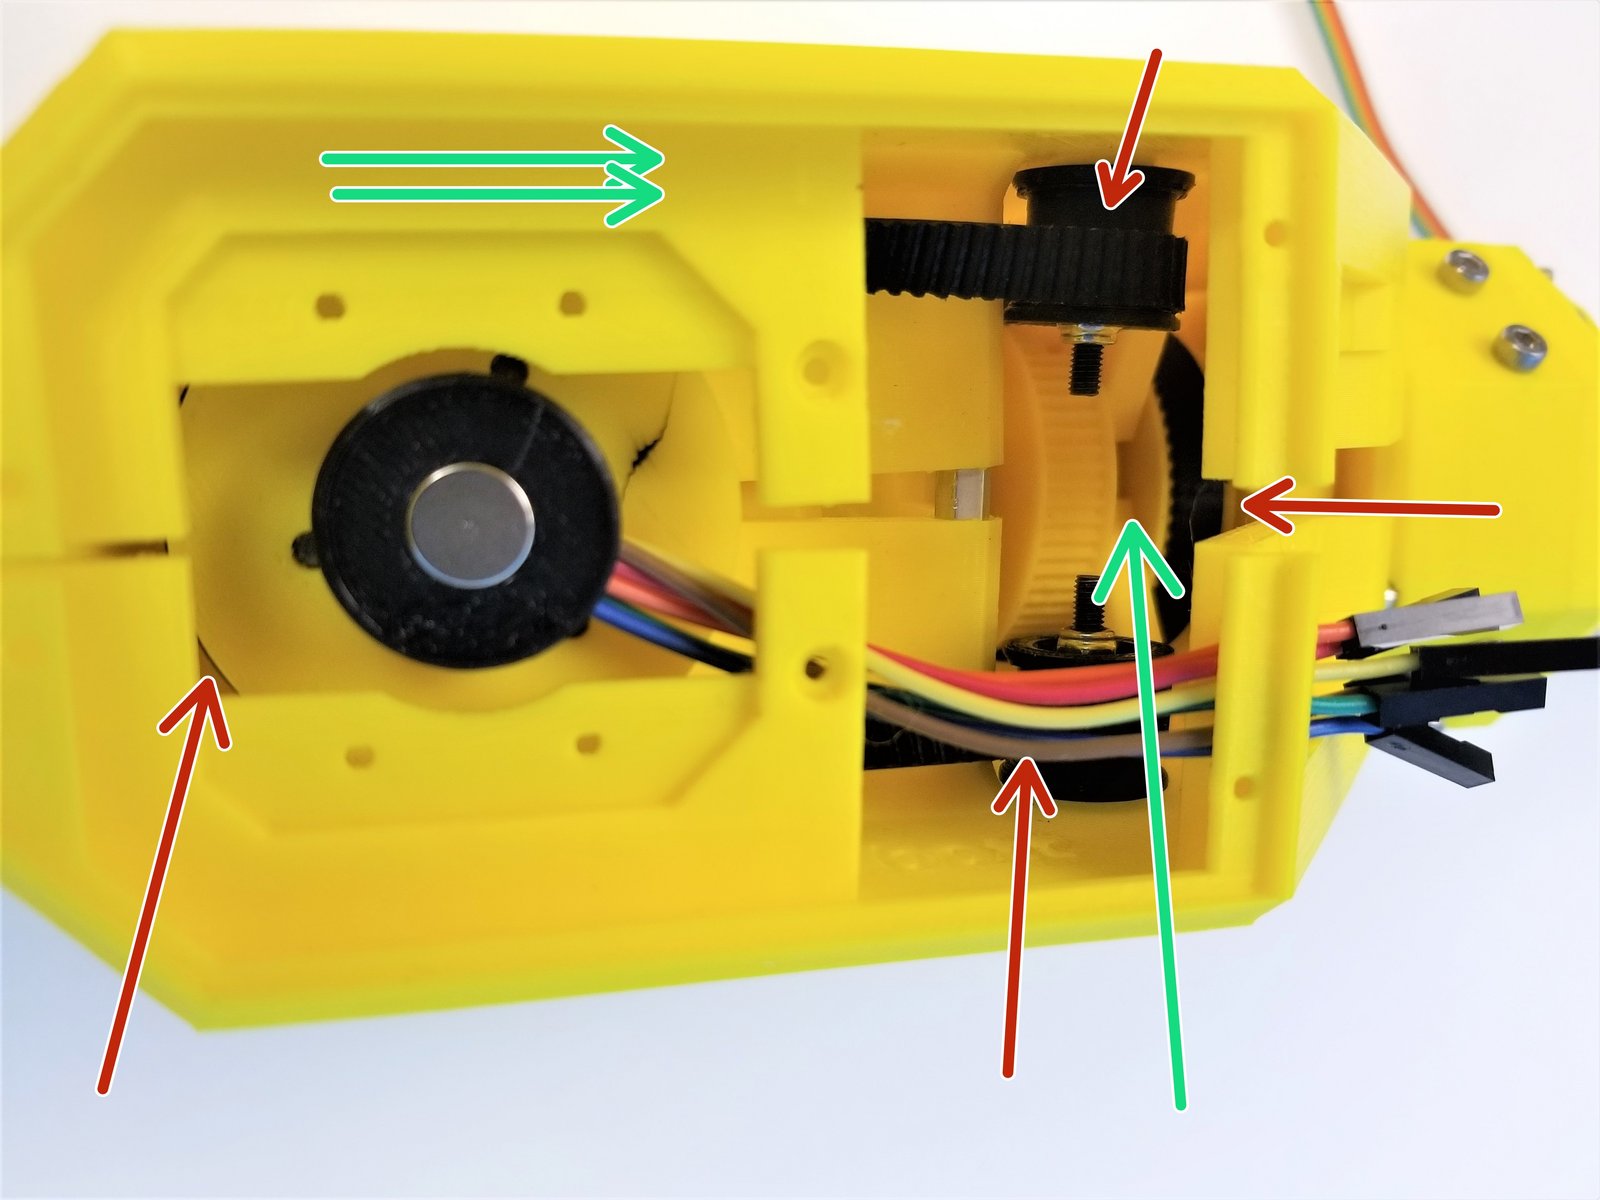
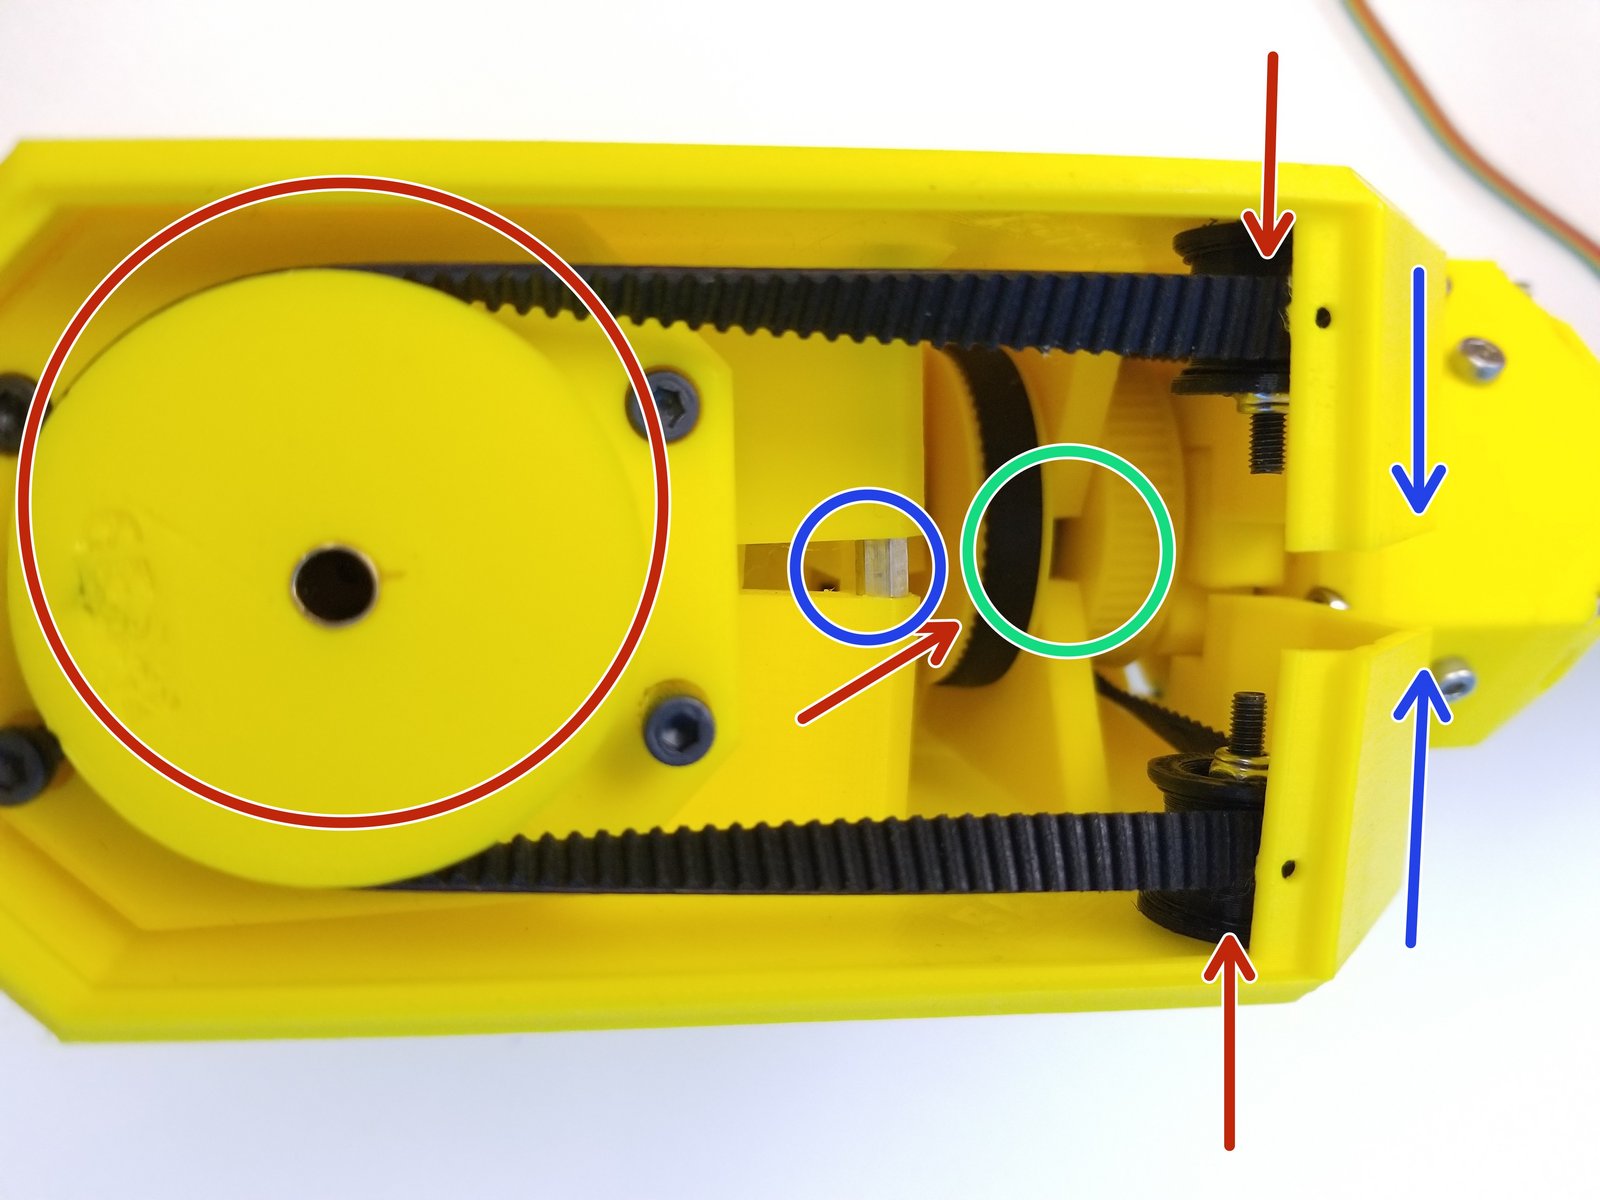
Click the large image to open full size.
- Warning:
Make sure the both Inner and Outer Belts are on ALL the Pulley Gears
Shift the Top Fork back and align the "Pulley Separating Wall"
- Note:
Double check that the Picasso Gearbox Side is all good too
Once all Hex Standoffs are aligned too, Clamp the Top Fork down
Step 20 Fork Clamp - Final
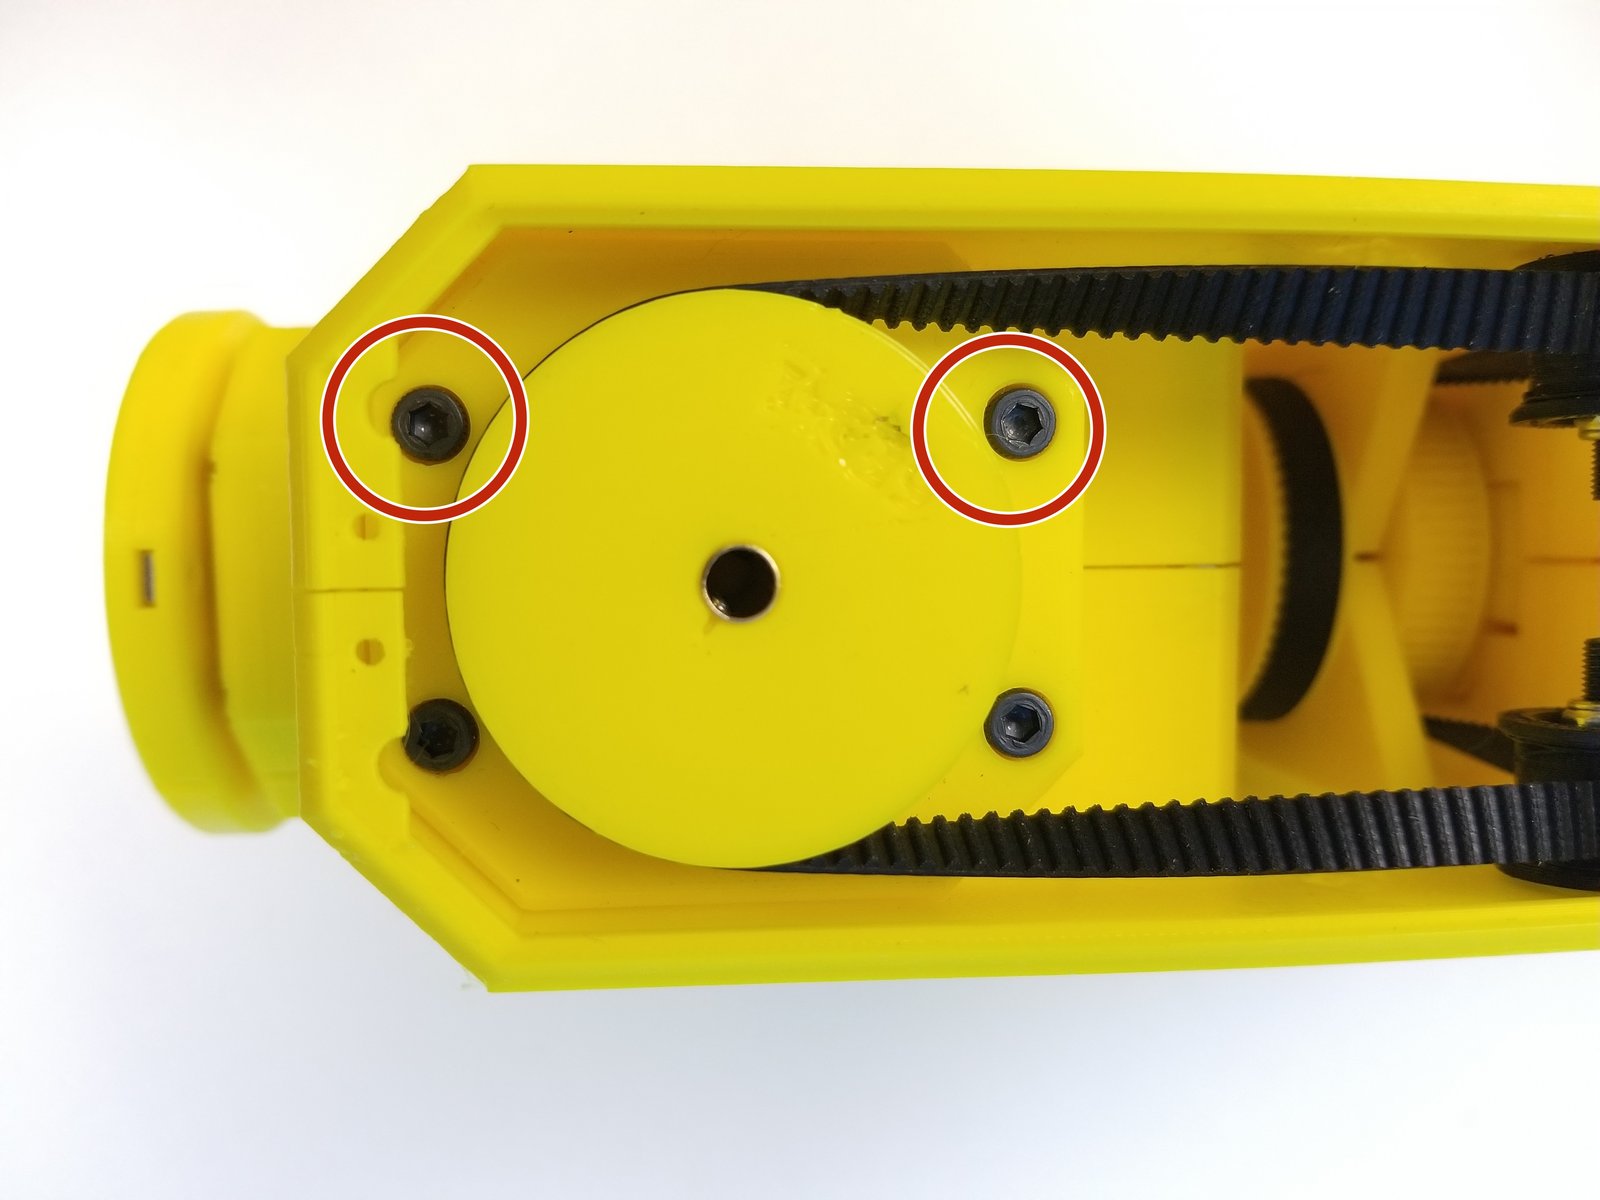
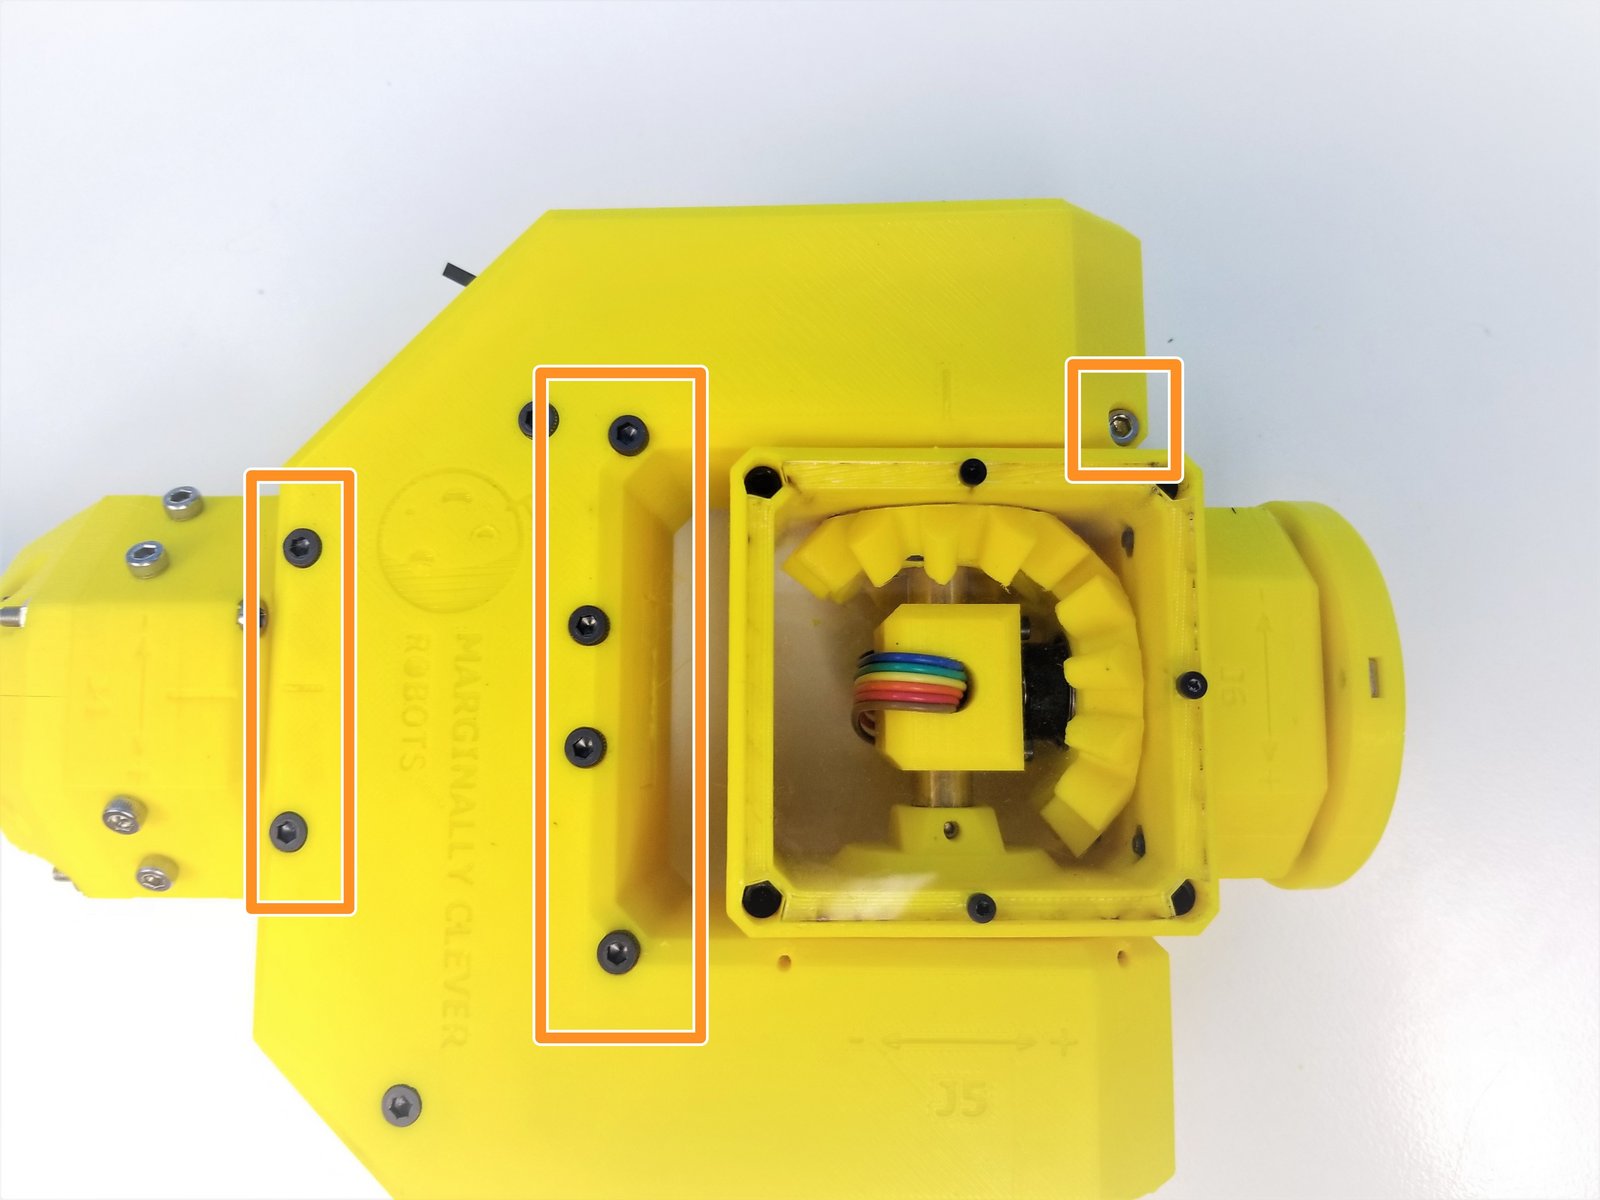
Click the large image to open full size.
Secure the Picasso Gearbox to the Top Fork by tightening the top screws on the Housing
Use M3x25mm Screws and M3x10mm screw to secure the Top Fork to the Bottom Fork
Step 21 Fork Picasso Sensor - Parts
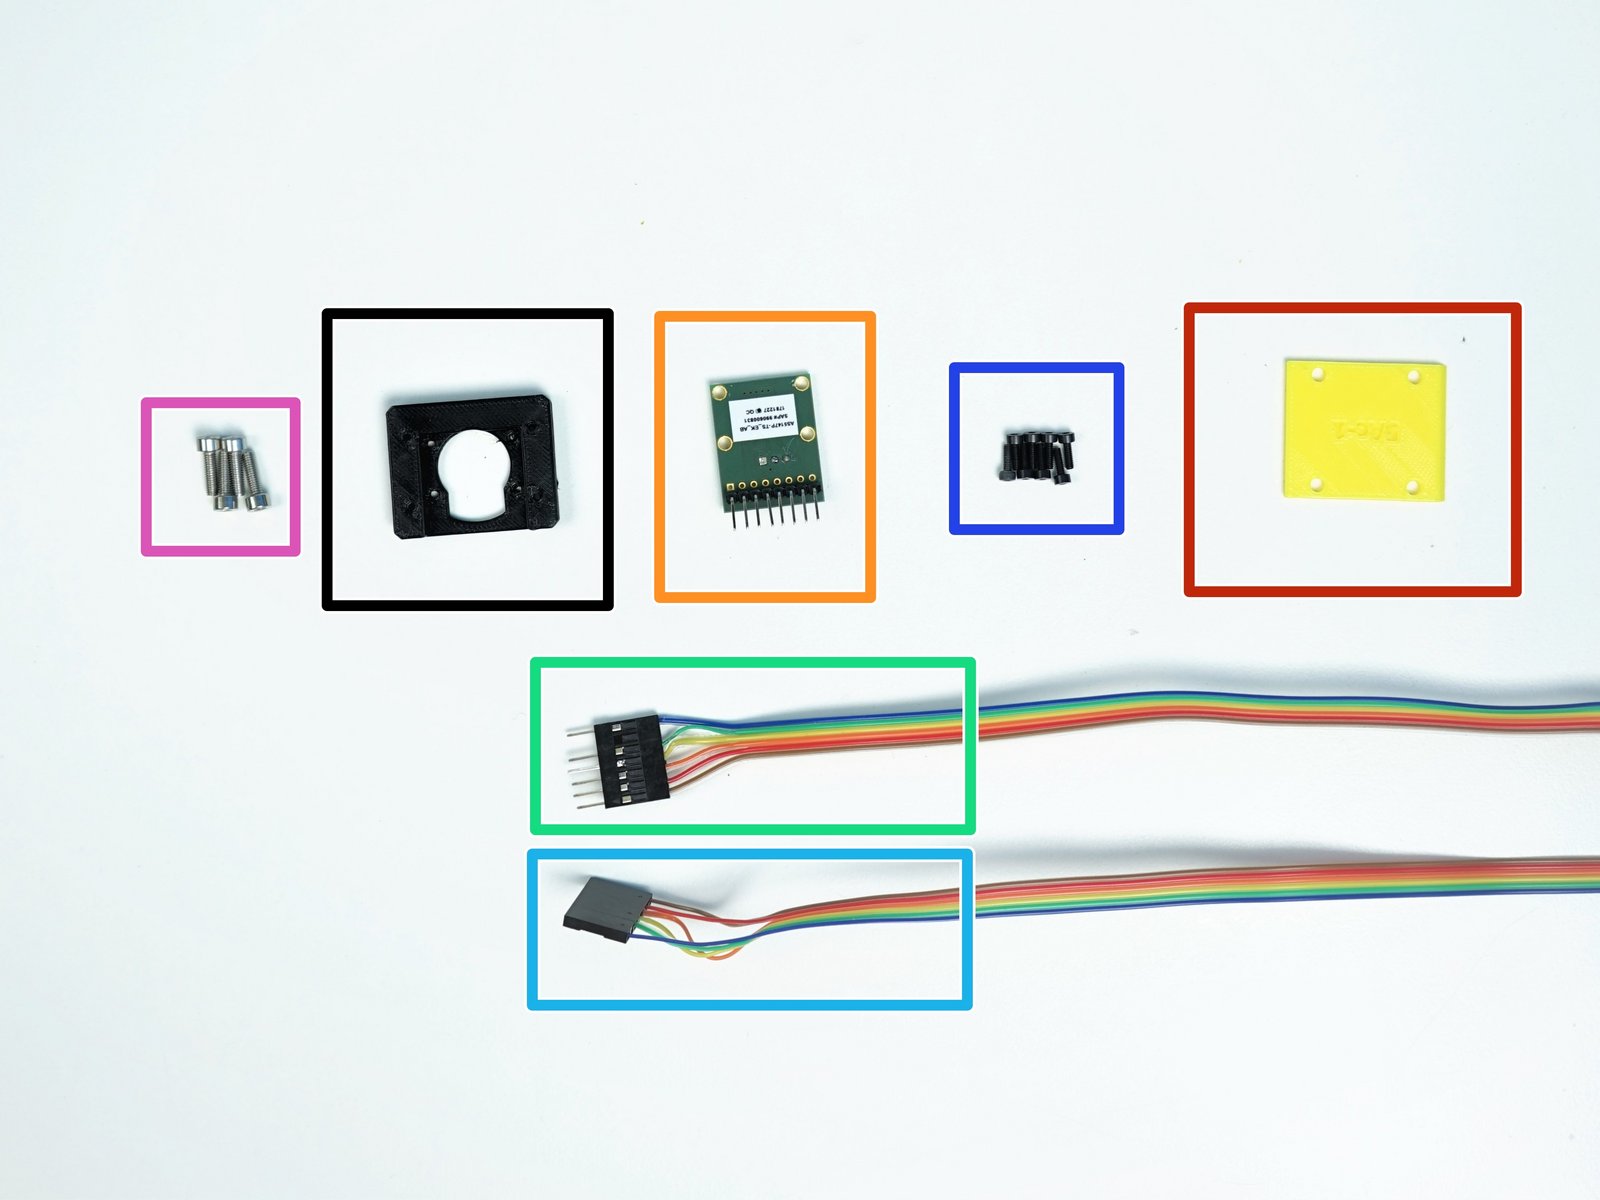
Click the large image to open full size.
- Note:
Prepare the following components:
[3D] - AS6147 Sensor Adapter 2
[3D] - 5Ac Fork Cable Clamp
AS5147 Sensor {right angle header on the label side}
6-pin Ribbon Cable M/O - Brown to Blue {sensor 5 Hand} - [1470mm]
6-pin Ribbon Cable F/O - Brown to Blue {sensor 4 Wrist} - [1520mm]
M2x6mm Screws (x8)
M3x10mm Screws (x4)
Step 22 Fork Picasso Sensor - 1
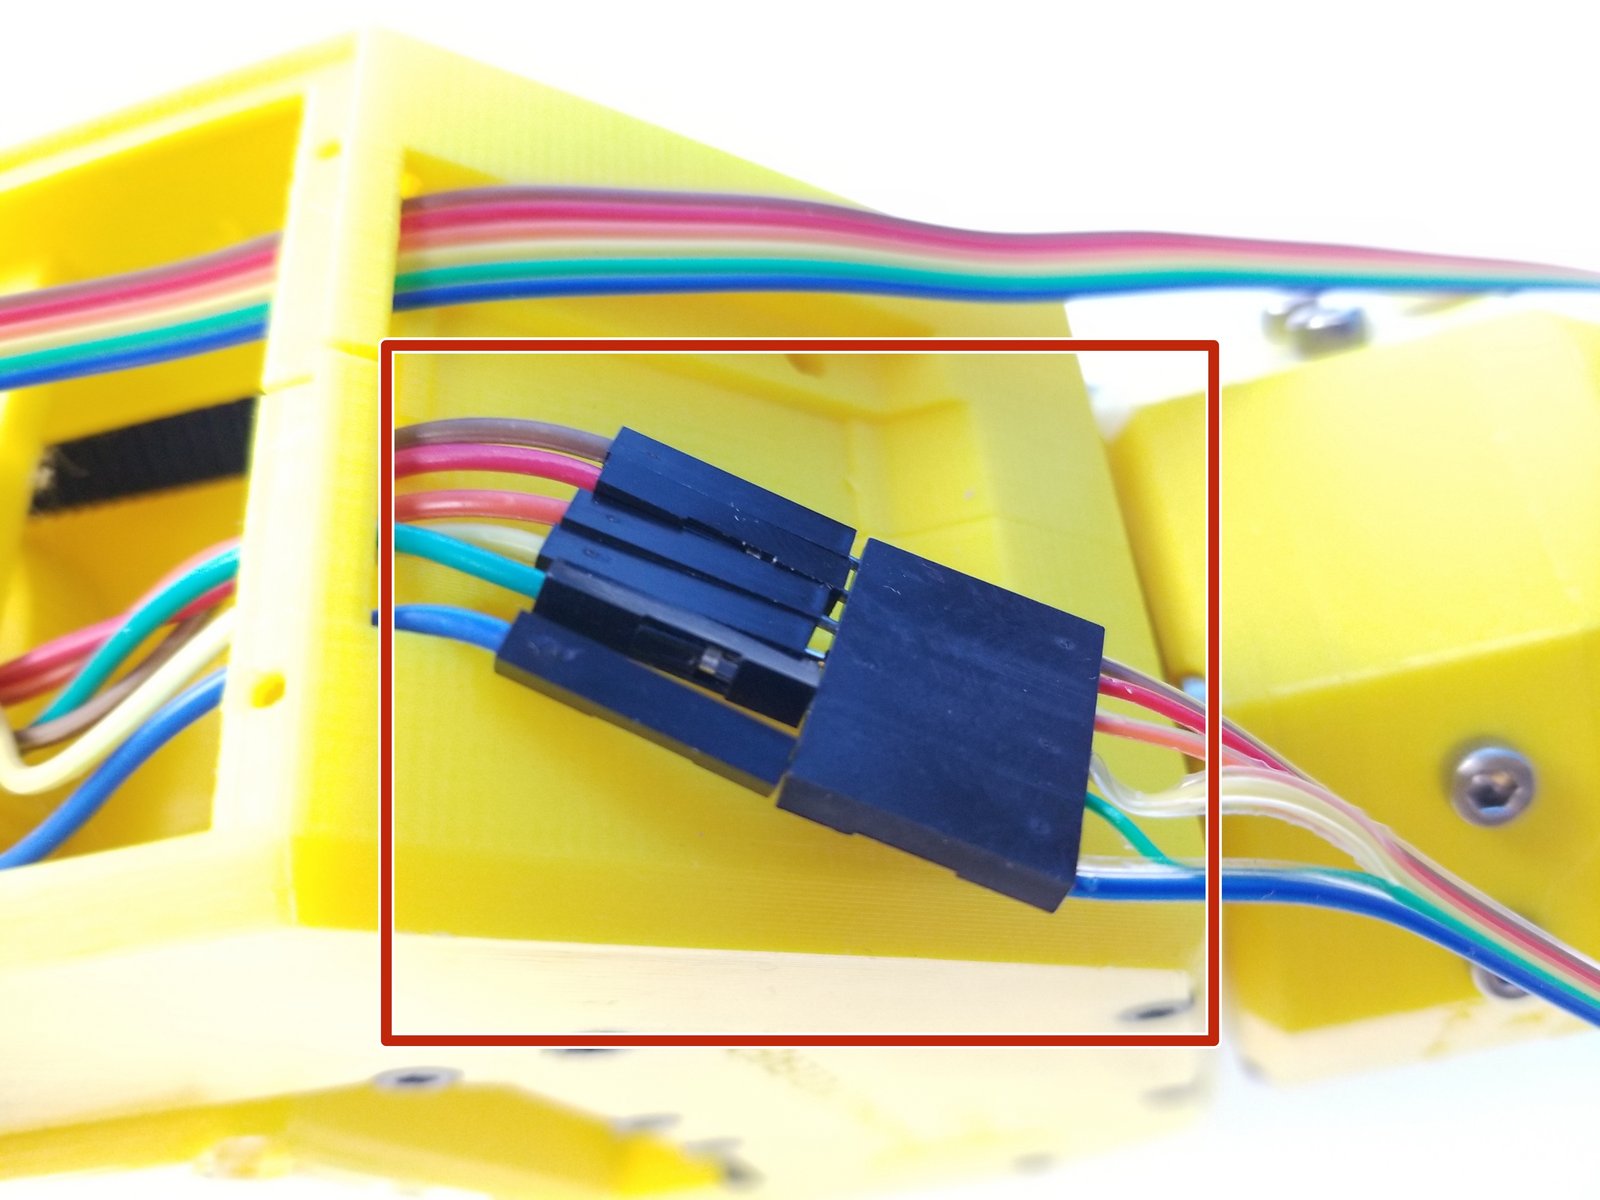
Click the large image to open full size.
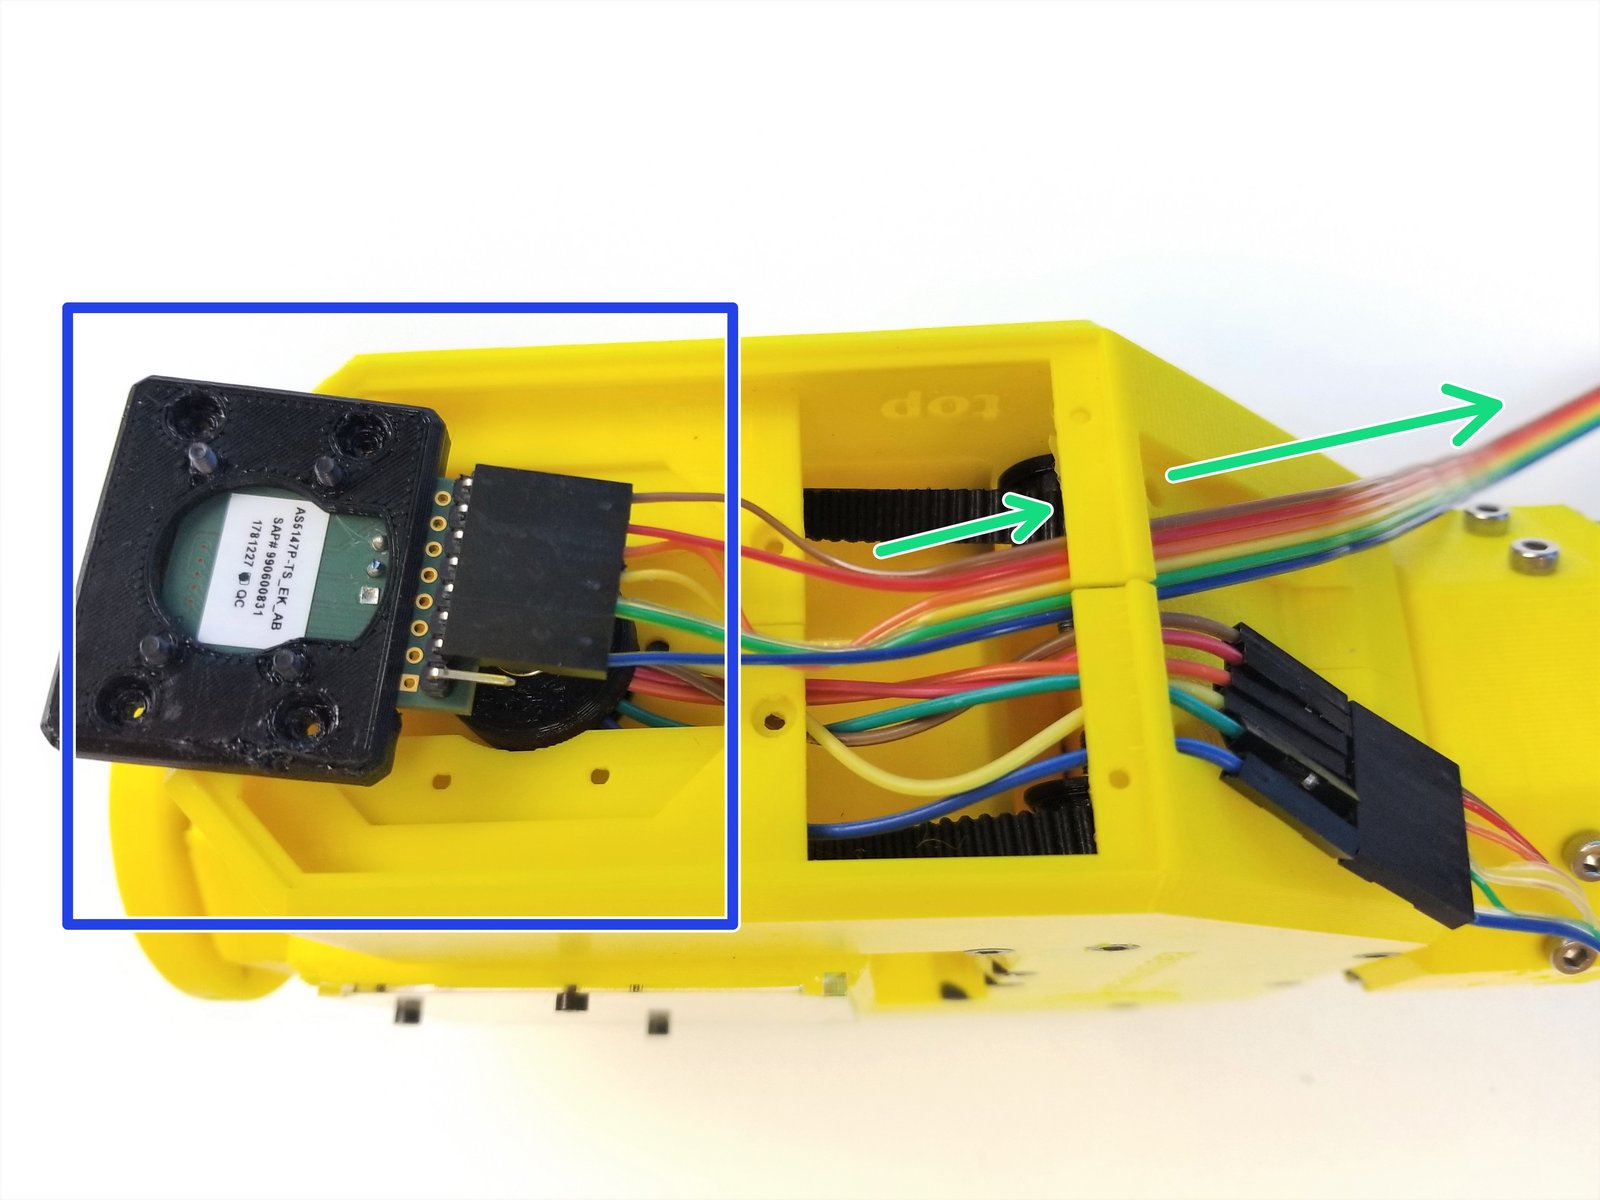
Connect the Hand Sensor Cable Extension to the Wires that comes out of the Picasso Box {Hand Sensor}
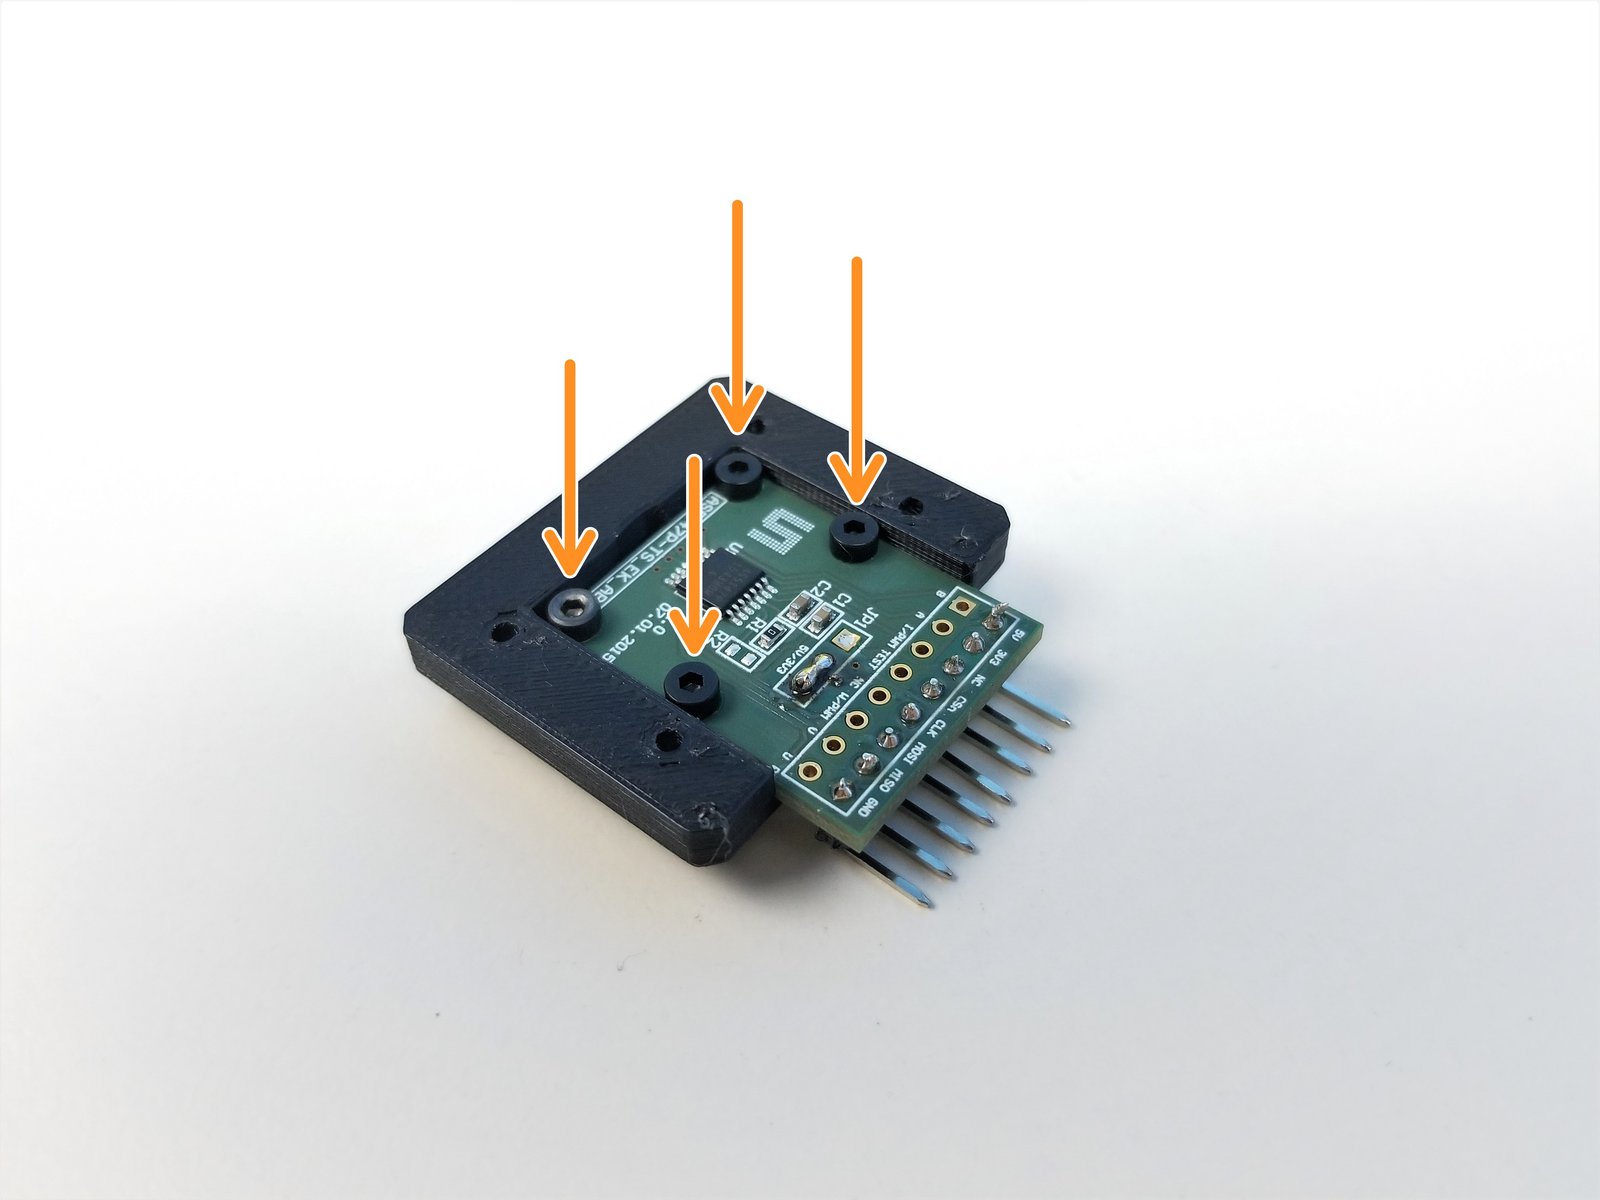
Mount AS5147 Sensor to the Sensor Adapter 2 using M2x6mm Screws
Insert the Wrist Sensor Cable {Female} through the Cable Clamp
Connect the Wrist Sensor Cable to AS5147 Sensor
- Note:
If you don't remember the Connection Orientation from previous steps, just copy the picture.
Step 23 Fork Picasso Sensor - 2
Click the large image to open full size.
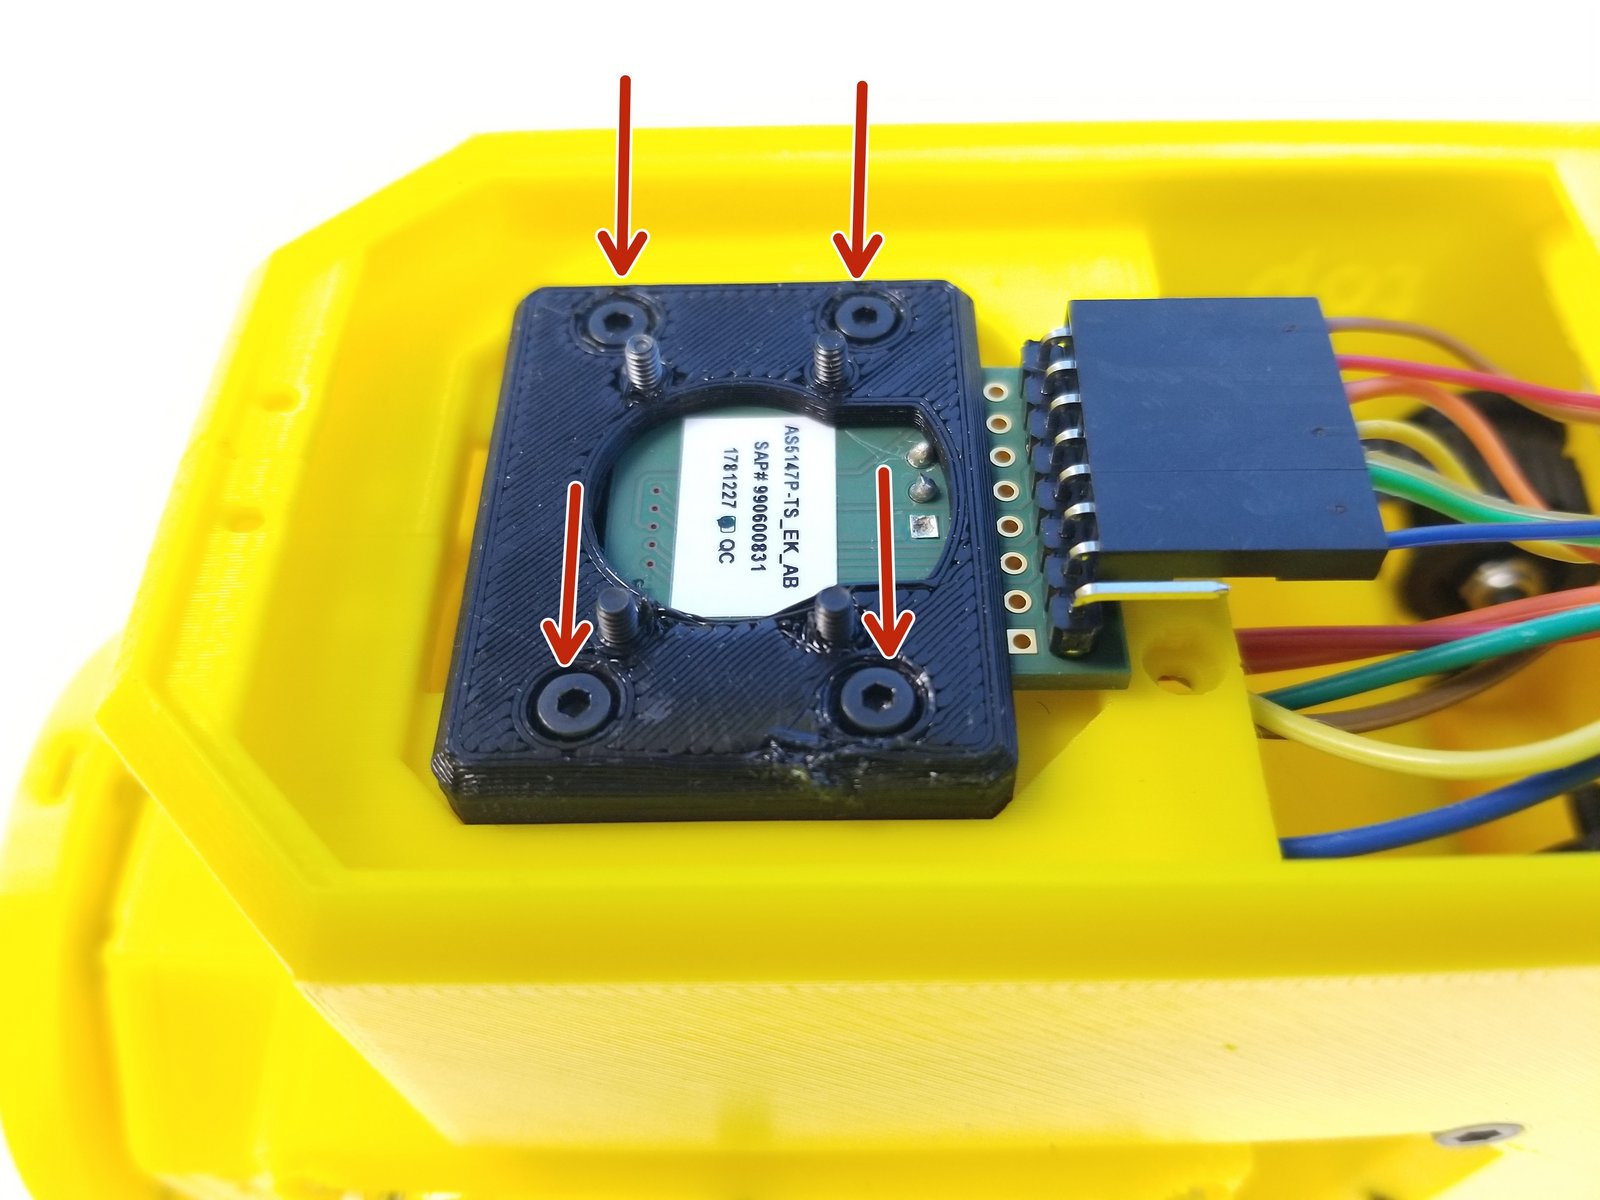
Use M2x6mm Screws to secure the Sensor Adapter to the Fork
- Note:
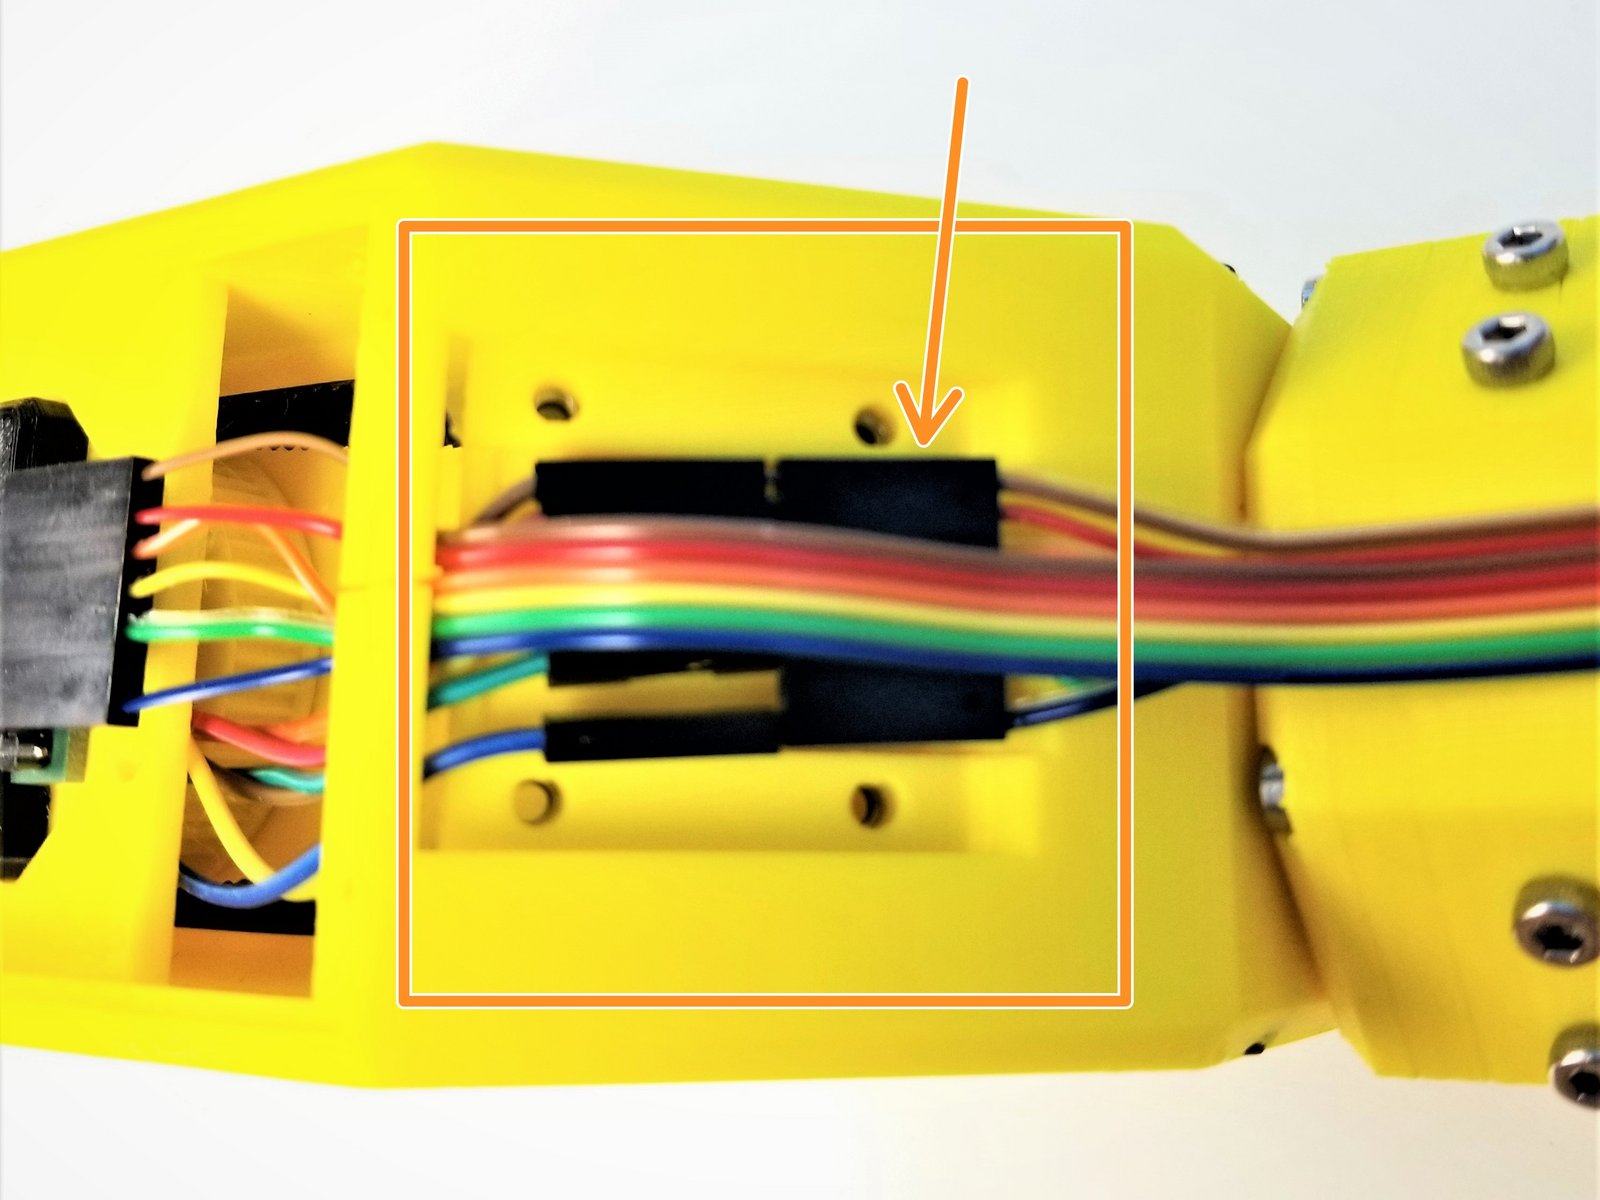
Organize the Cables on the Cable Clamp area
The Hand Sensor Connector is below the Wrist Sensor Cable
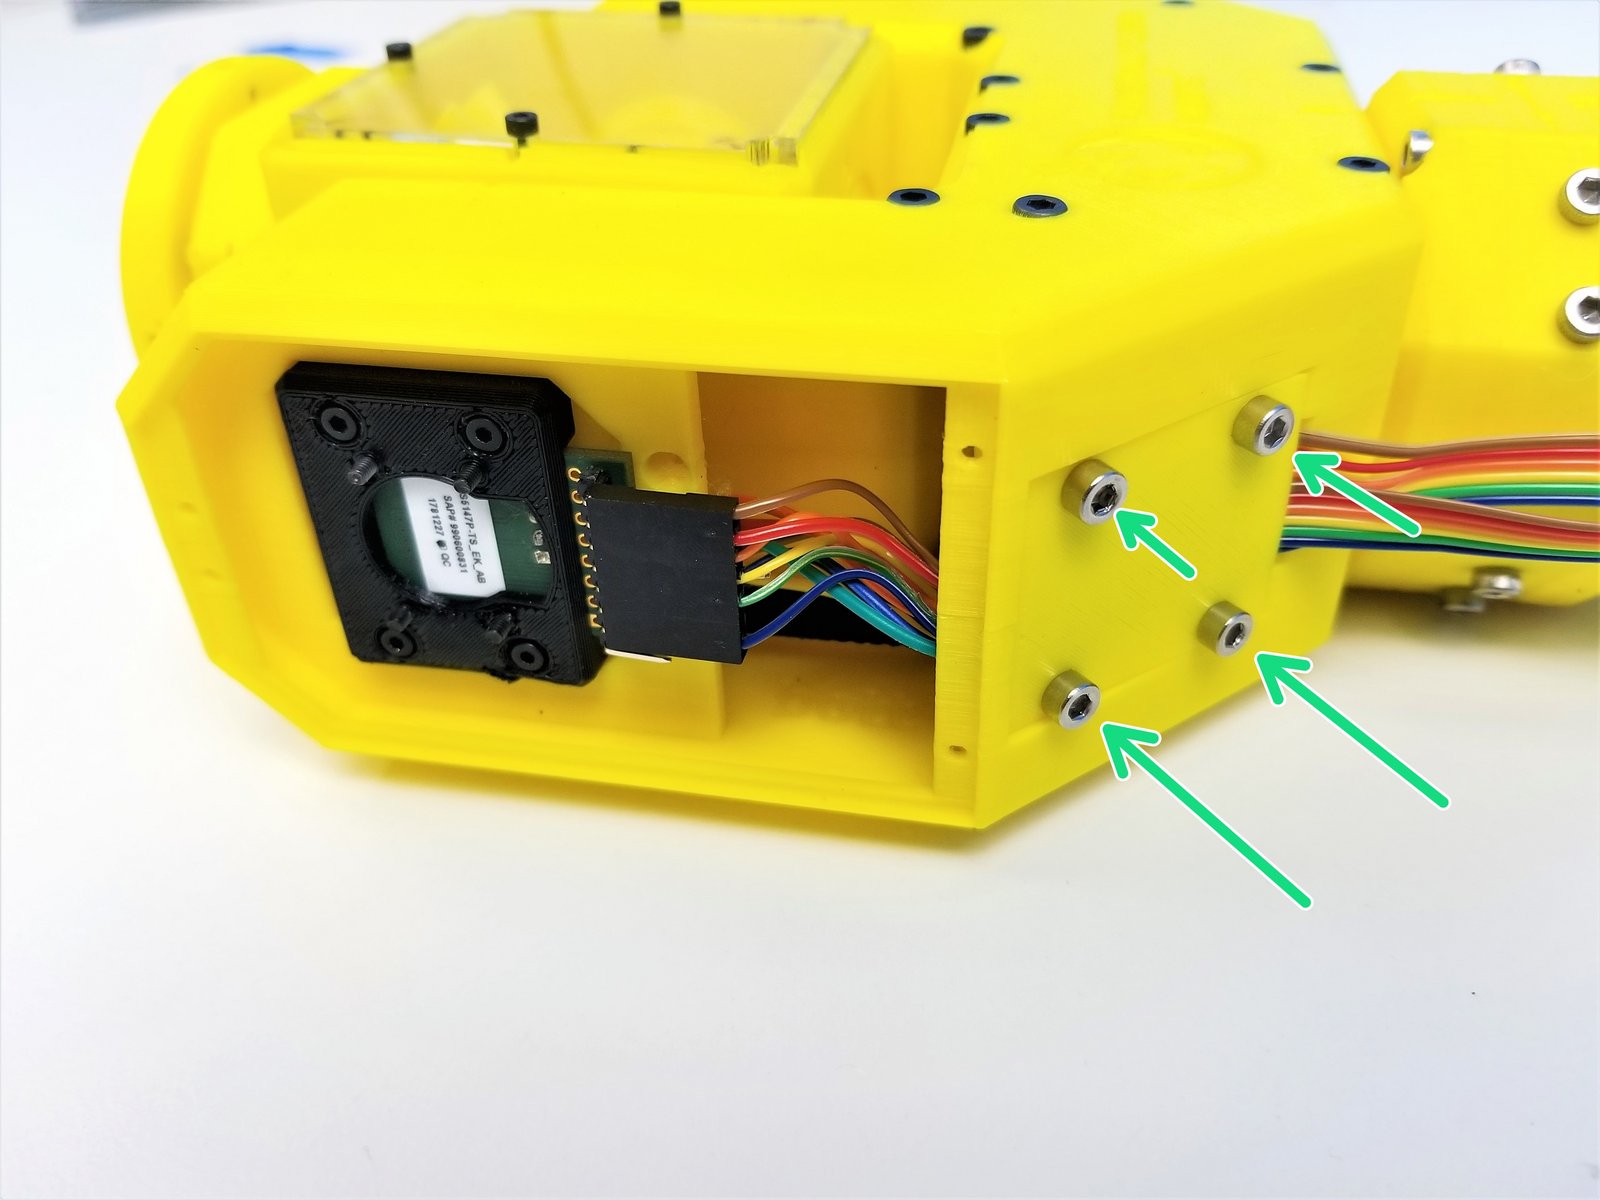
Use M3x10mm Screws to clamp the sensor cables with Fork Cable Clamp Plate
- Note:
There's only one orientation that the Clamp Plate can go on,
- Warning:
Make sure the Version Label is facing the Cable
- Warning:
Chamfered Part is where the Cable comes Out
Step 24 Fork Final Touch - Cover
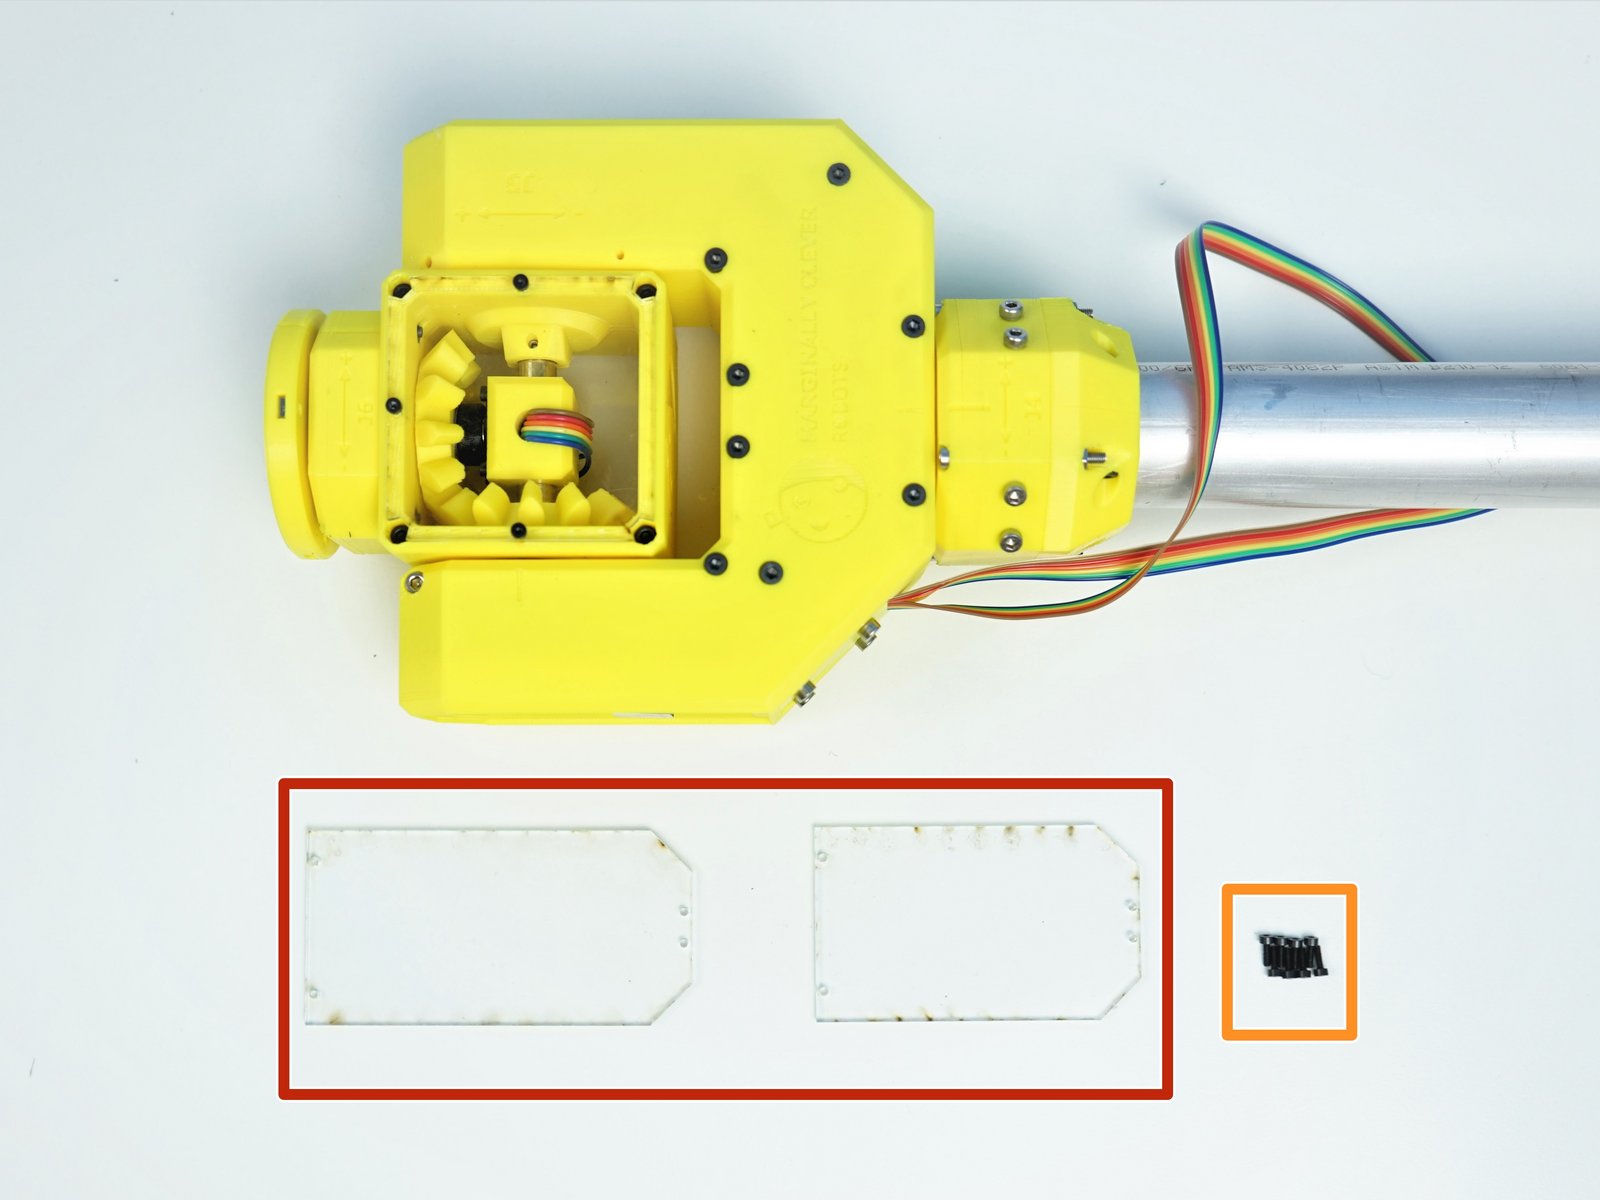
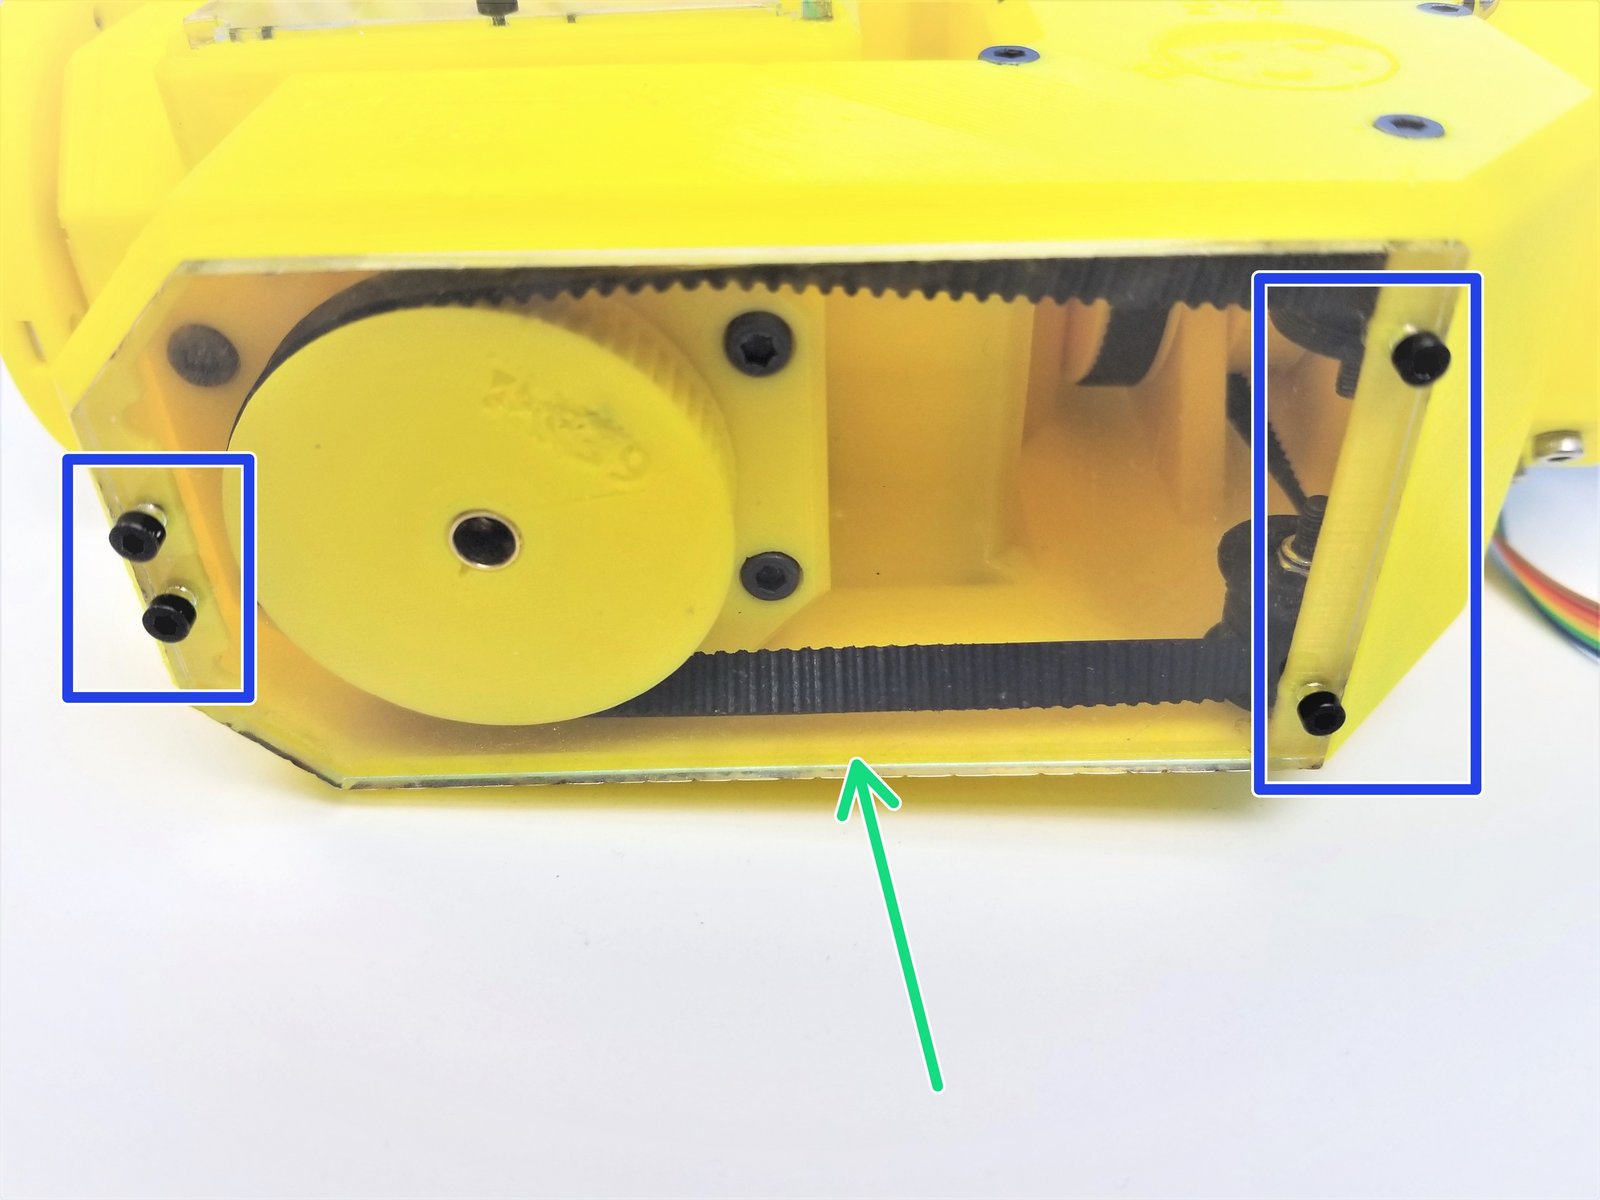
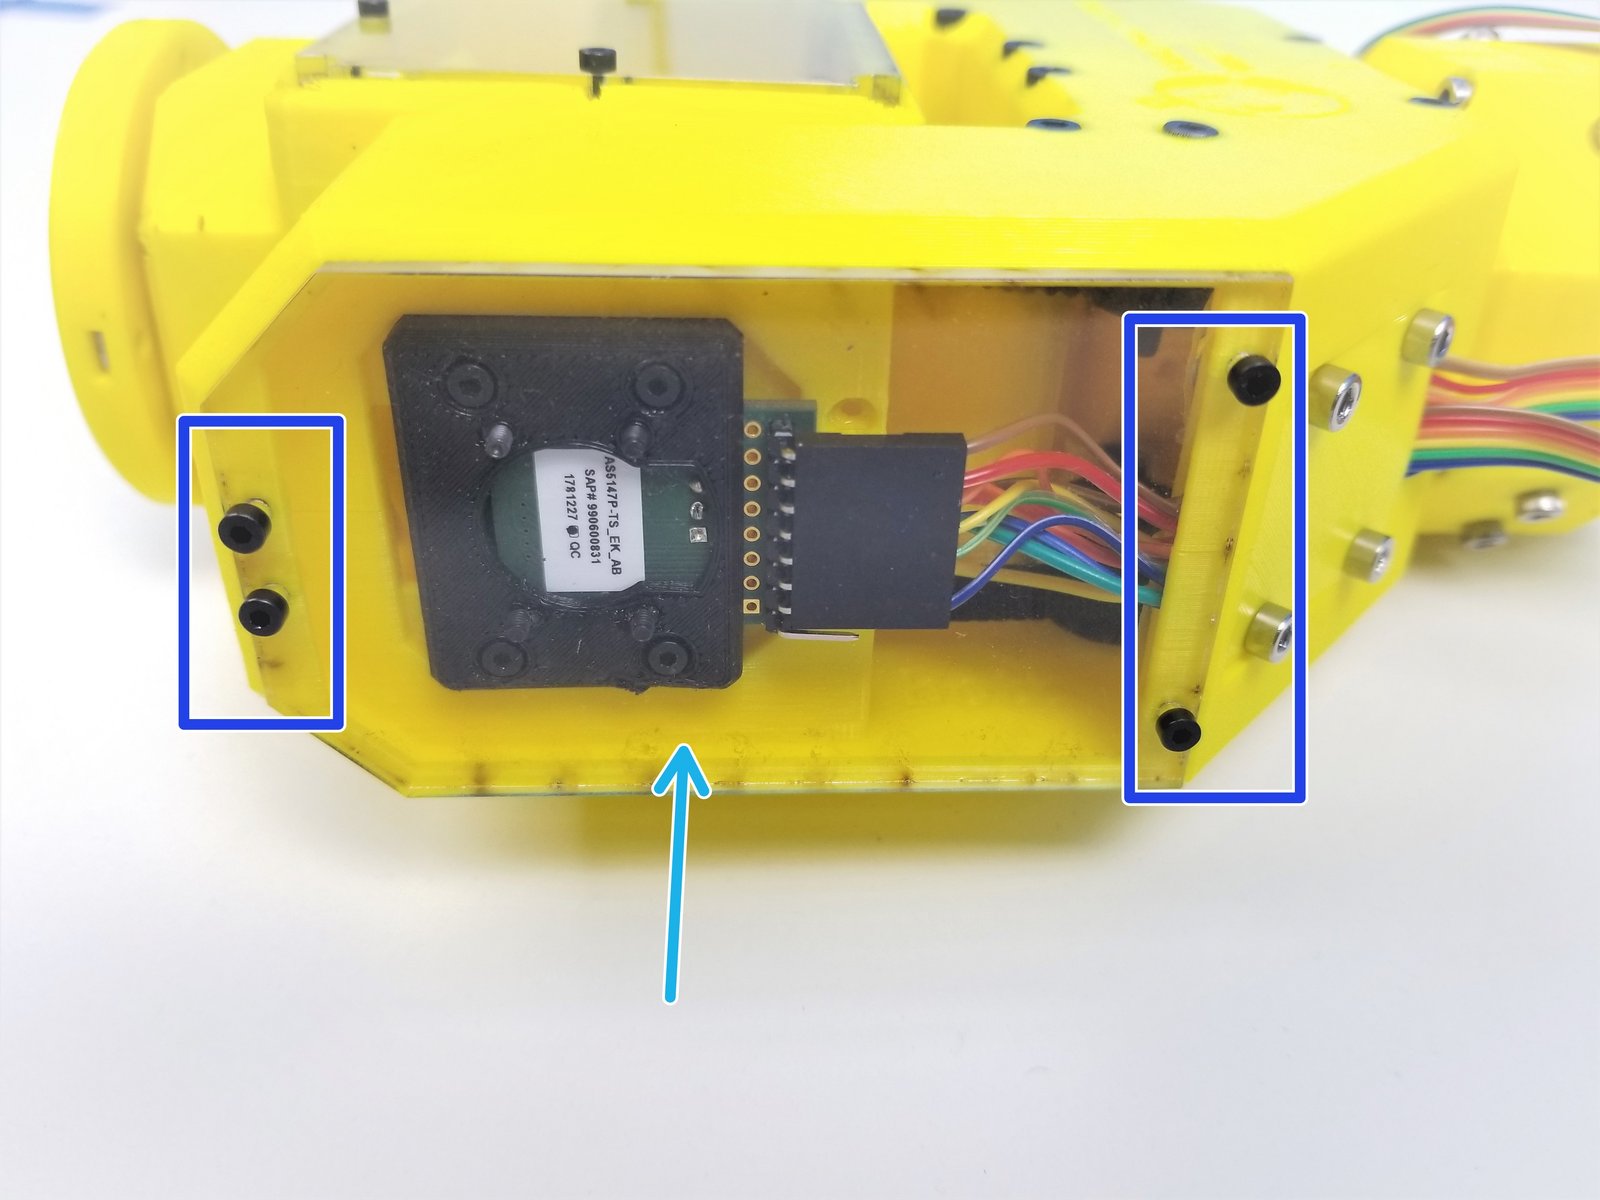
Click the large image to open full size.
- Note:
Prepare the following components:
[LSR] - Fork Acrylic Plates {Large & Small}
M2x6mm Screws (x8)
Small Acrylic Plate goes on the Sensor Side
Large one goes on the Wrist Gearbox Side
Secure them with M2x6mm Screws
Step 25 Fork Final Touch - Alignment
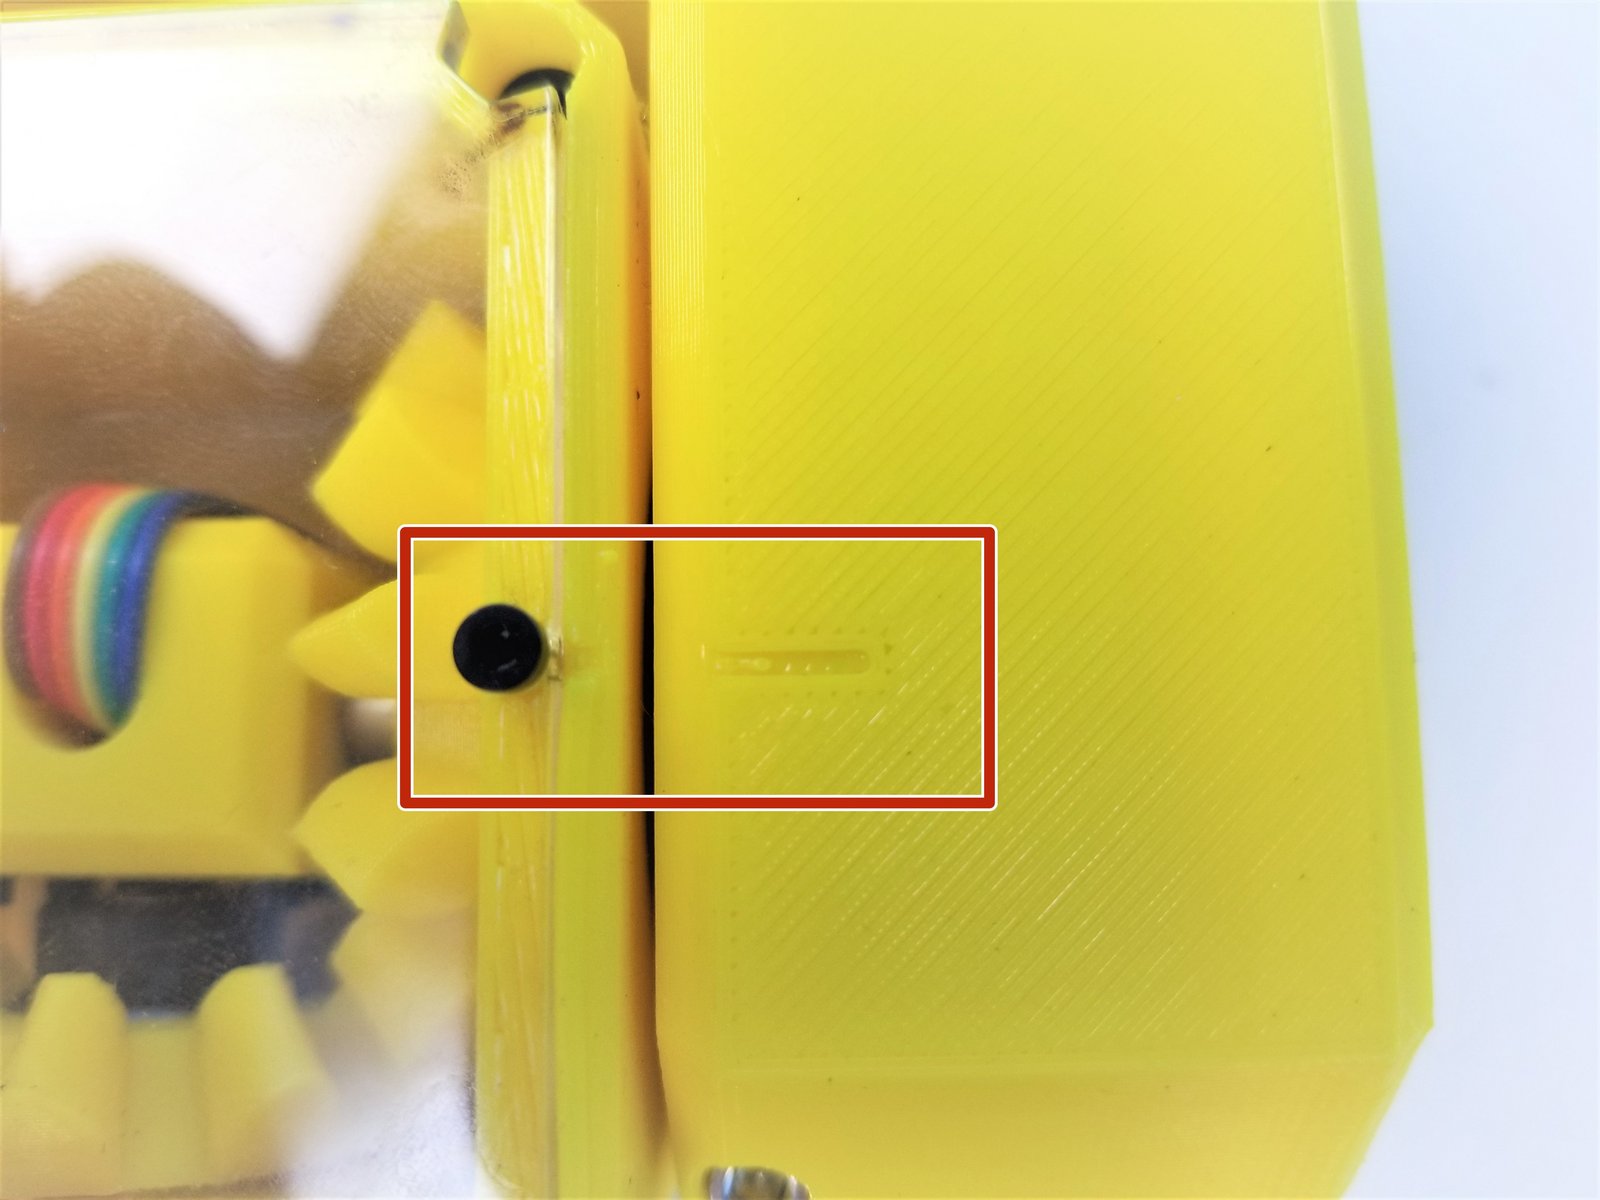
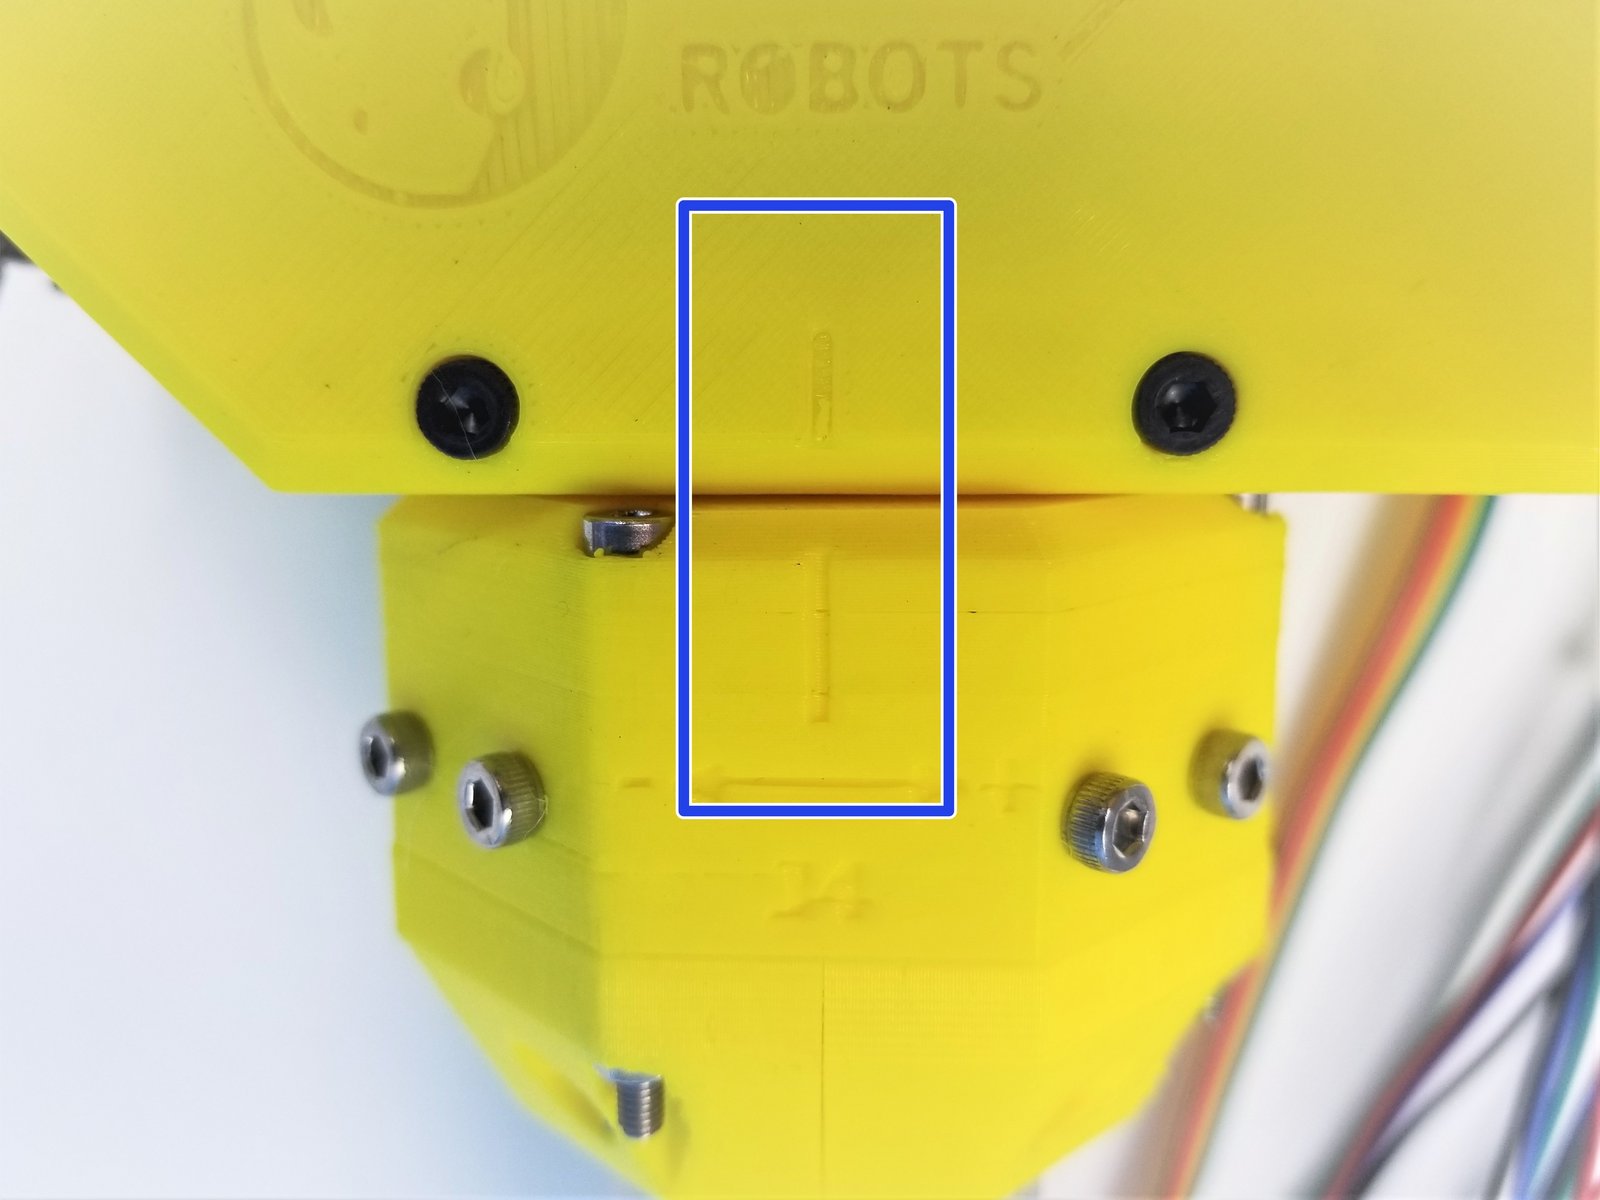
Click the large image to open full size.
- Note:
Rotate the Motor Shafts on the Elbow Tail Side to rotate the joints
Align the Picasso Box to the Fork
Align the Fork to the Ulna Gearbox
Align the Hand to the Picasso Box.
- Note:
Movement for all three joints should be smooth and without play in both directions.
Step 26 Finish!
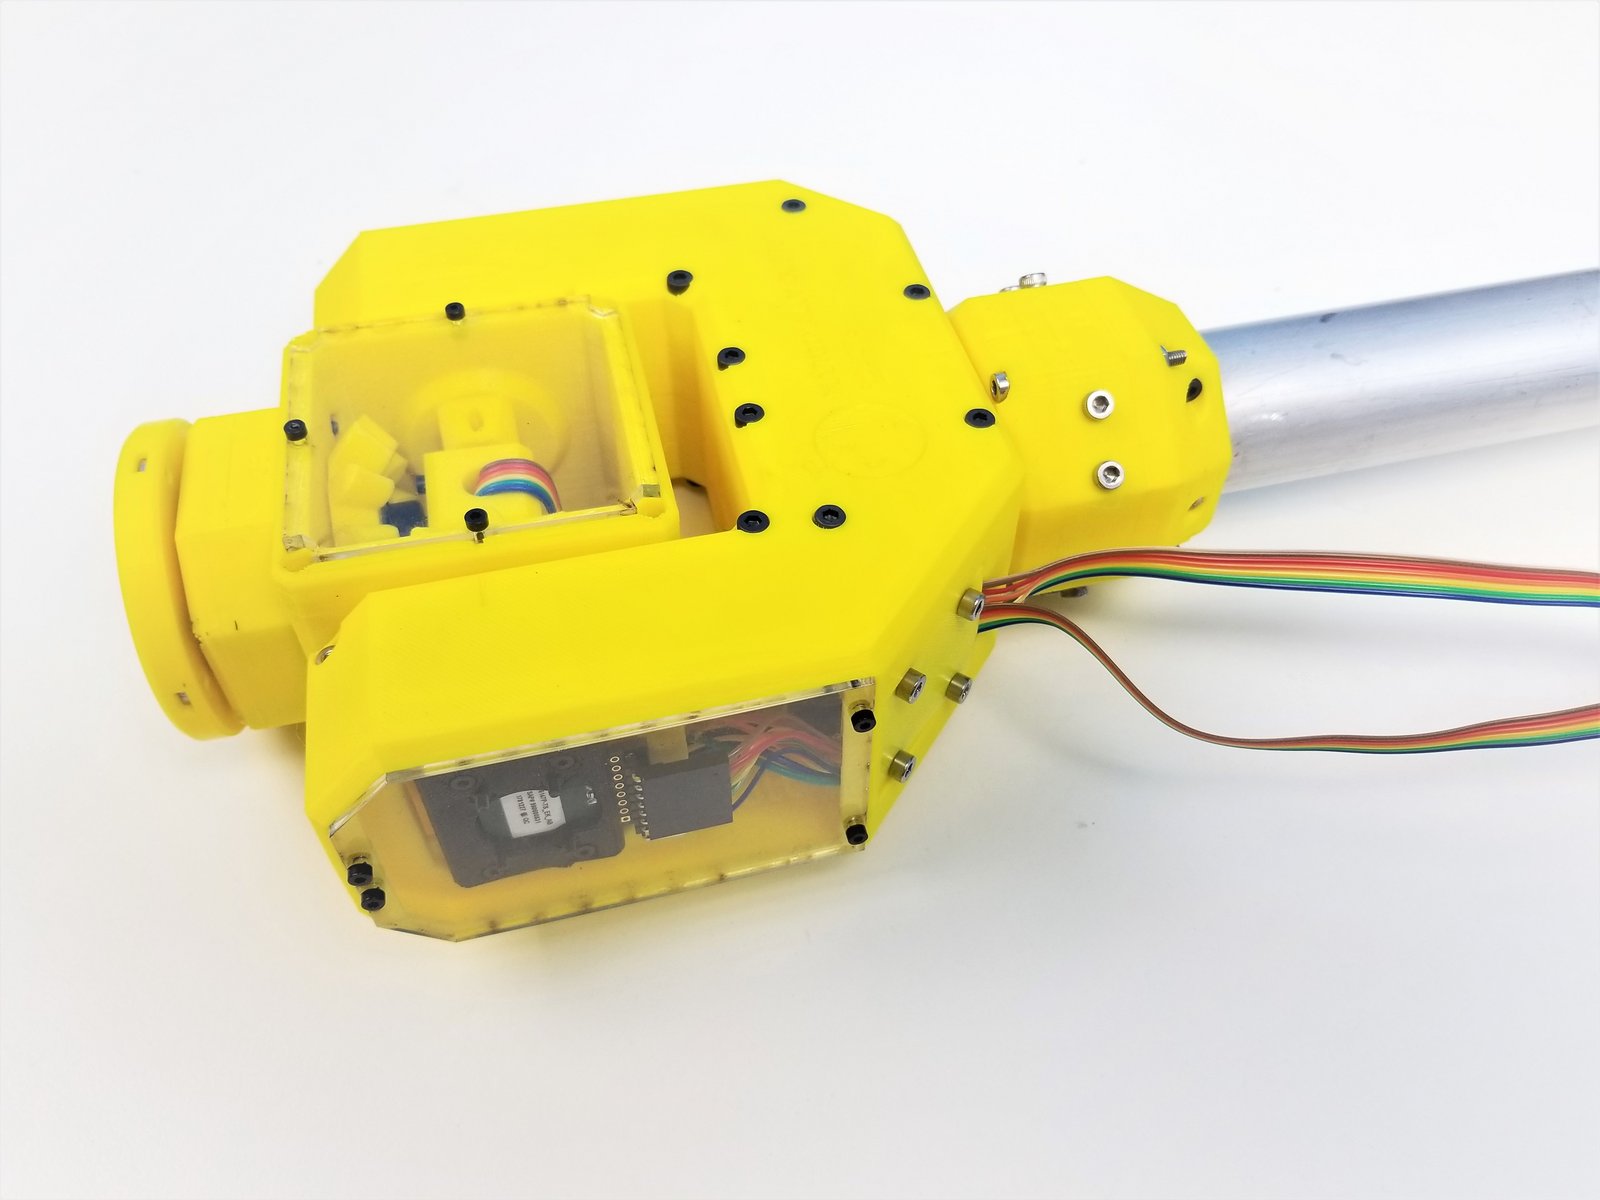
Click the large image to open full size.
Congratulation! You are nearly there!!!