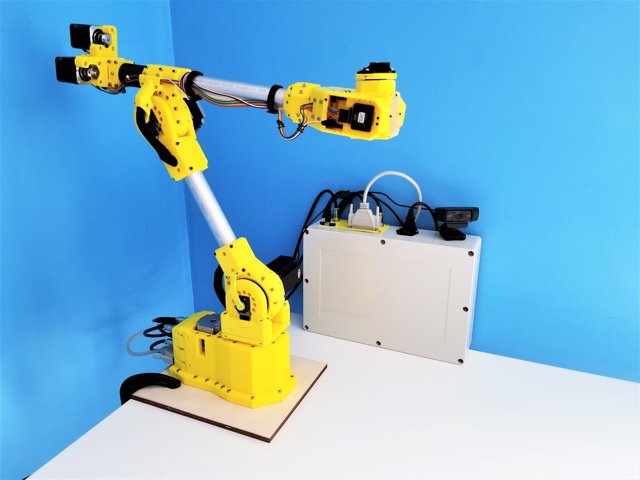
Sixi 2 robot arm
8. Anchor Assembly
Step 1 Tools and Parts Required for this Chapter
Click the large image to open full size.
[3D] - Anchor Components
[LSR] - Anchor Base Plate
Cable Management Components
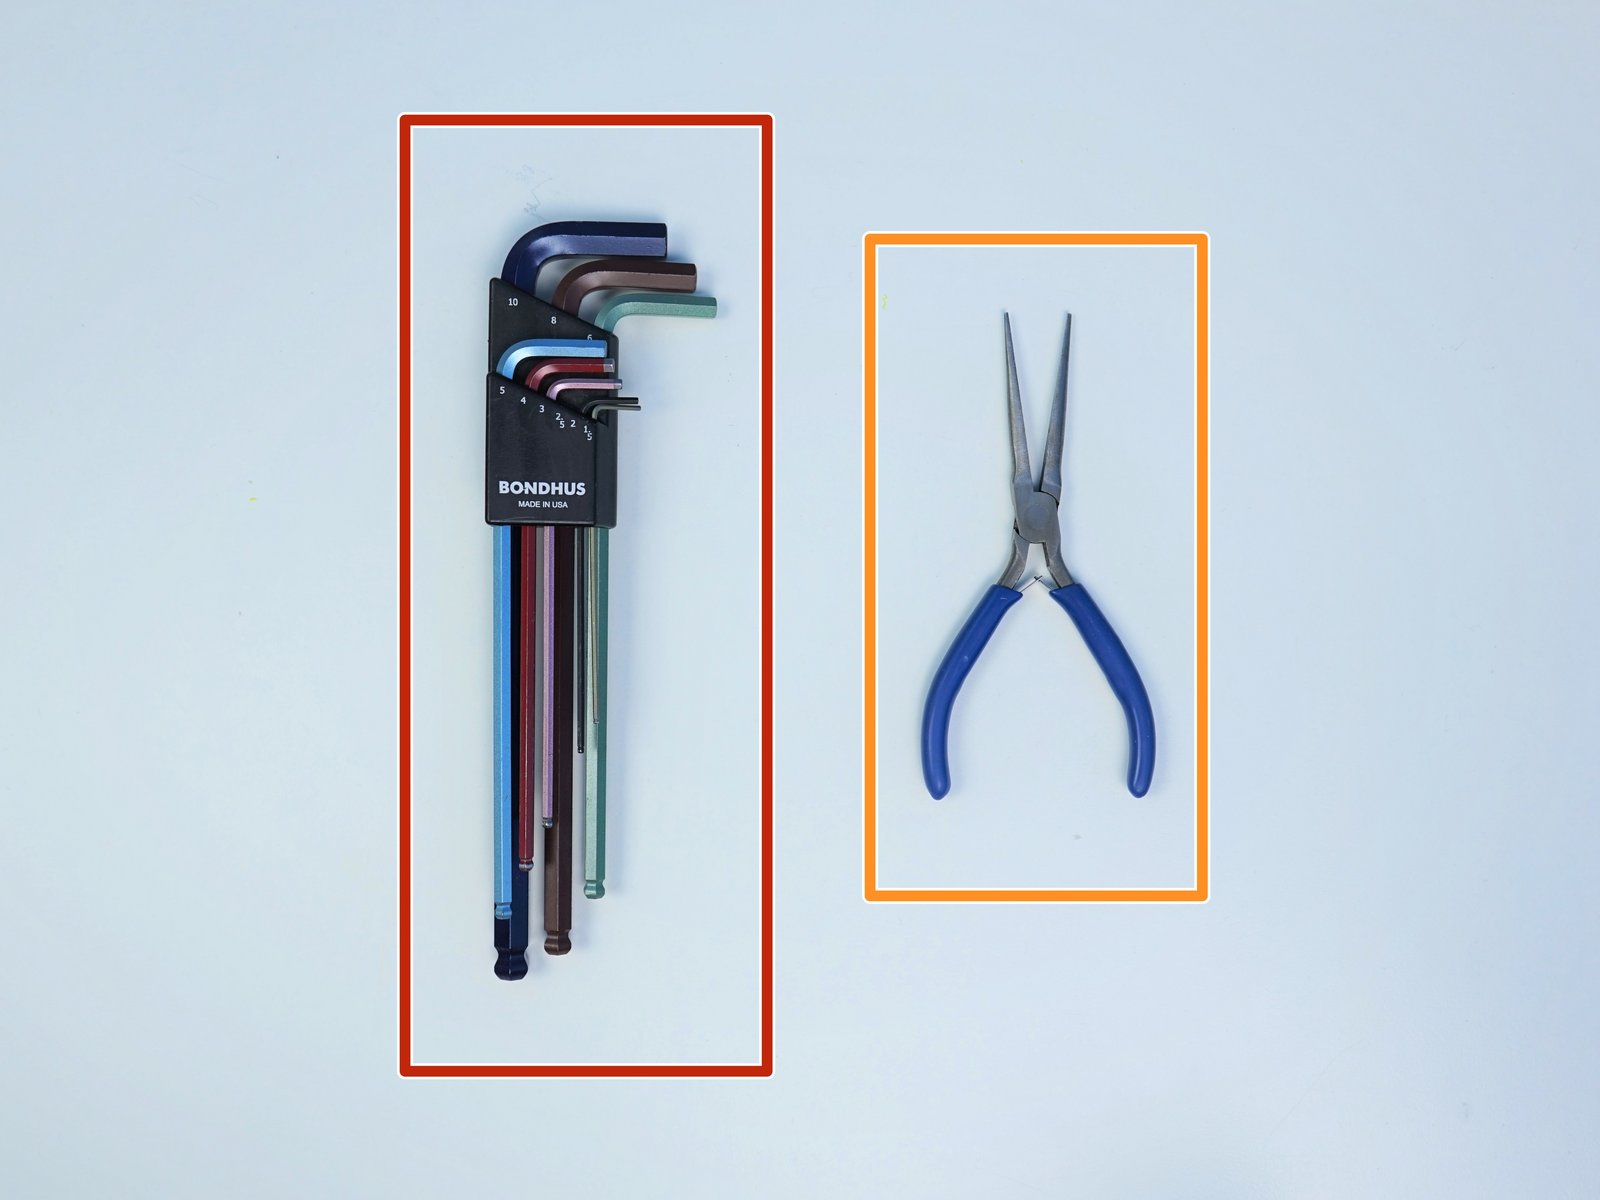
Alan Keys
Pliers
Step 2 Anchor Gearbox Output Disk Bottom - Parts
Click the large image to open full size.
- Note:
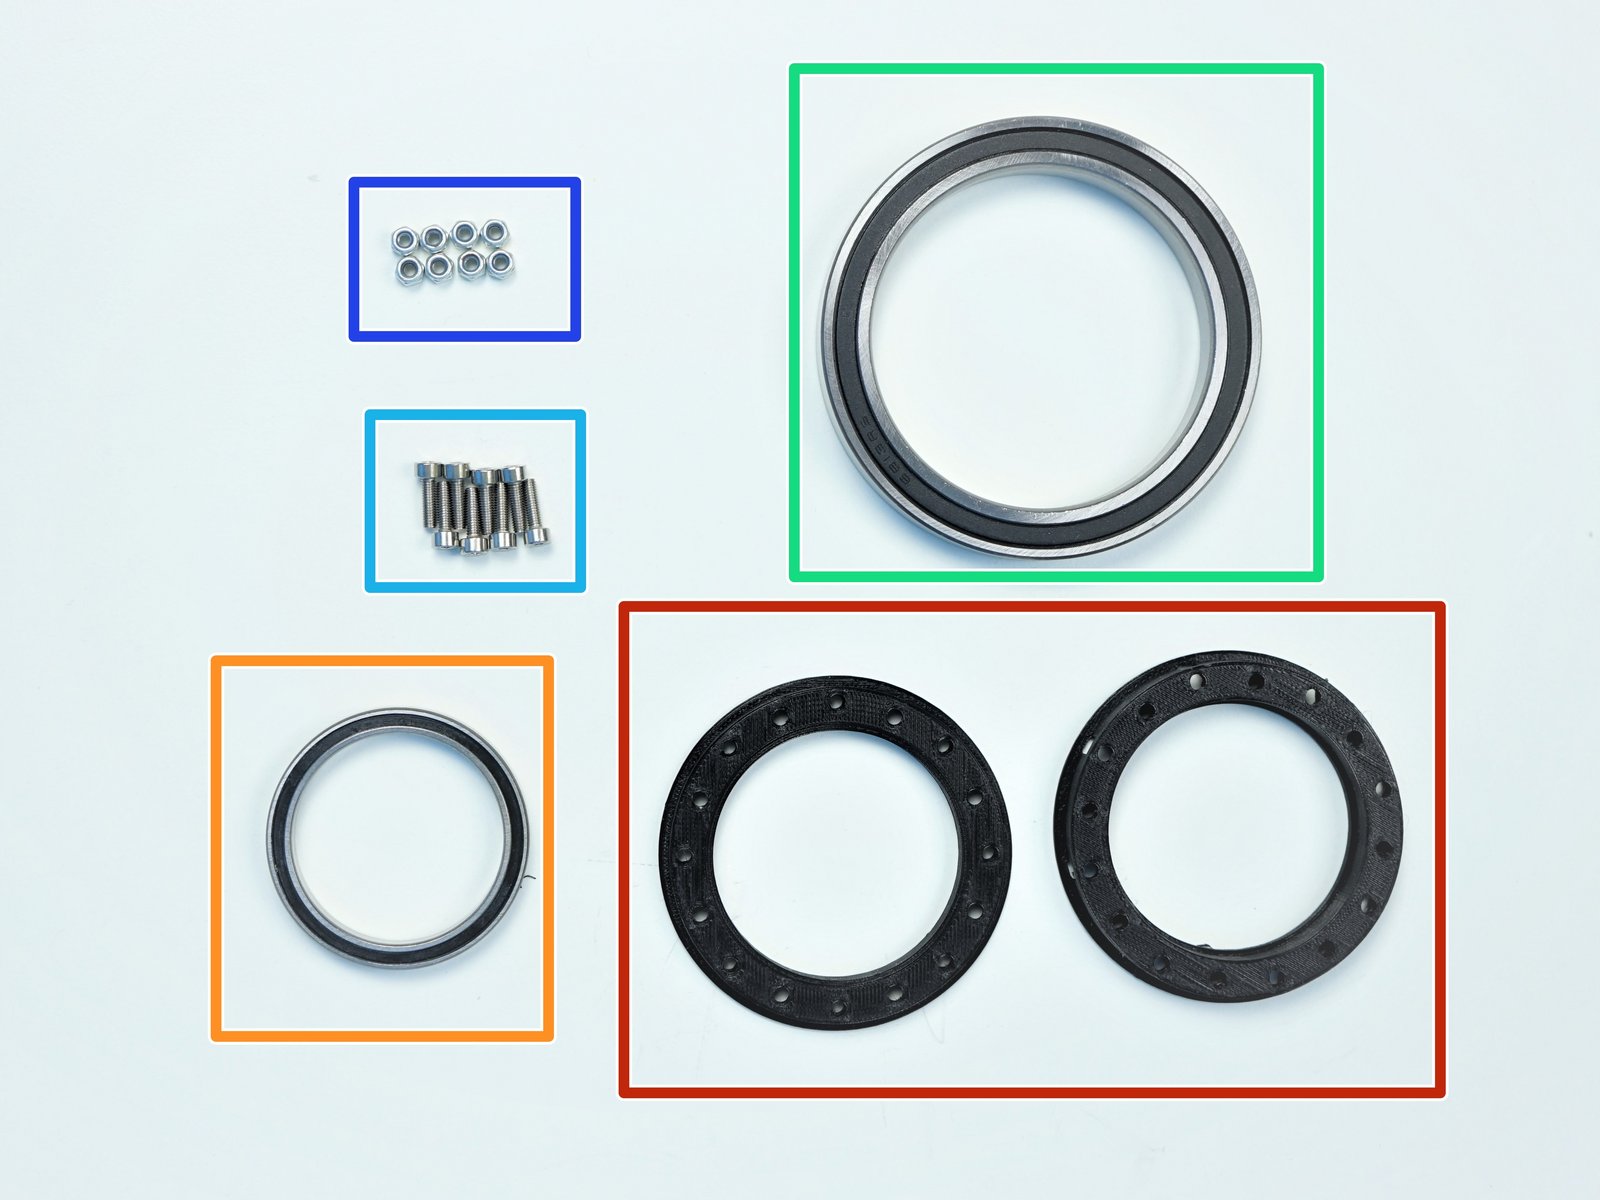
Prepare the following components:
[3D] - 1GB Output Disks Bottom {screw head side & nut insert side}
6708 Bearings [40x50x6mm] (x1)
6813 Bearing [65x85x10mm] (x1)
M3x10mm Screws (x8)
M3 Nylock Nuts (x8)
Step 3 Anchor Gearbox Output Disk Bottom - 1
Click the large image to open full size.
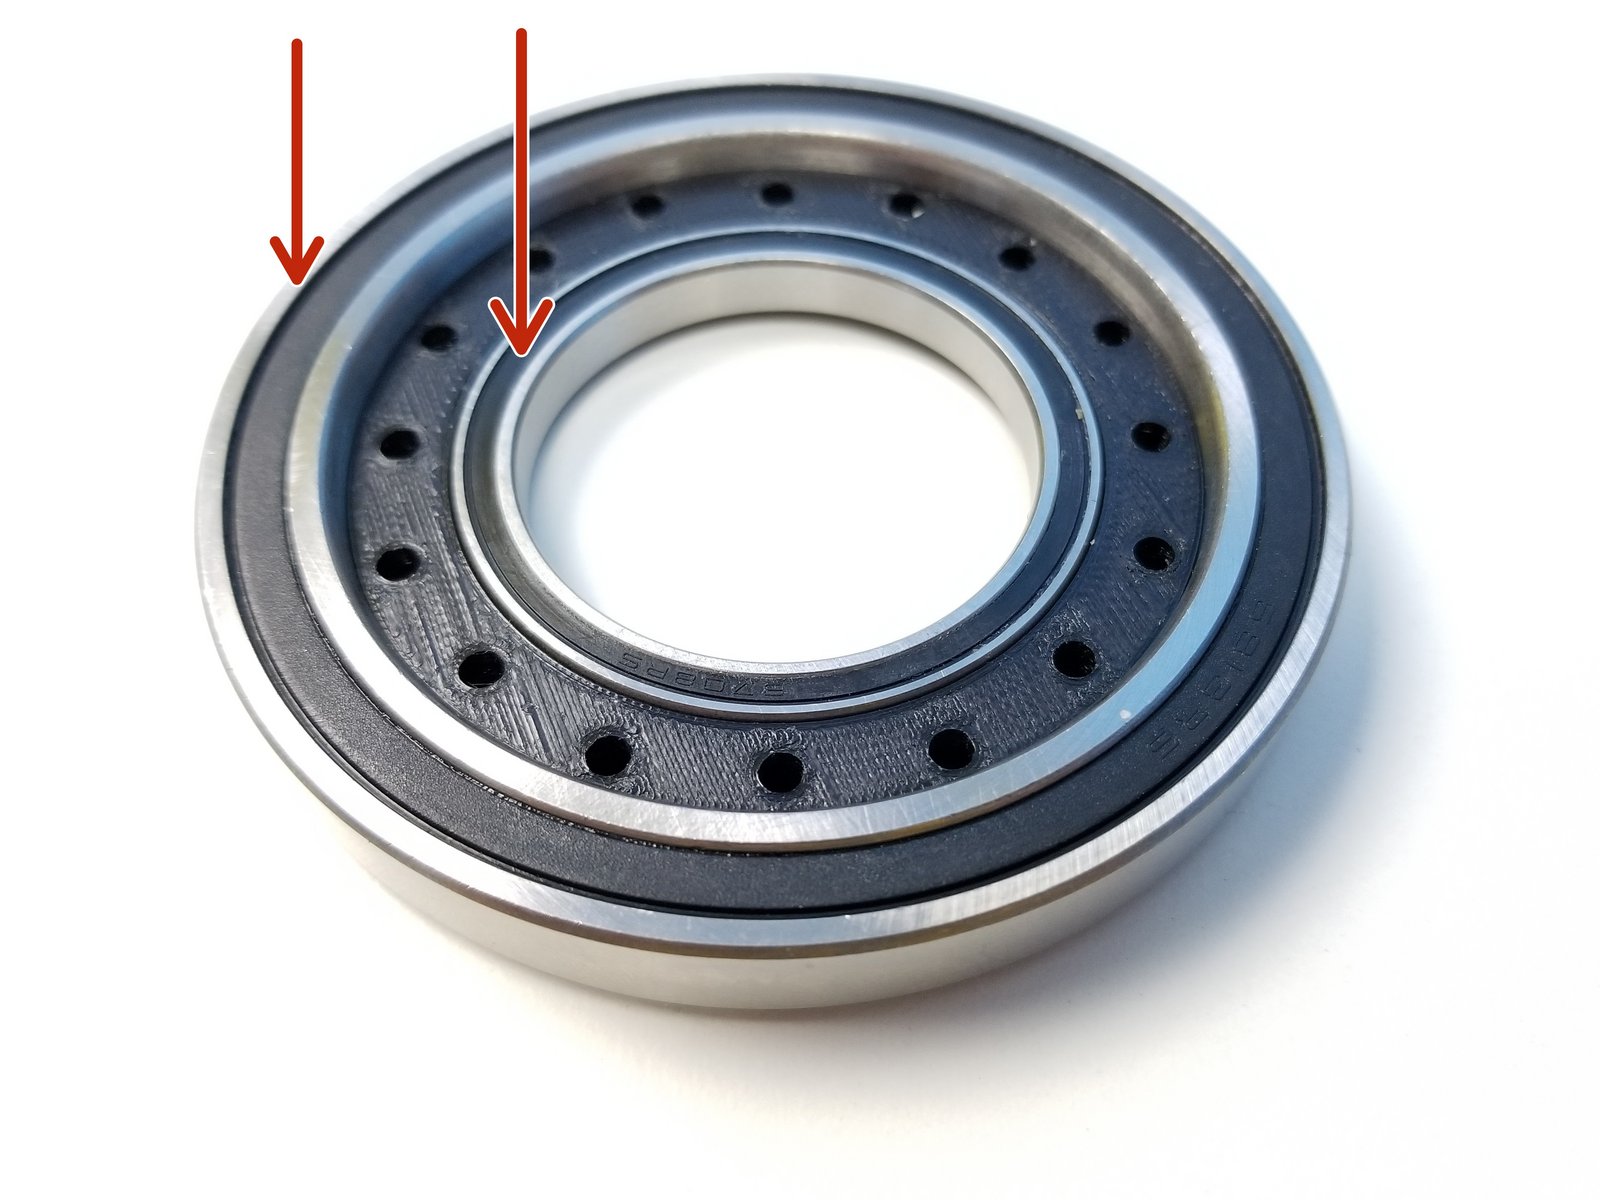
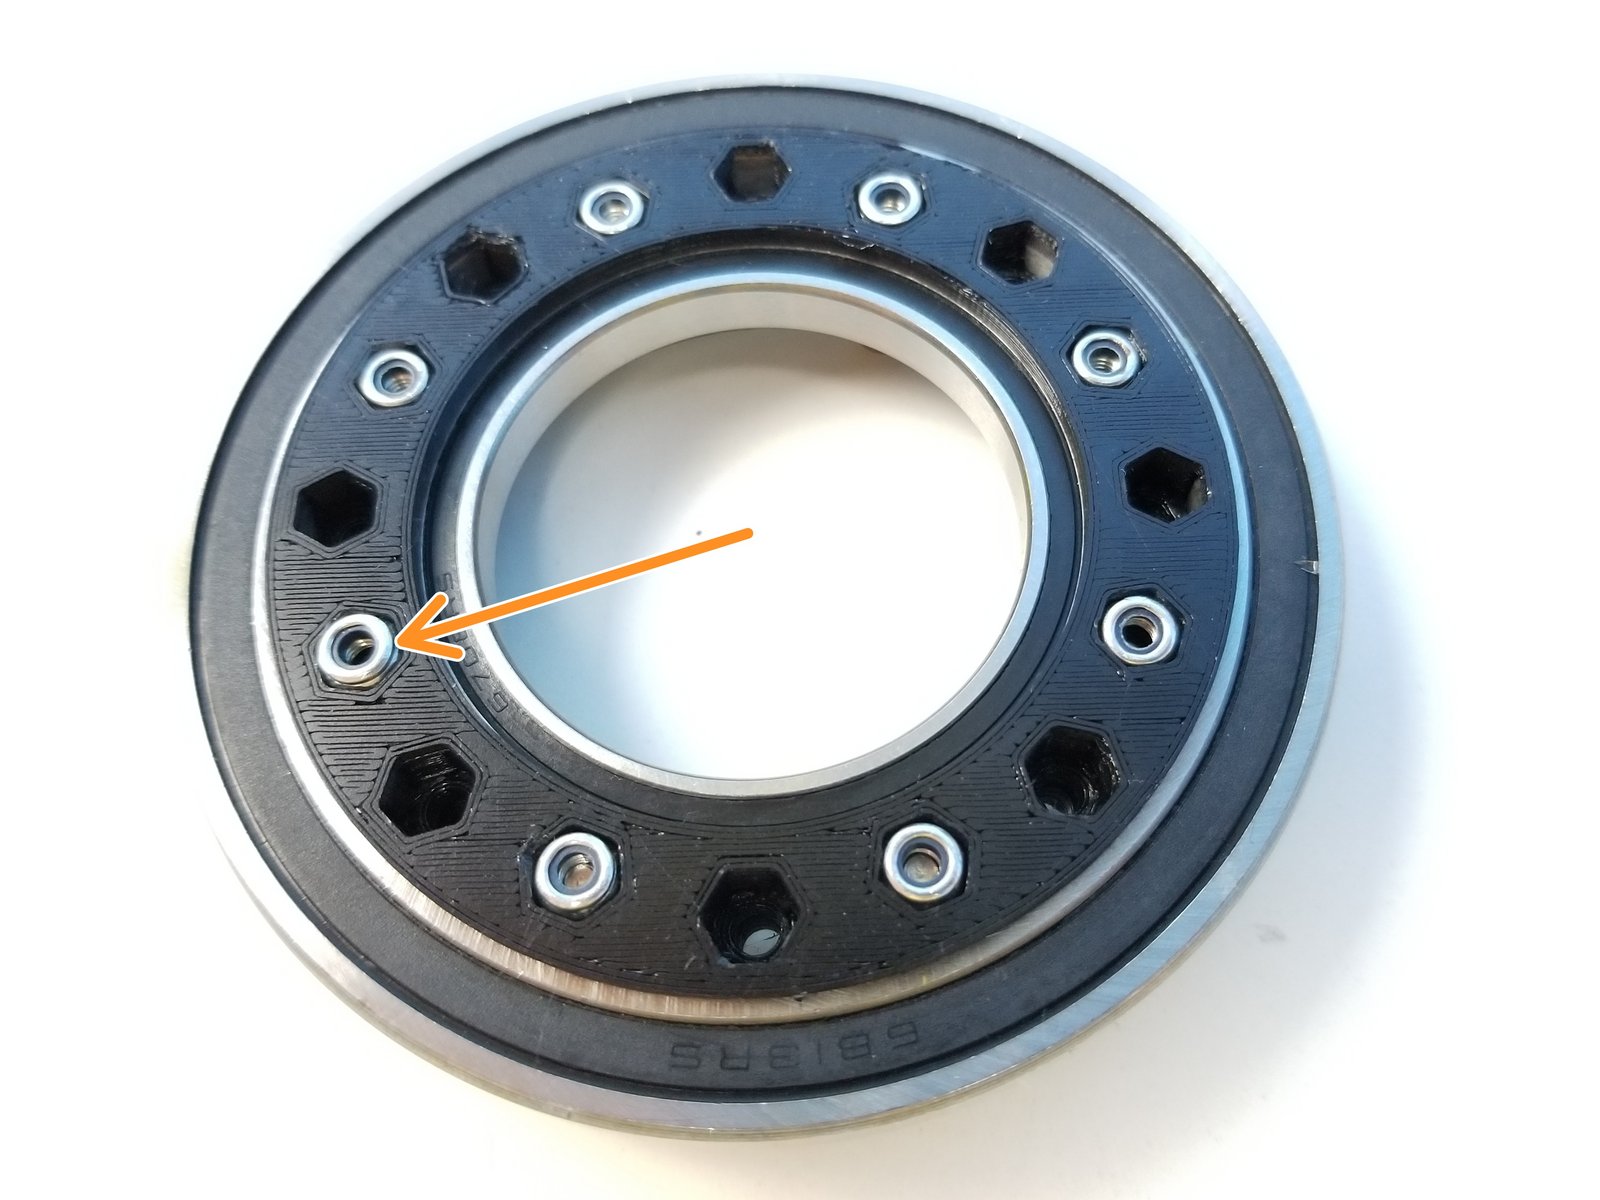
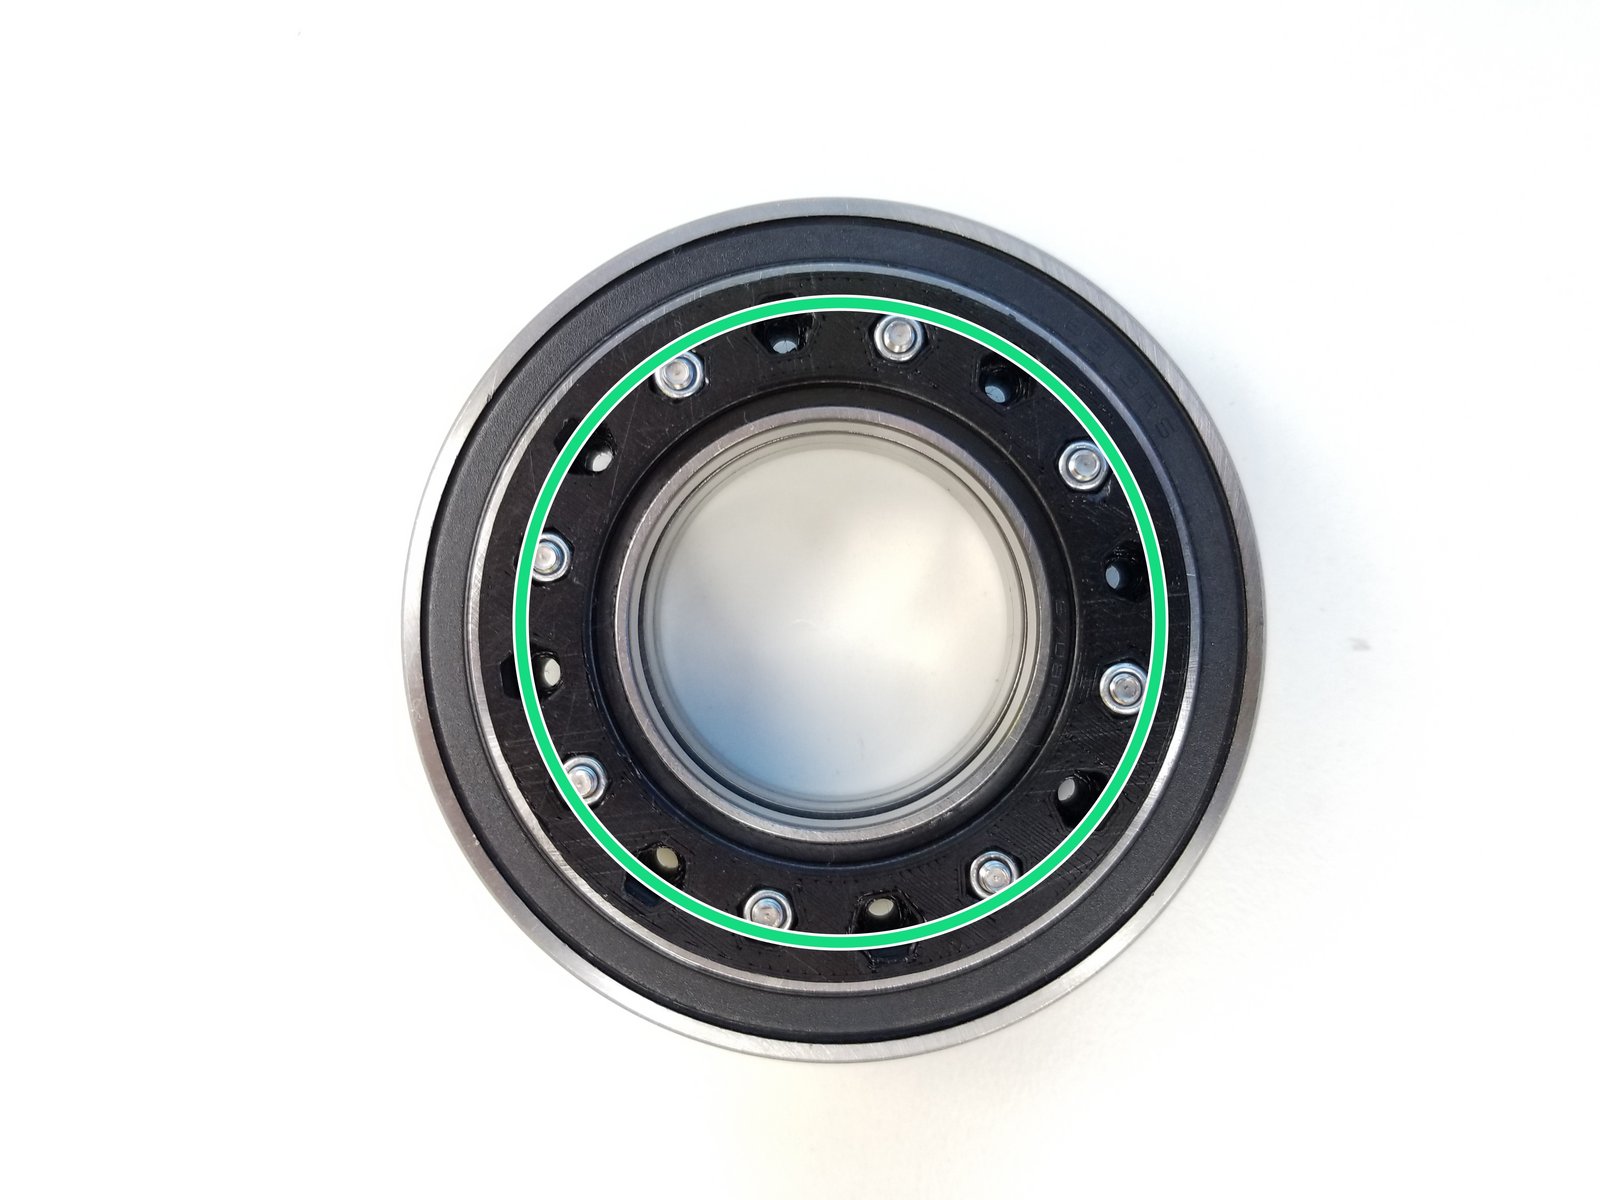
Insert 6813 Bearing and 6708 Bearing in the Nut Insert Half of the Bottom Output Disk
- Note:
NOTE
There are 2 sets of Nut Inserts, the one we are concerned about first is the one closer to the center
Secure the Bearings by clamping them with Screw Head Half of the Bottom Output Disk using M3x10mm Screws and M3 Nylock Nuts
Step 4 Anchor Gearbox Input Shaft - Parts
Click the large image to open full size.
- Note:
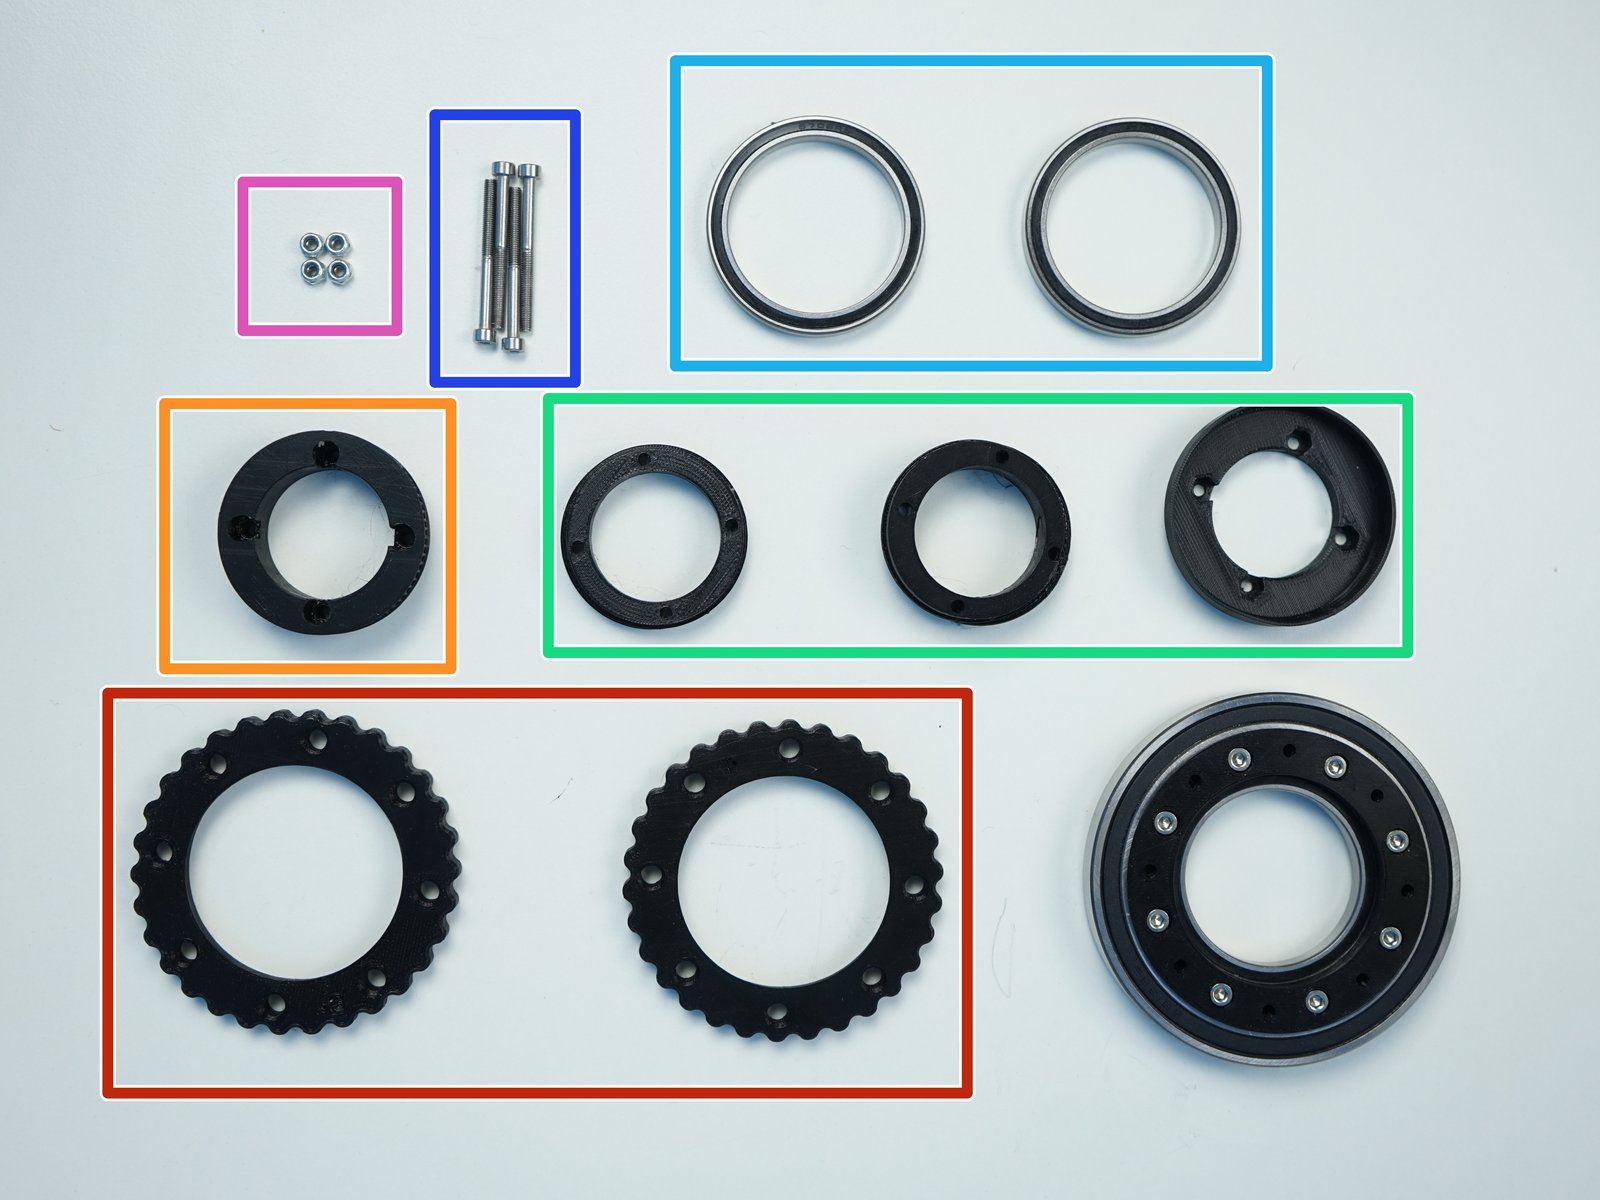
Prepare the following components:
[3D] - 1GB Anchor GB Rotors
[3D] - 1PO GB Pulley
[3D] - 1GB Input Shafts {Bottom, Eccentric Top}
6708 Bearings [40x50x6mm] (x2)
M3x35mm Screws (x4)
M3 Nylock Nuts (x4)
Step 5 Anchor Gearbox Input Shaft - 1
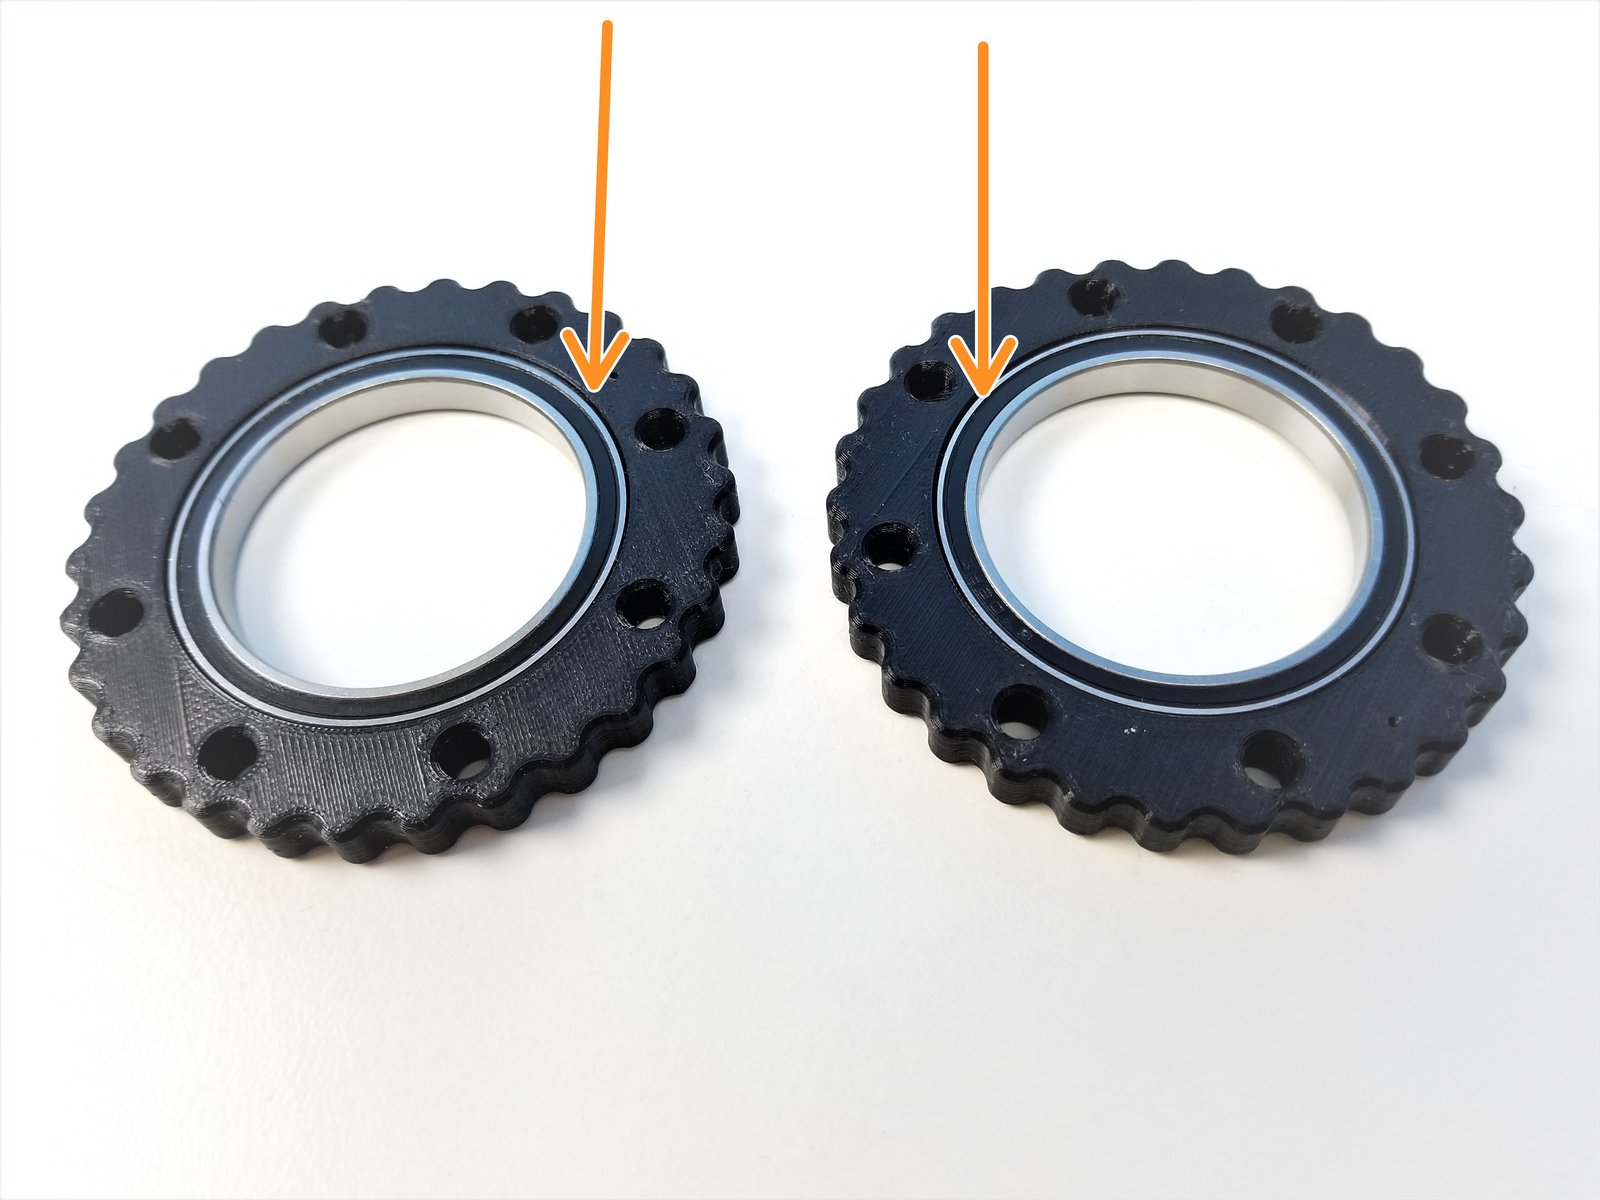
Click the large image to open full size.
- Note:
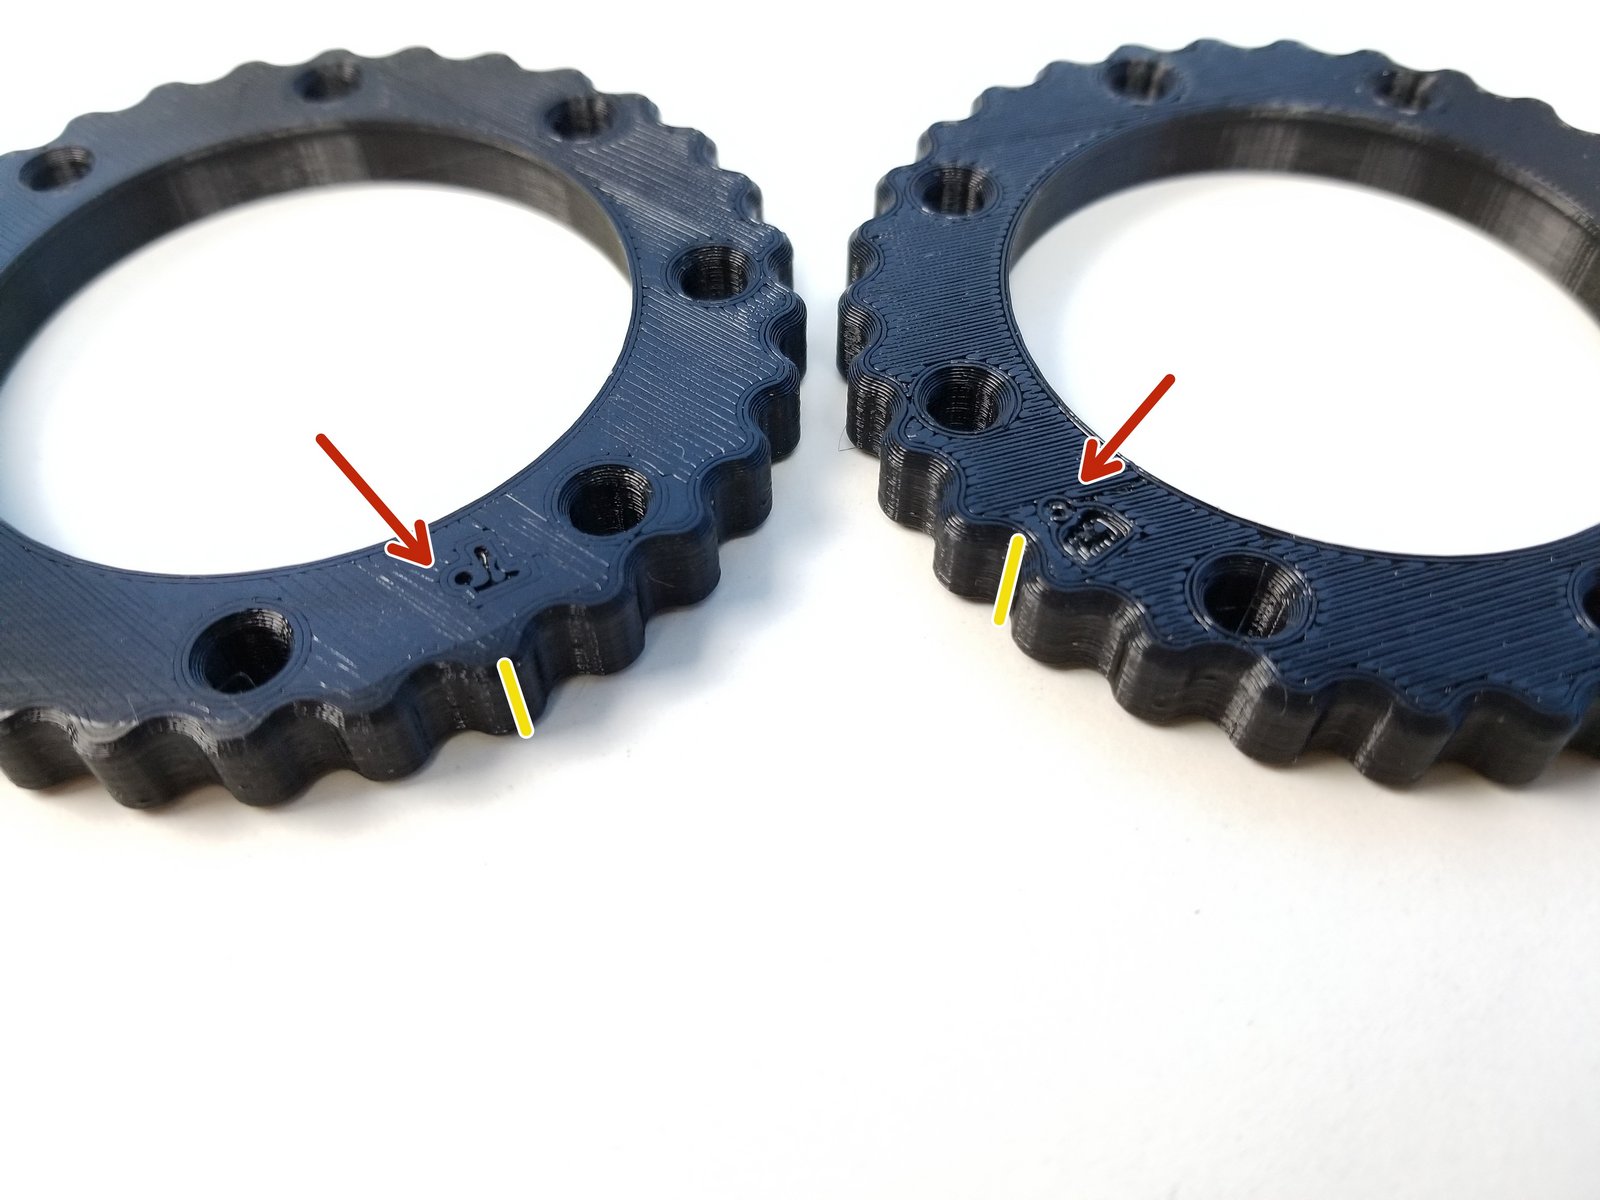
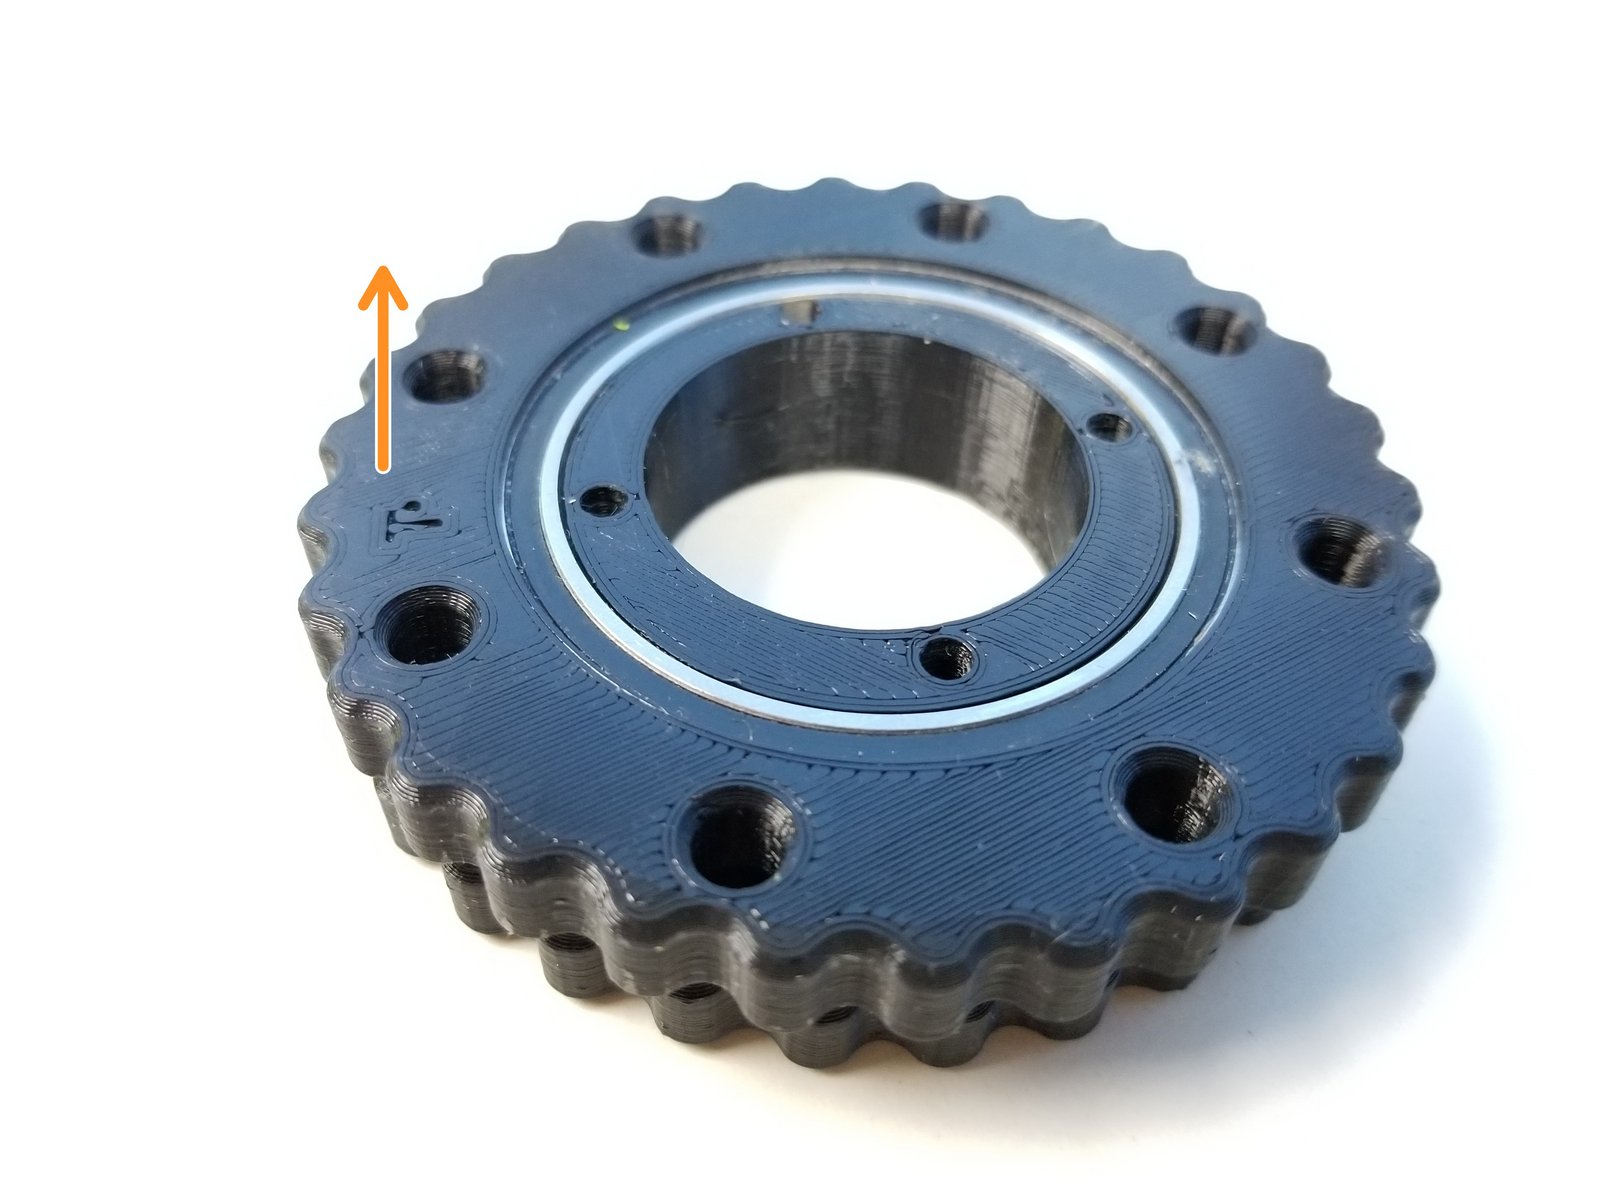
Rotors are labeled "T" for Top and "B" for Bottom
Make a sharpie mark on the side of the Rotors along THE HOLE beisde "T" and "B"
- Warning:
In other Gearboxes we lined along the T and B label, but NOT THIS TIME
- Note:
New alignment method that's being tested
There's a very small hole beside the labels, small enough to get a bobby pin through, when aligned correctly, pin should go all the way through both Rotors
Insert 6708 Bearings in to the Rotors
Step 6 Anchor Gearbox Input Shaft - 2
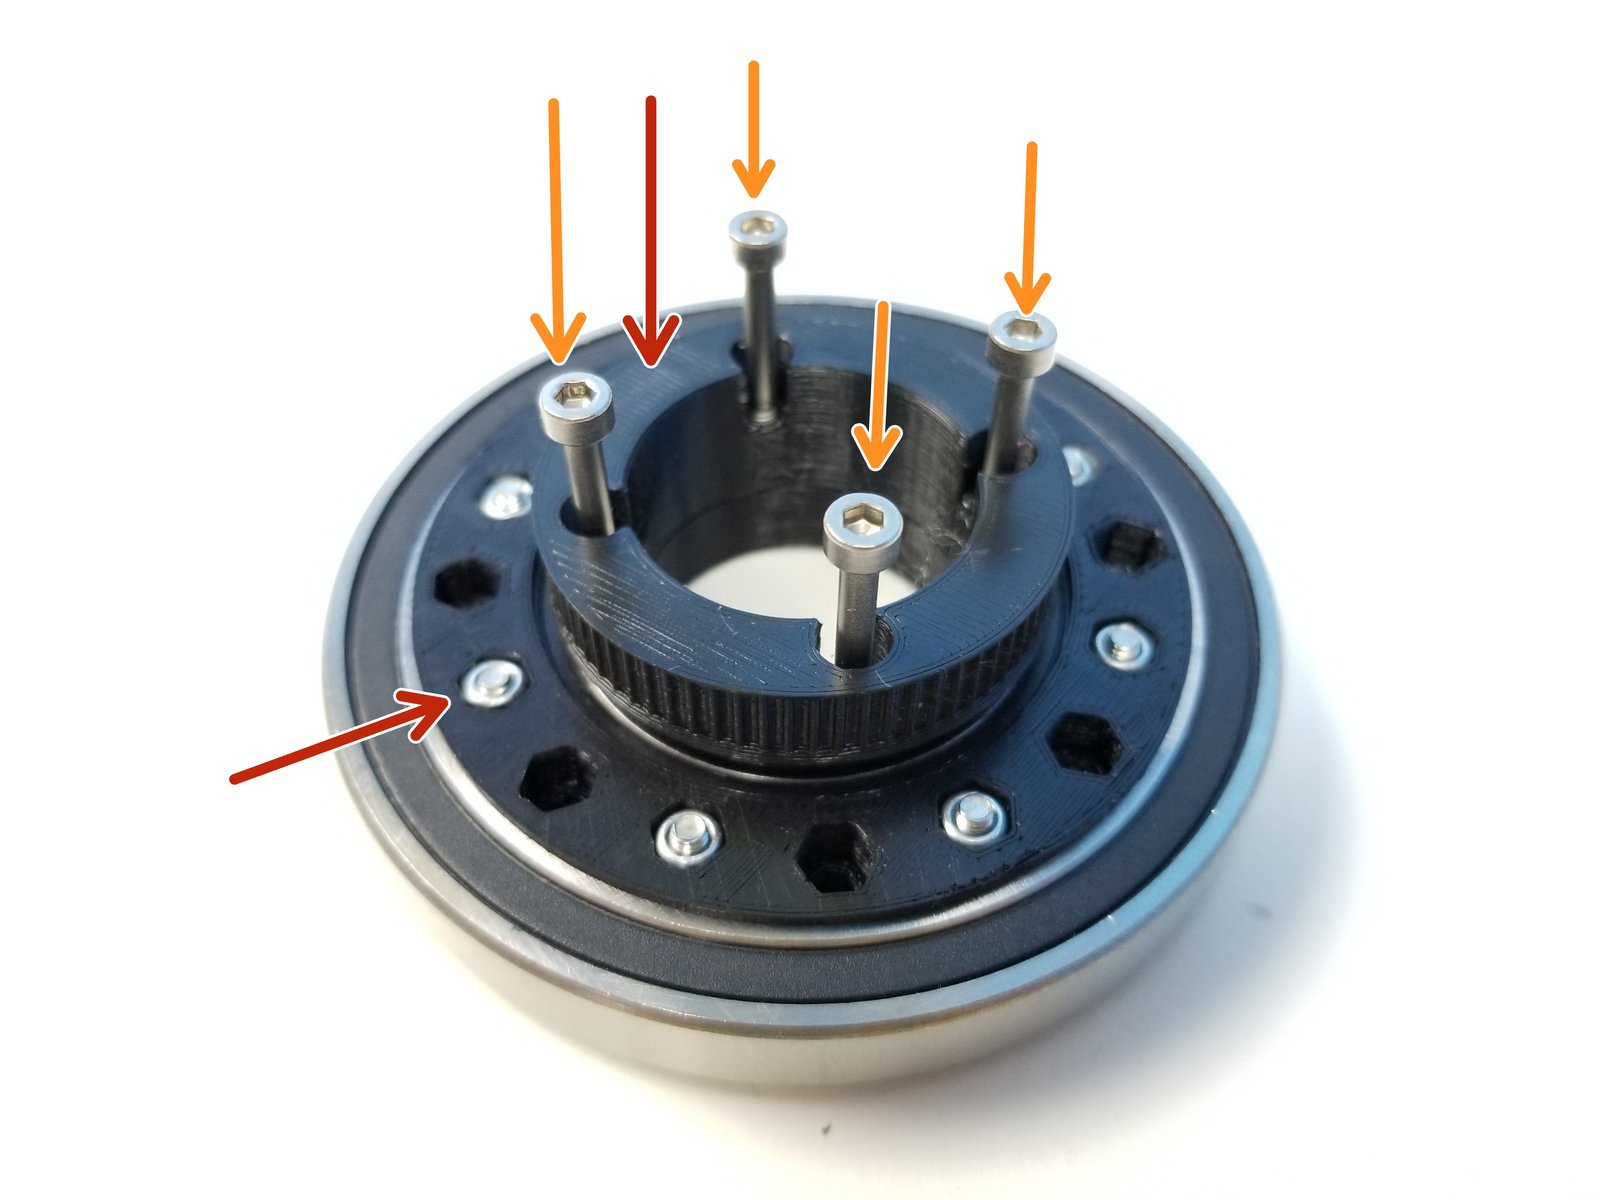
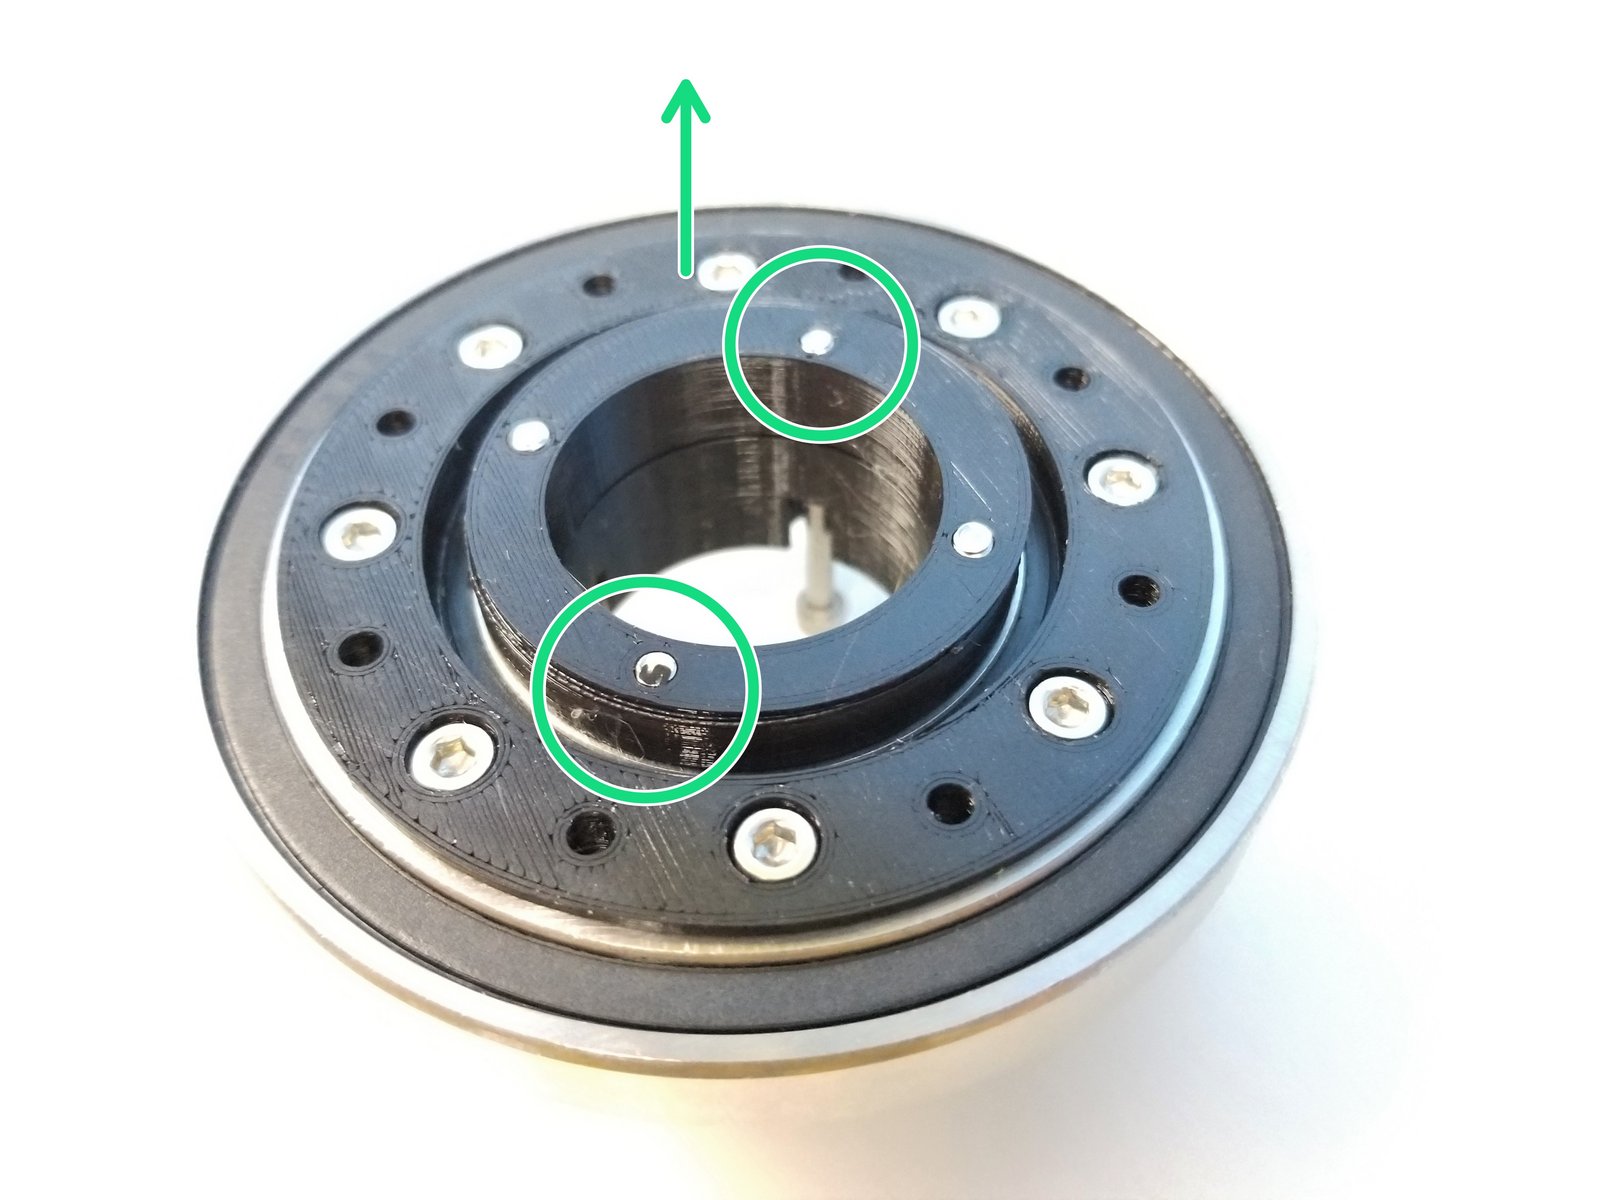
Click the large image to open full size.
Insert the Input Pulley on the Nut Insert Half side
Partially screw in the M3x35mm Screws to secure and Shaft Bottom on the Screw Head Half side
Notice that the Eccentric Face of the Shaft Bottom is facing up
Step 7 Anchor Gearbox Input Shaft - 3
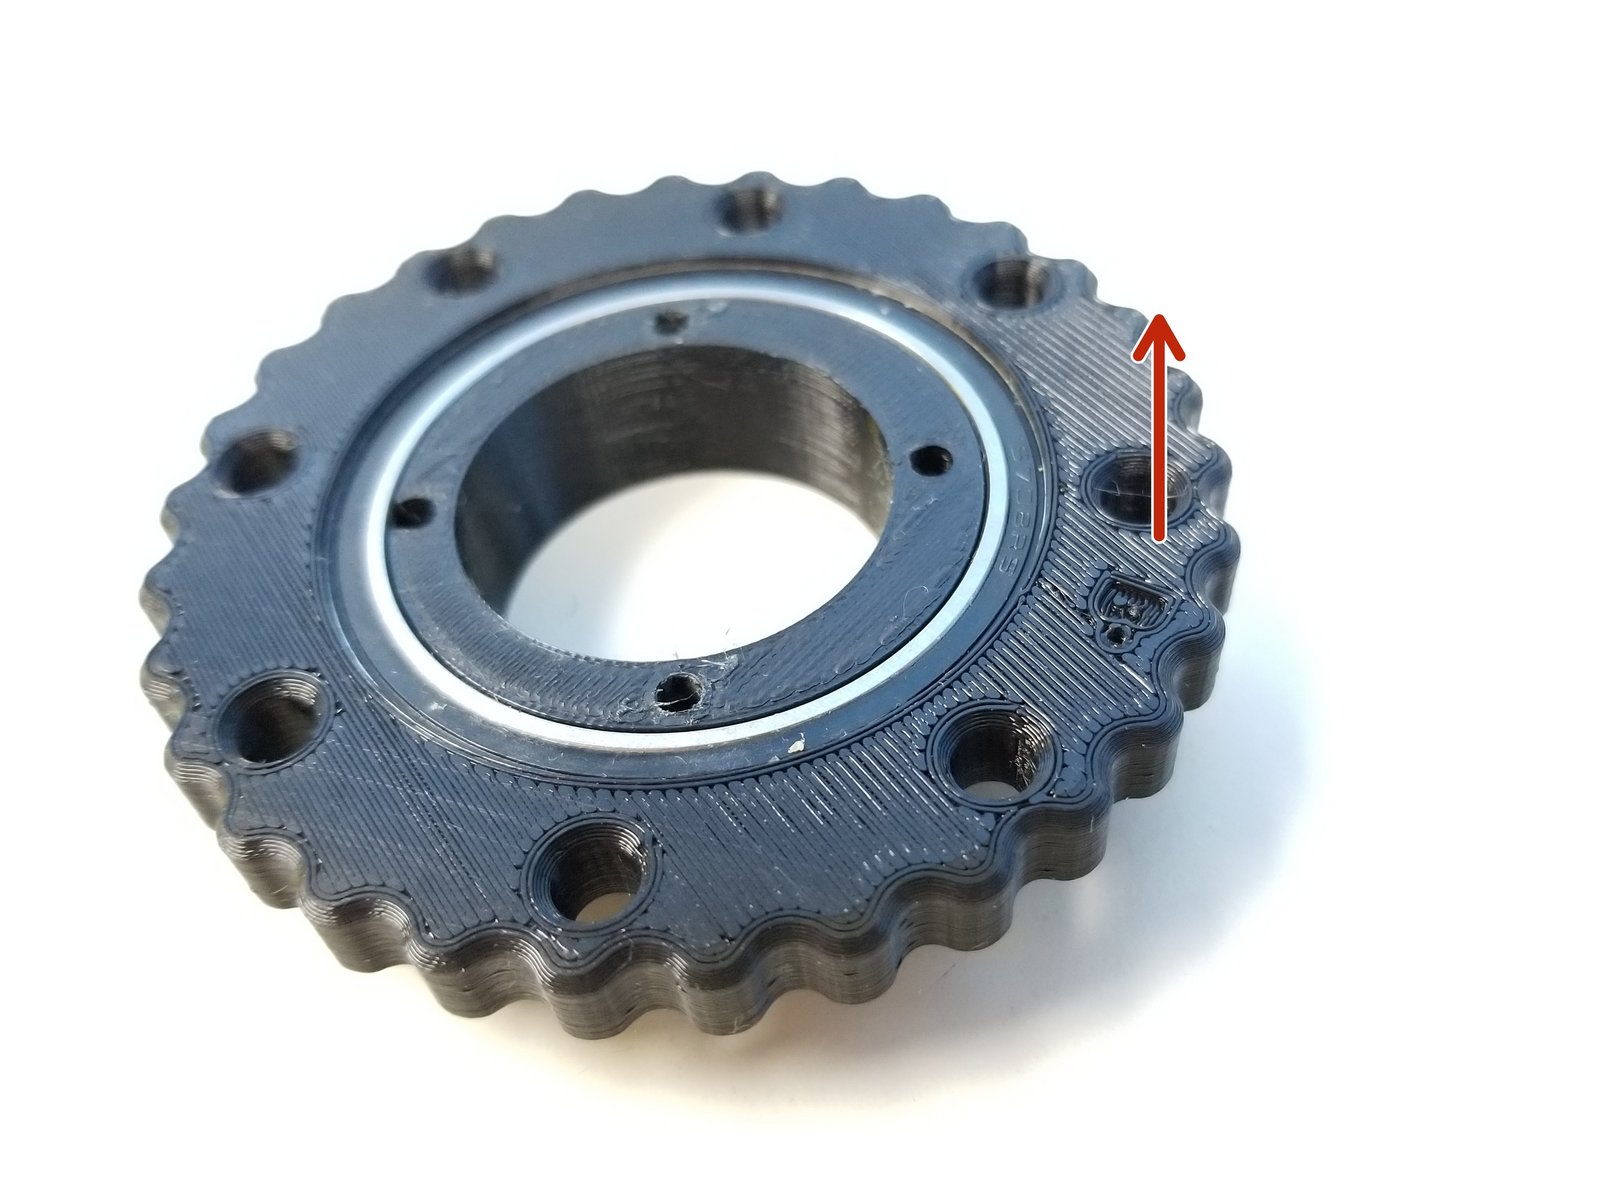
Click the large image to open full size.
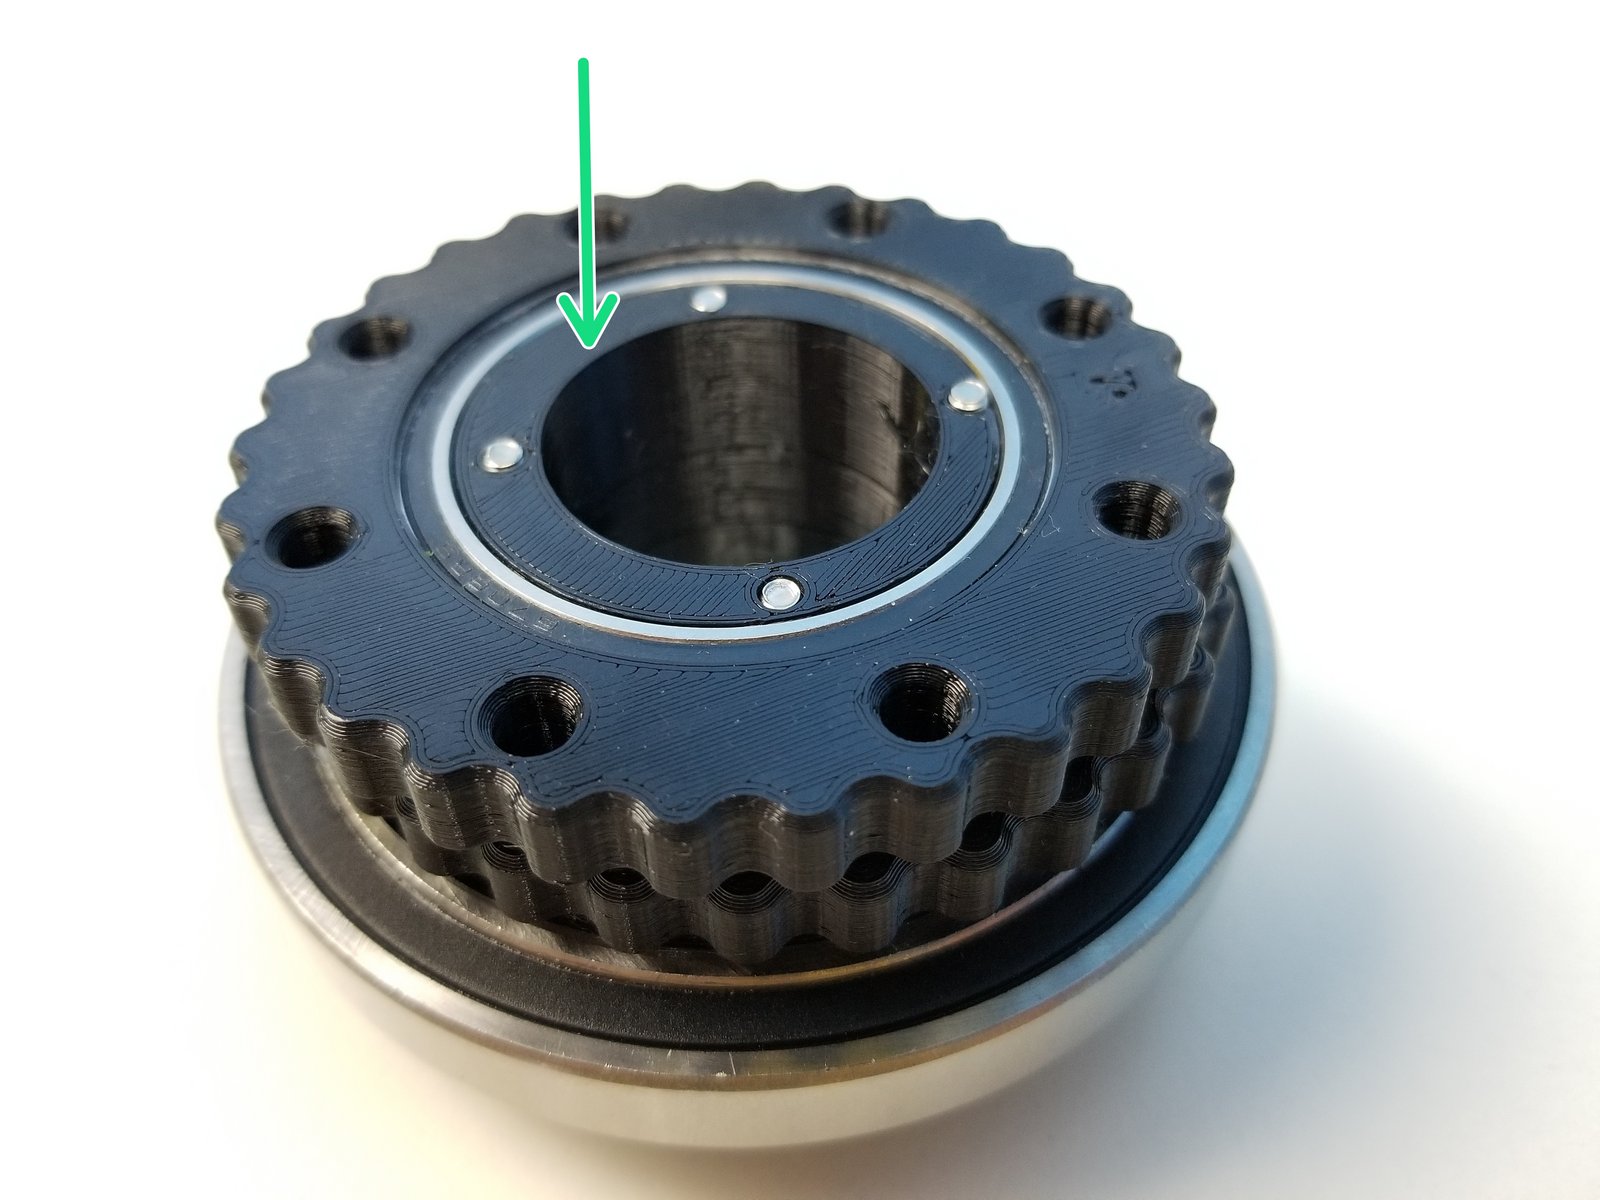
Insert "B" Rotor into the Eccentric Cam with "B" Label Facing Outward
Repeat the same process with "T" Rotor
Align the Eccentric Cam with the Bottom Shaft Cam and partially screw the M3x35mm Screws
Step 8 Anchor Gearbox Input Shaft - 4
Click the large image to open full size.
- Note:
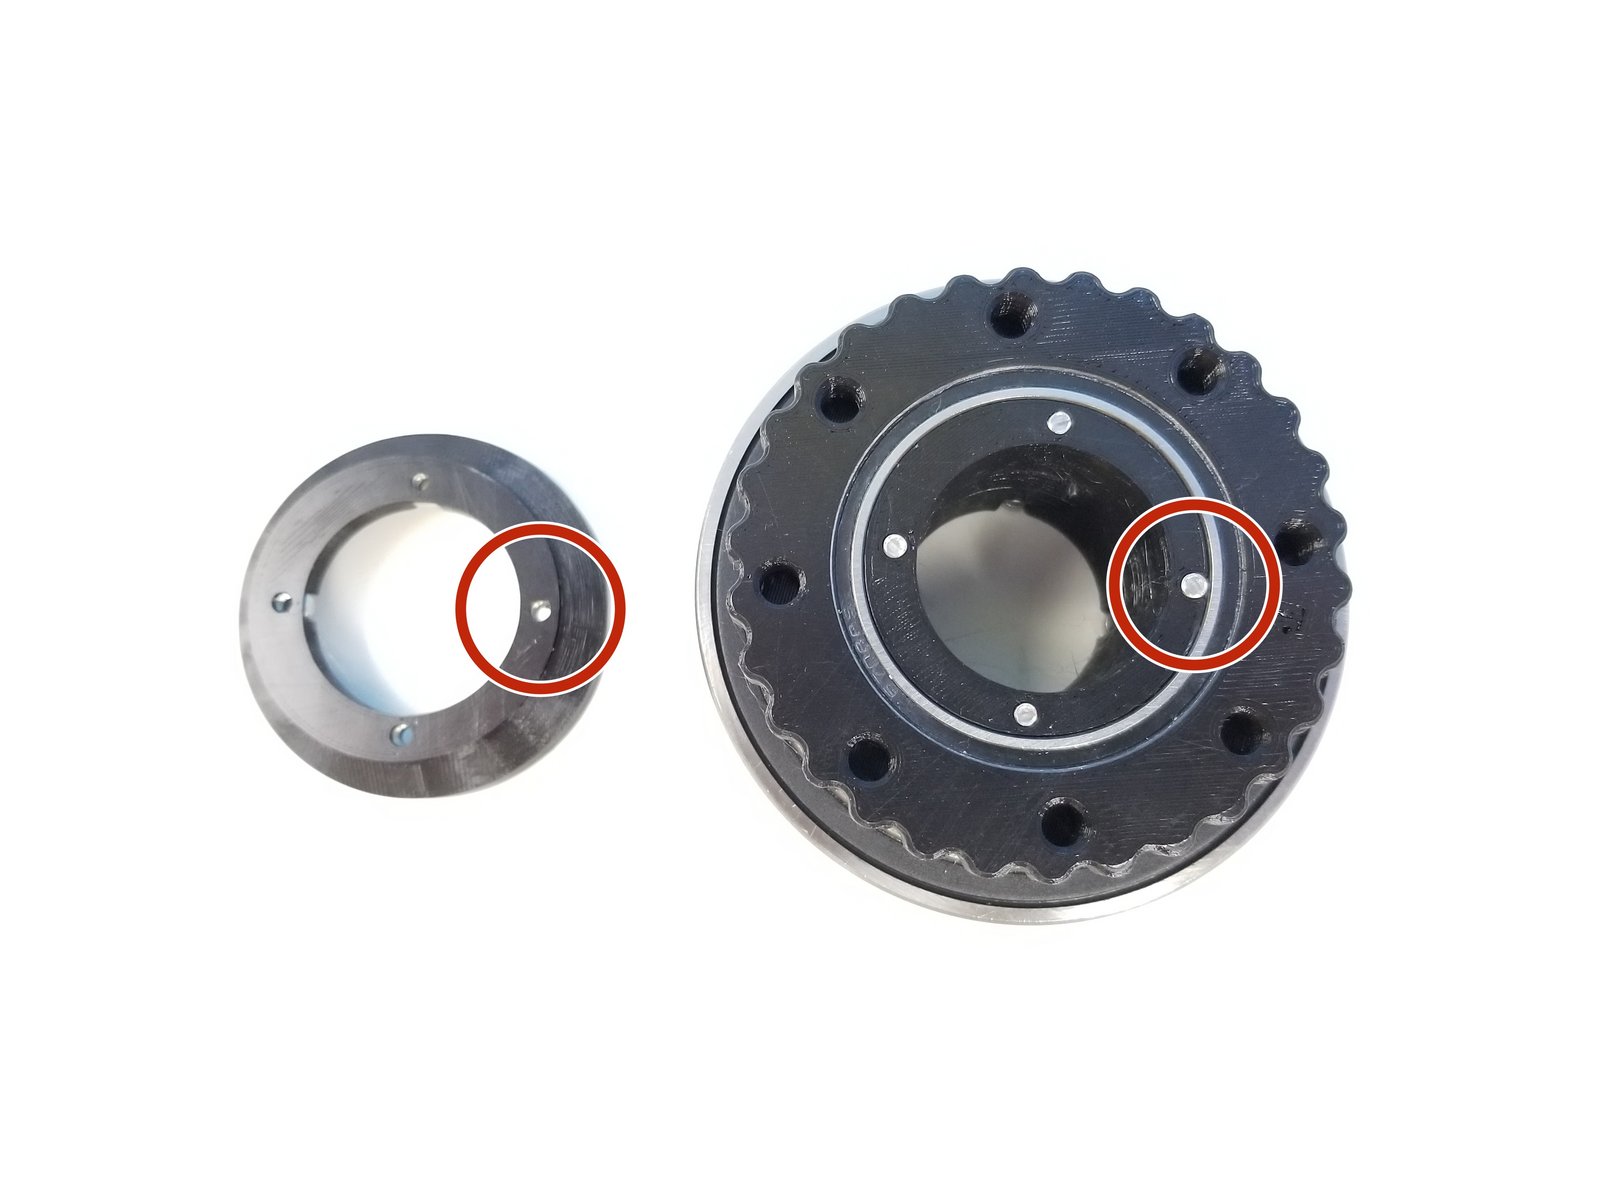
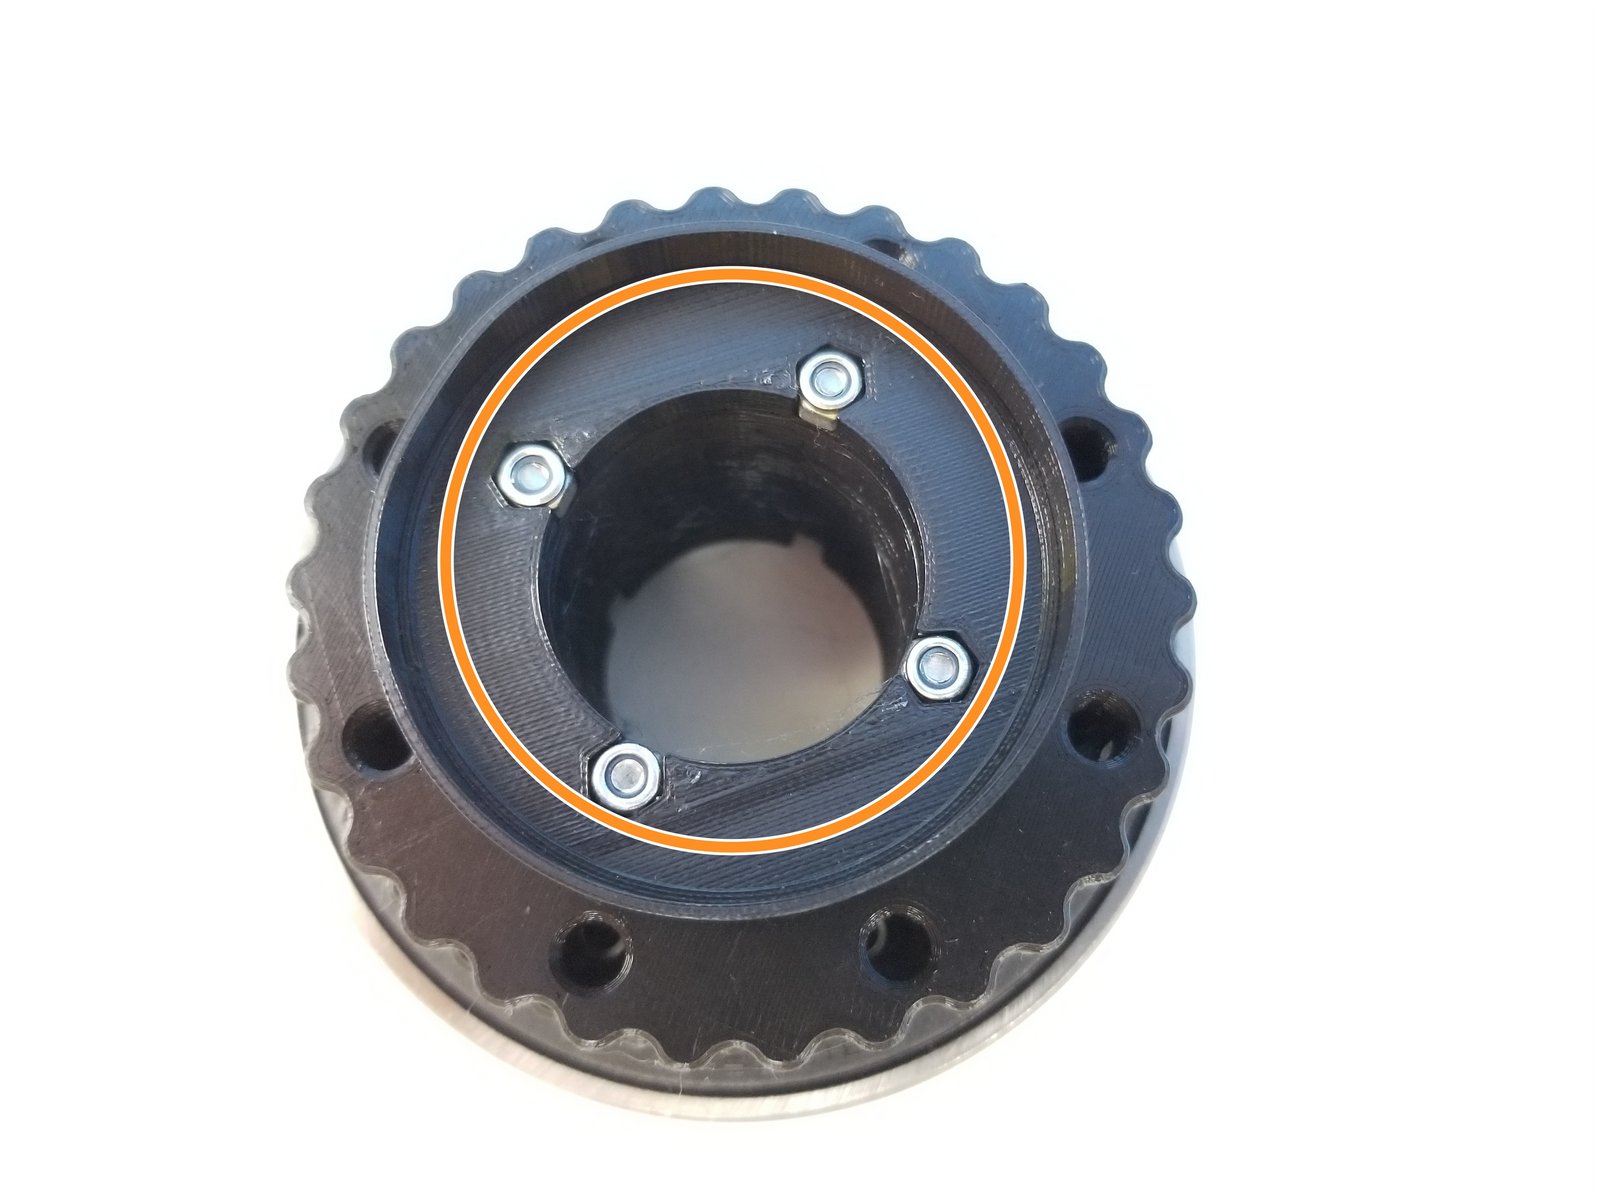
Align the Top Shaft Cam.
Just like the Eccentric Cam, the Screw that's touching the bearing should be aligned with the thinner part of the Cam
Secure the Top Shaft Cam using the M3 Nylock Nuts and screwing in 'M3x35mm Screws all the way through
Step 9 Anchor Gearbox Housing - Parts
Click the large image to open full size.
- Note:
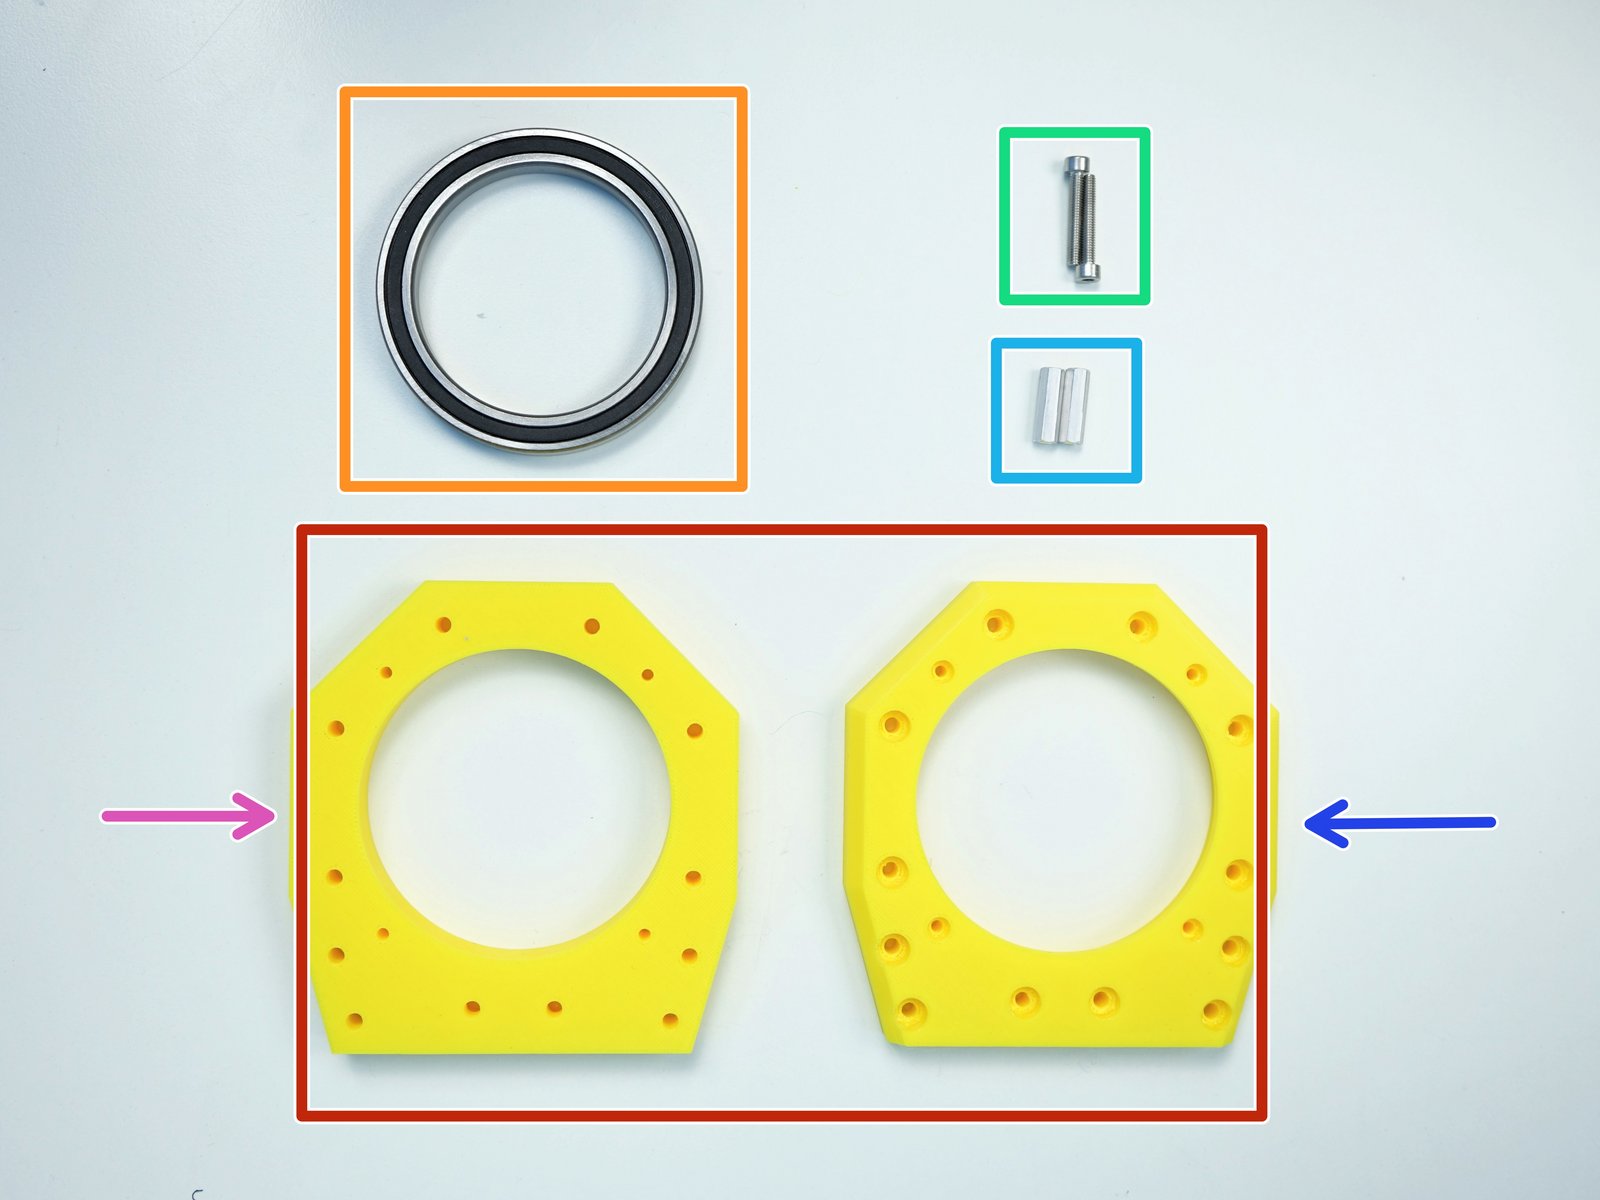
Prepare the following components:
[3D] - 1GB Anchor Top Bearing & Spacer
6813 Bearing [65x85x10mm] (x1)
M4x25mm Screws (x2)
M4x20mm Hex Standoff (x2)
- Note:
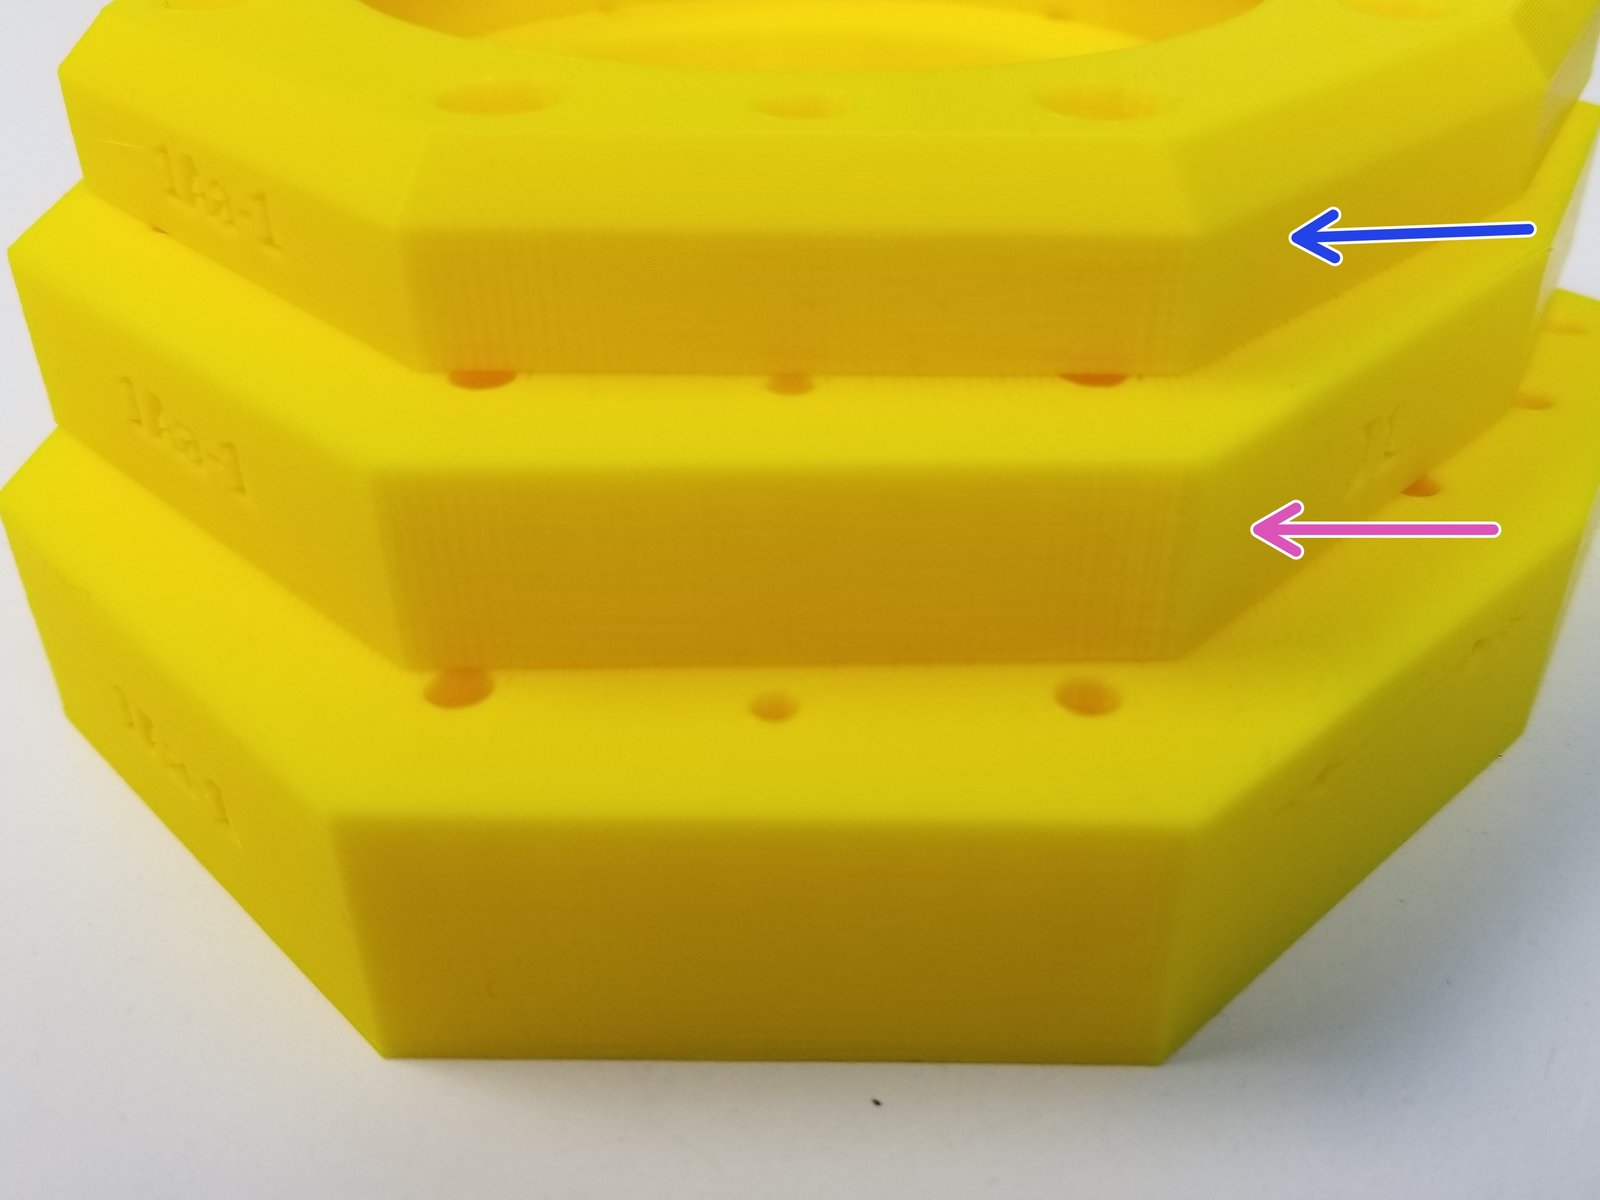
Note that there are three 3D-printed Anchor Gearbox Housing components, labeled as "1Aa"
Anchor Top Bearing is the top component and is chamfered
Anchor Top Spacer is the middle component that separates the Anchor Top Bearing and Anchor Gearbox Housing
Step 10 Anchor Gearbox Housing
Click the large image to open full size.
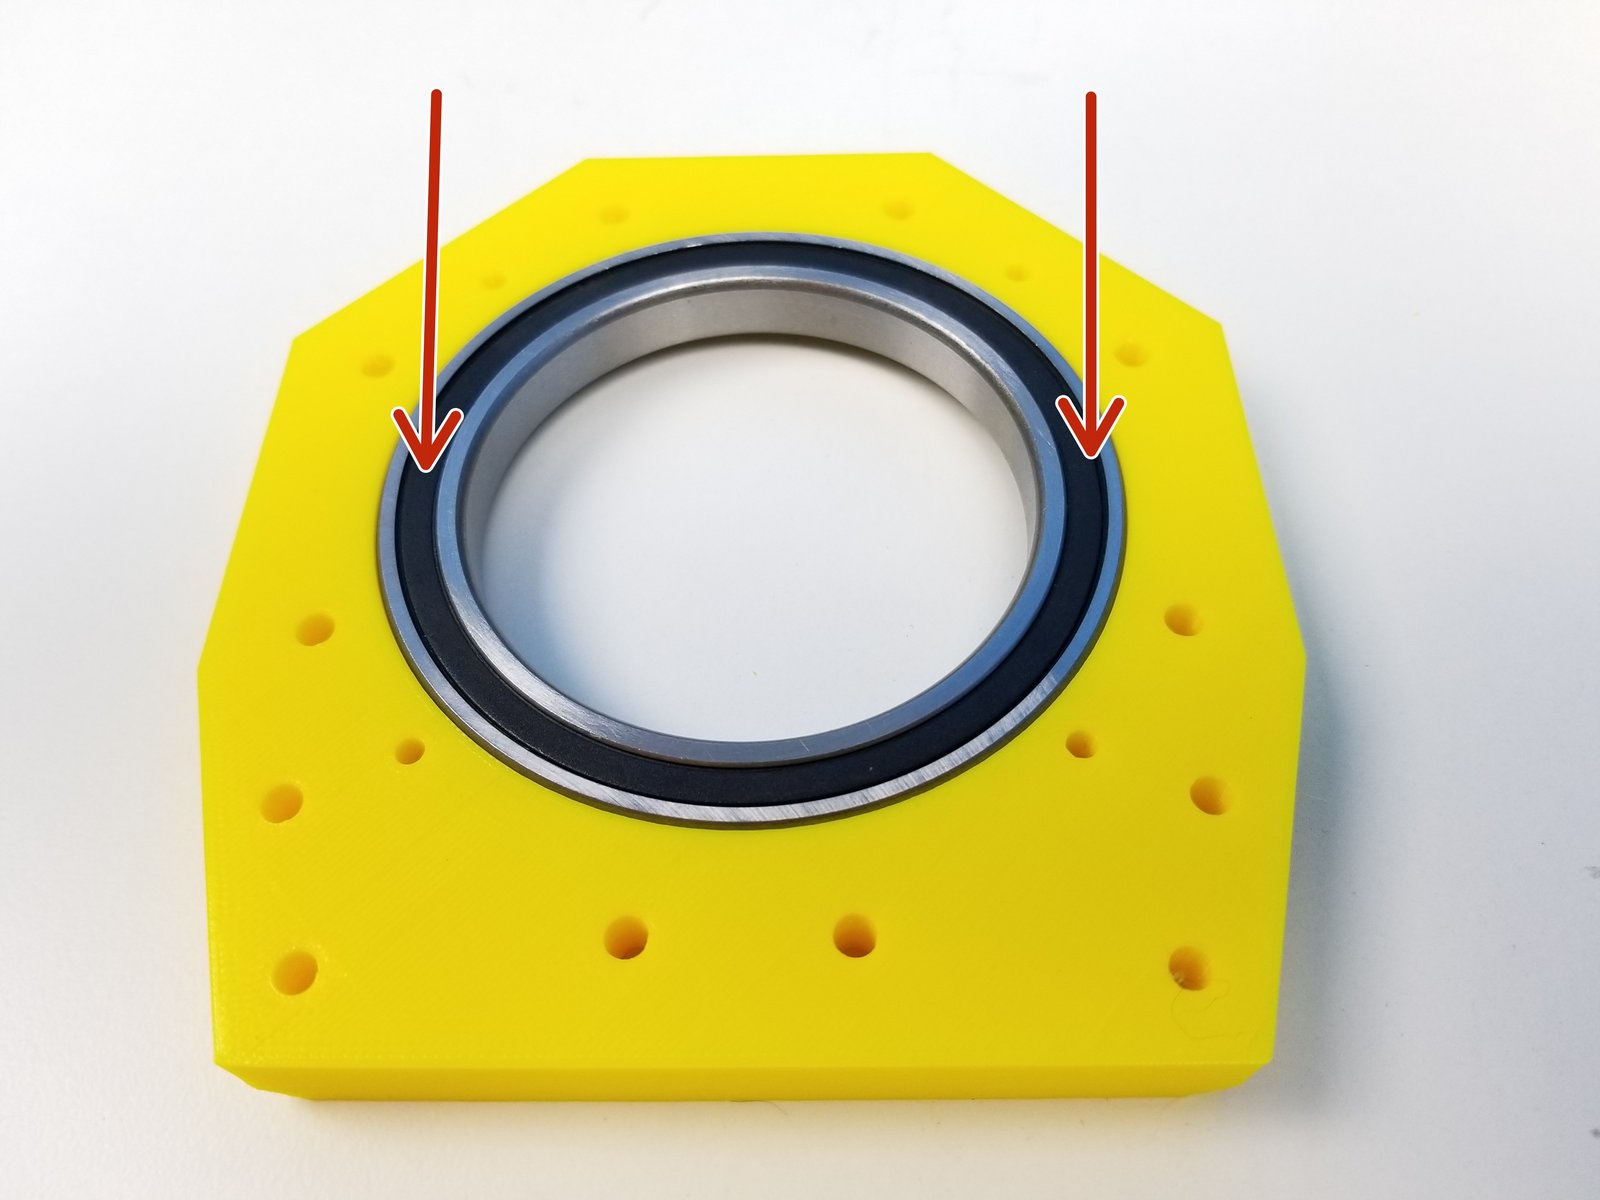
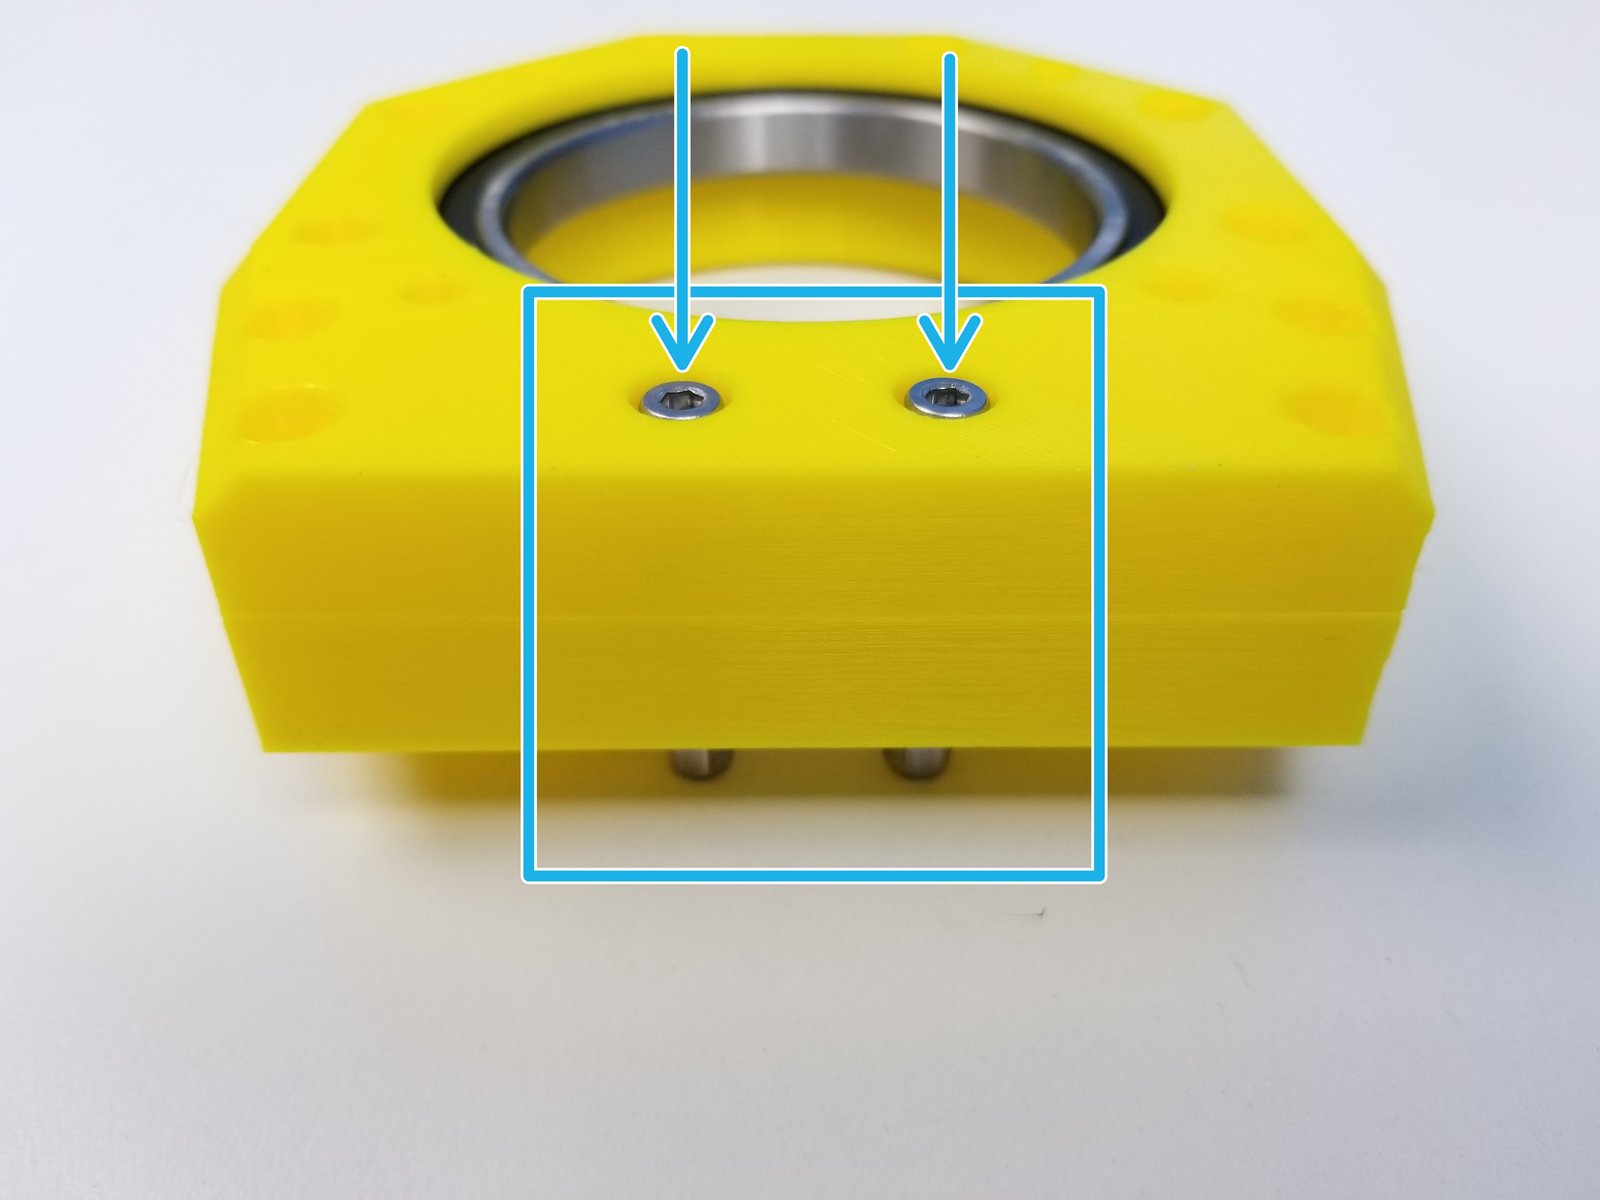
Insert 6813 Bearing into the Anchor Top Bearing
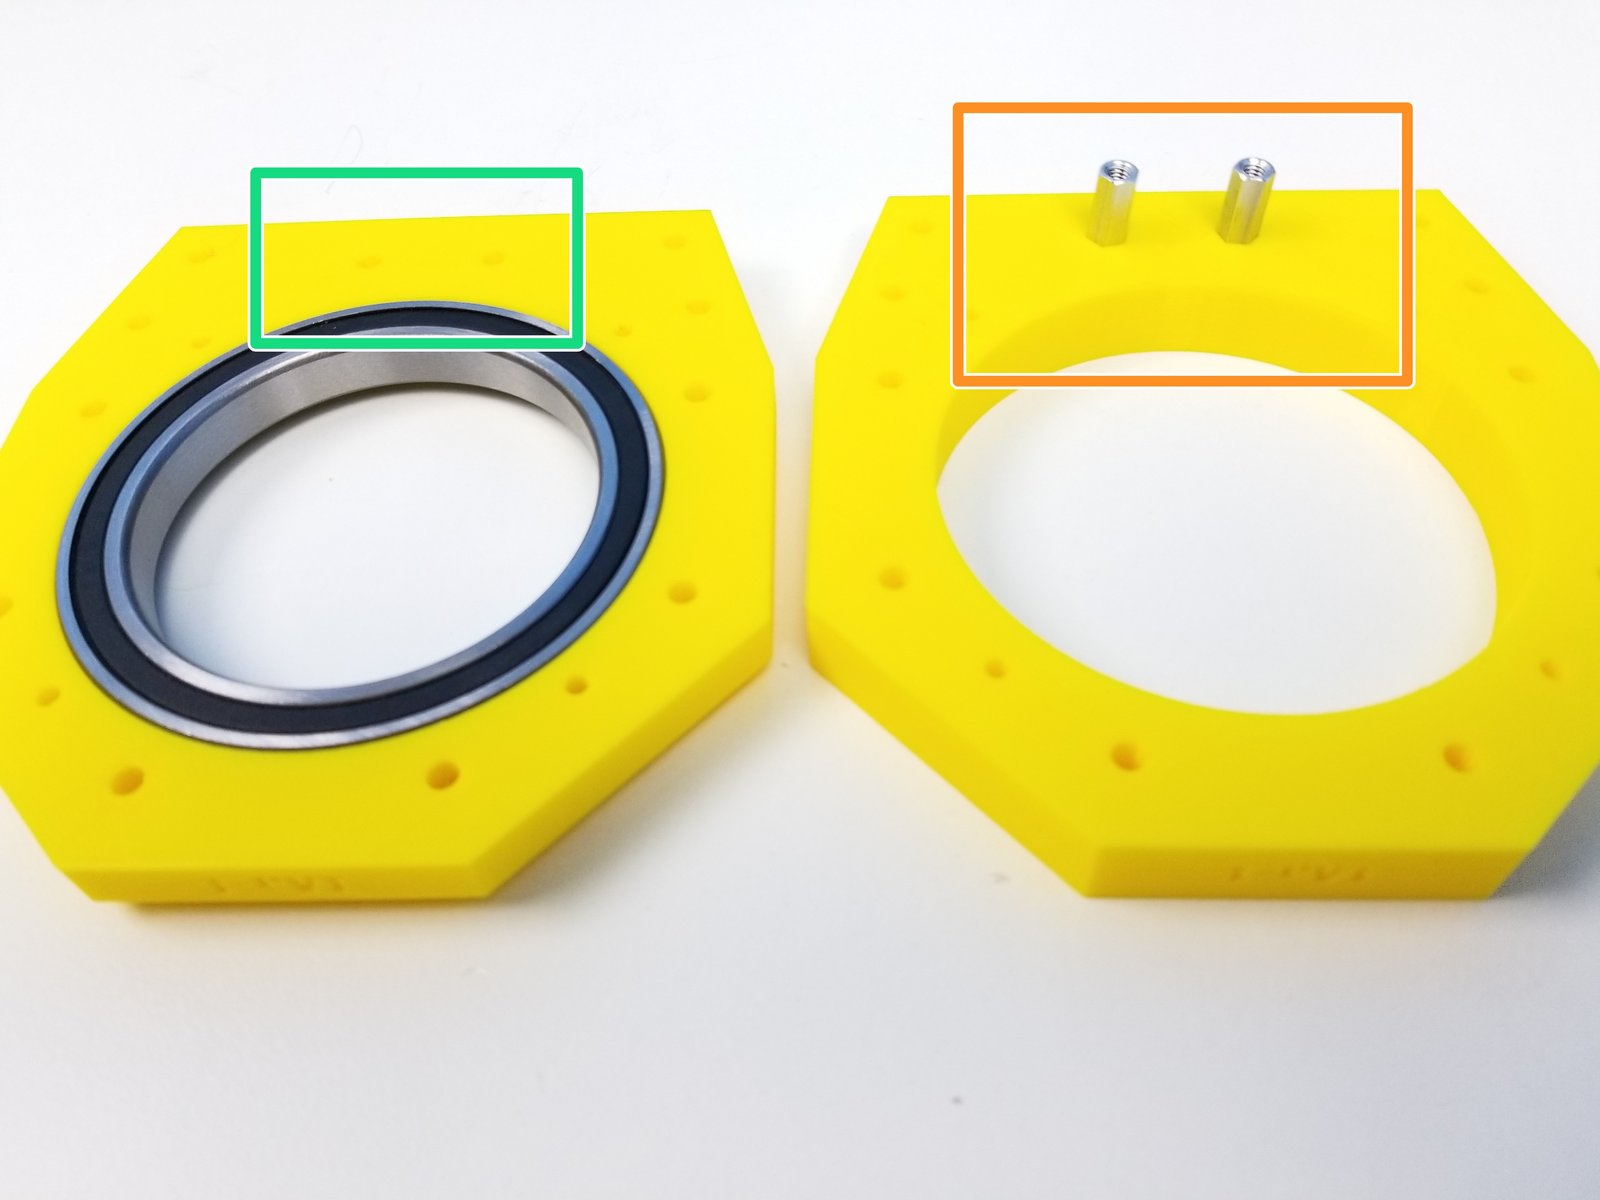
Insert the M4 Hex Standoffs to the Anchor Top Spacer
Align the Top Spacer and Top Bearing
Secure the 2 components using the M4x25mm Screws
Step 11 Anchor Gearbox Output - Parts
Click the large image to open full size.
- Note:
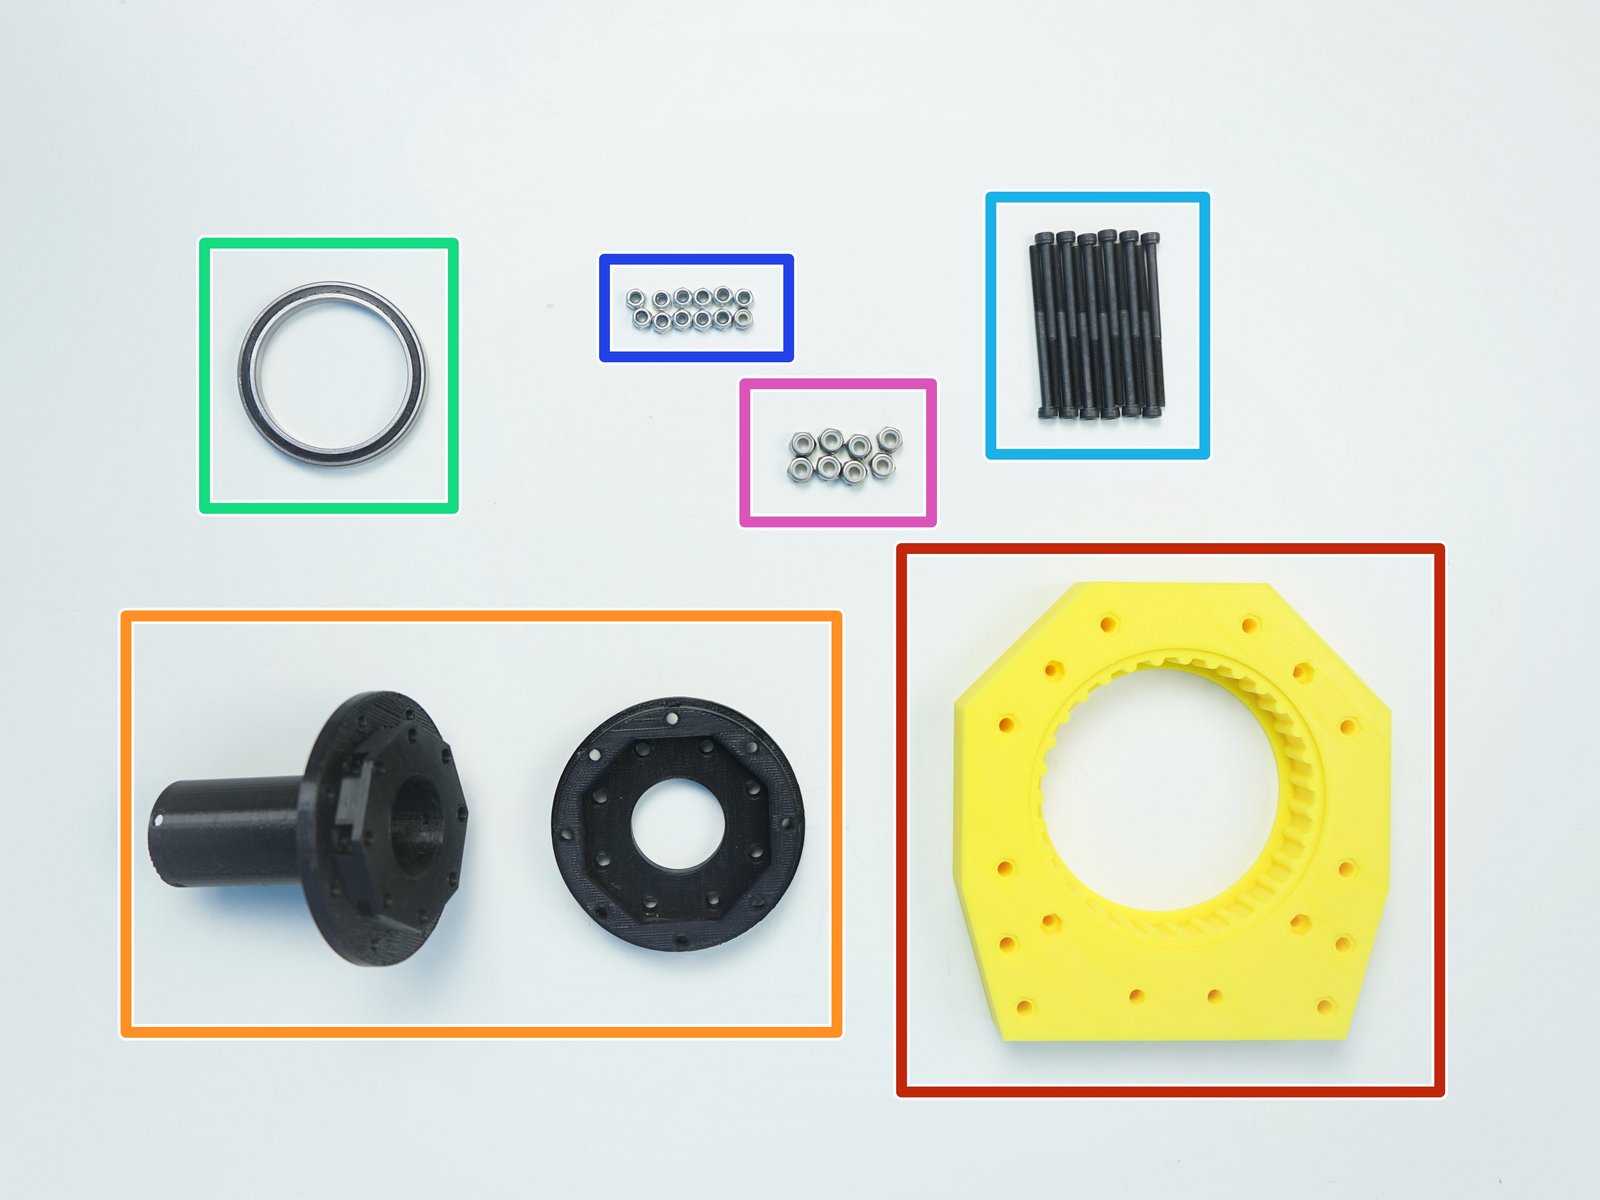
Prepare the following components:
[3D] - 1GB Anchor GB Housing
[3D] - 1GB Output Top Bearing & Disk
6708 Bearing [40x50x6mm] (x1)
M3x45mm Screws (x12)
M3 Nylock Nuts (x12)
M4 Nylock Nuts (x8)
Step 12 Anchor Gearbox Output- Rotor Alignment
Click the large image to open full size.
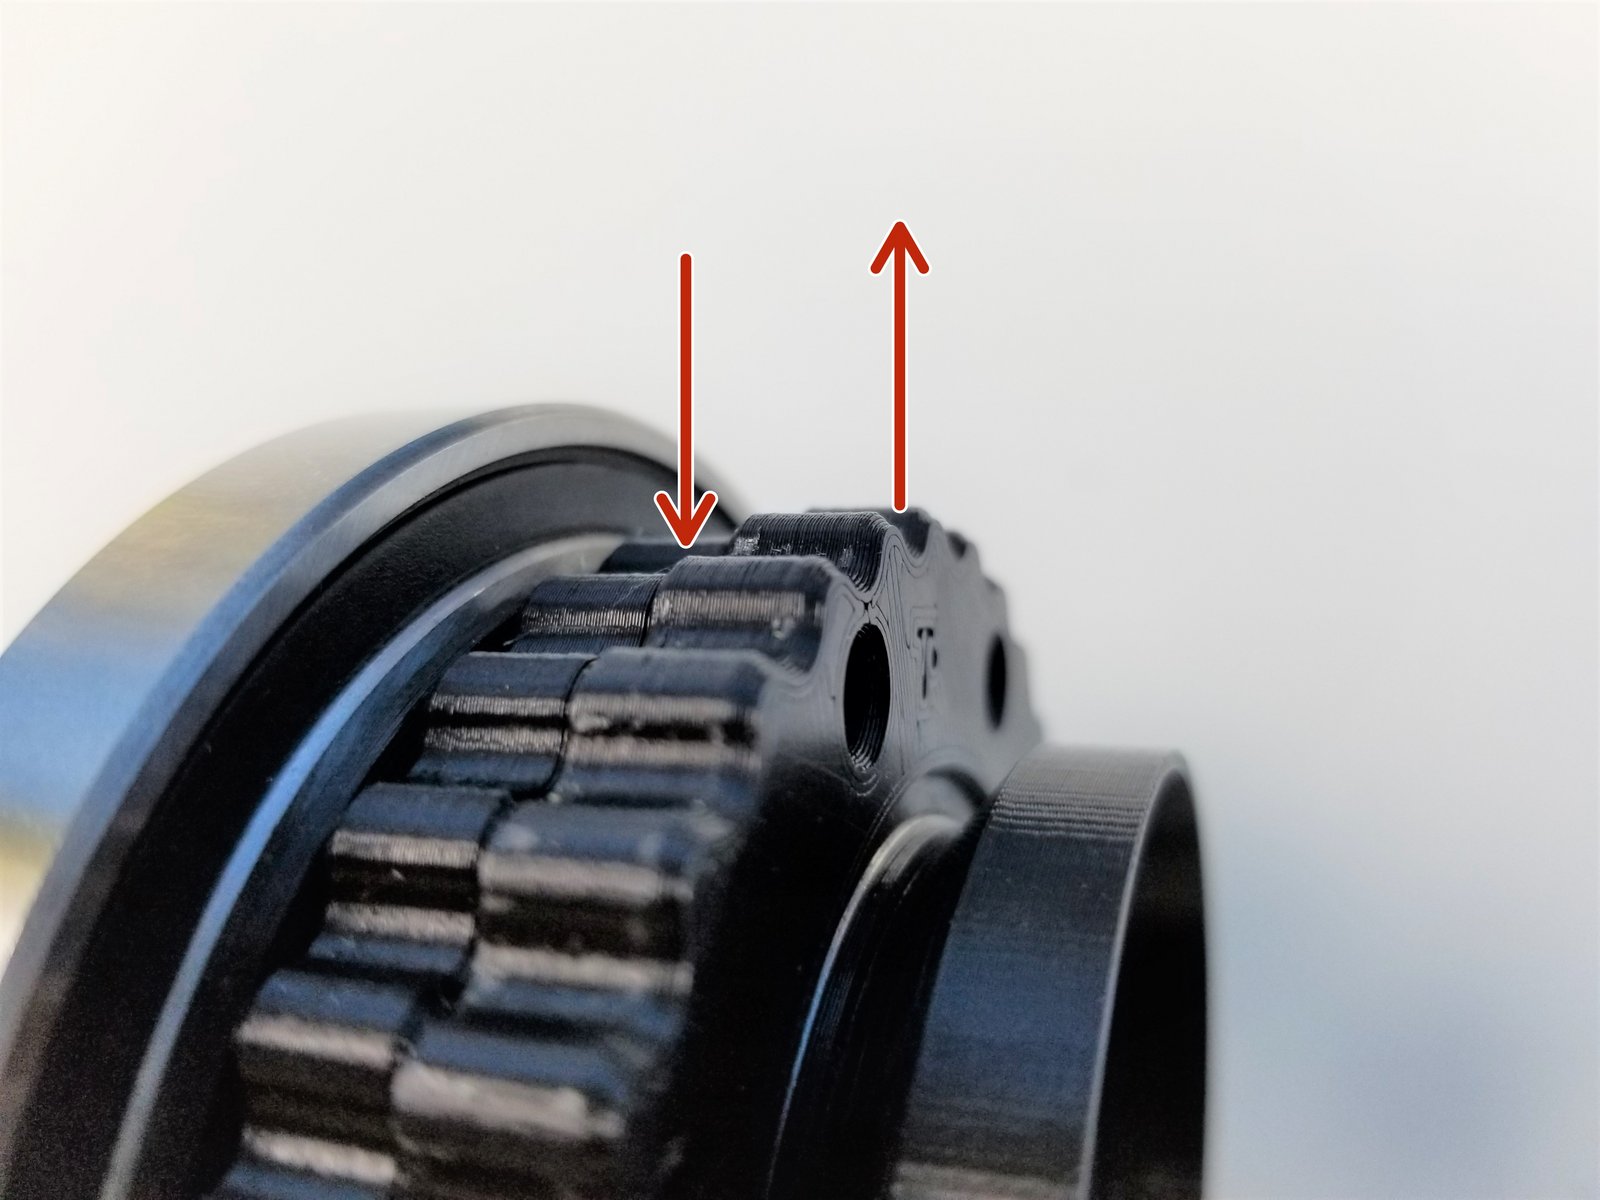
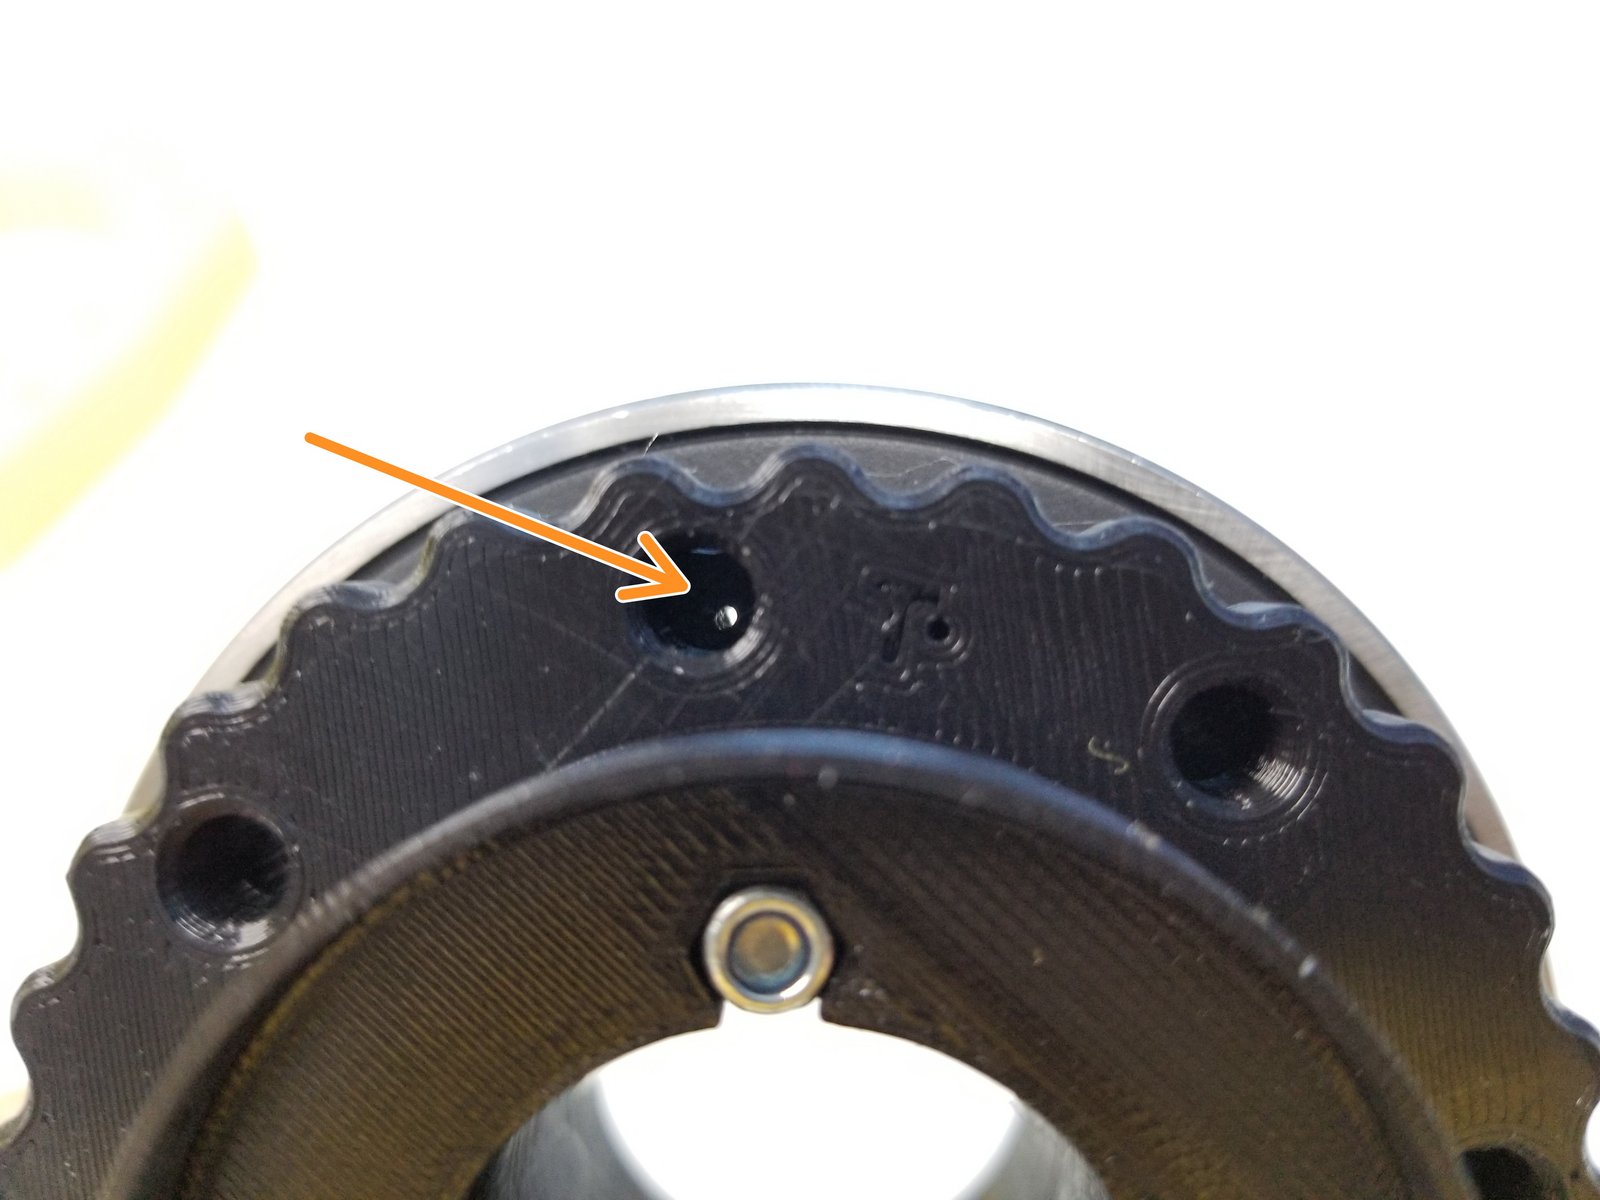
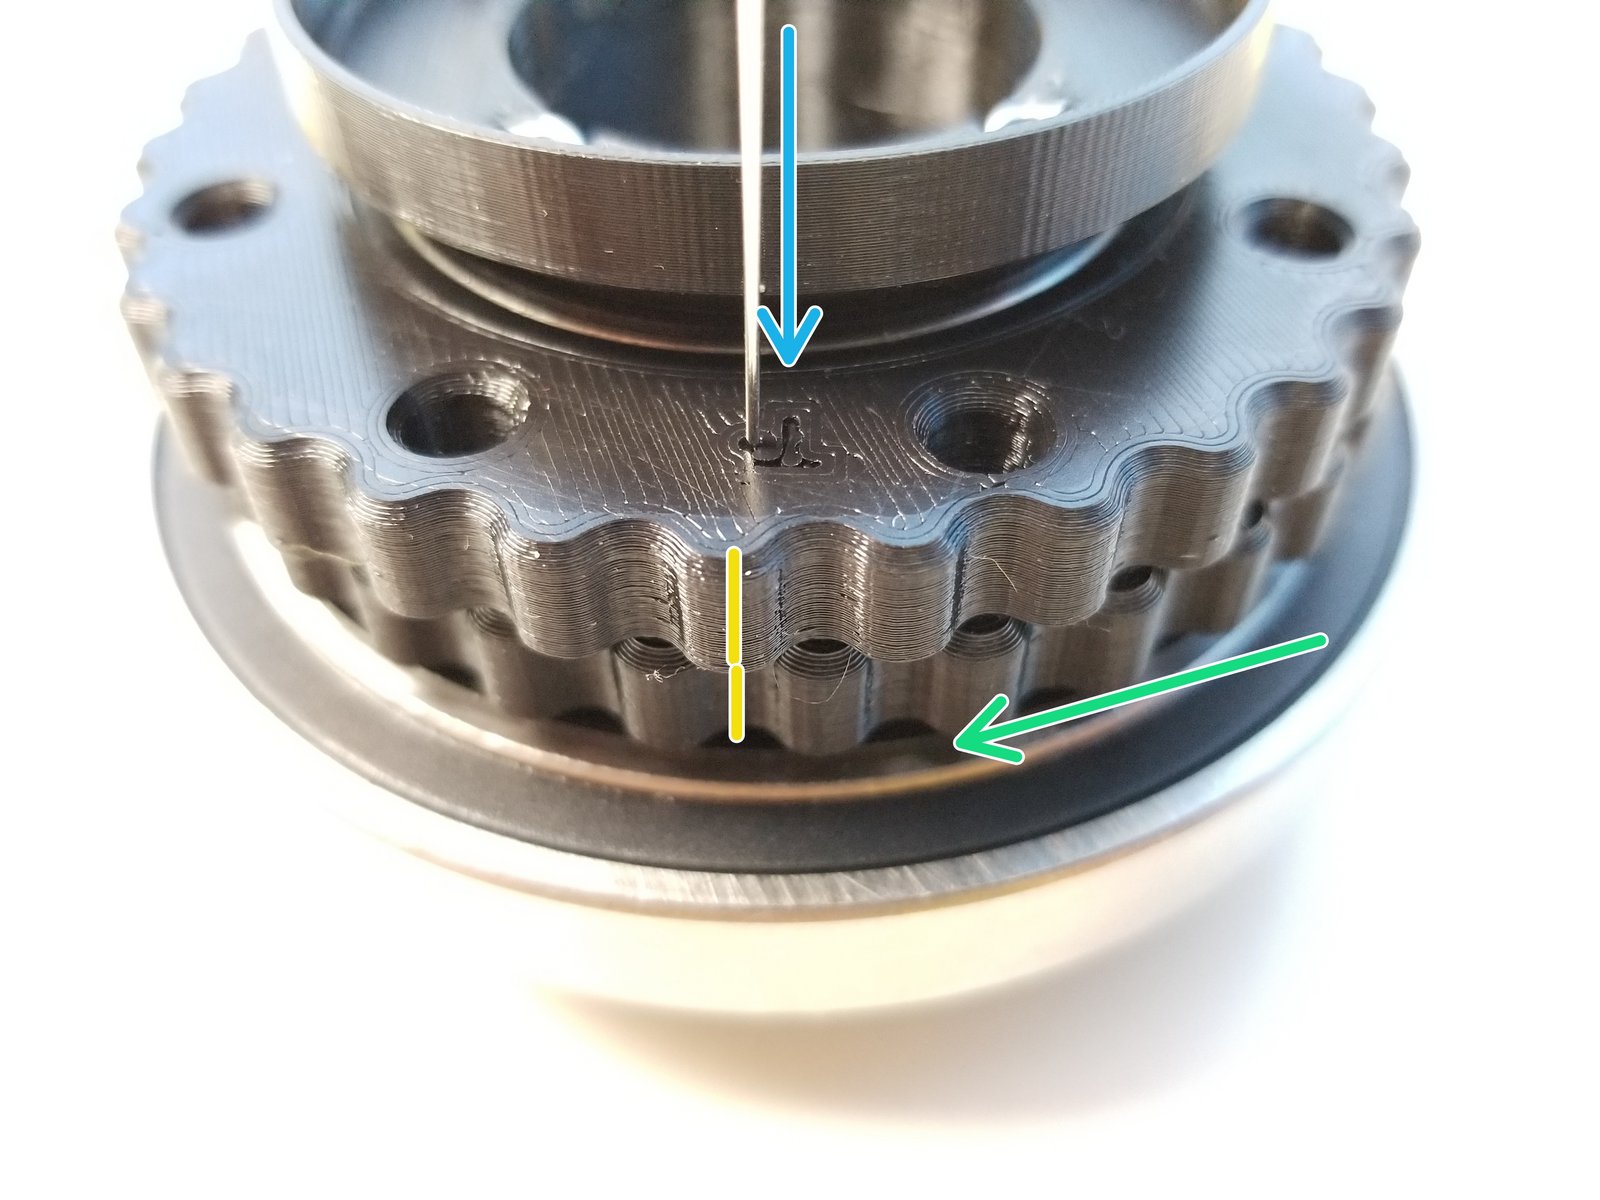
For our new alignment method, Eccentricity is aligned with the T and B label of the Rotors.
- Warning:
Notice how the Top Rotor is sticking out yet the Bottom Rotor is not.
While keeping the Eccentric Shaft and Top Rotor in a fixed position, rotate the Bottom Rotor to a point where you can see the Bottom Alignment Hole
Rotate a little more so that the Top and Bottom Alignment Holes are aligned to each other.
A pin can be fit right through the 2 alignment holes if done correctly
When this is done, you will be able to see that the sharpie marks made from Step 5 aligns vertically too
Step 13 Anchor Gearbox Output- Rotor Insert
Click the large image to open full size.
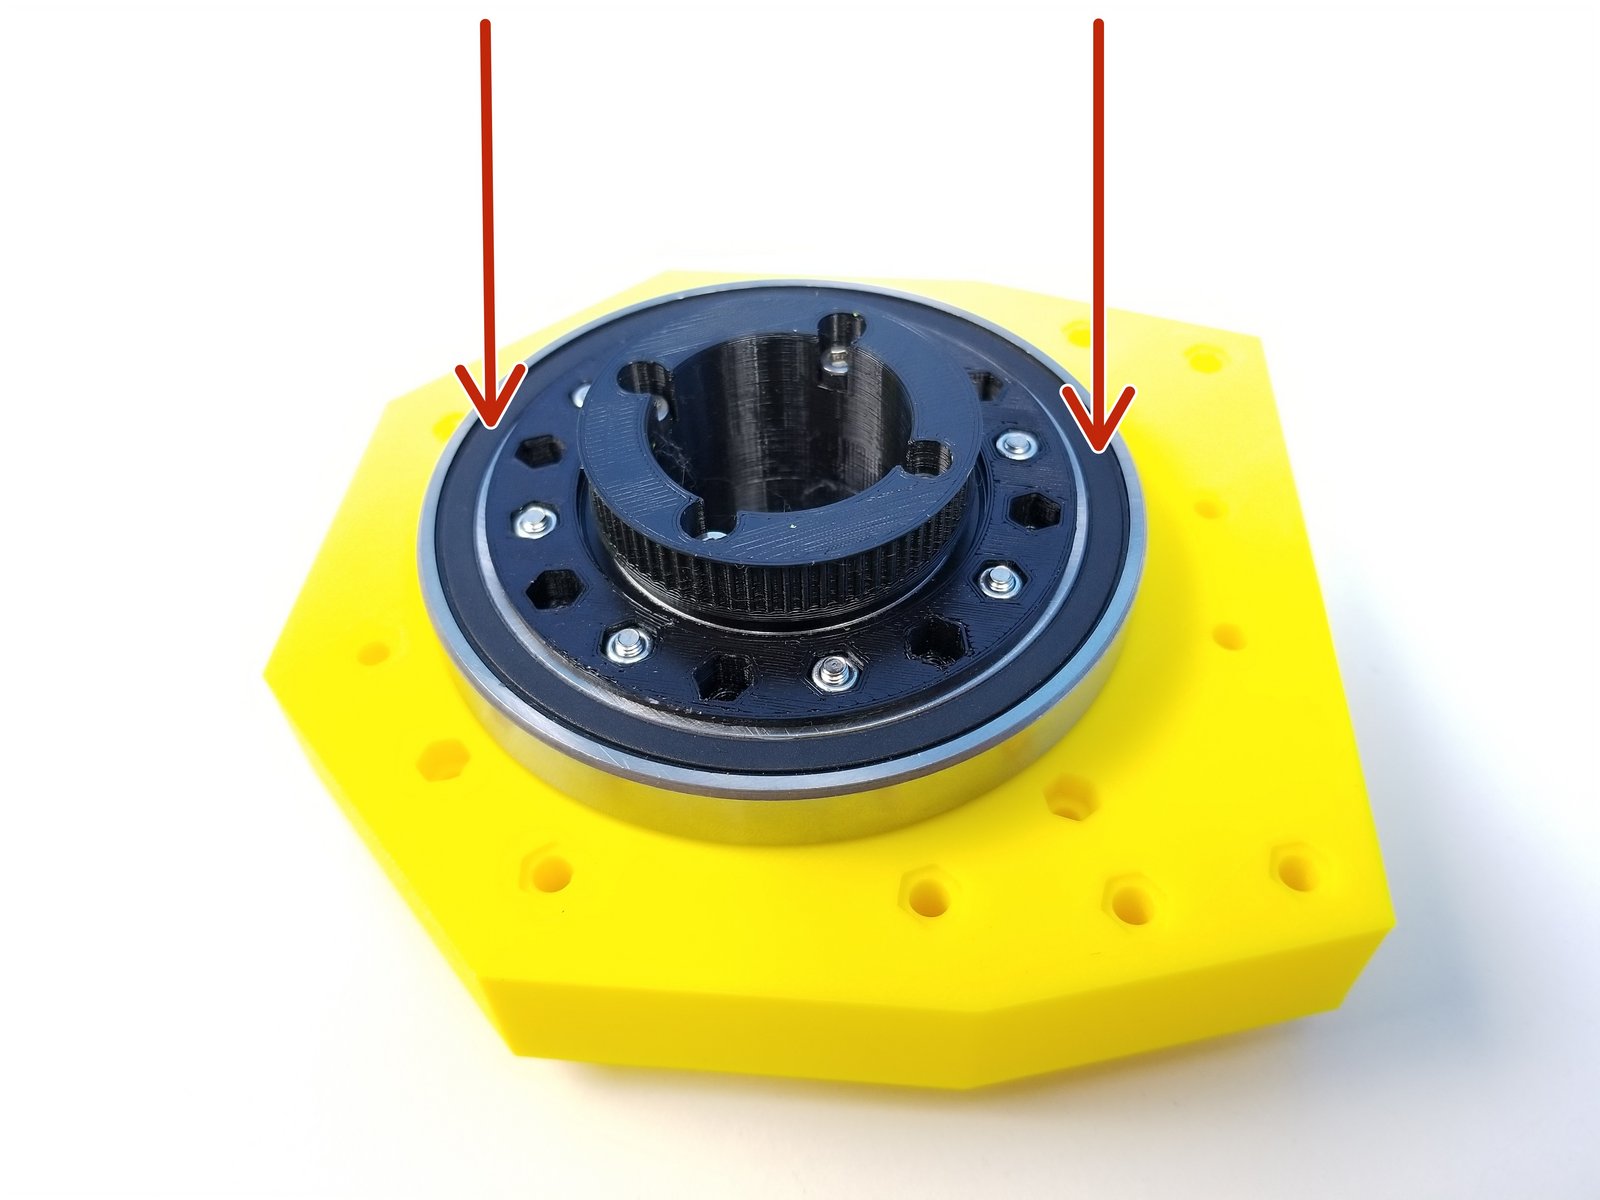
Insert the Rotors in the Anchor Gearbox Housing while maintaining the alignment
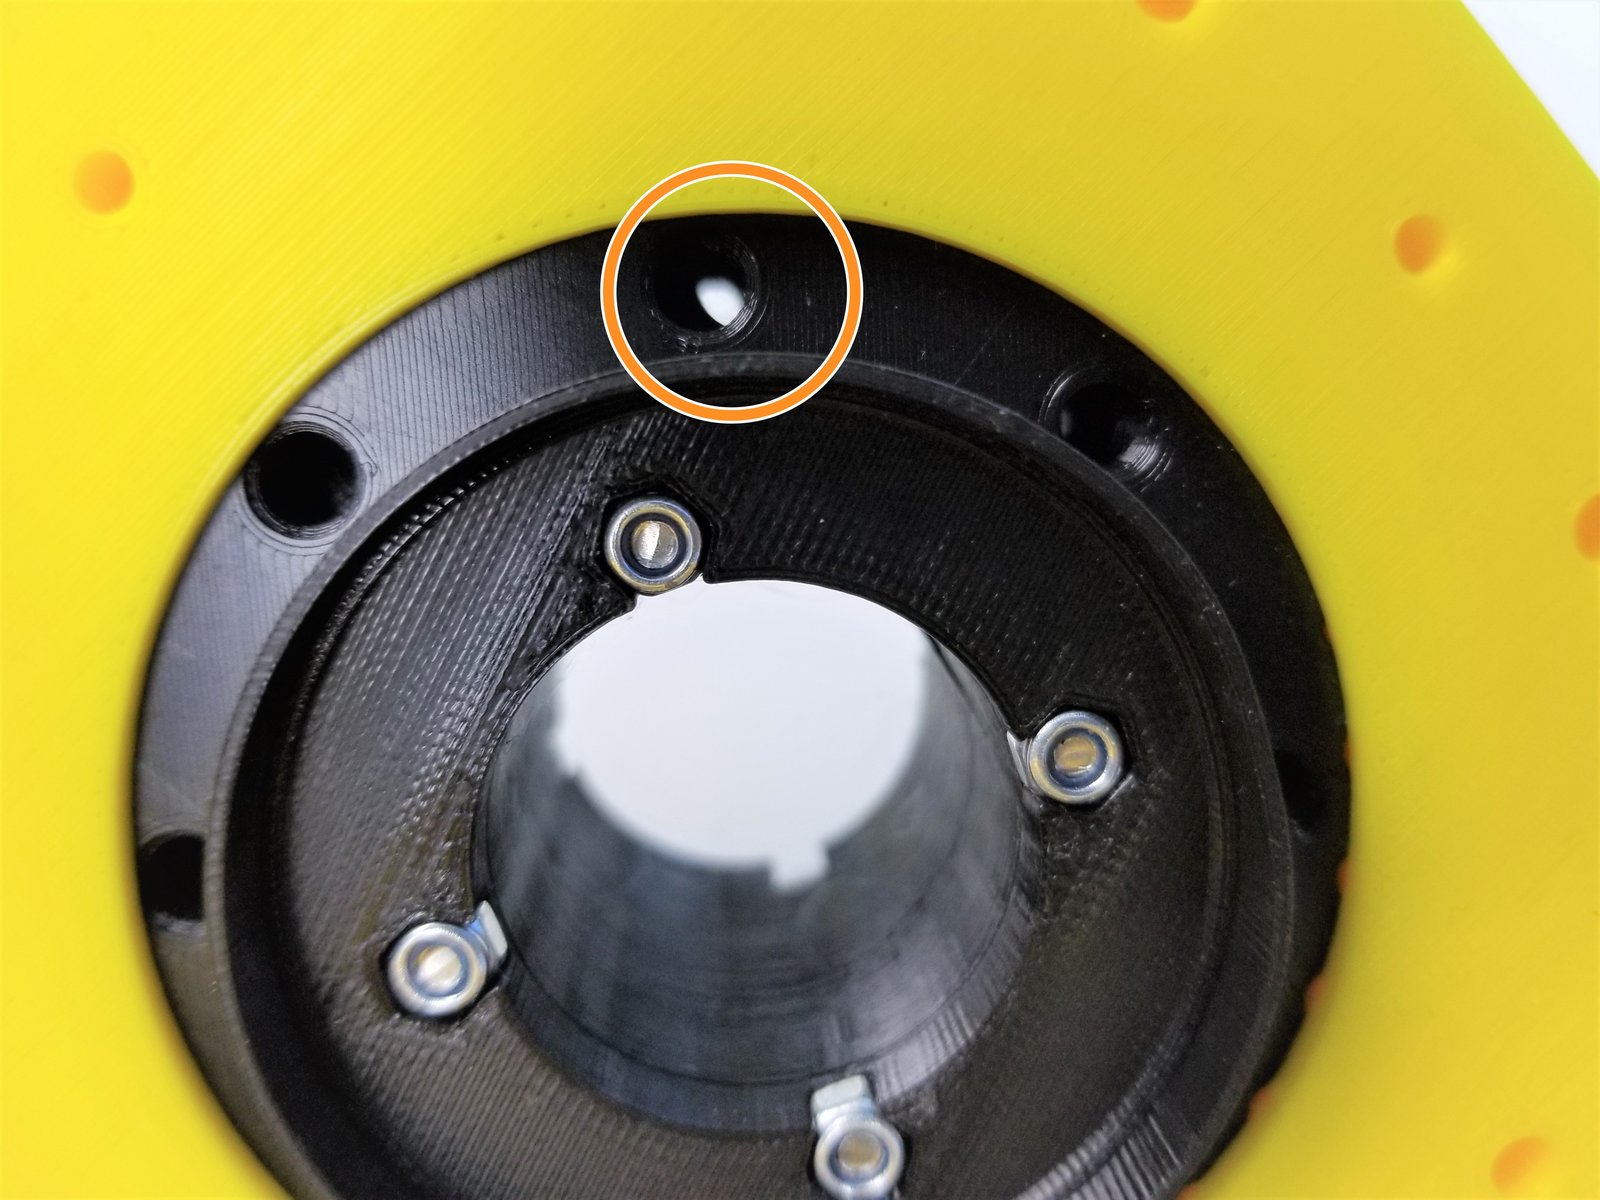
If aligned correctly, the 8 holes made by the 2 rotors should have equal space
- Note:
Camerac angle could only capture one hole
- Note:
Remove the Alignment Pin once the Rotors are in the Housing
Step 14 Anchor Gearbox Output - 1
Click the large image to open full size.
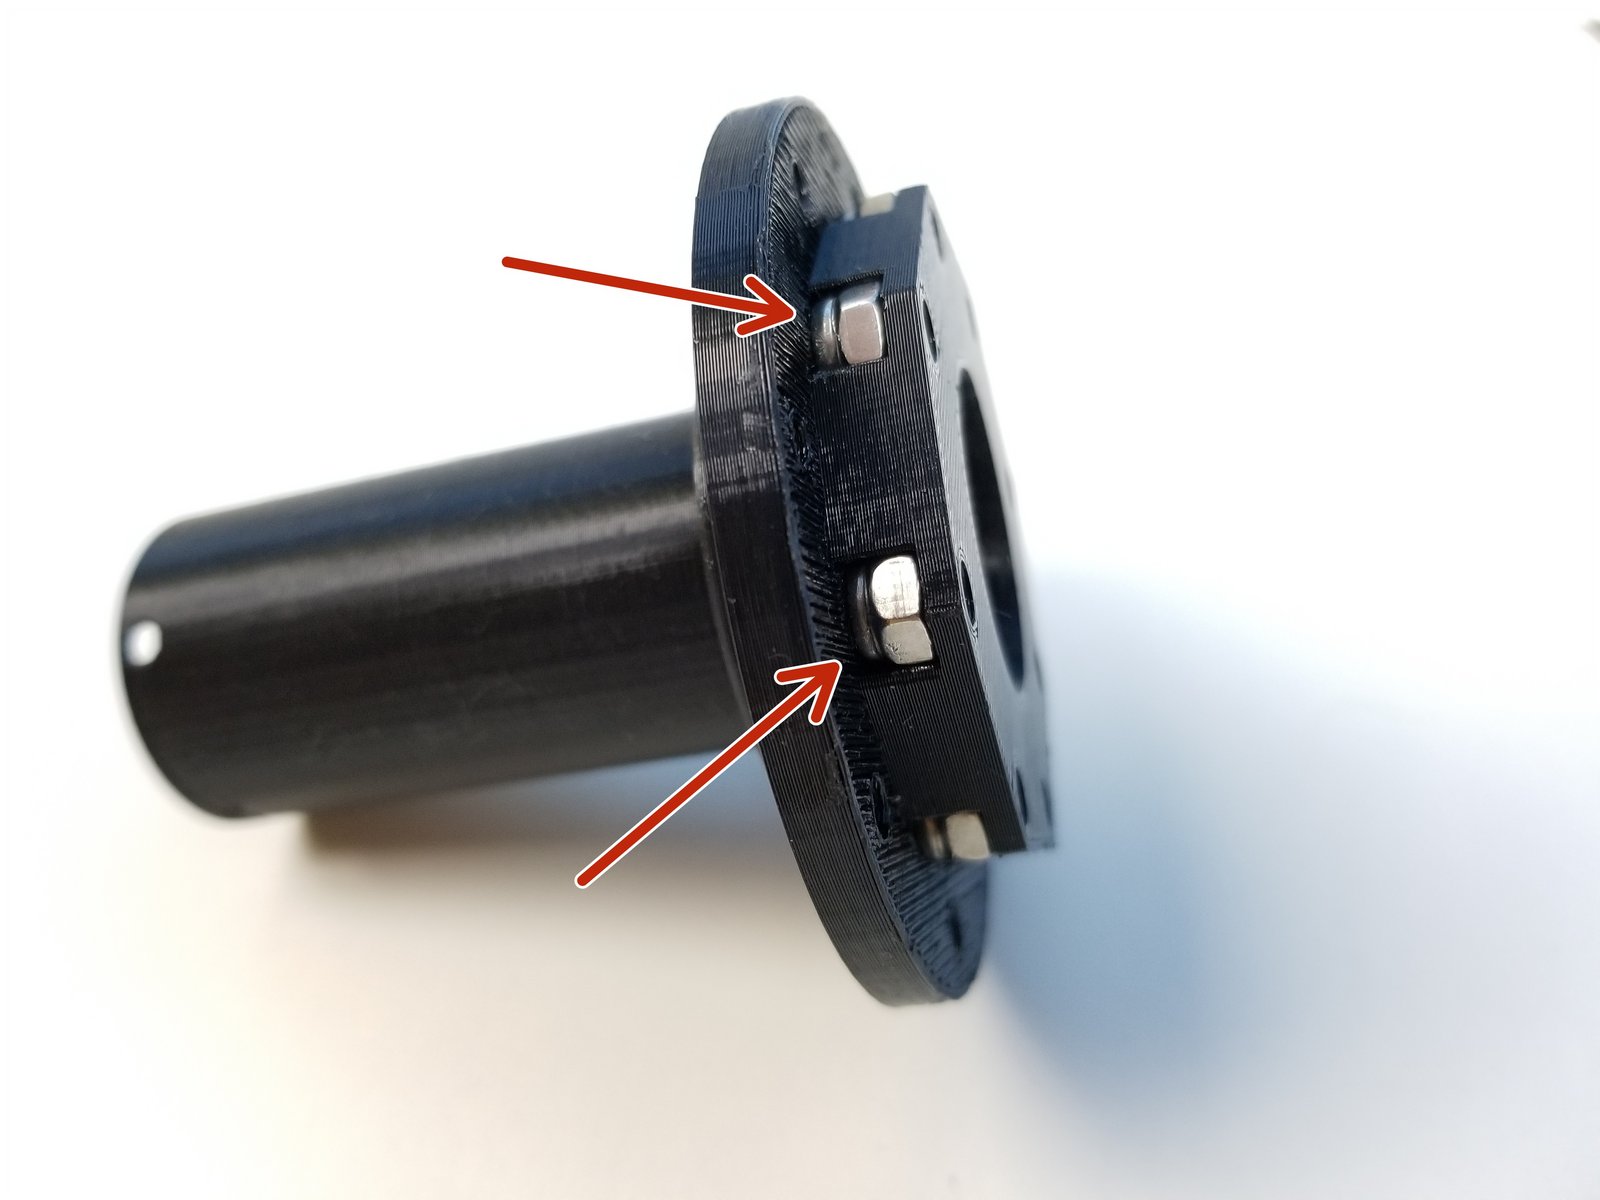
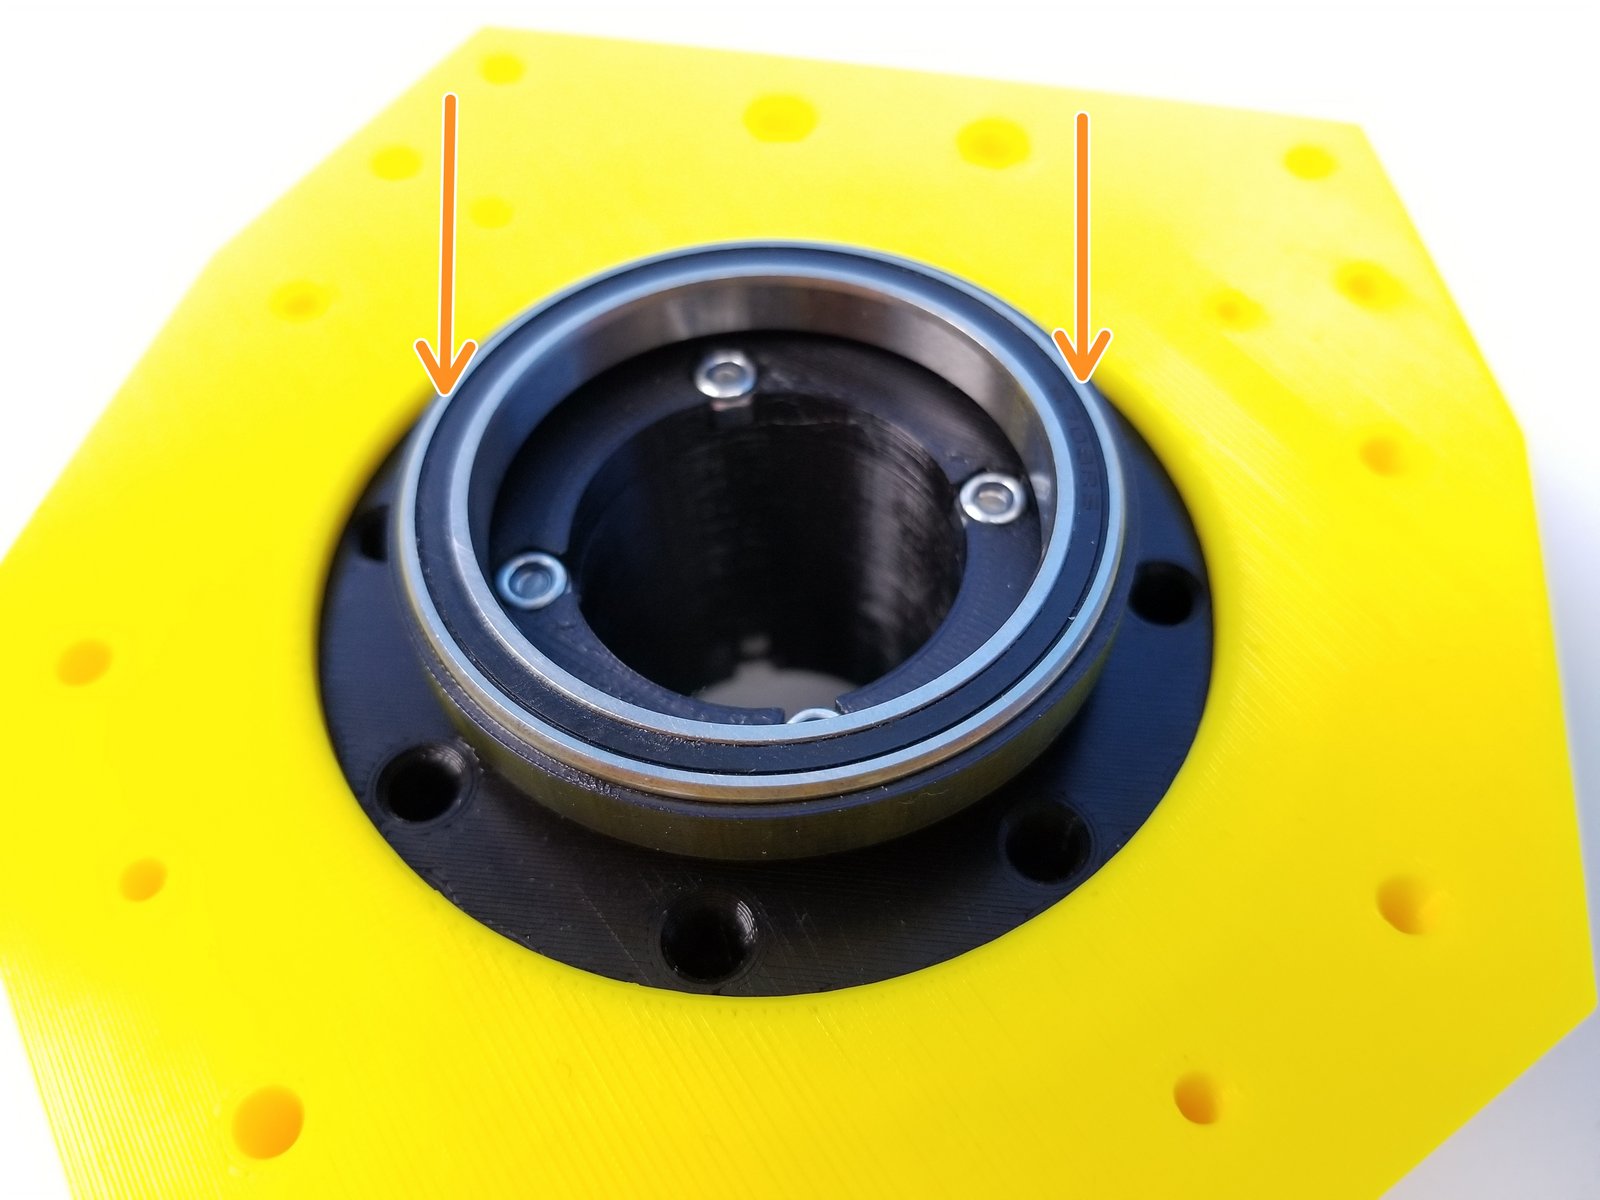
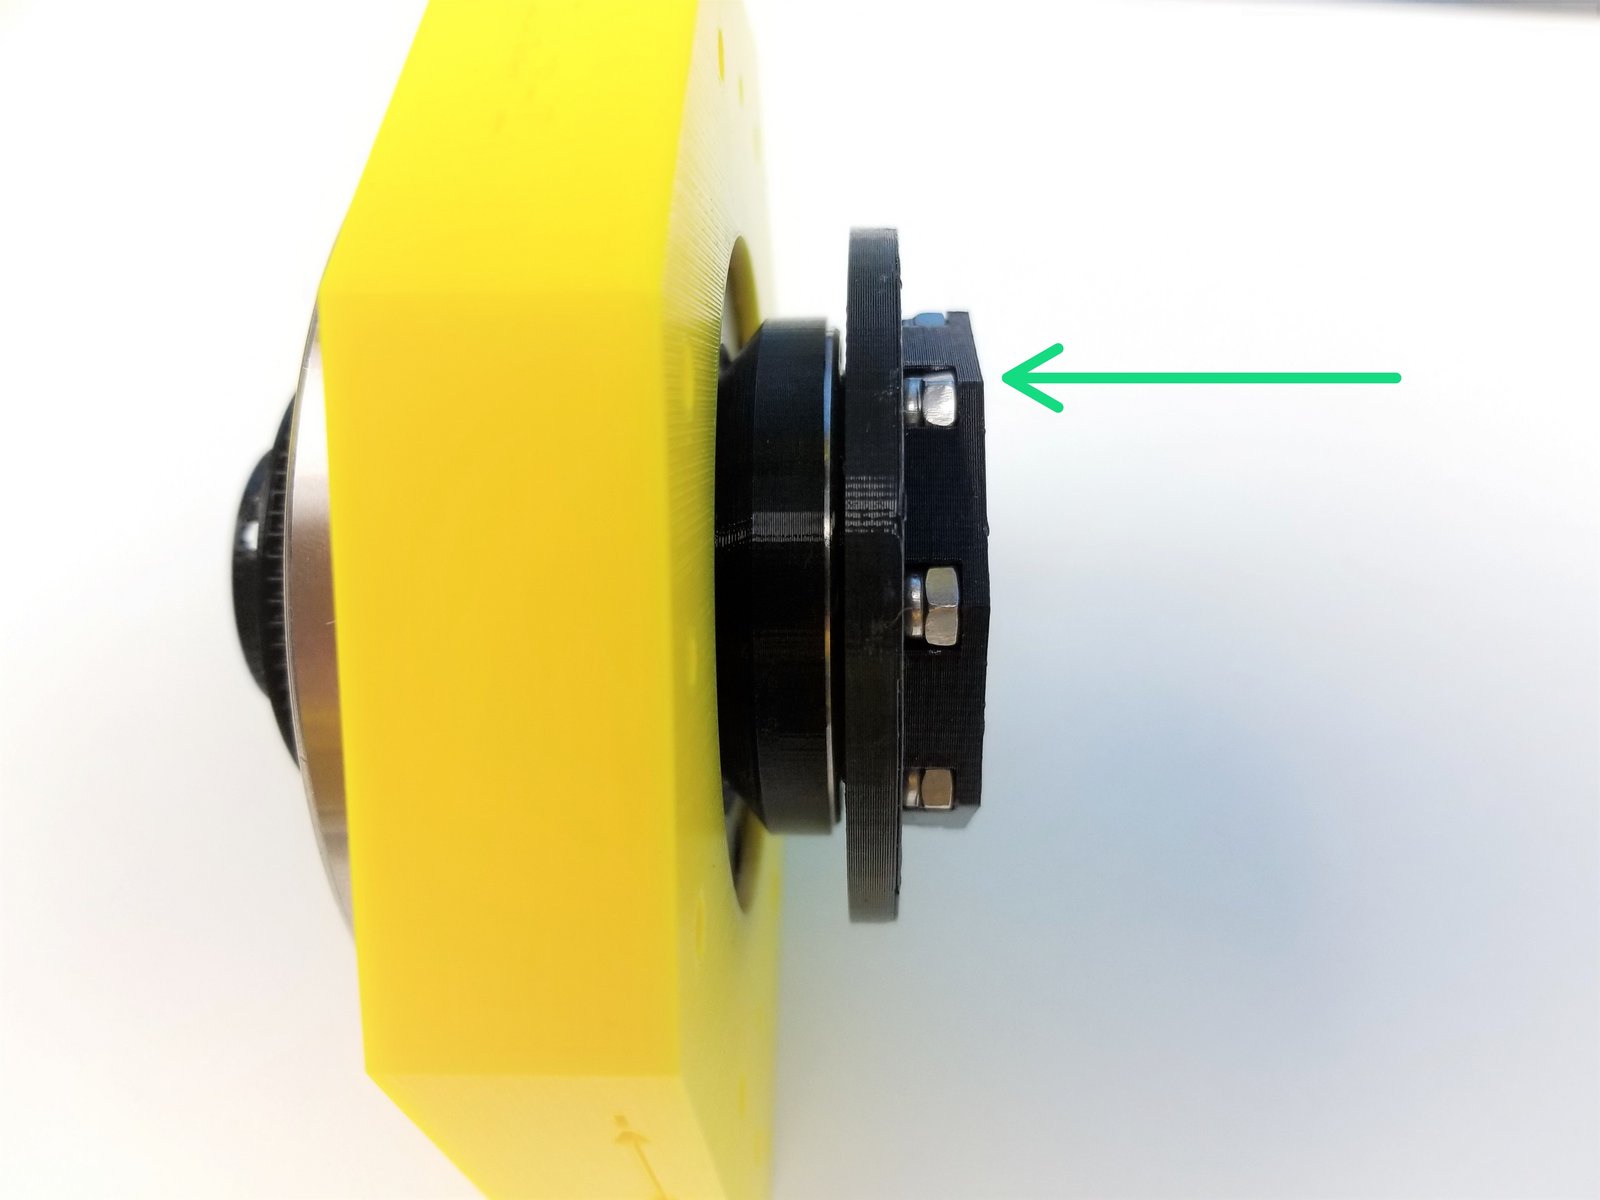
Insert M4 Nylock Nuts into the Output Top Bearing [one with the long tube]
Insert 6708 Bearing in Gearbox Shaft Top.
Then insert the Top Output Disk into the same bearing
Step 15 Anchor Gearbox Output - 2
Click the large image to open full size.
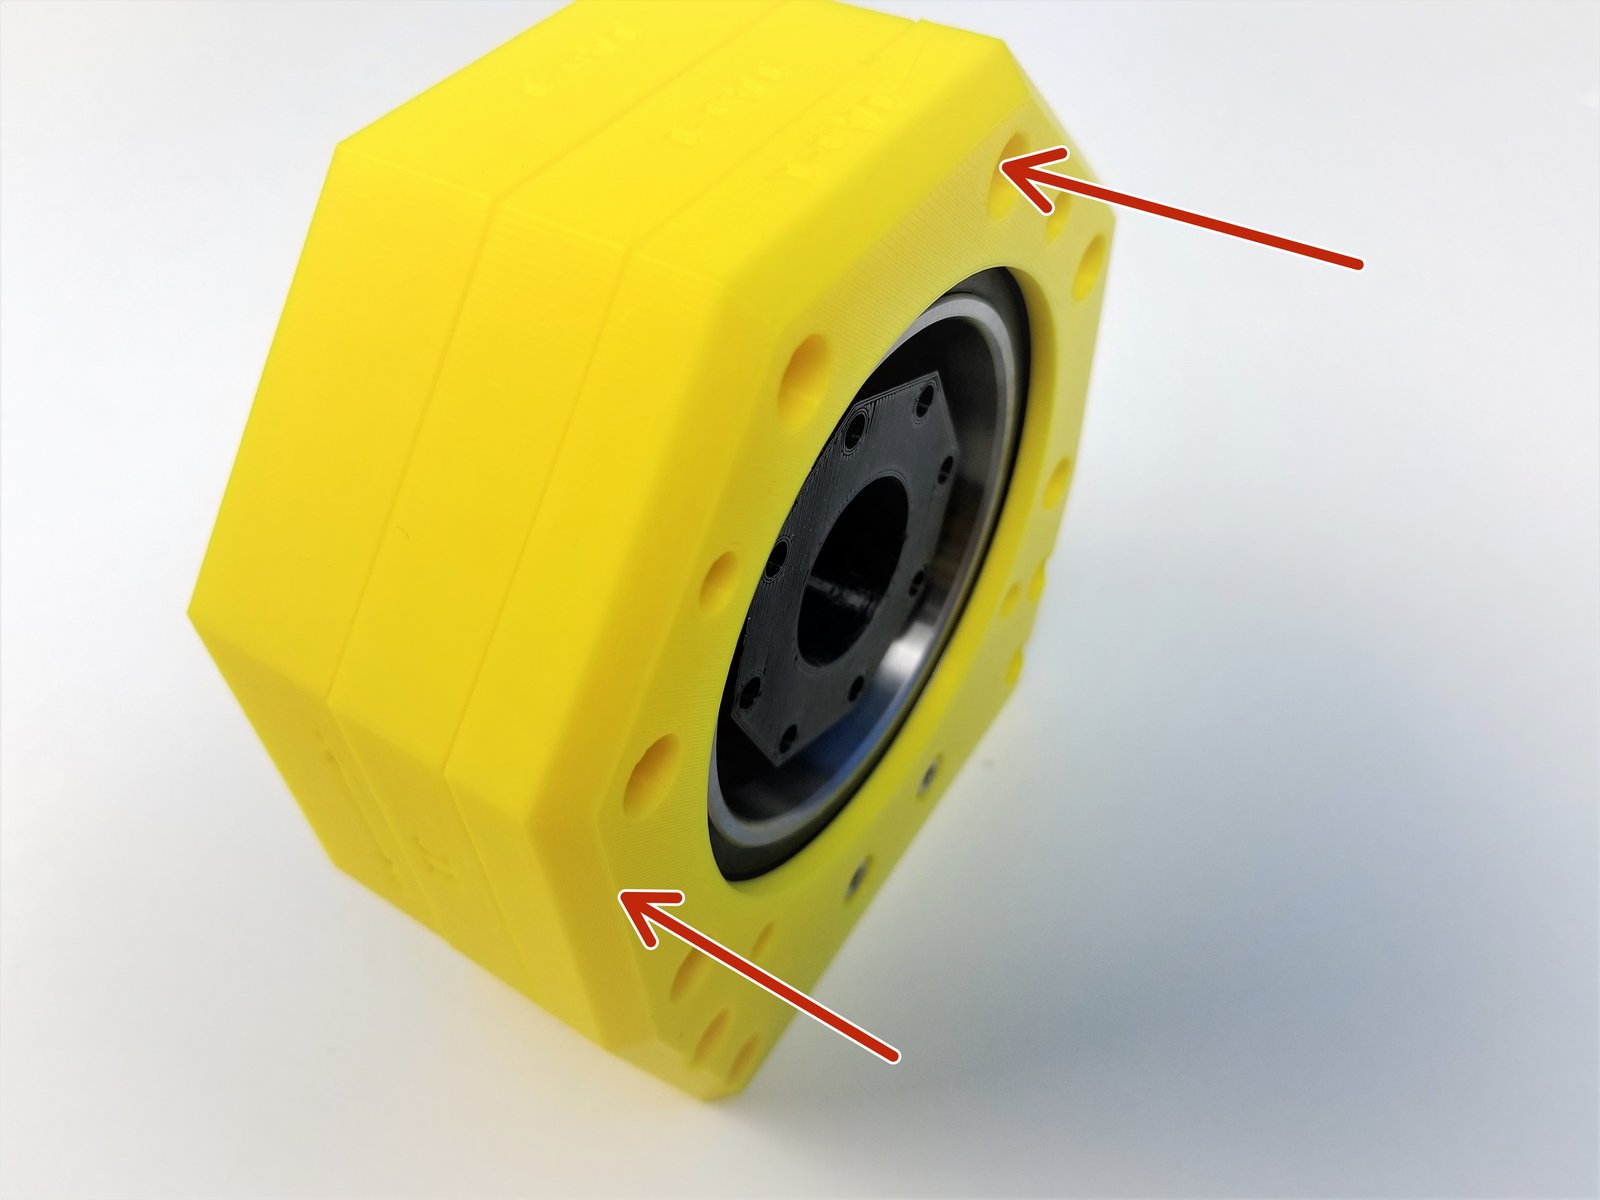
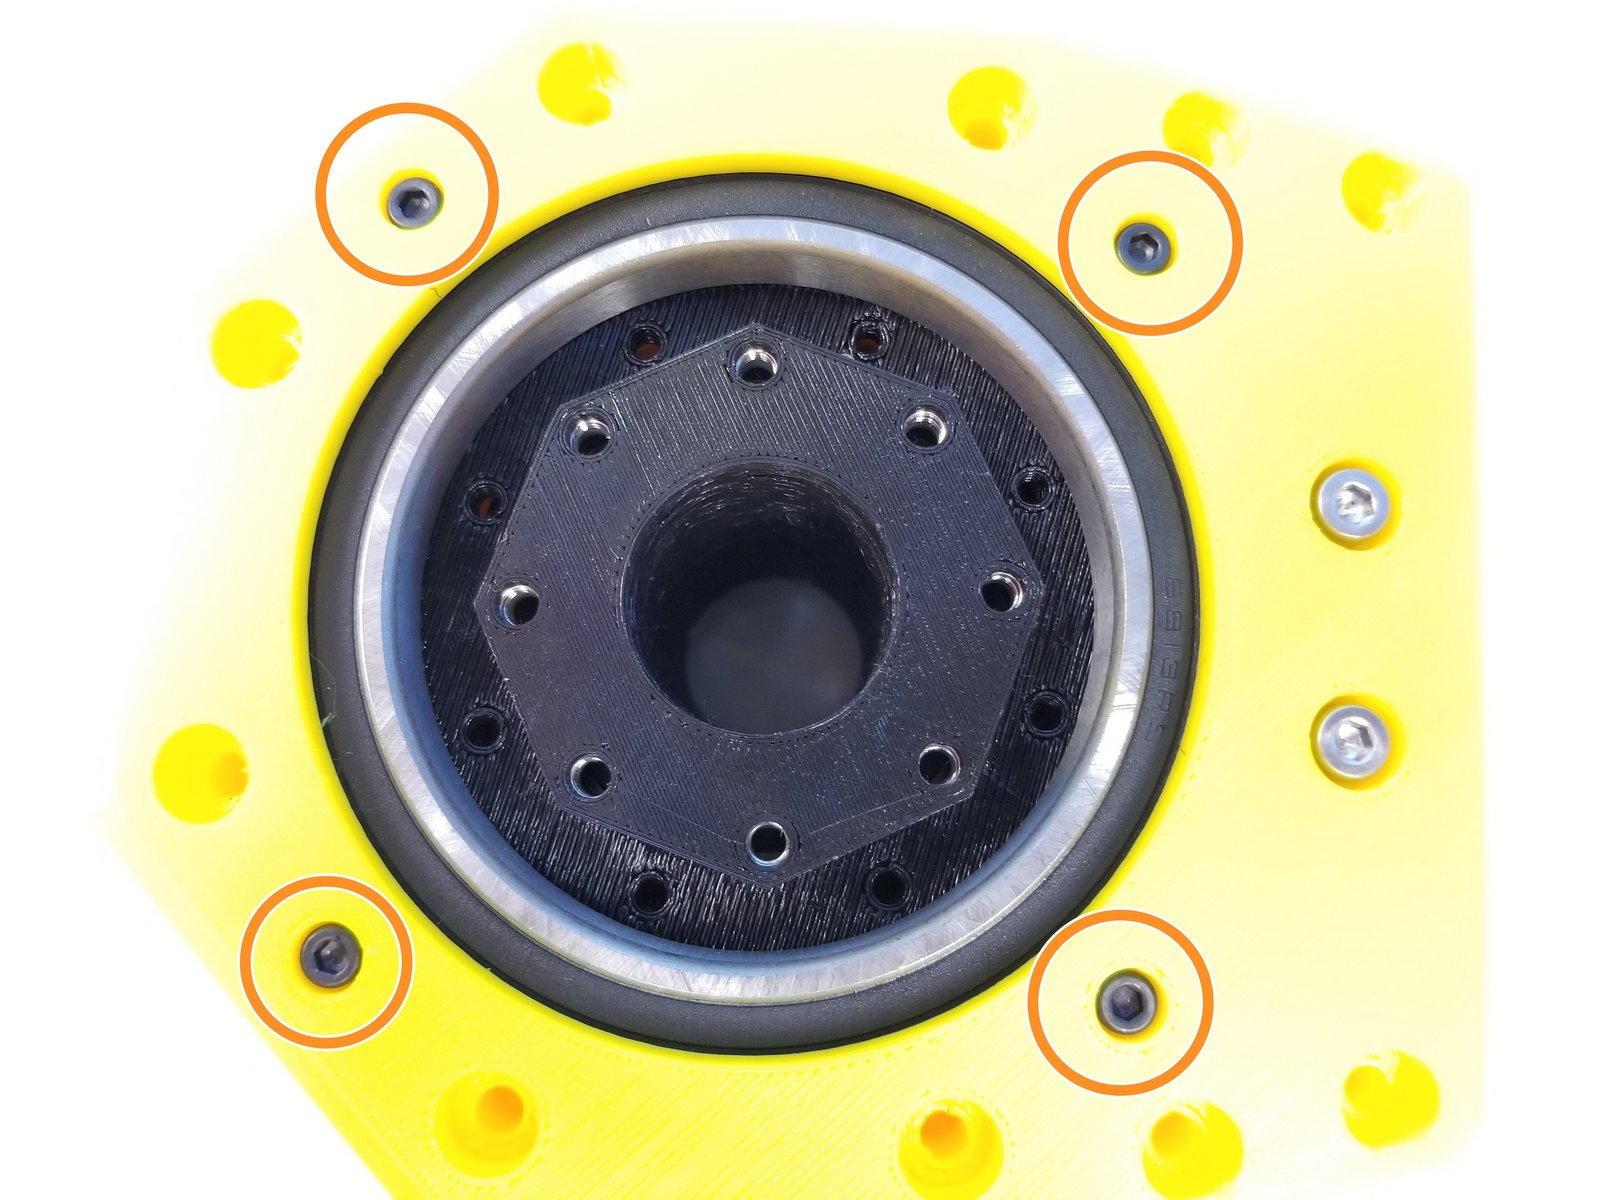
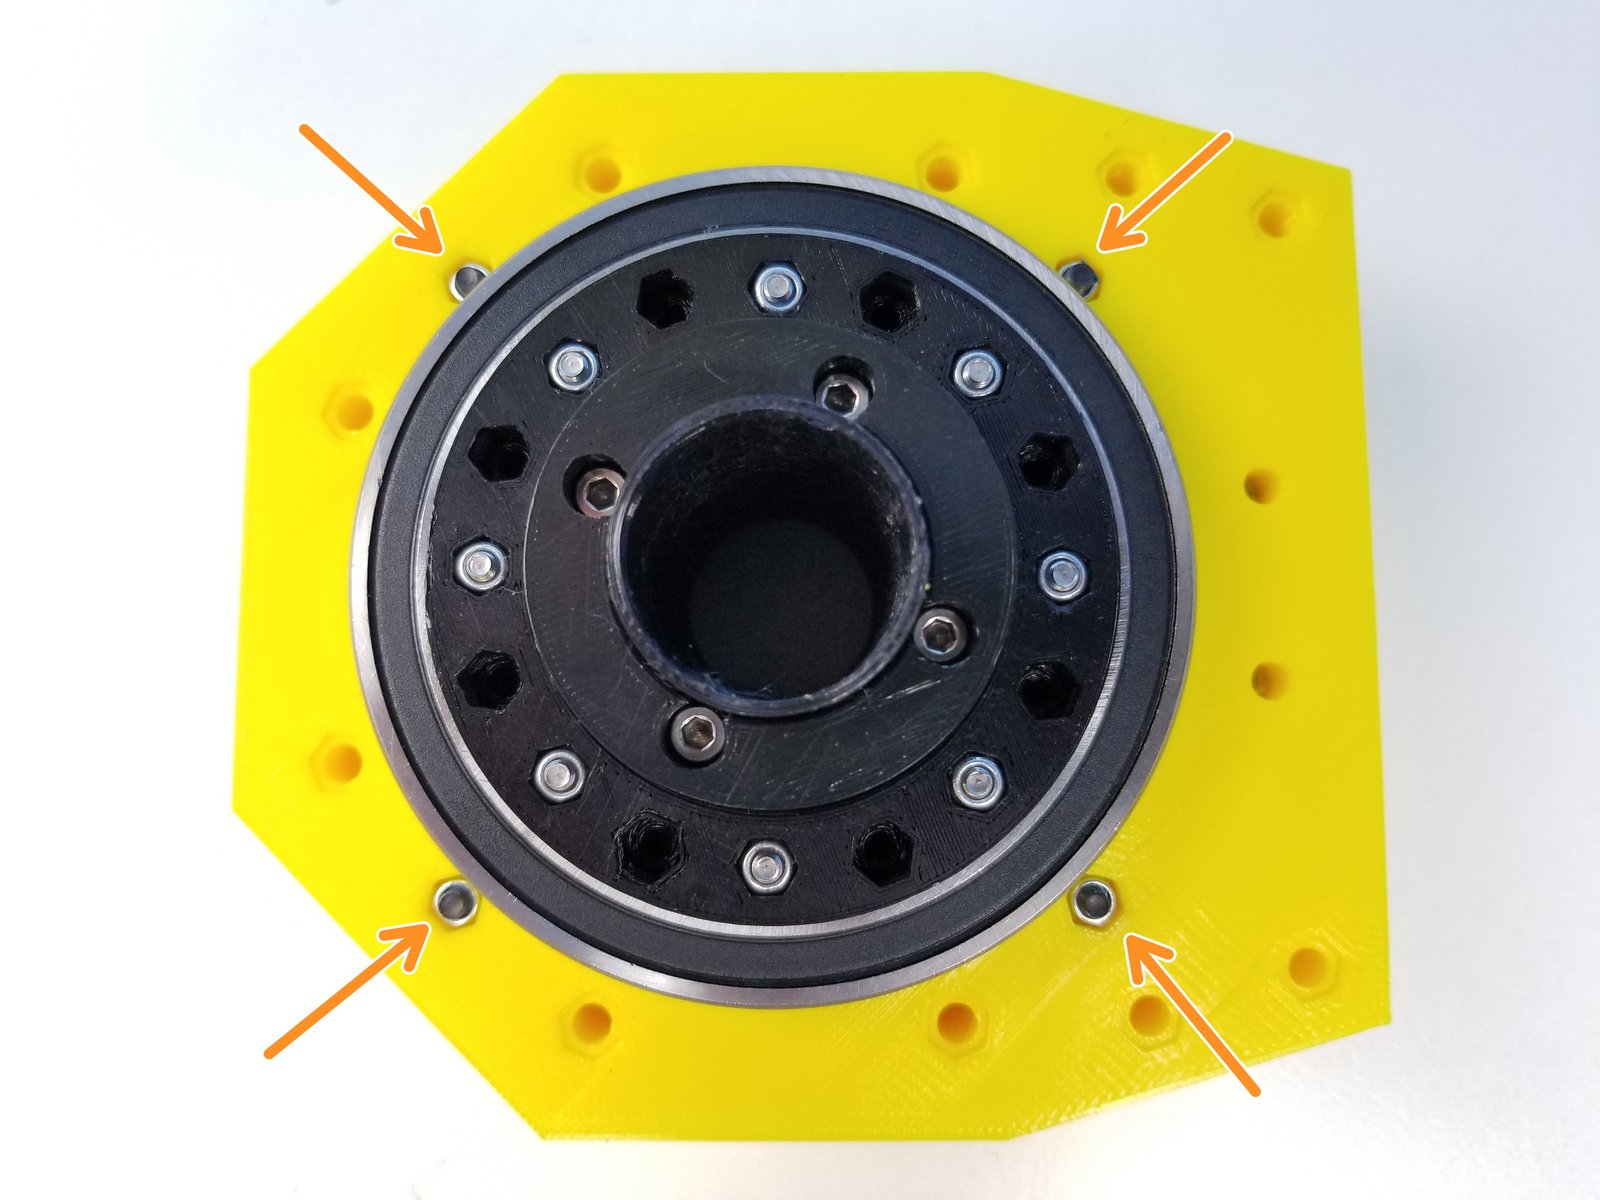
Insert the Top Bearing & Spacer Housing (assembled in Step 10) over the Roller Housing. (Hex standoff should fit right in)
Secure these housing components using M3x45mm Screws and M3 Nylock Nuts
Step 16 Anchor Gearbox Output - 3
Click the large image to open full size.
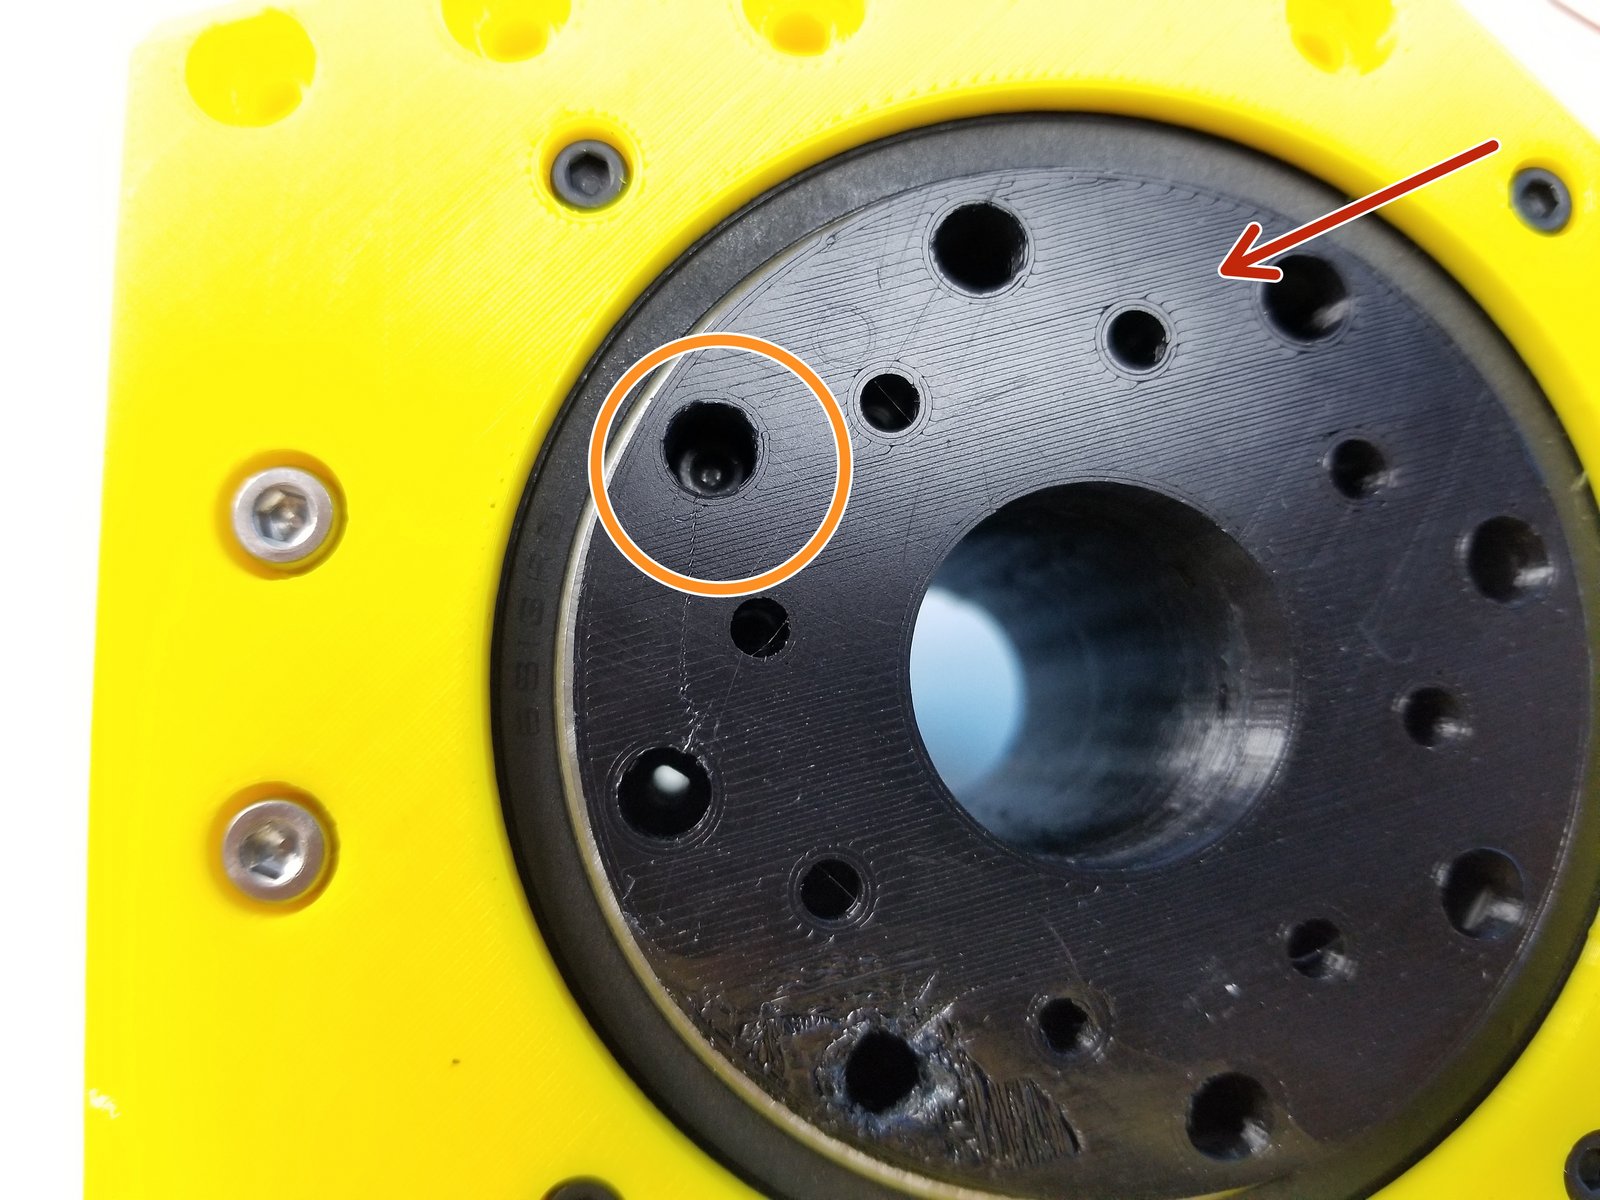
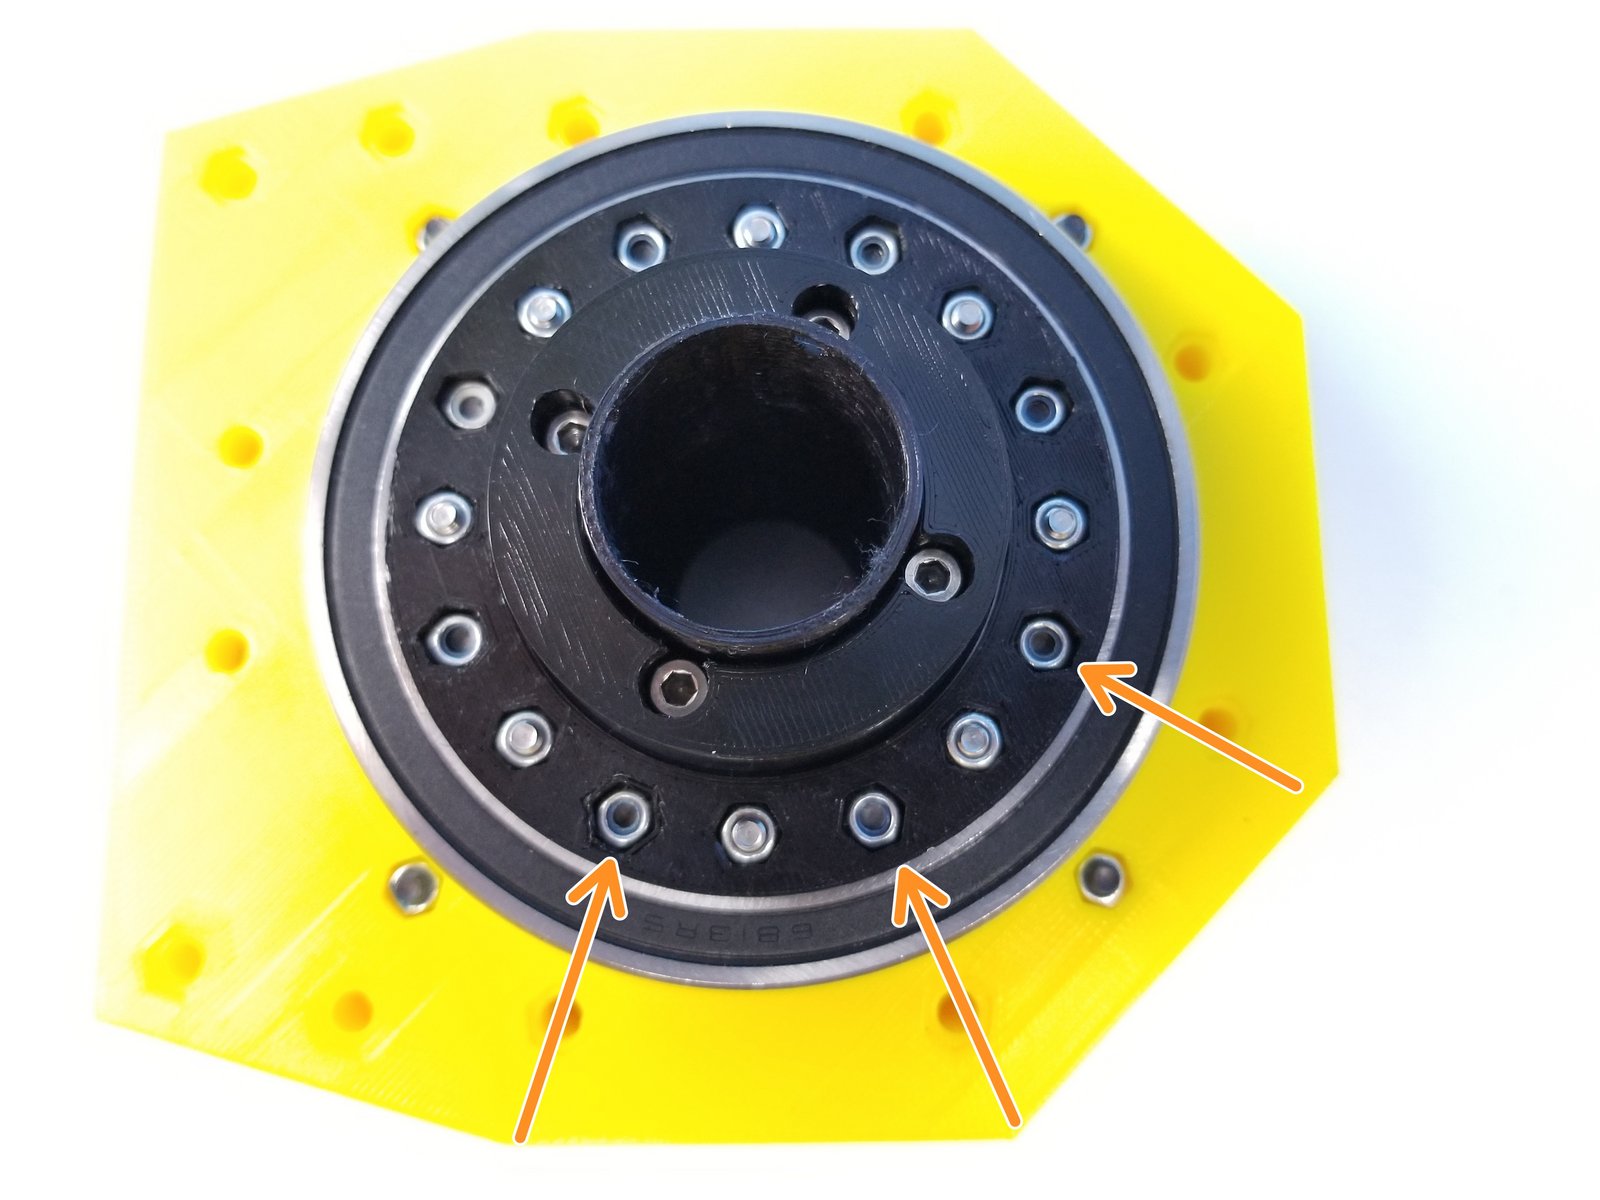
Insert the Top Output Disk to the 6813 Bearing
Secure the Top and Bottom Output Disks using M3x45mm Screws and M3 Nylock Nuts
- Note:
Verify that you can manually turn the eccentric shaft in the center and that the rotors smoothly turn inside the housing. Tight printing and misaligned rotors can cause the gearbox to jam.
Step 17 Anchor Motor Mount - Parts
Click the large image to open full size.
- Note:
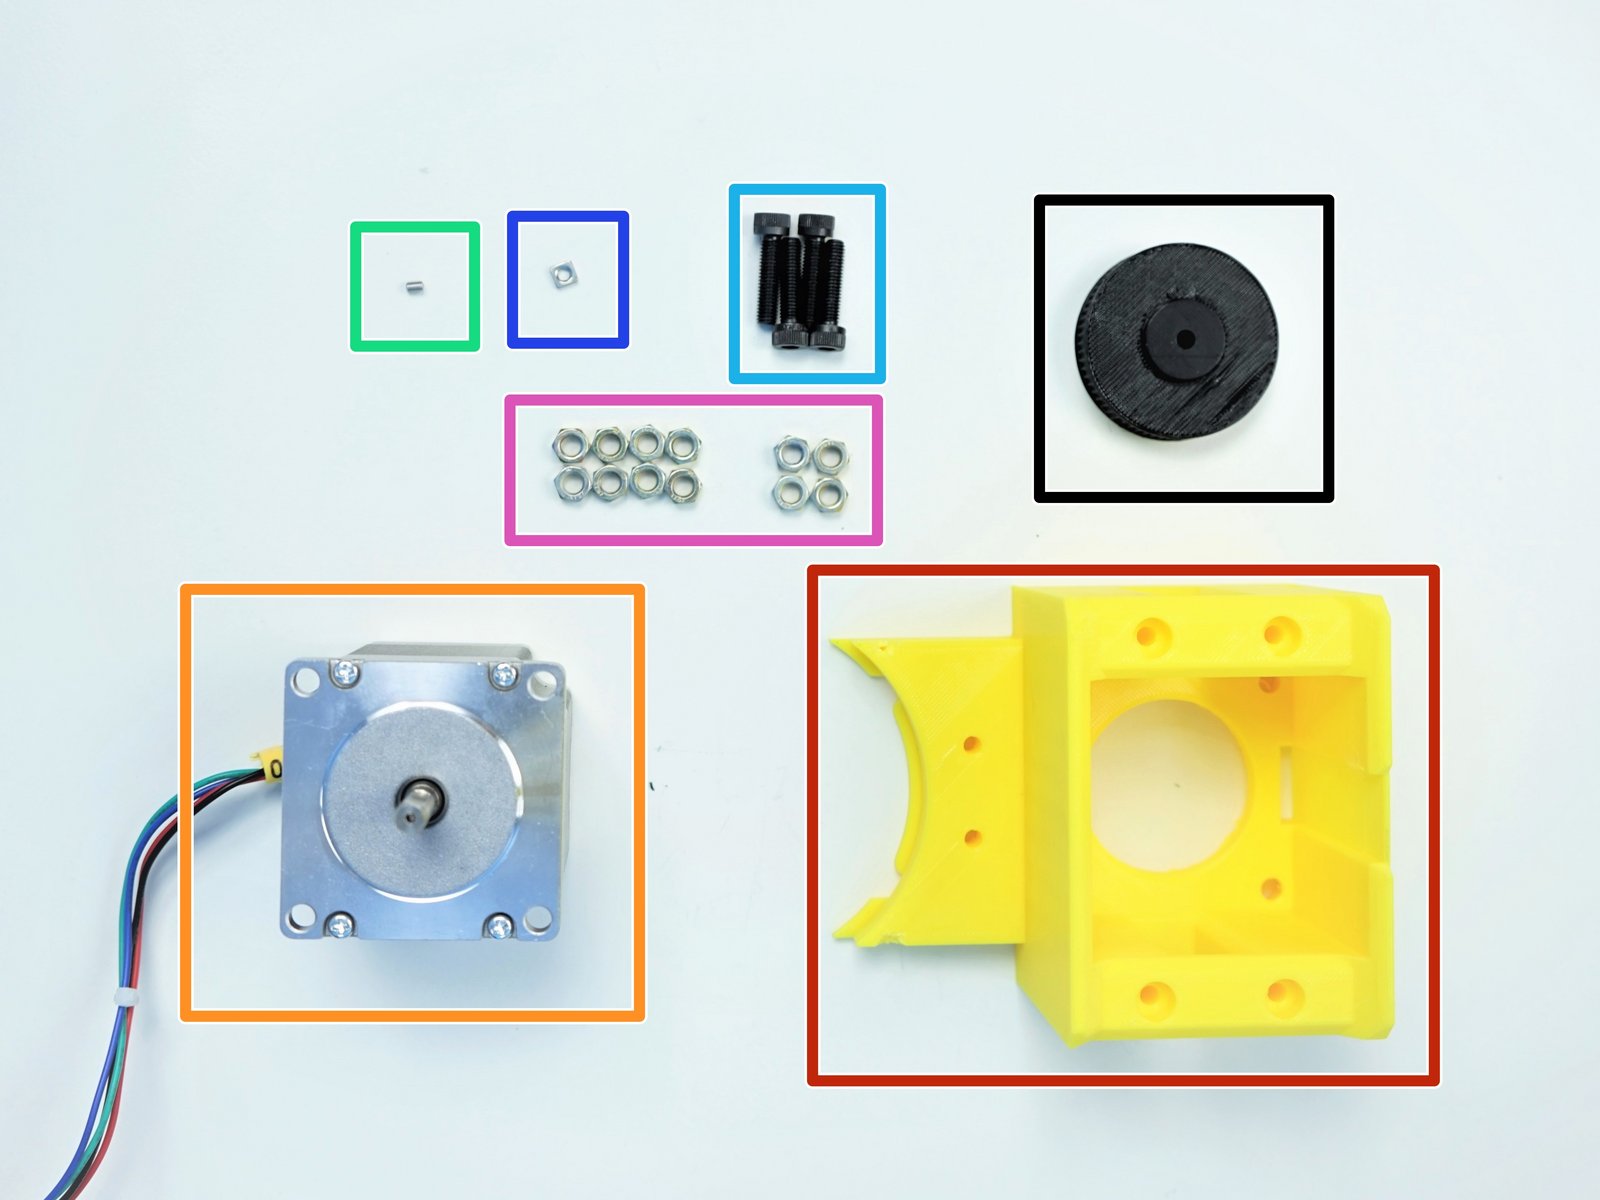
Prepare the following components:
[3D] - 1Ab Anchor Motor Holder
[3D] - 1PI-pulleyAnchor INPUT-71t
NEMA23 56mm Motor
M3x4mm Set Screw (x1)
M5x25mm Screws (x4)
M3 Square Nut (x1)
M5 Hex Nuts (x12)
Step 18 Anchor Motor Mount - 1
Click the large image to open full size.
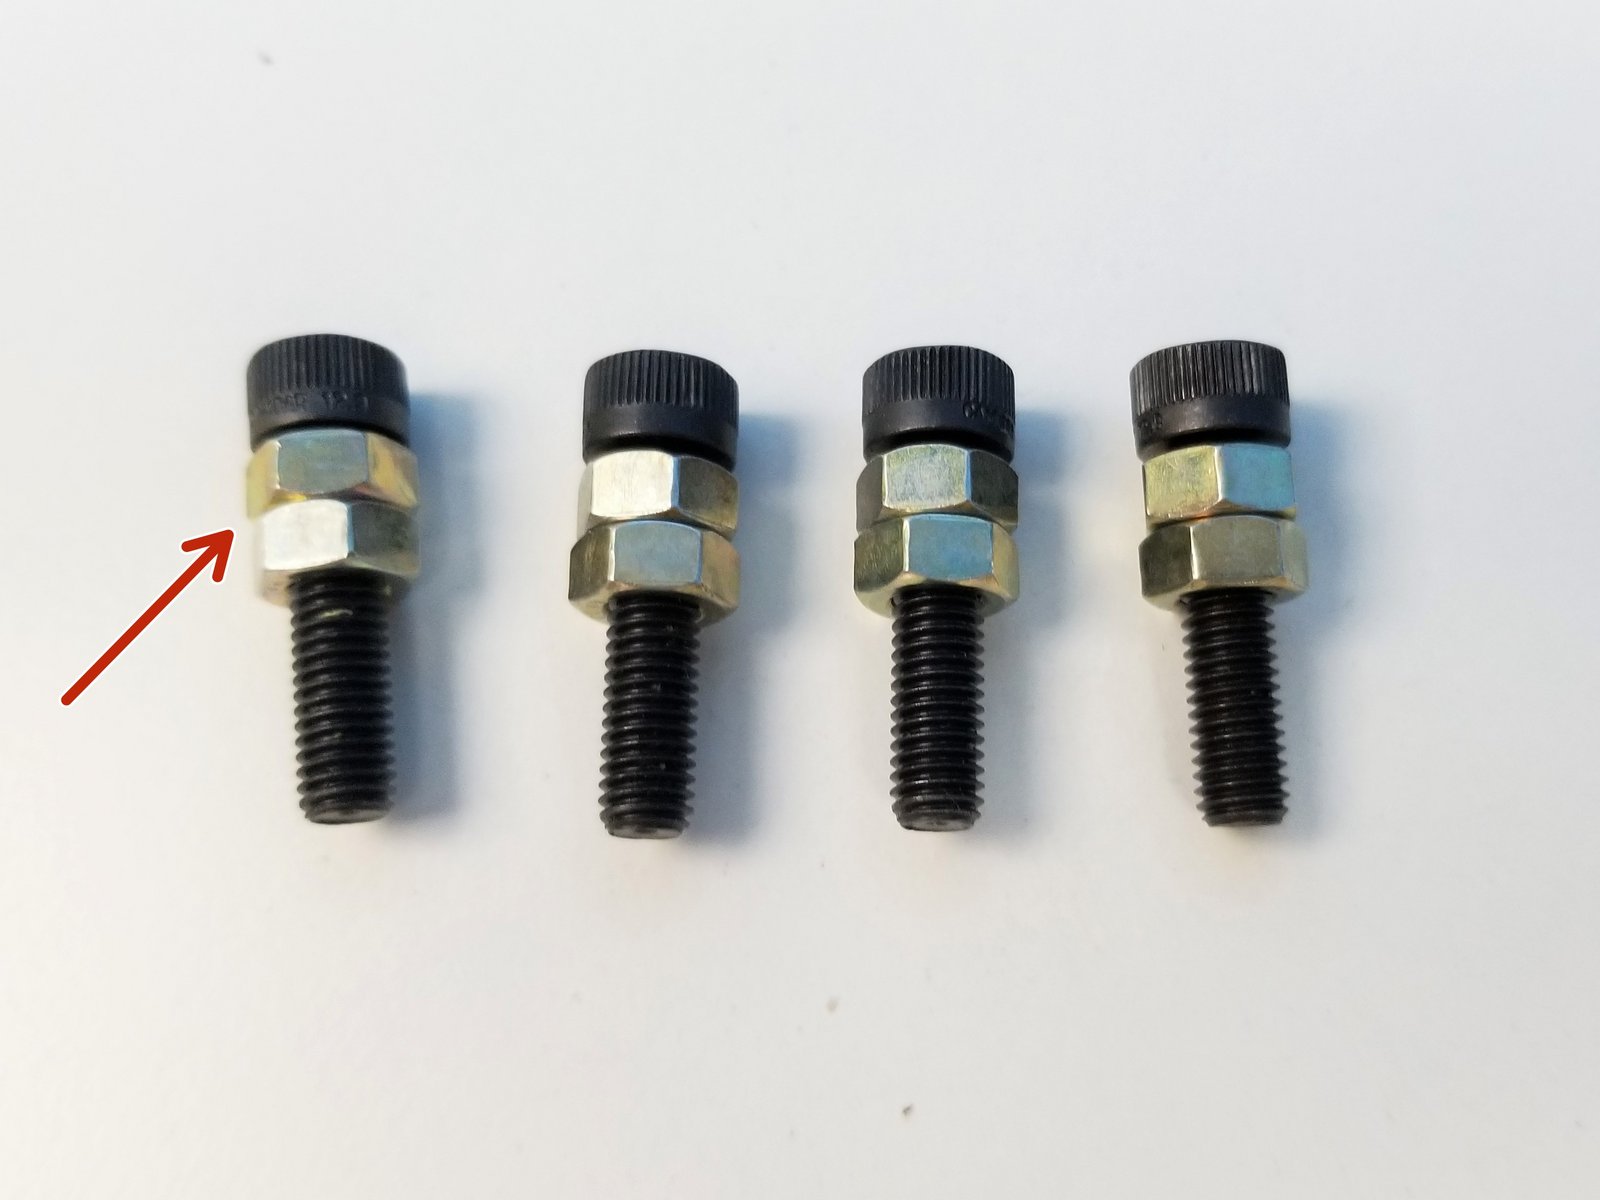
Screw in TWO M5 Hex Nuts in the M5x25mm Screws as spacers
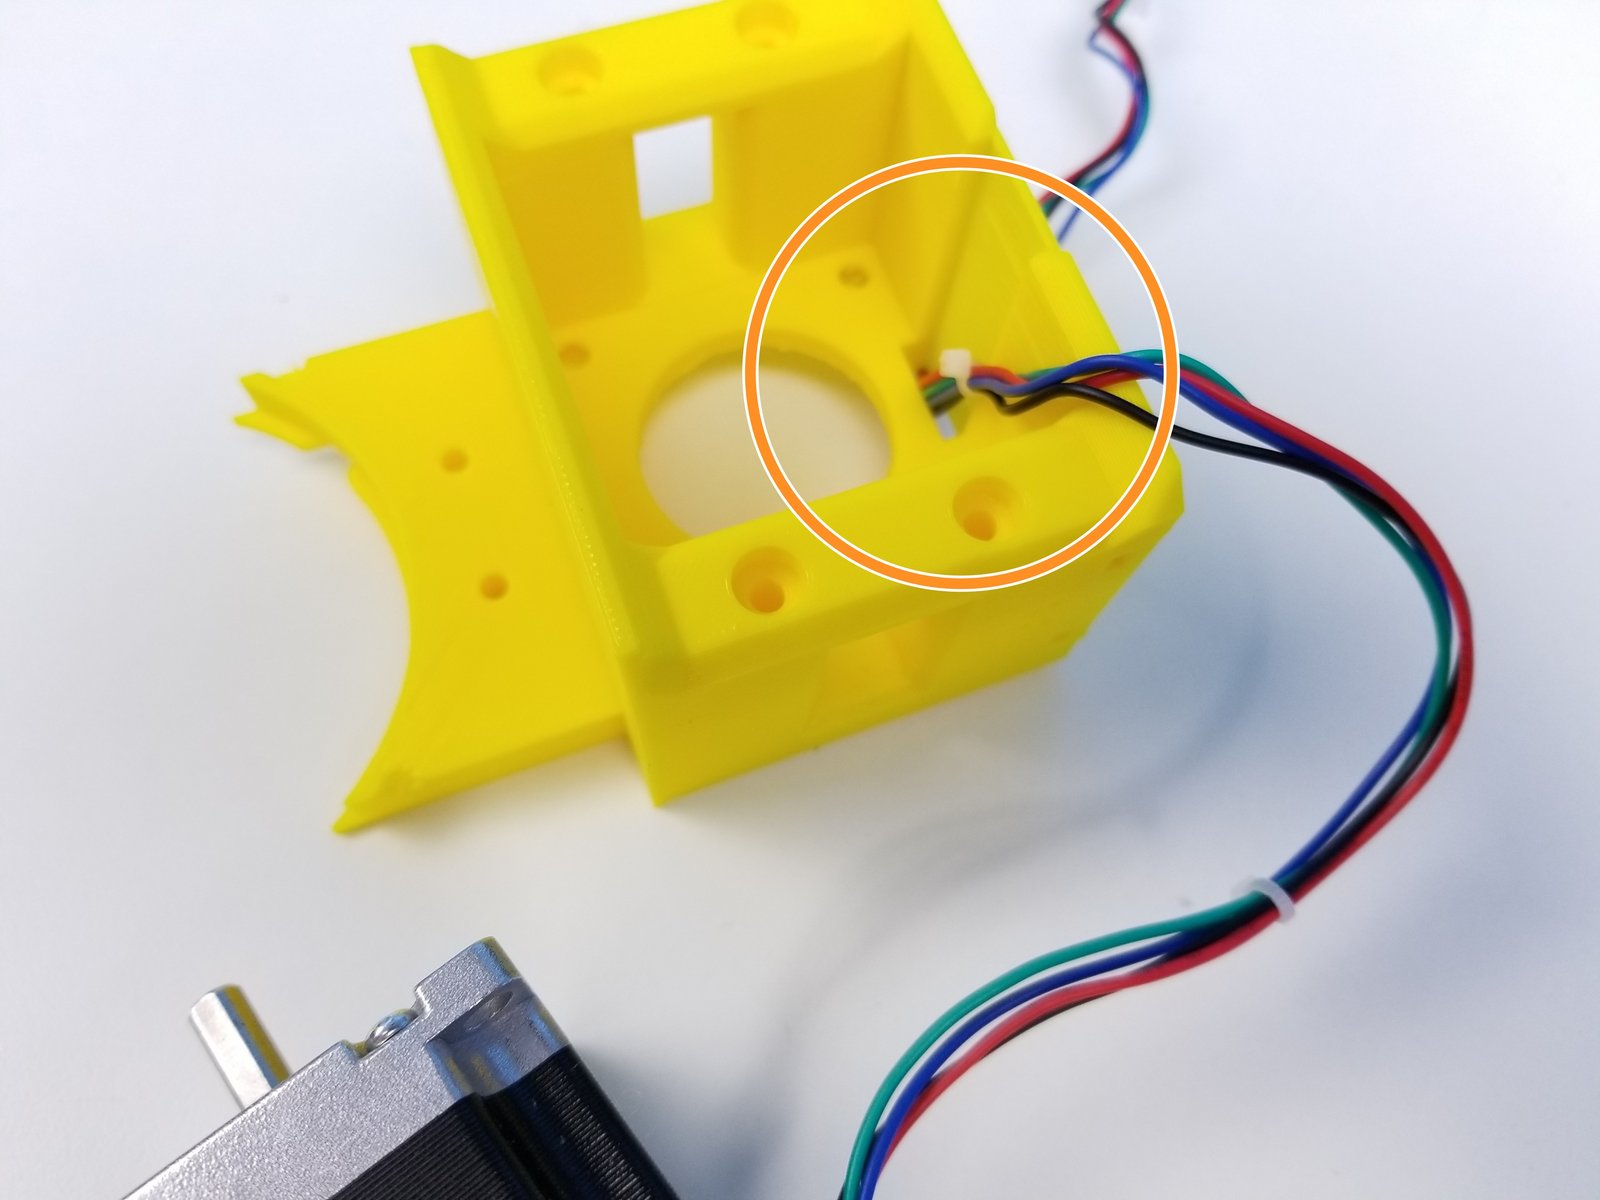
Insert the NEMA 23 Motor to the Motor Holder along with its Cable
Step 19 Anchor Motor Mount - 2
Click the large image to open full size.
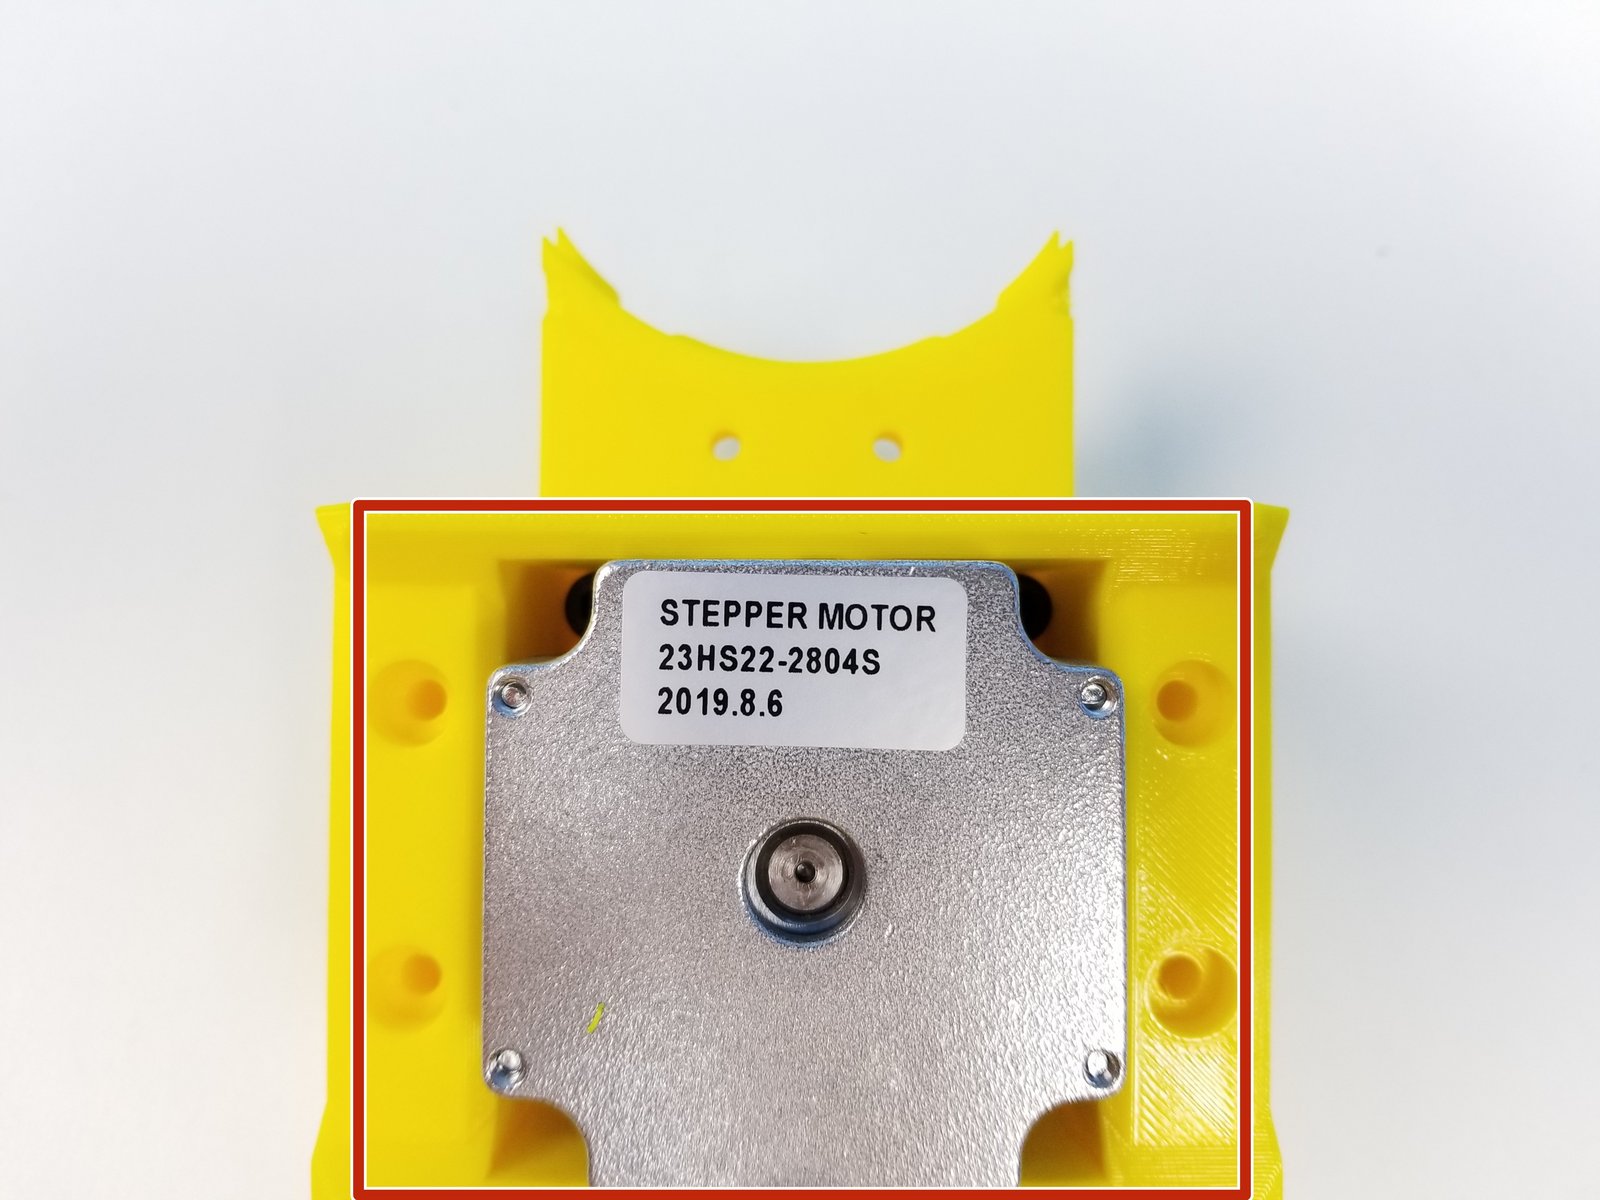
Insert the Motor Body into the Motor Mount
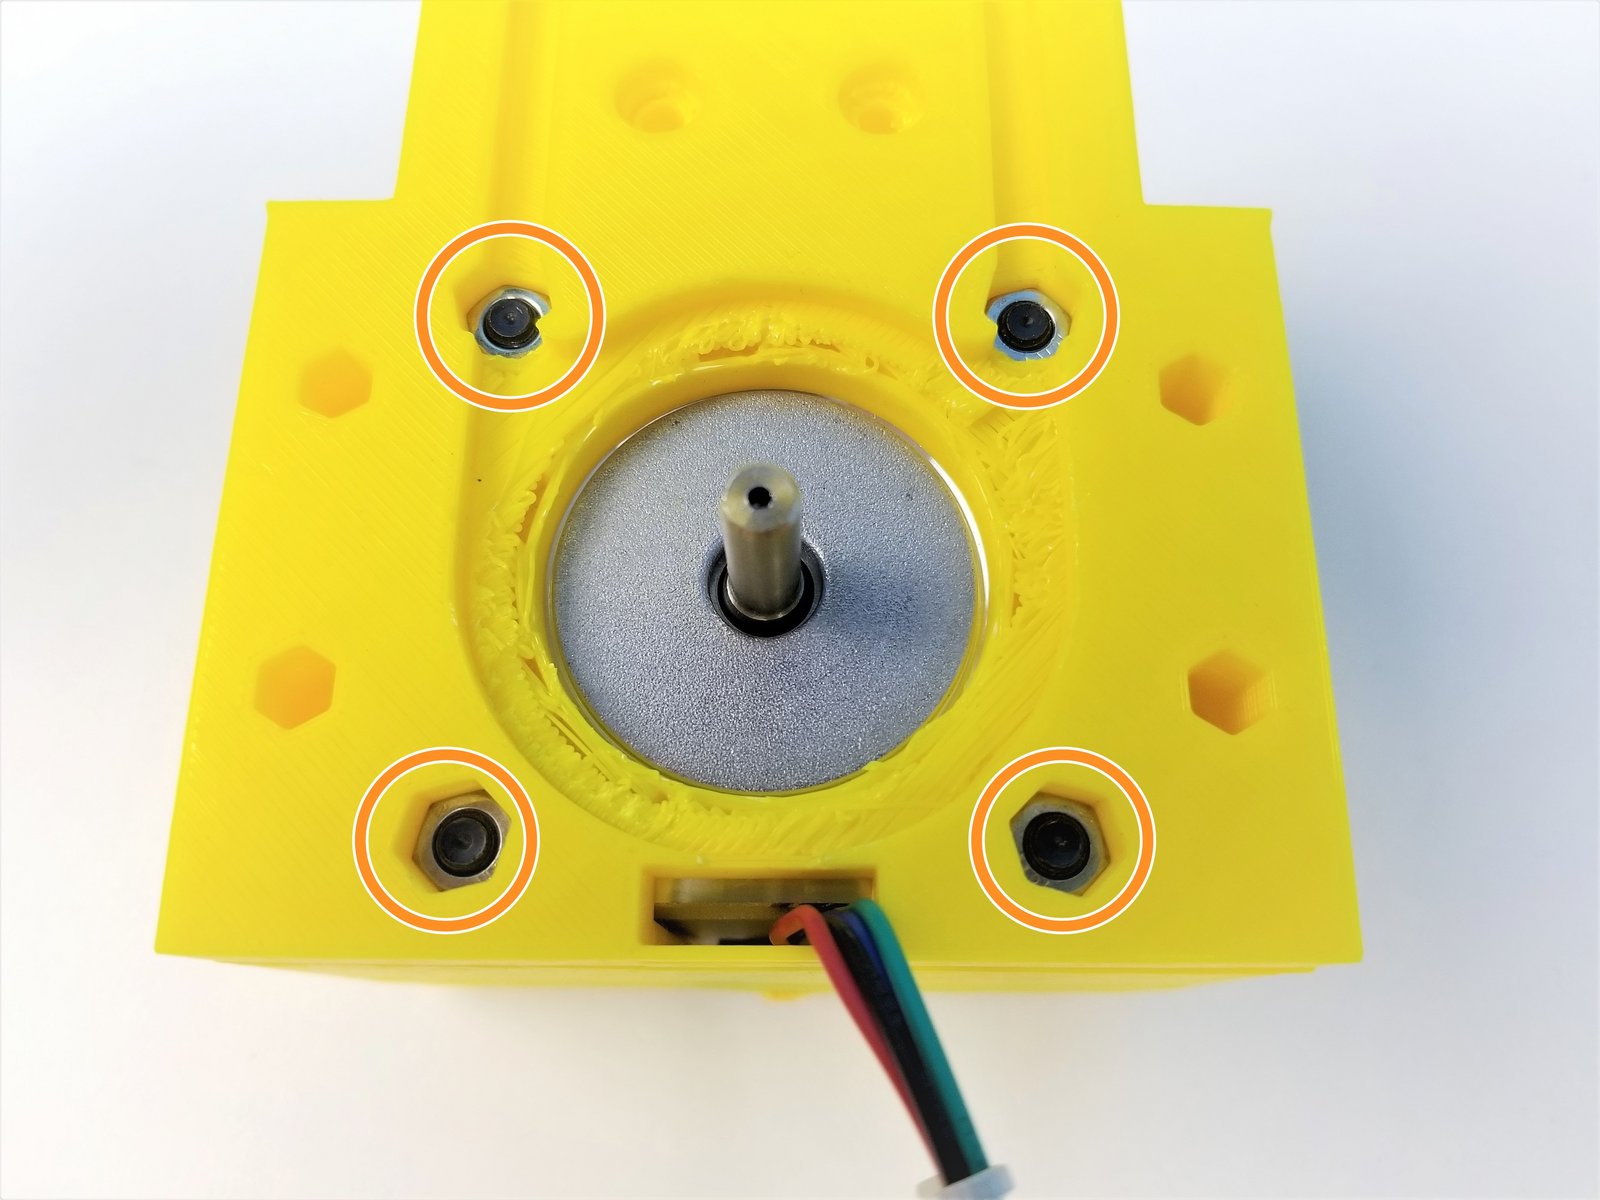
Use the M5x25mm Screws and M5 Hex Nuts to Secure the Motor to the Motor Mount
Step 20 Anchor Motor Mount - 3
Click the large image to open full size.
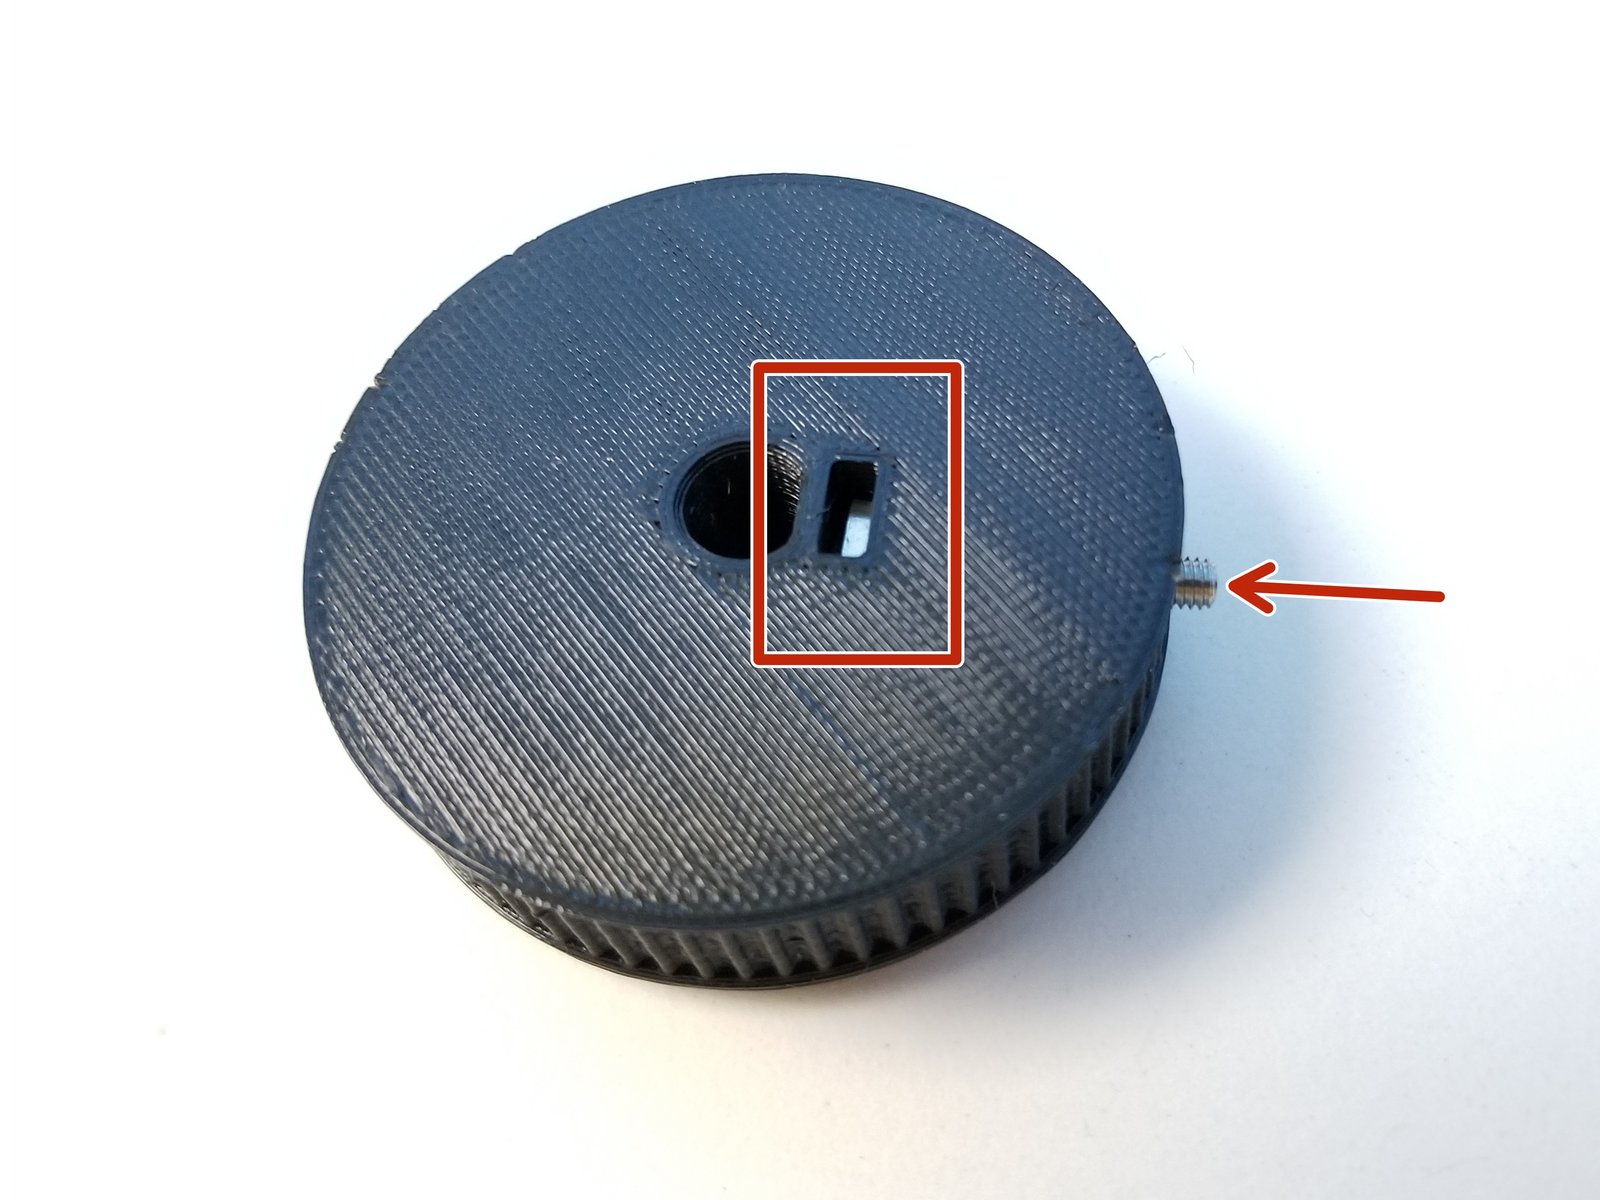
Insert M3 Square Nut in the Pulley and secure it with M3 Set Screw
- Warning:
Do Not tighten the screw all the way yet!
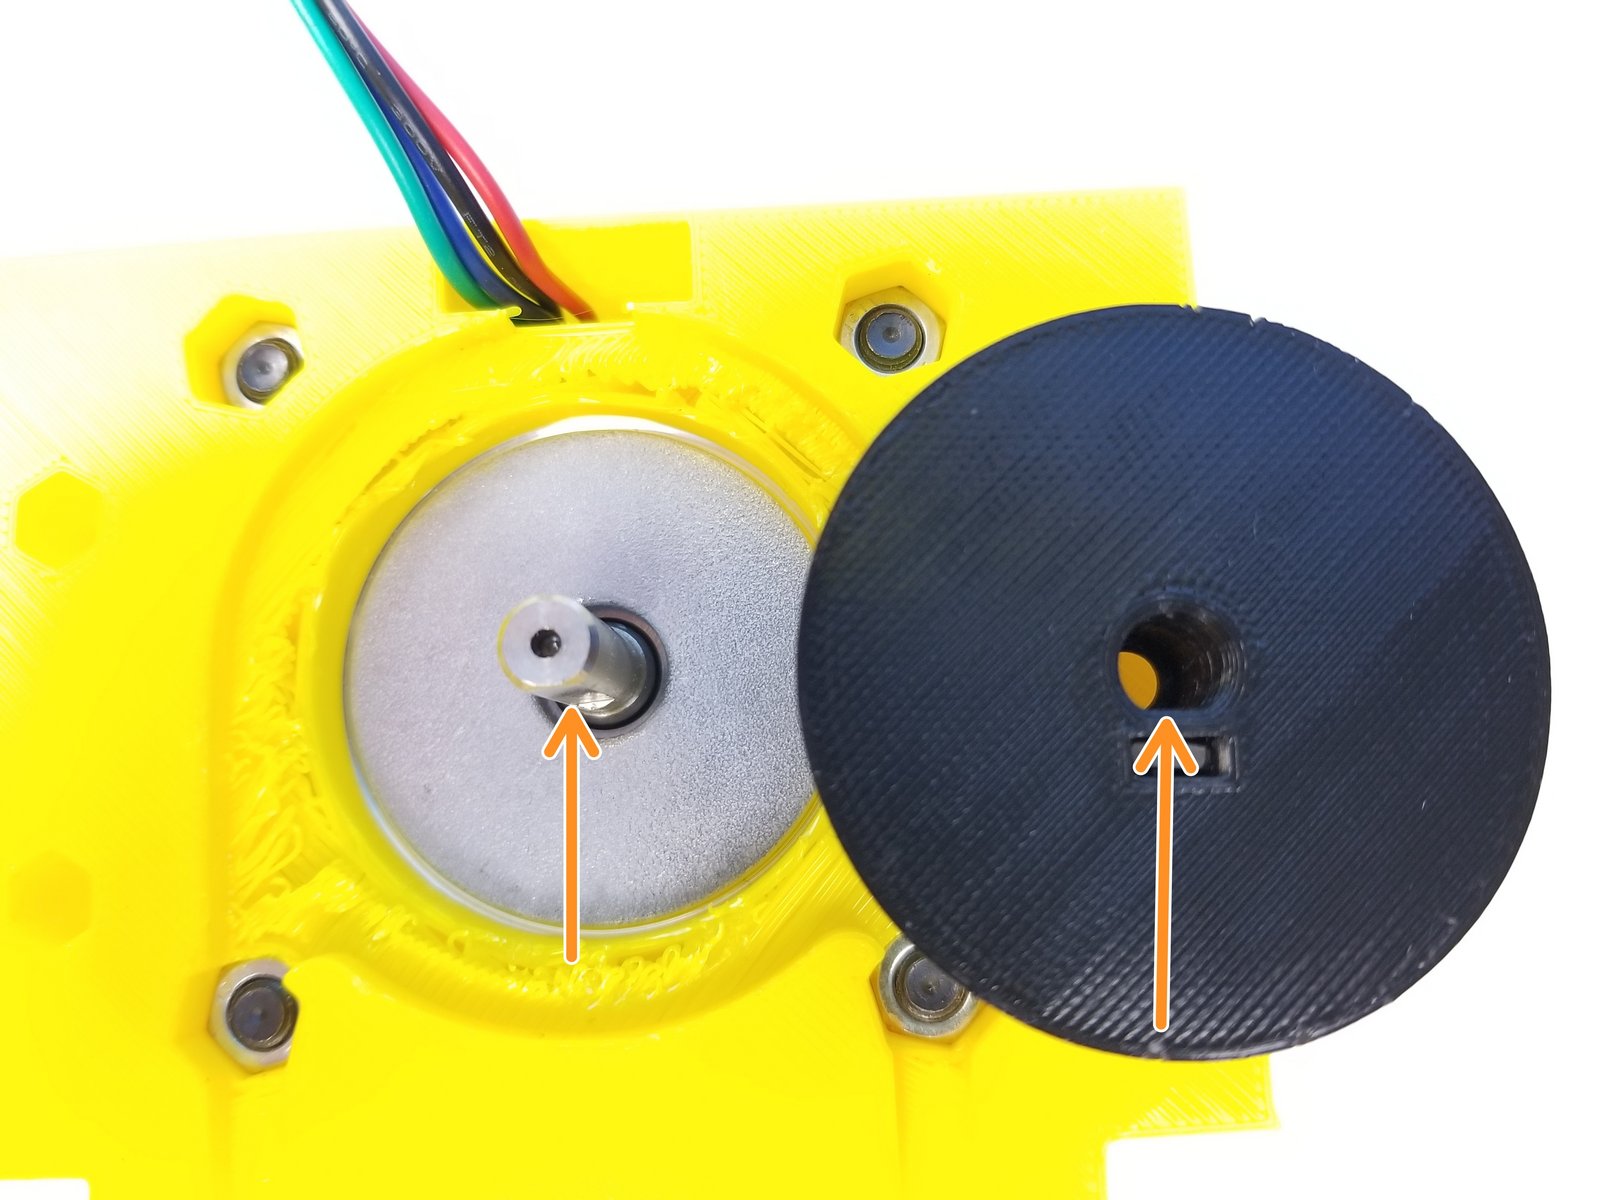
Align the D-Cut on the Motor Shaft and on the Pulley
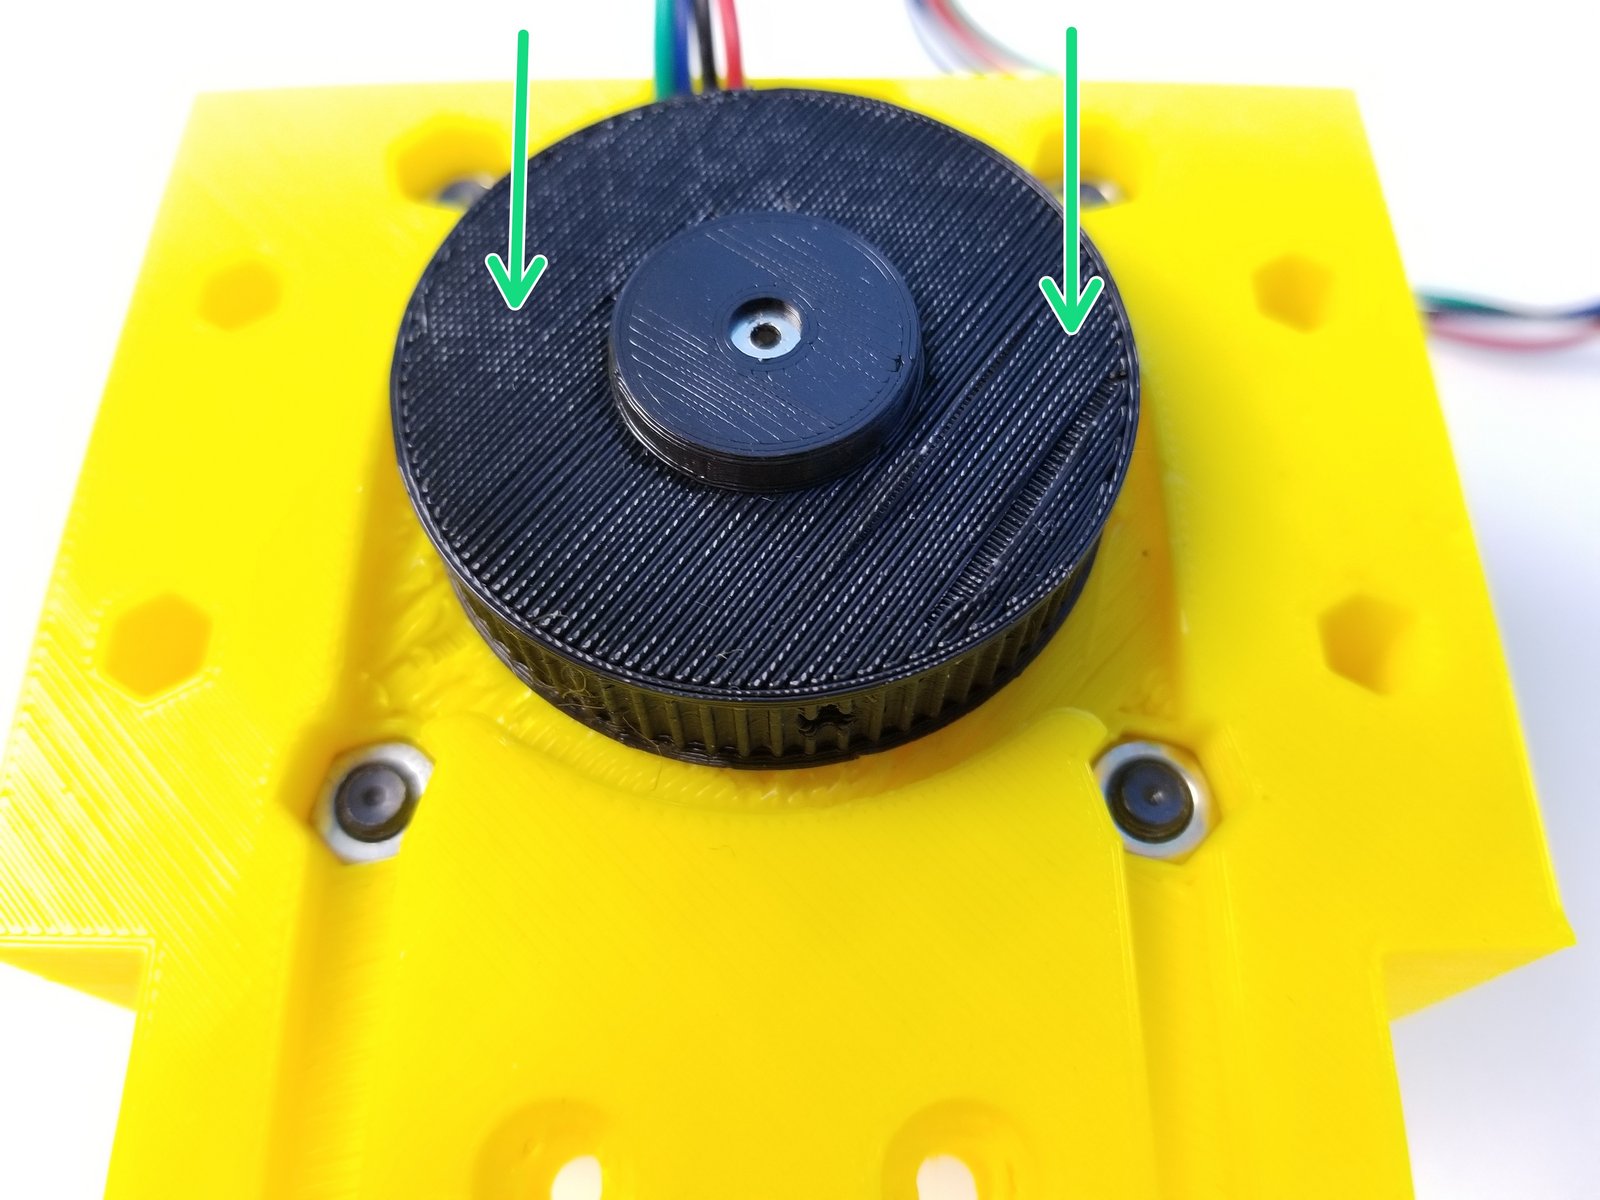
Insert the Pulley and tighten the set screw
Step 21 Anchor Belt Assembly - Parts
Click the large image to open full size.
- Note:
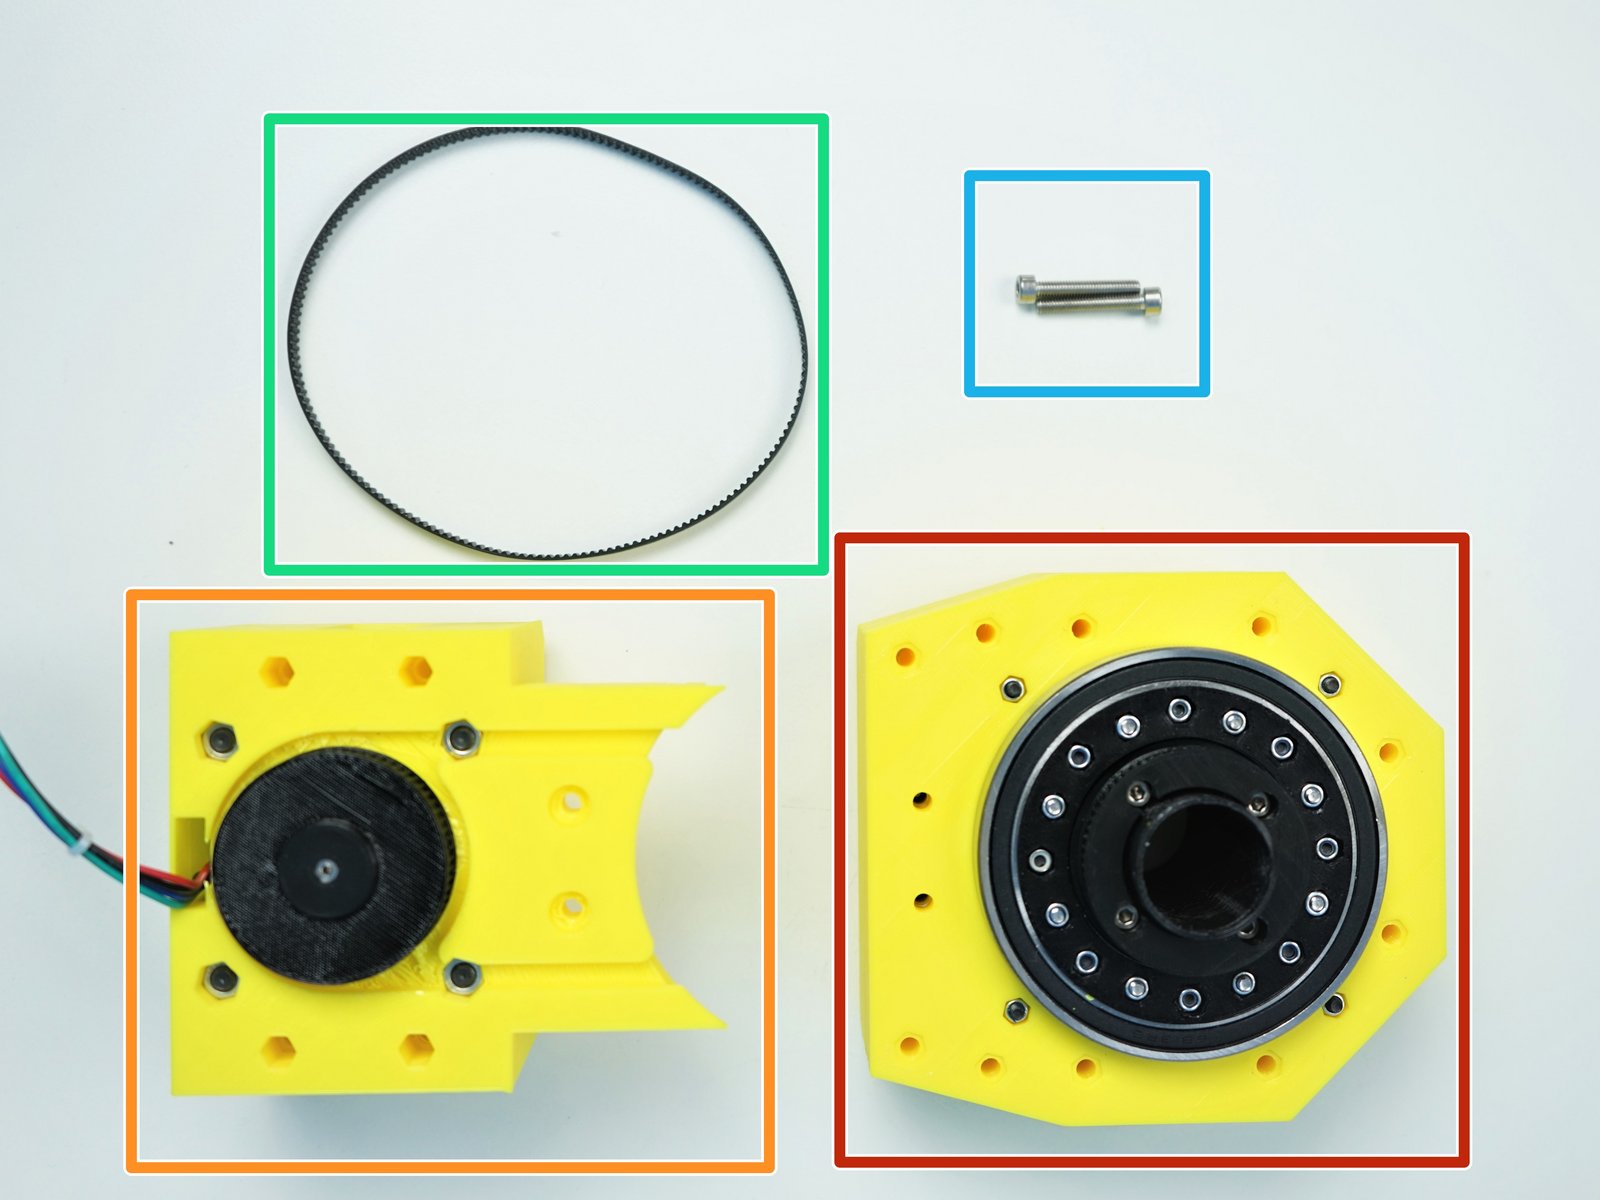
Prepare the following components:
Assembled Anchor Gearbox
Assembled Anchor Motor Mount
Timing Belt GT2-336mm
M4x25mm Screws (x2)
Step 22 Anchor Belt Assembly - 1
Click the large image to open full size.
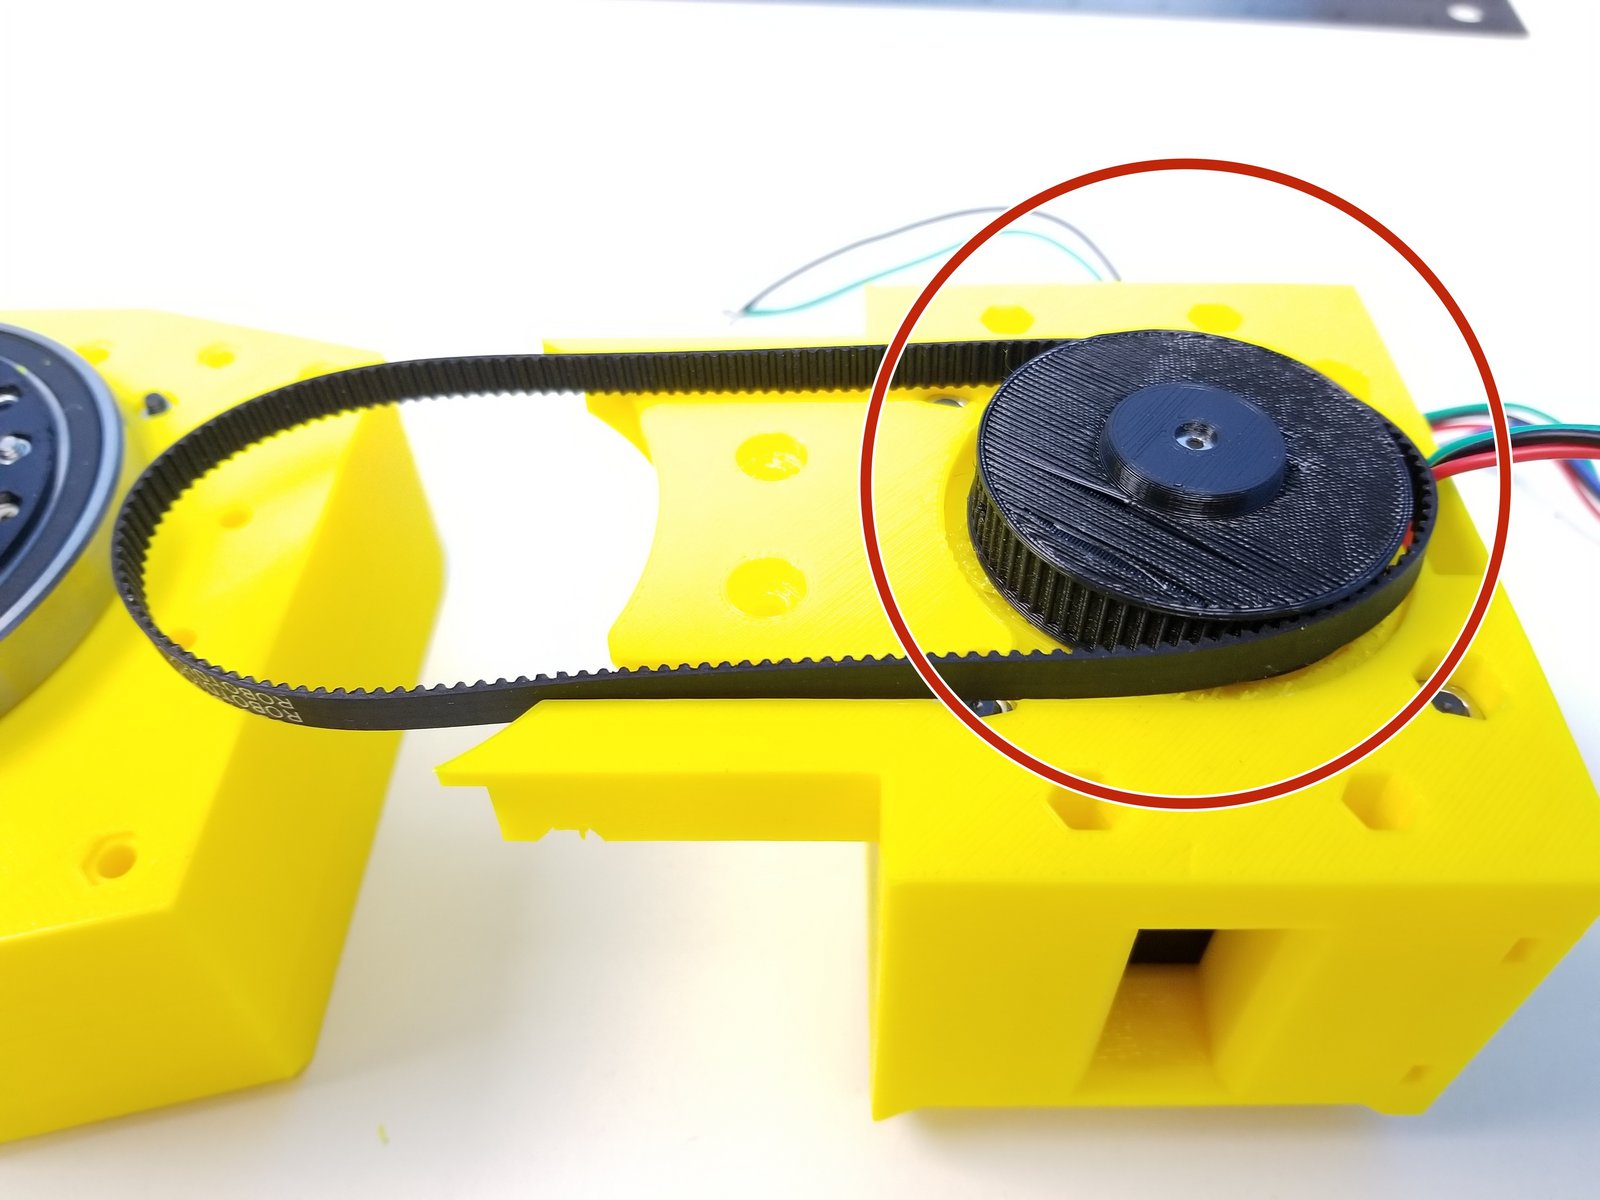
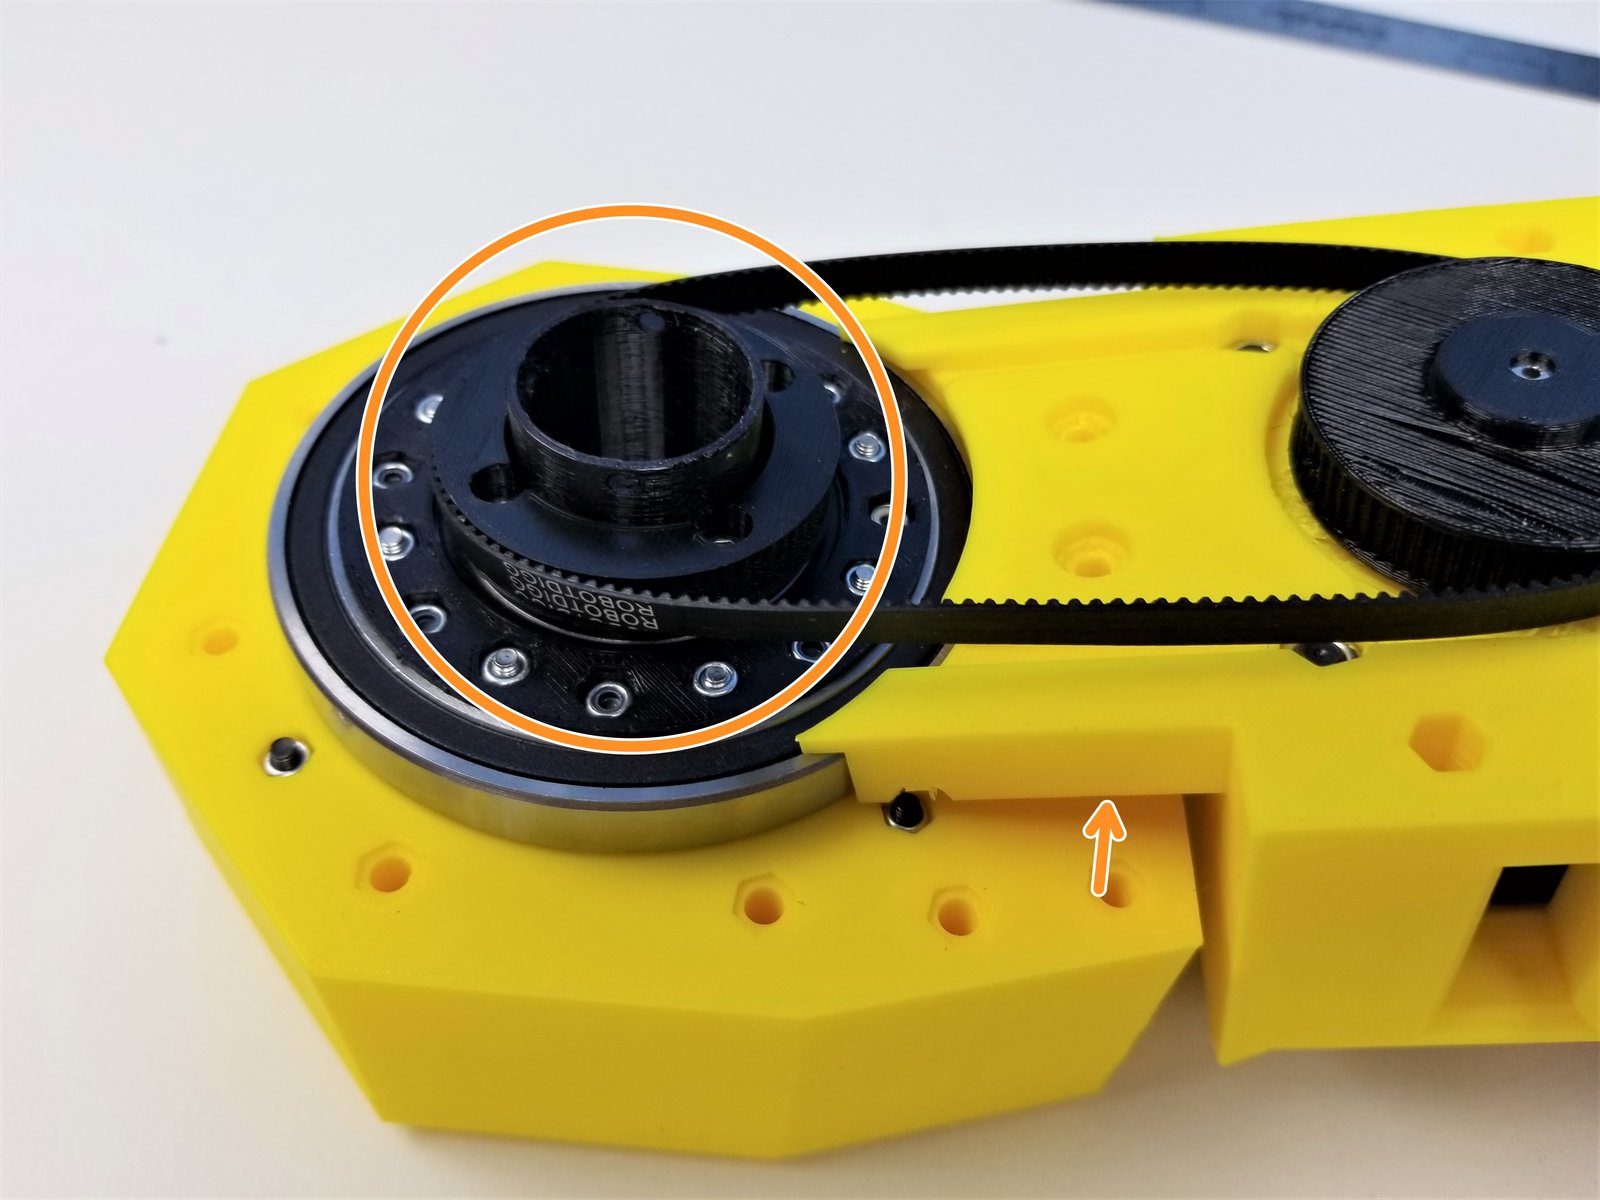
Loop the Timing Belt around the Input Pulley (motor side)
Tile the Motor Mount in an angle and loop the Timing Belt on the Ouput Pulley (gearbox side)
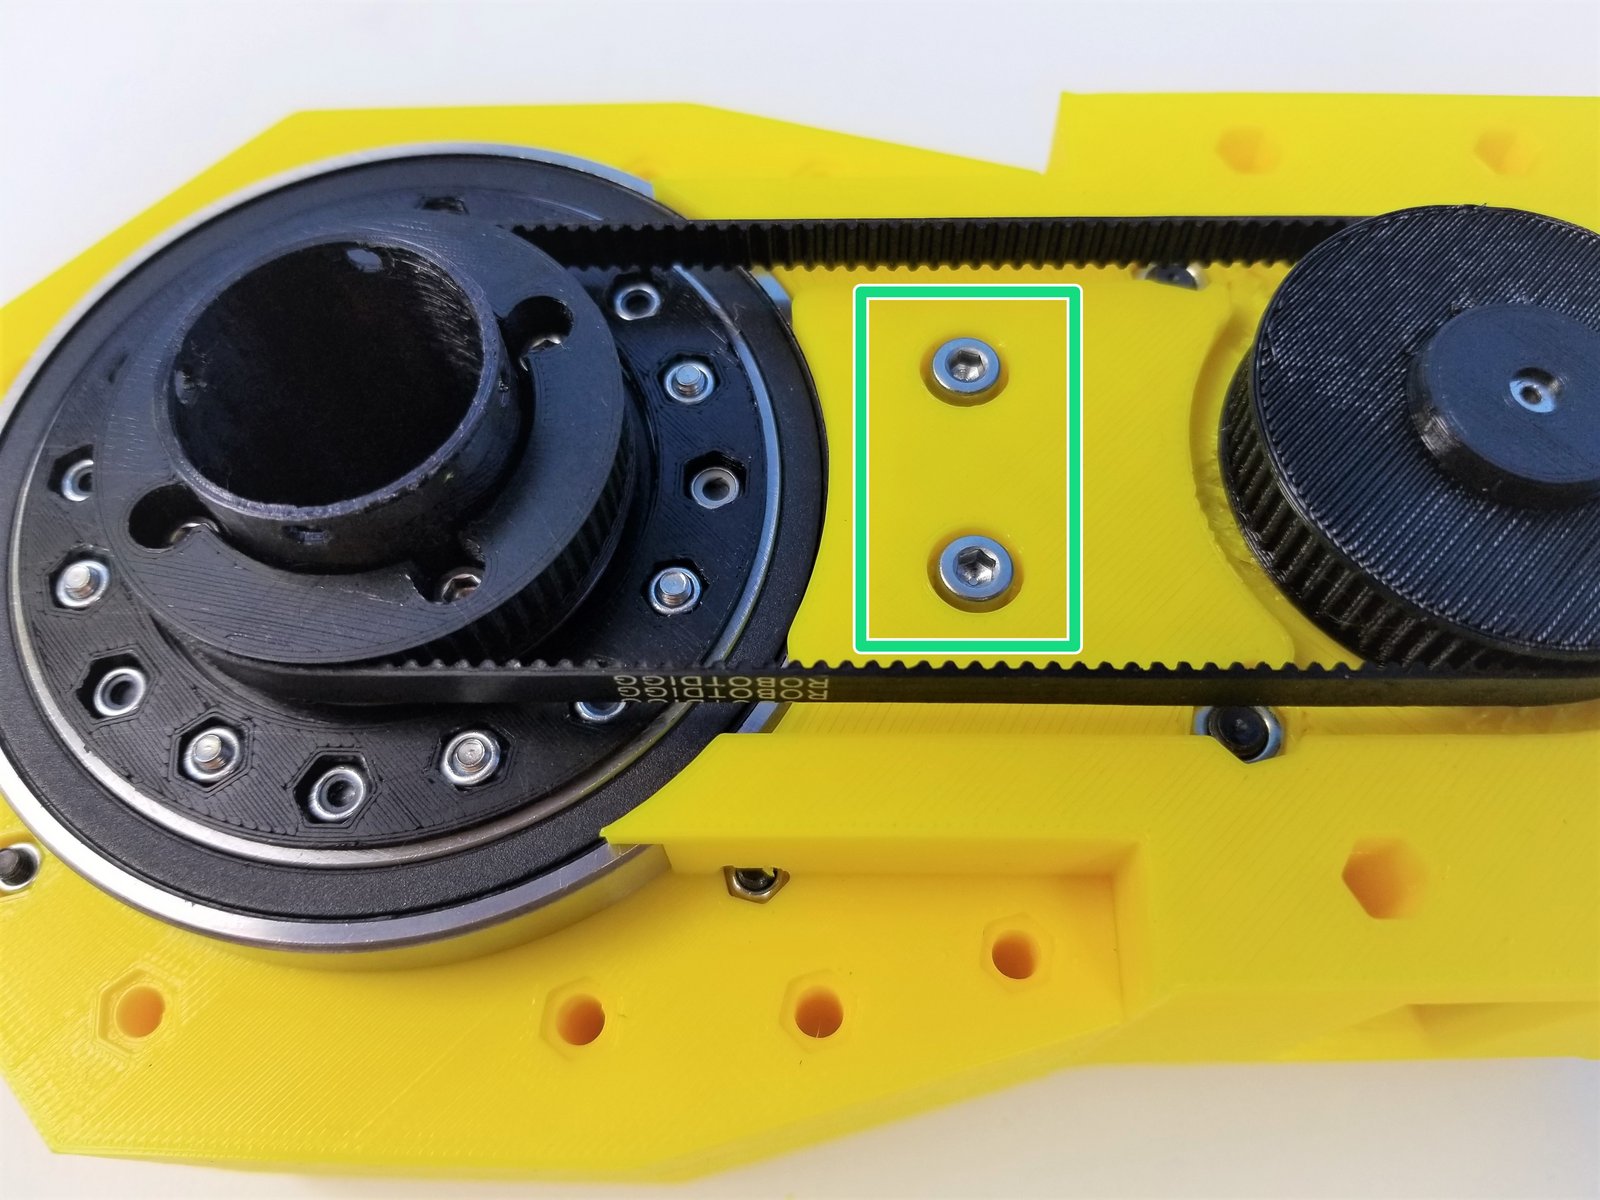
Flatten the Motor Mount and secure its location using M4x25mm Screws (this will tighten the belt)
Step 23 Anchor Front Bottom Preparation - Parts
Click the large image to open full size.
- Note:
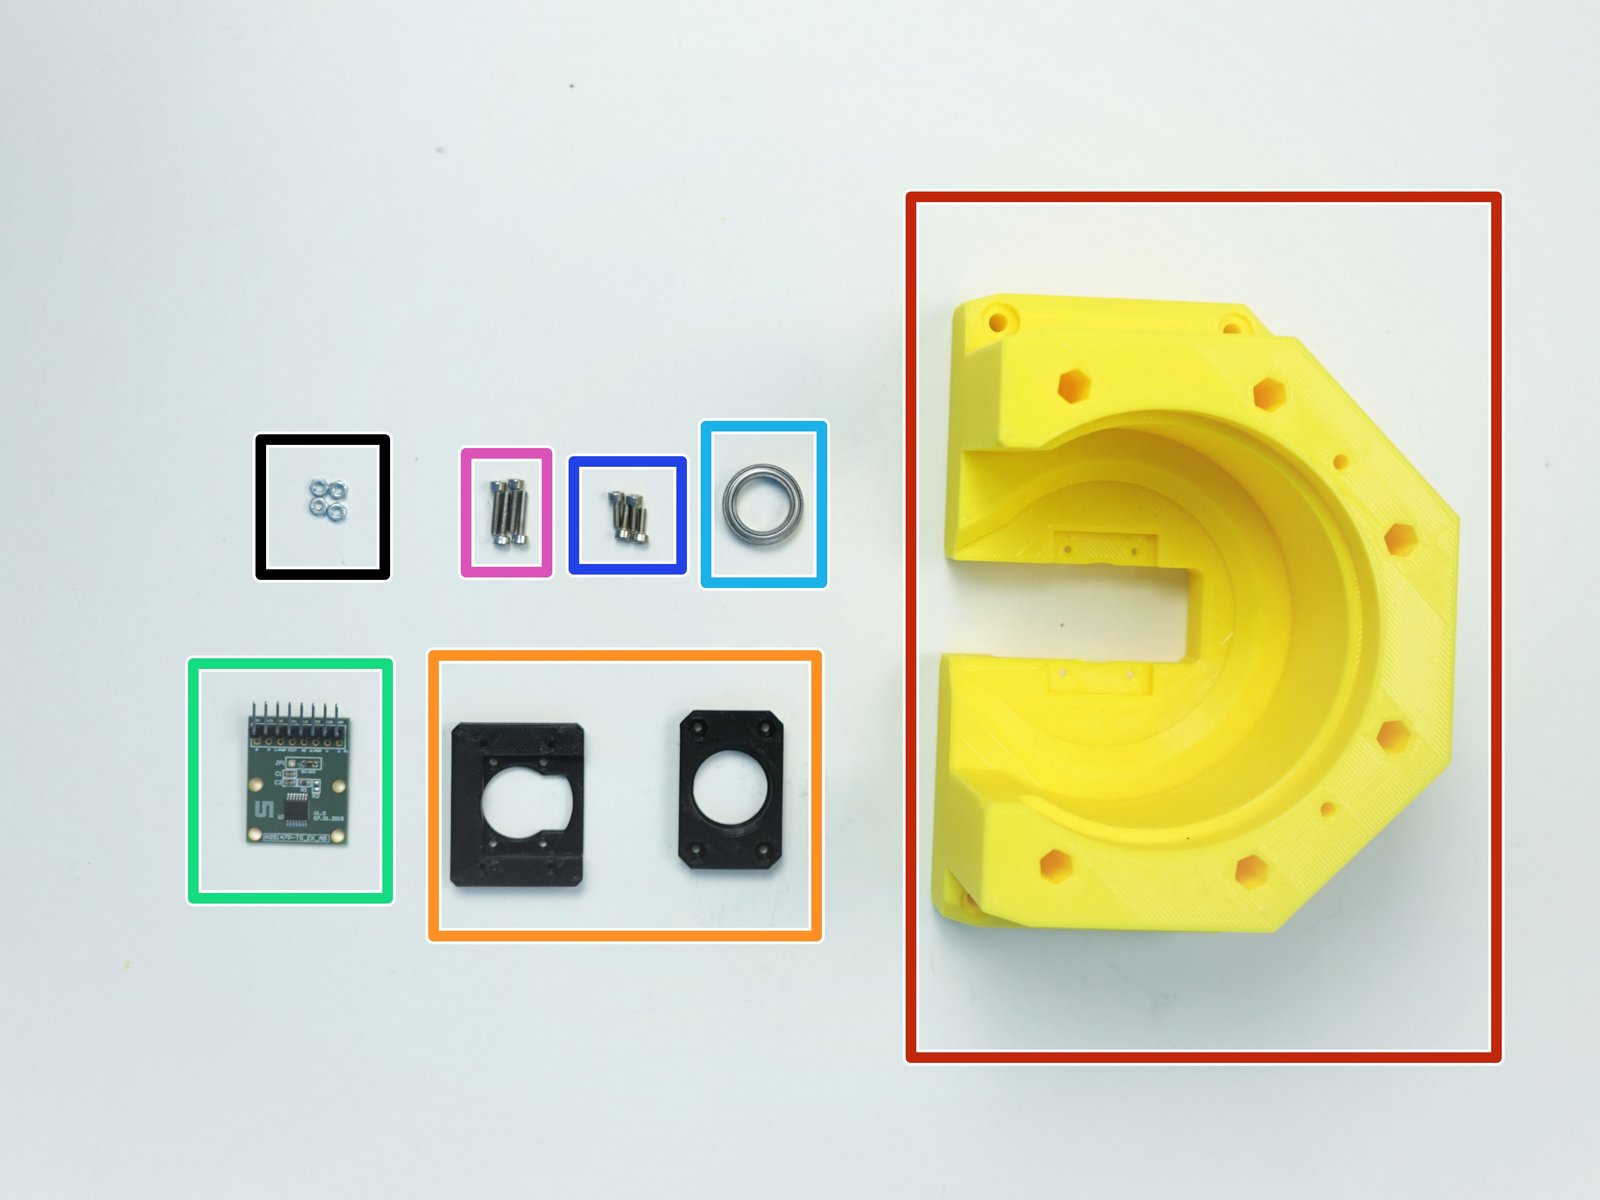
Prepare the following components:
[3D] - 1Ba Anchor Front Bottom
[3D] - AS5147 Sensor Adapter 2 & Anchor Bearing Adapter
AS5147 Sensor {right angle header on the chip side}
6701 Bearing [12x18x4mm] (x1)
M2x6mm Screws (x4)
M2x10mm Screws (x4)
M2 Hex Nuts (x4)
Step 24 Anchor Front Bottom Preparation - 1
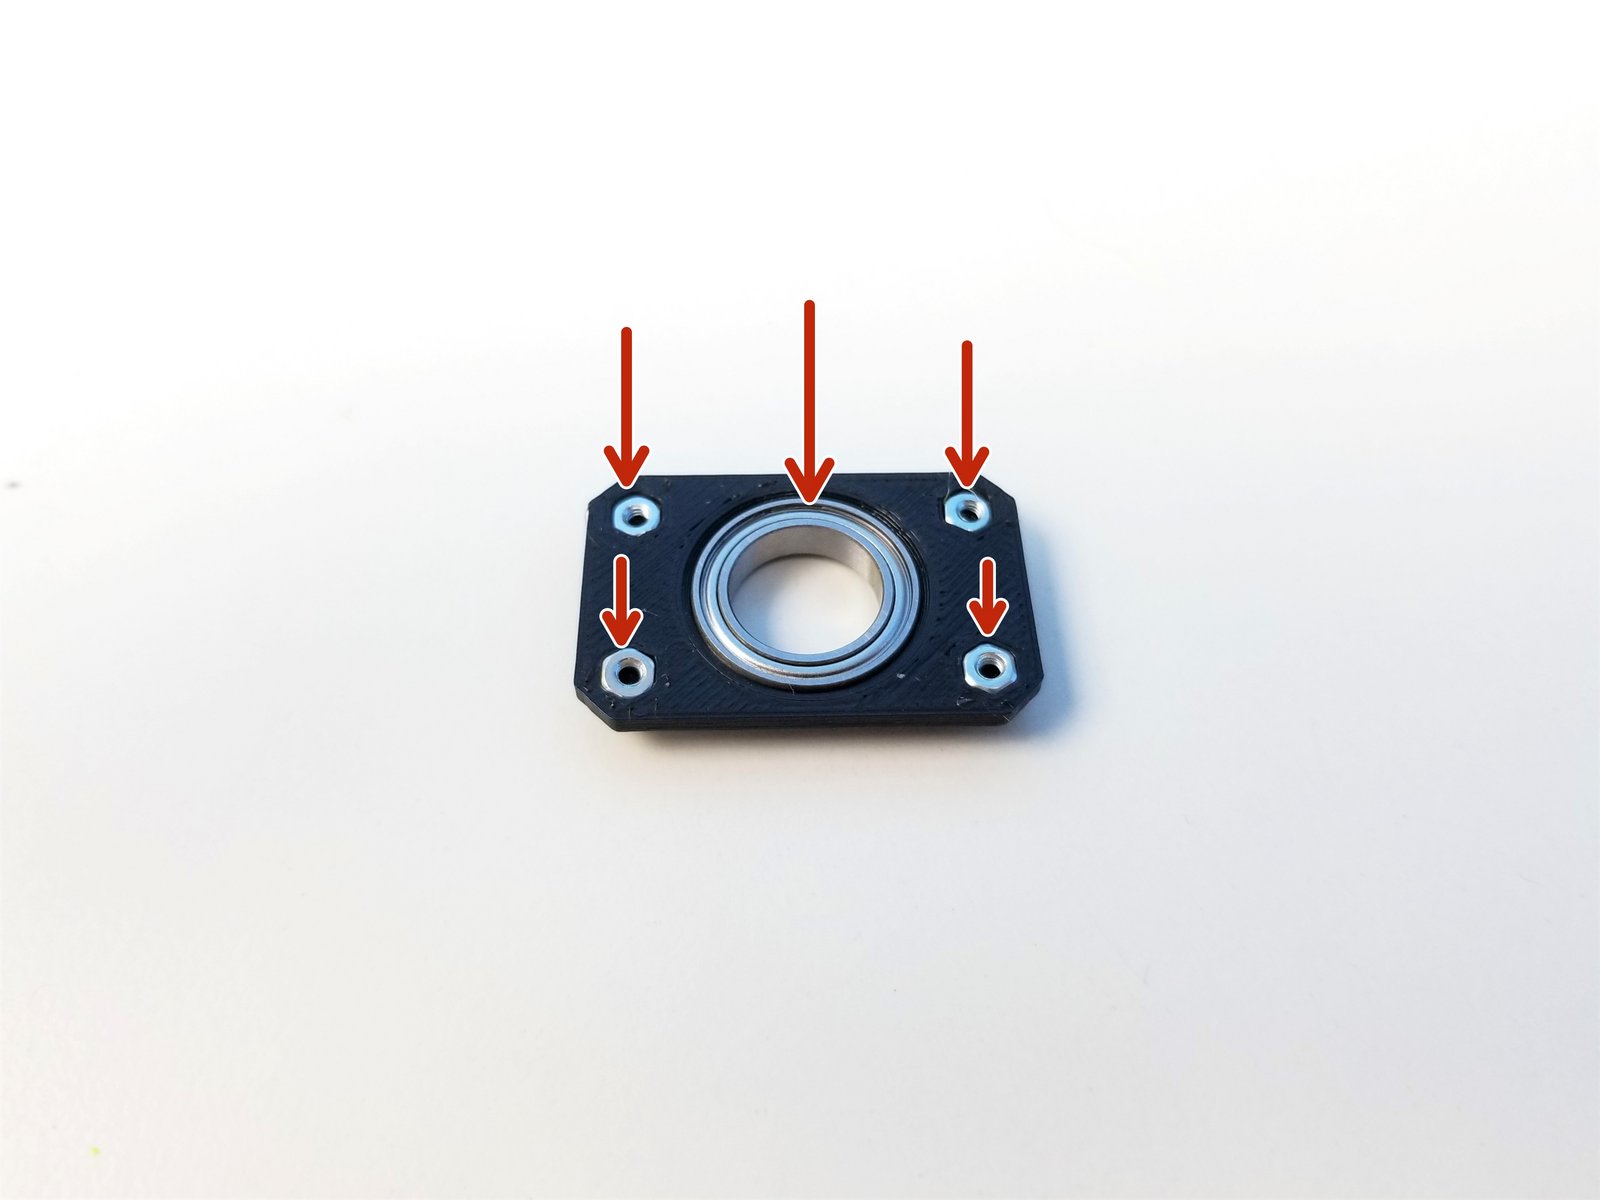
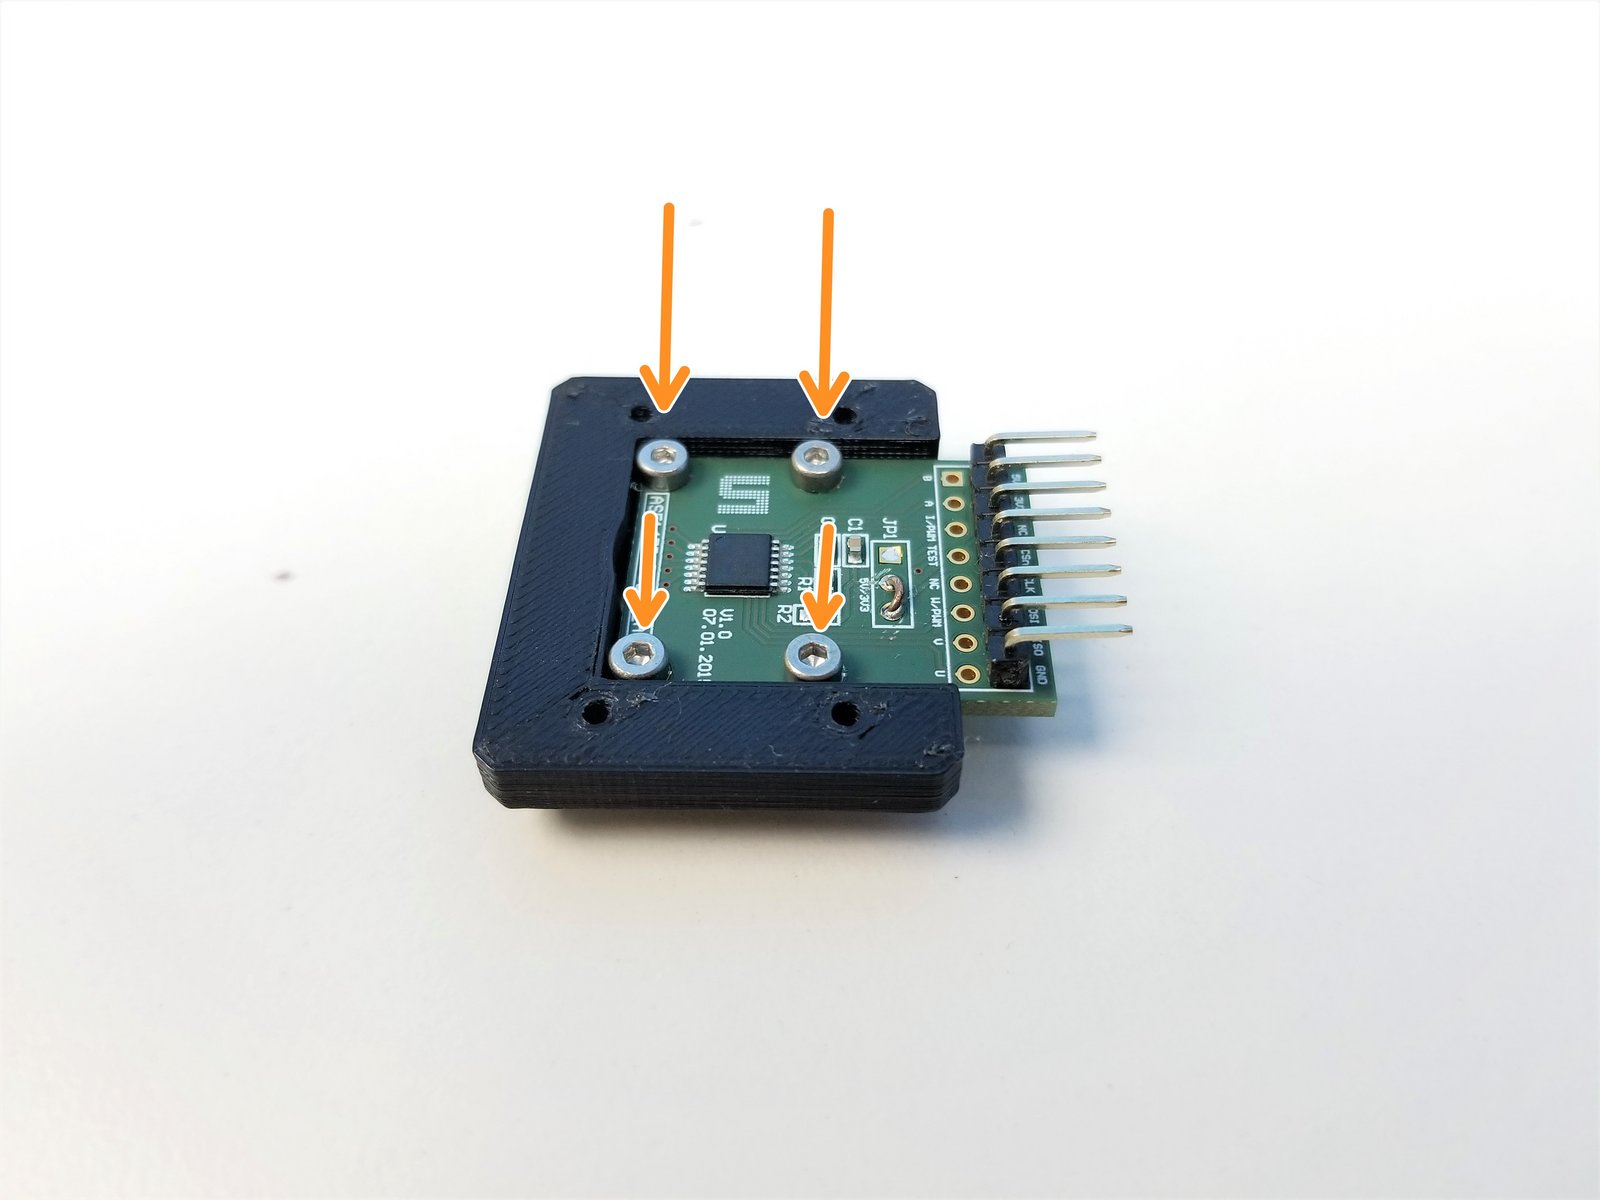
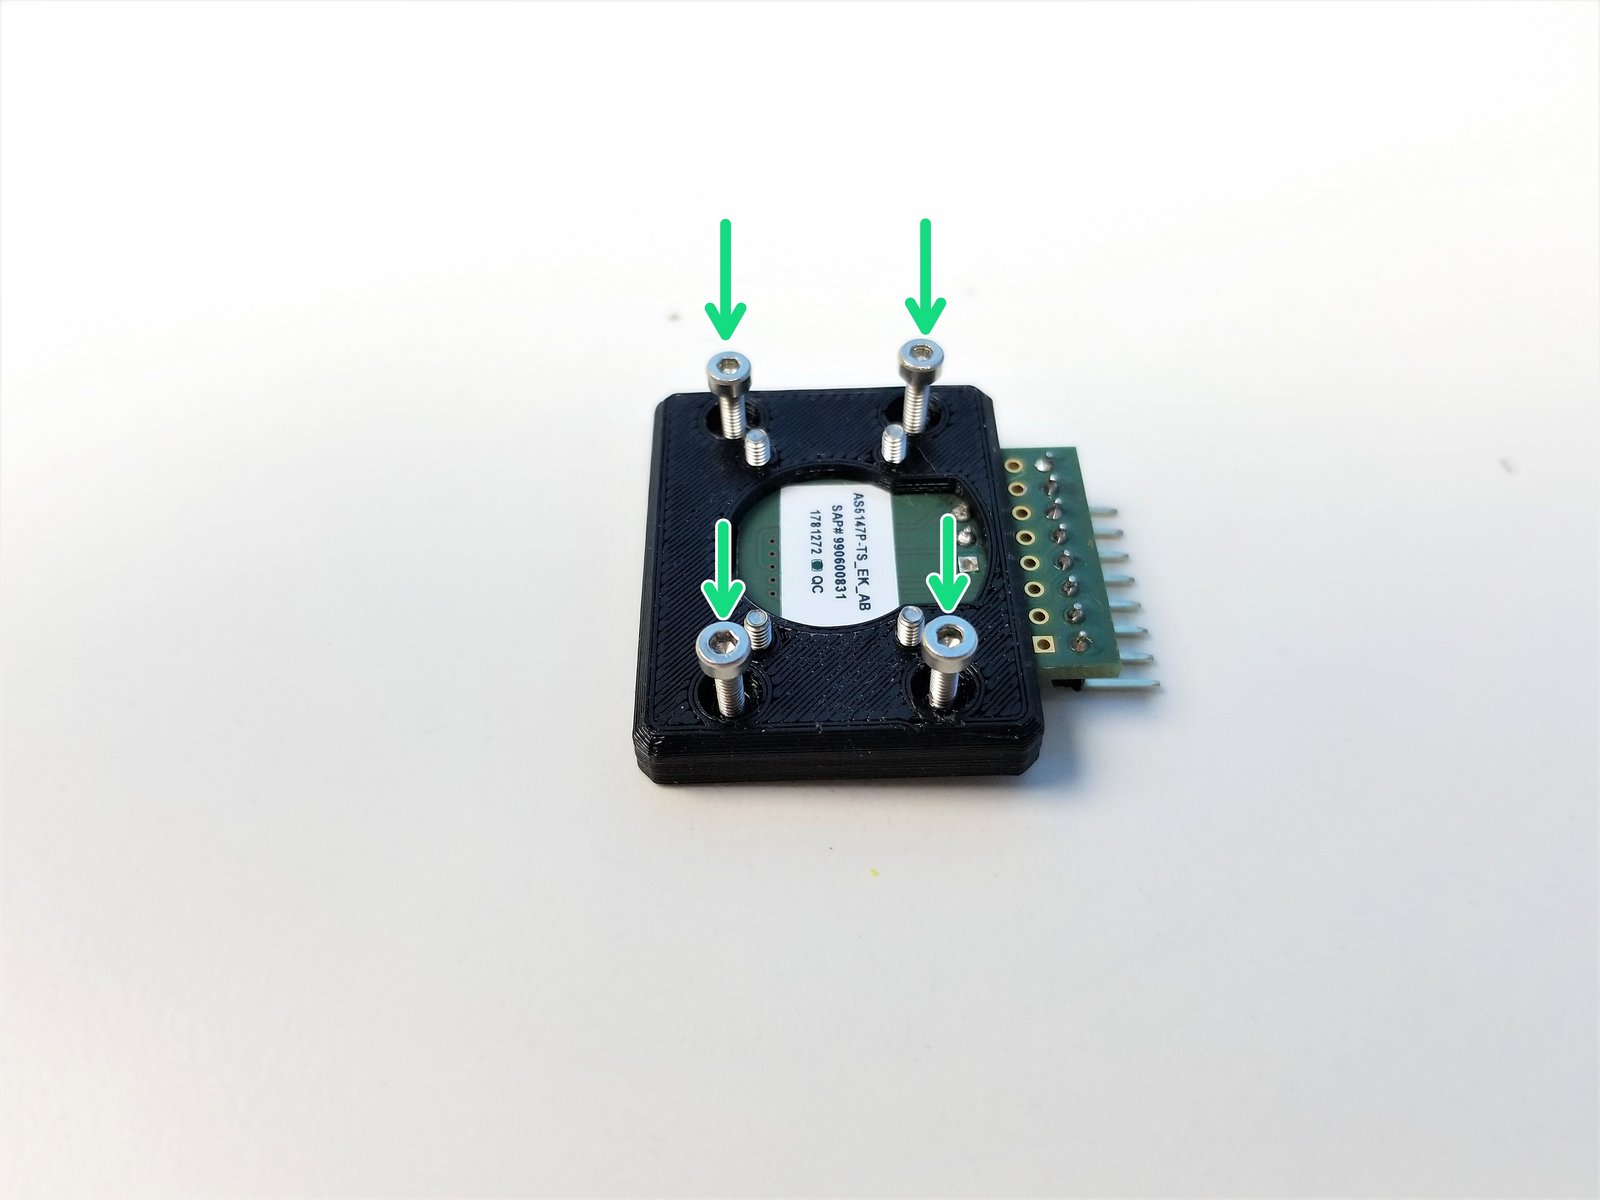
Click the large image to open full size.
Insert 6701 Bearing and M2 Hex Nuts into the Sensor Bearing Adapter
Mount AS5147 Sensor to the Sensor Adapter with the Chip facing up using the M2x6mm Screws
Partially screw in M2x10mm Screws in the Sensor Adapter
Step 25 Anchor Front Bottom Preparation - 2
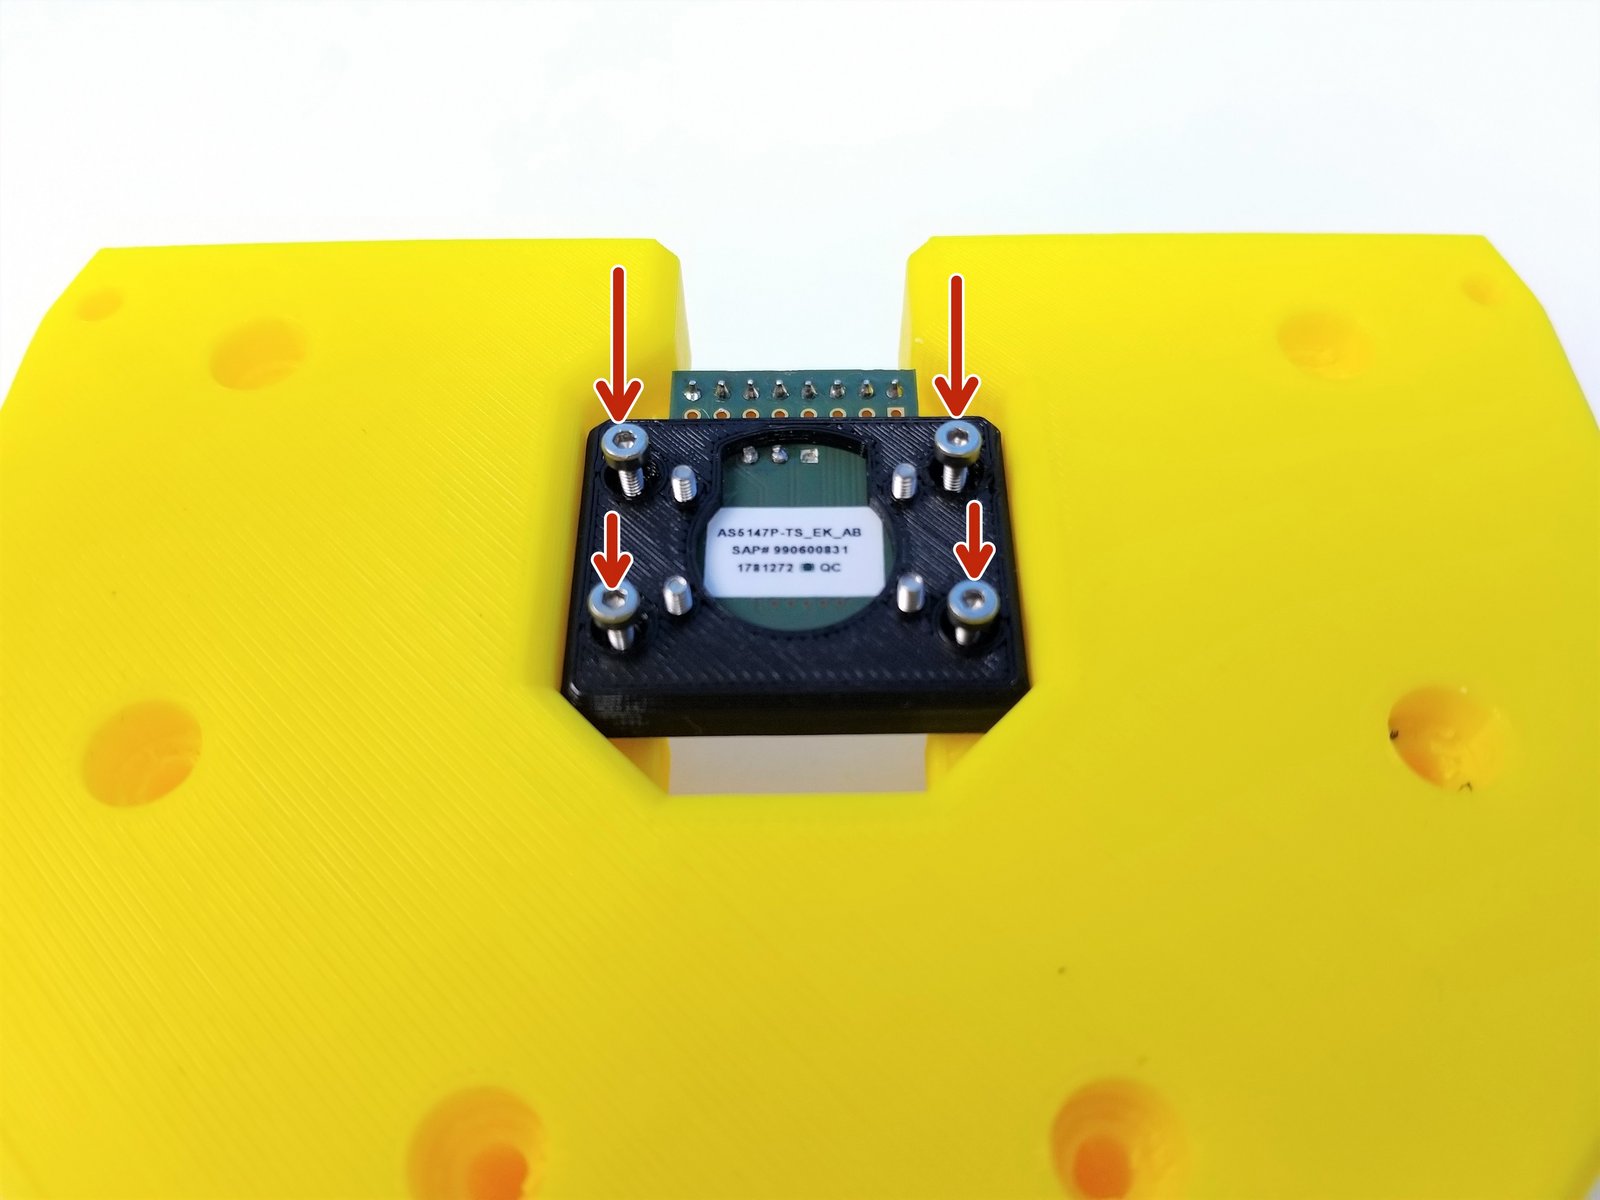
Click the large image to open full size.
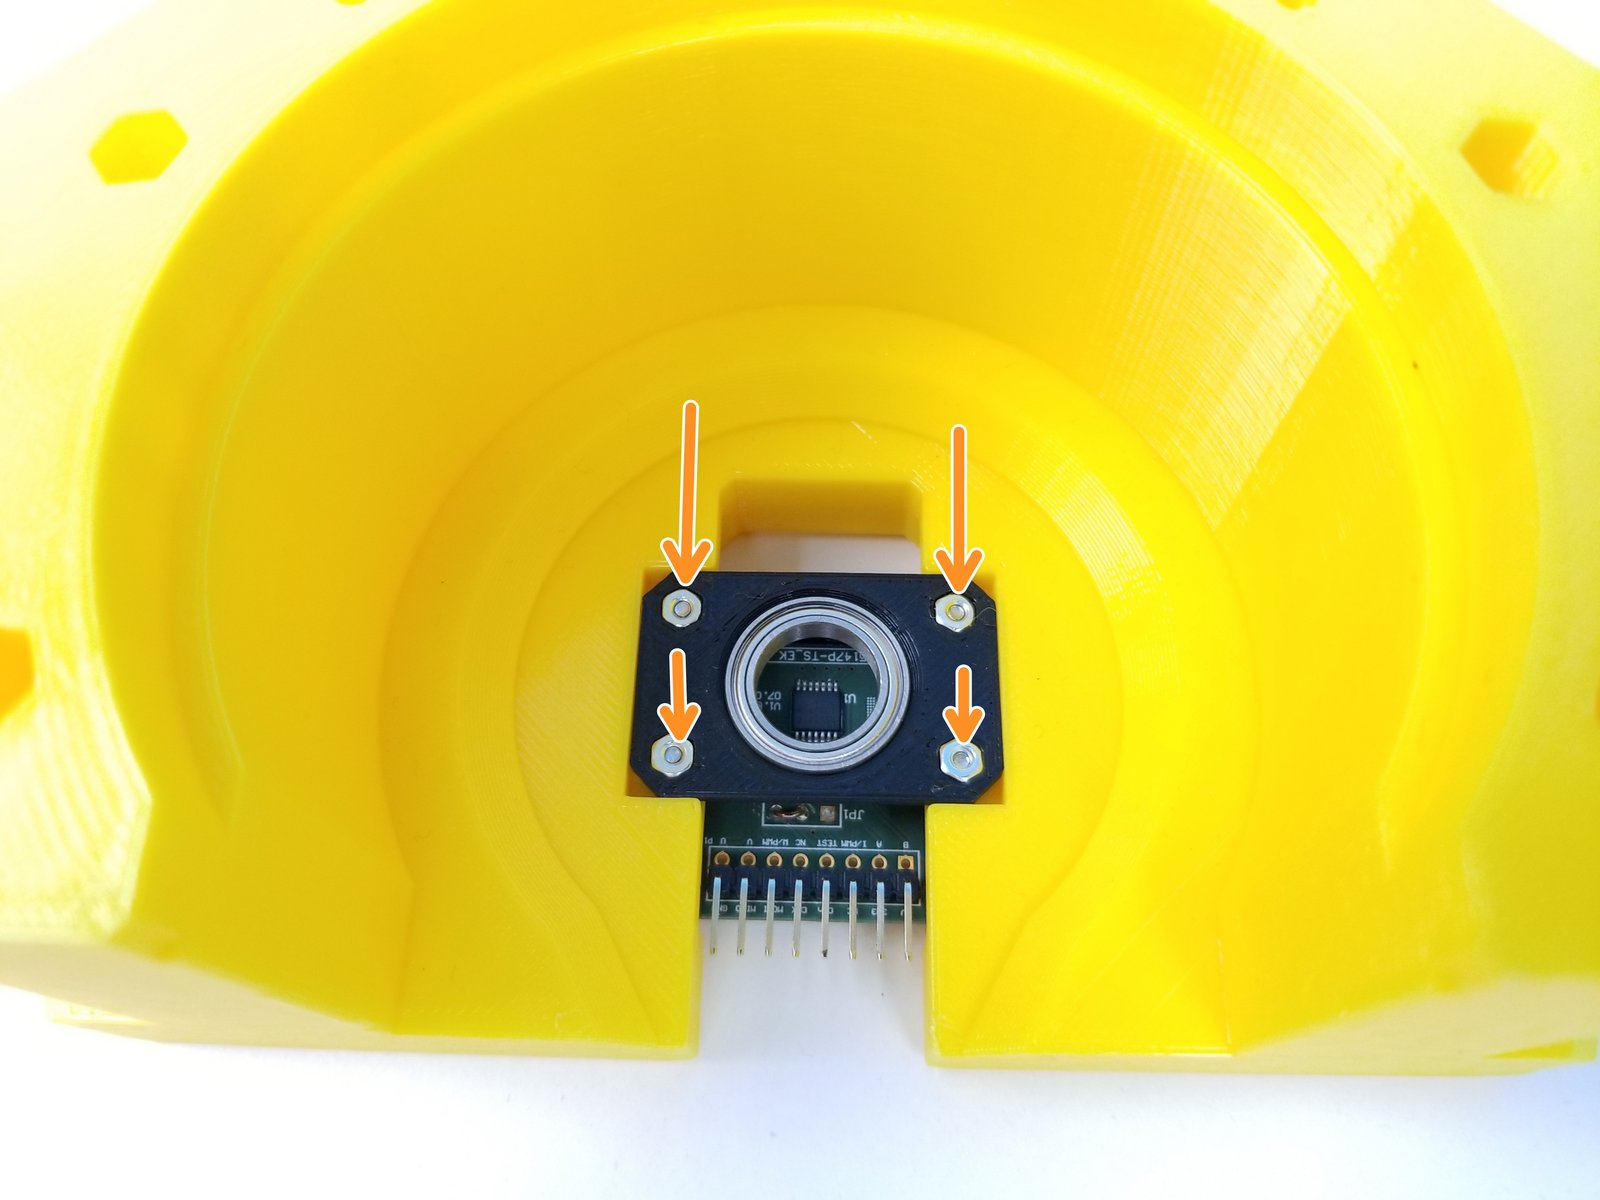
Partially screw in M2x10mm Screws into the Anchor Front Bottom
Position the Anchor Magnet Bearing so that the bearing is pointing upward and secure it by tightening the M2x10mm Screws all the way
Step 26 Anchor Front Bottom - Parts
Click the large image to open full size.
- Note:
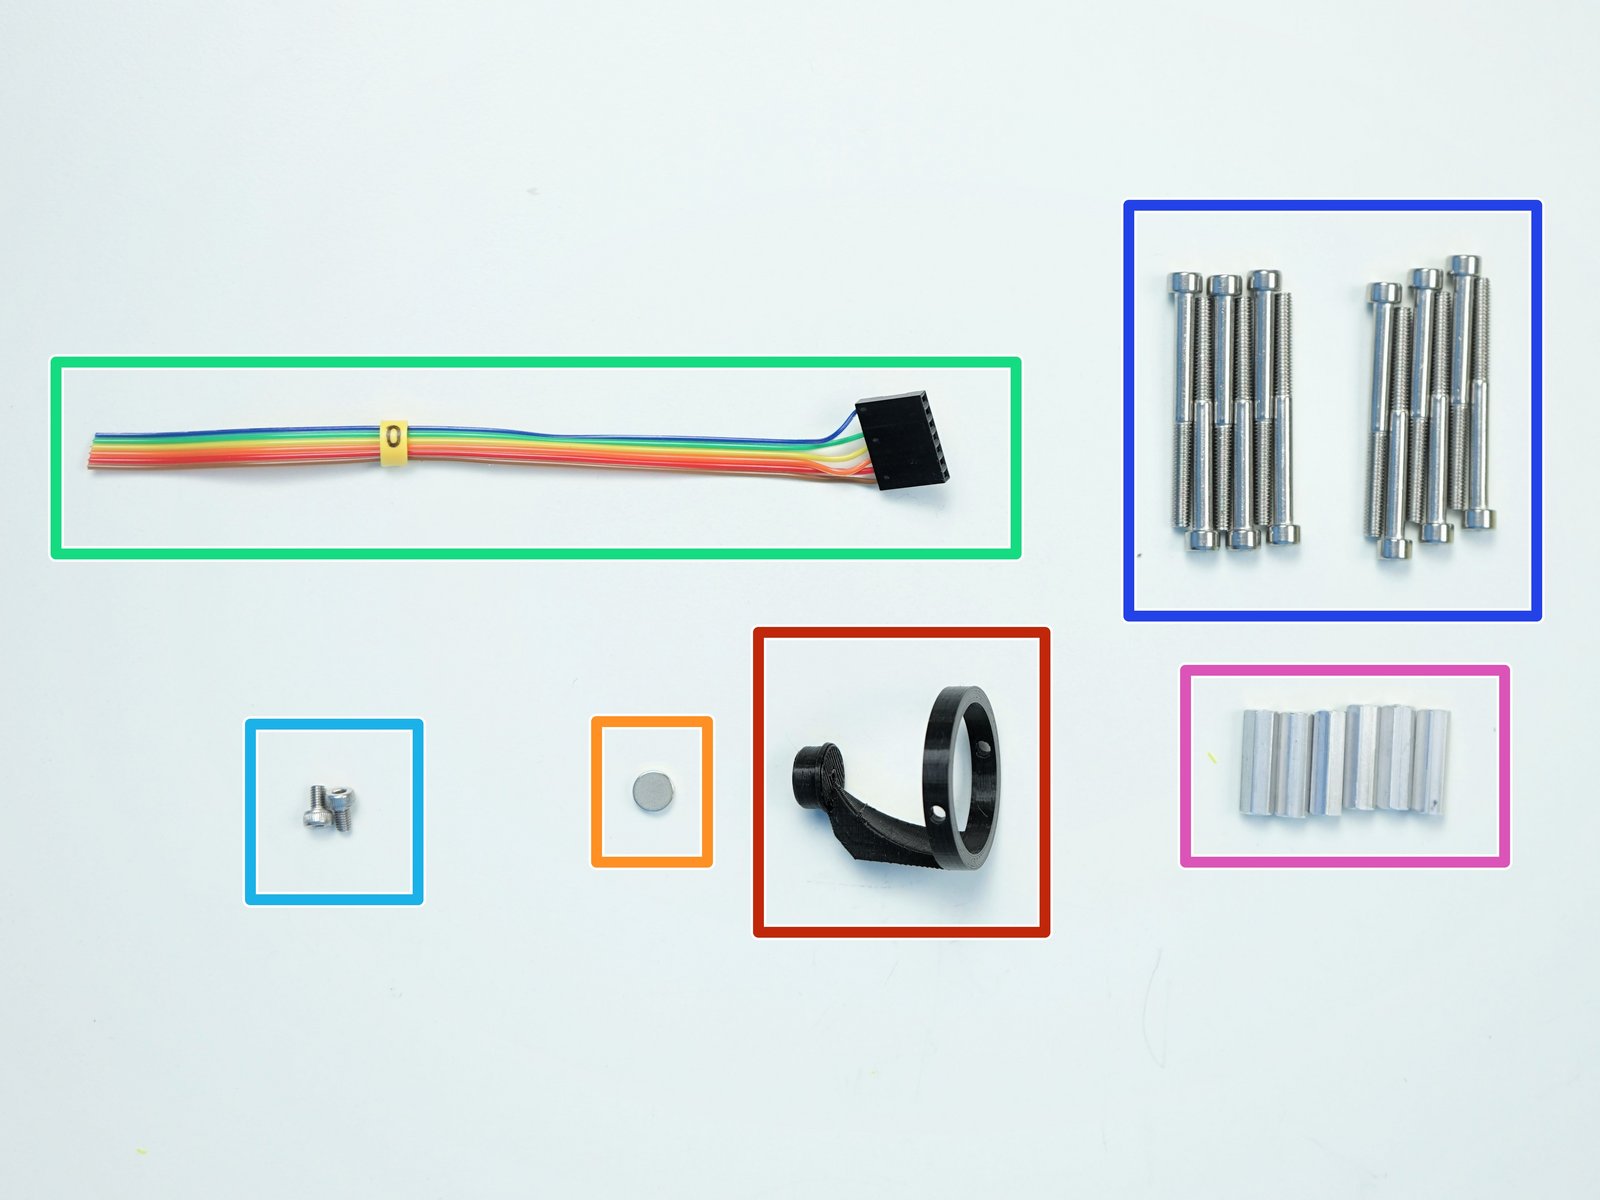
Prepare following components:
[3D] - 1M Anchor Magnet Holder
8x2.5mm Neodymium Magnet
6-pin Ribbon Cable F/O - Brown to Blue {sensor 0 Anchor} - [145mm]
M3x5mm Screws (x2)
M4x45mm Screws (x12)
M4x6x20mm Hex Standoffs (x6)
Step 27 Anchor Front Bottom - 1
Click the large image to open full size.
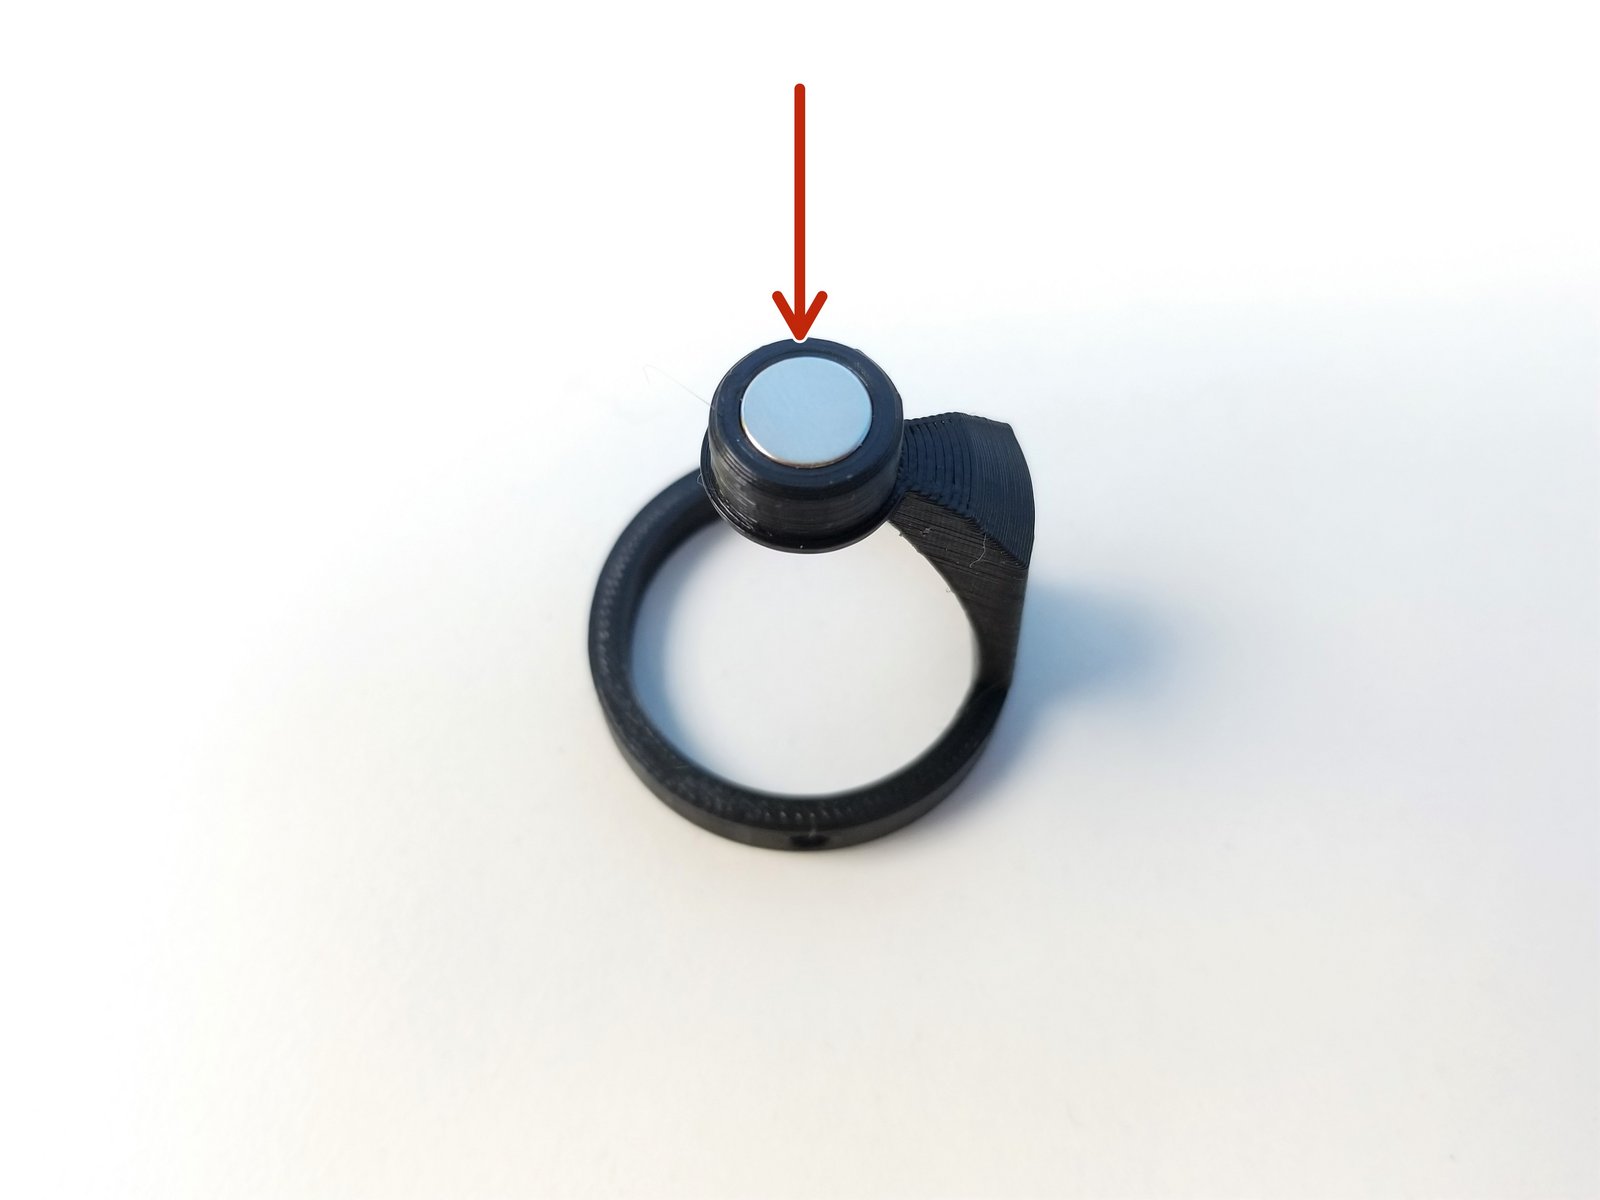
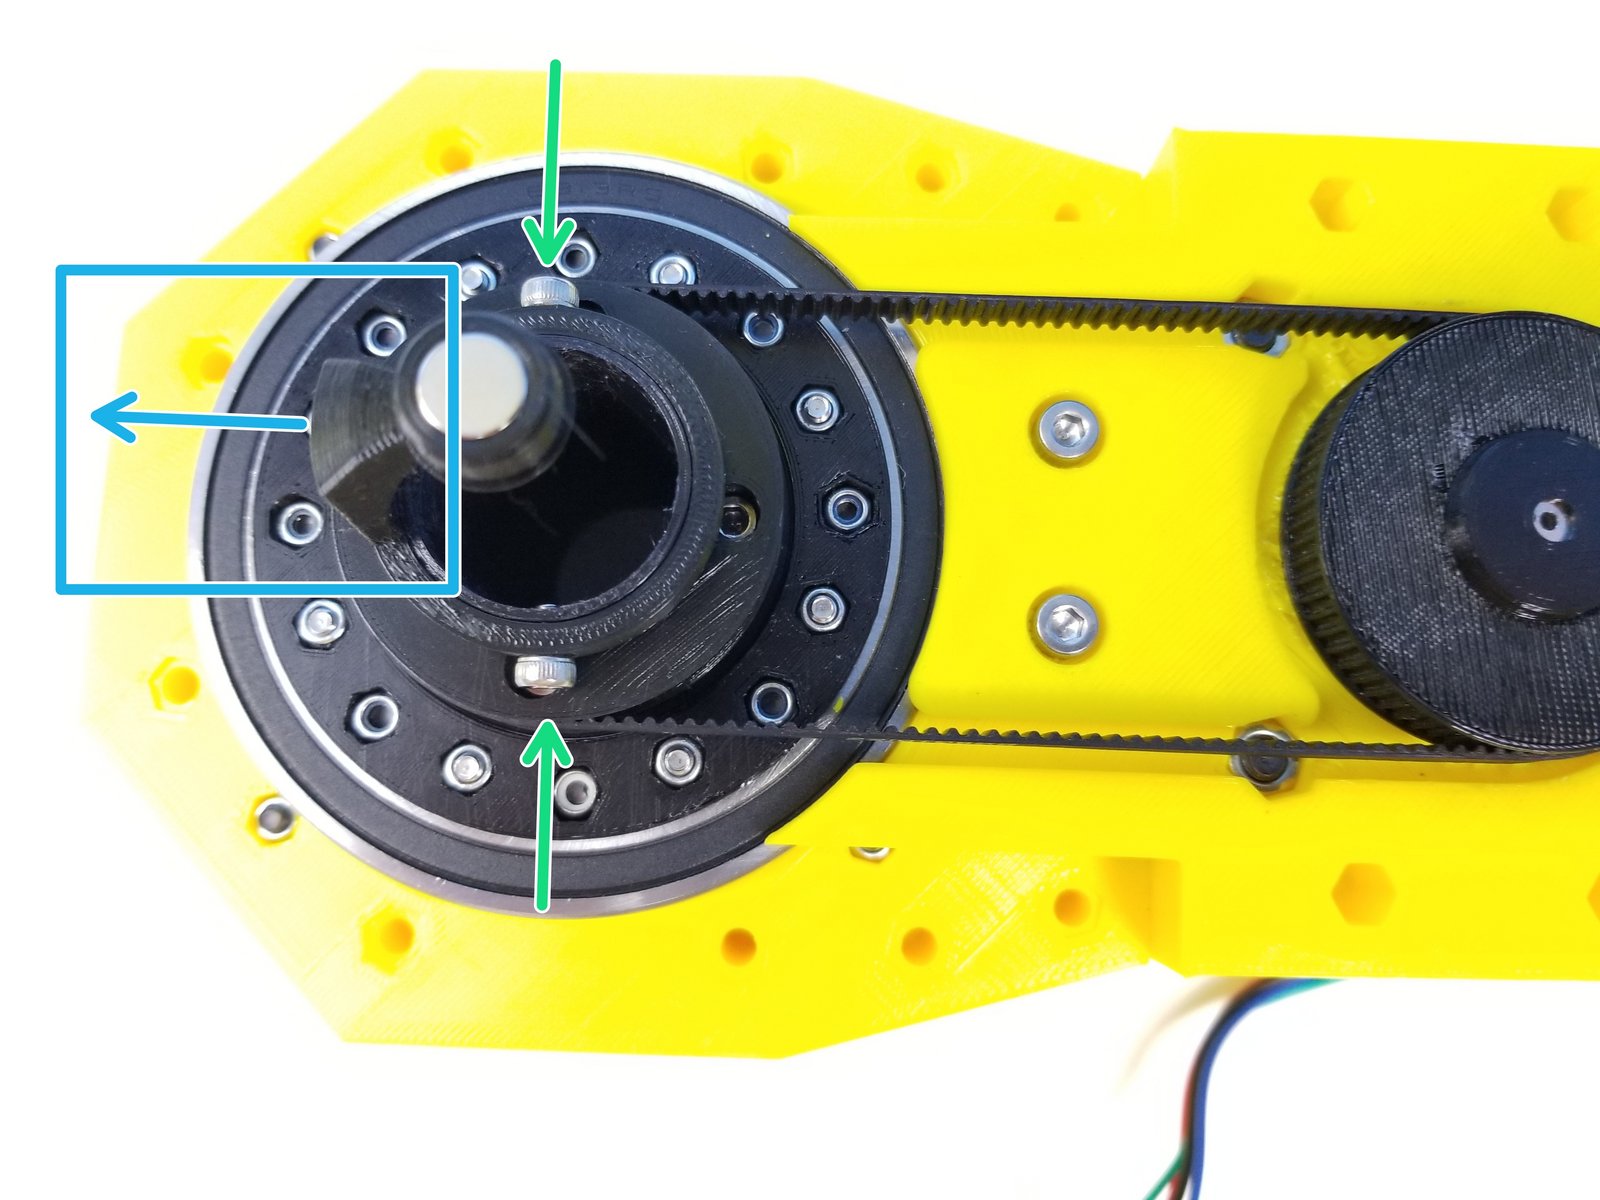
Insert Neodymium Magnet into the Magnet Holder
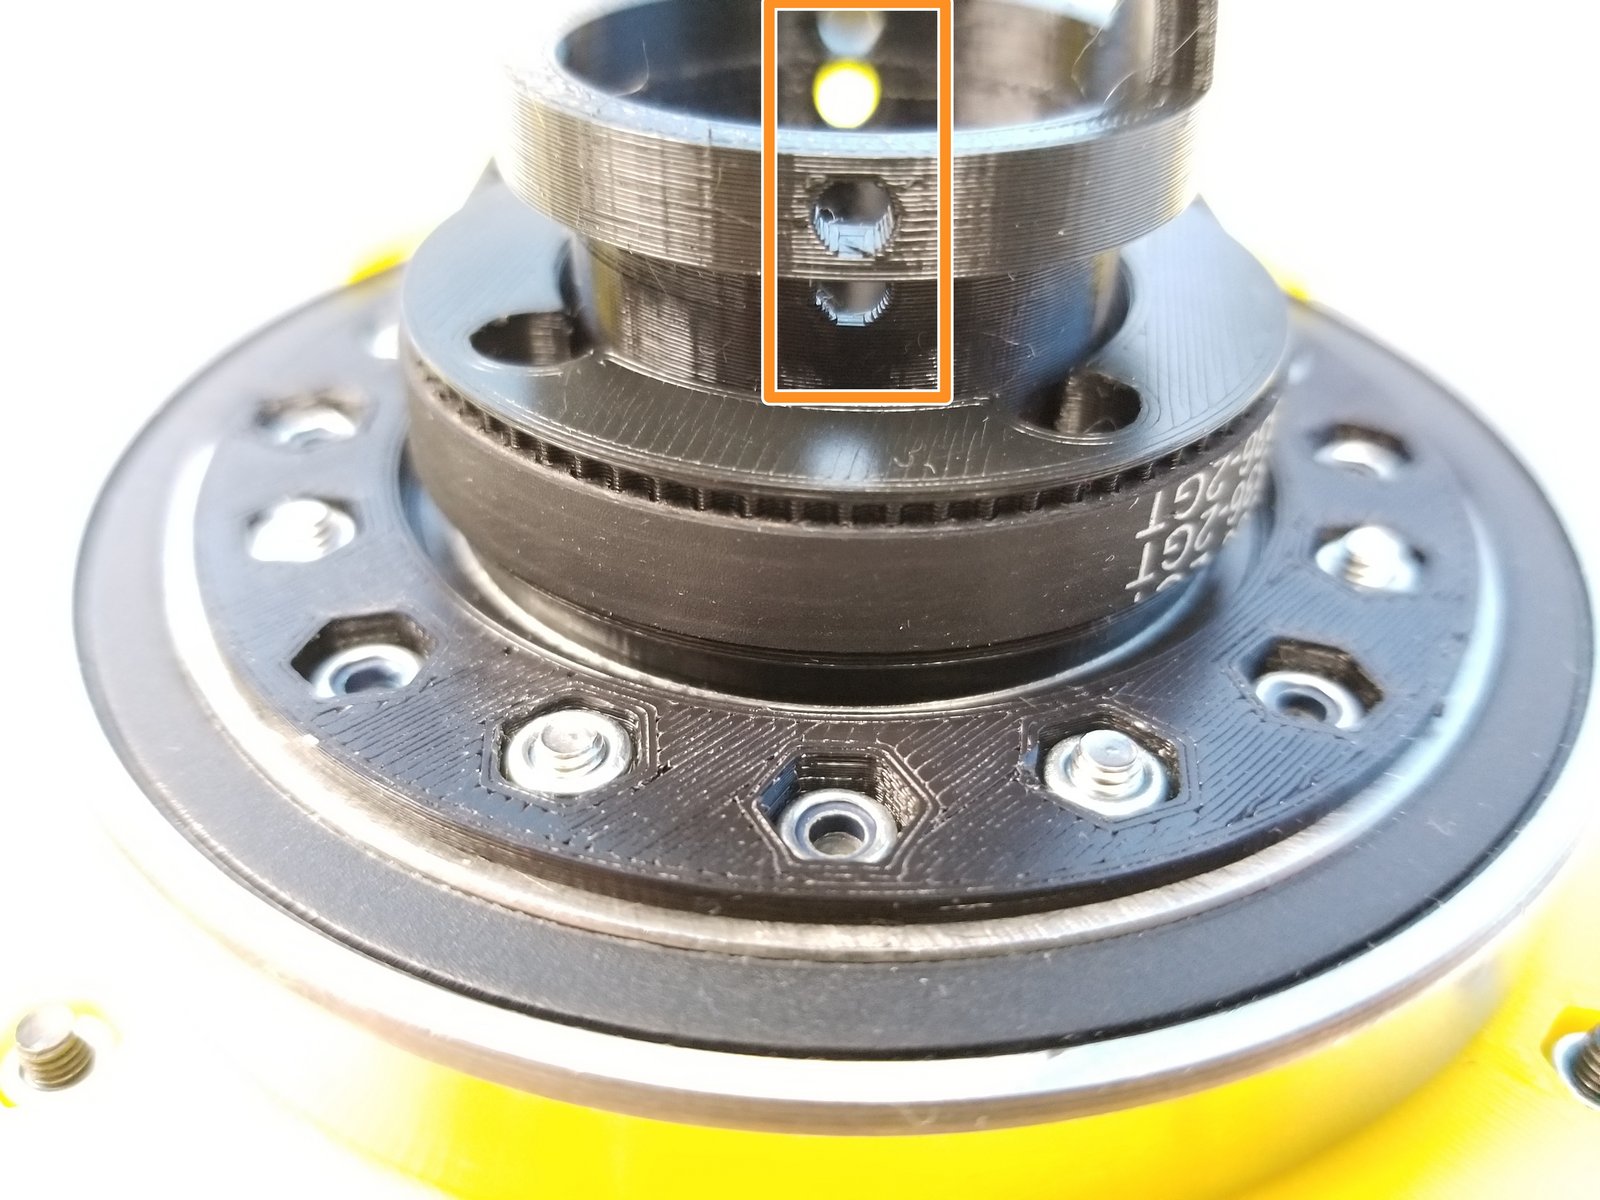
Align the Magnet Holder to the Output Tube
Secure the Magnet Holder to the Tube using M3x5mm Screws
Align the Magnet Holder so that the "Leg of the Magnet Holder" is pointing to the front center of the Anchor Gearbox
Step 28 Anchor Front Bottom - 2
Click the large image to open full size.
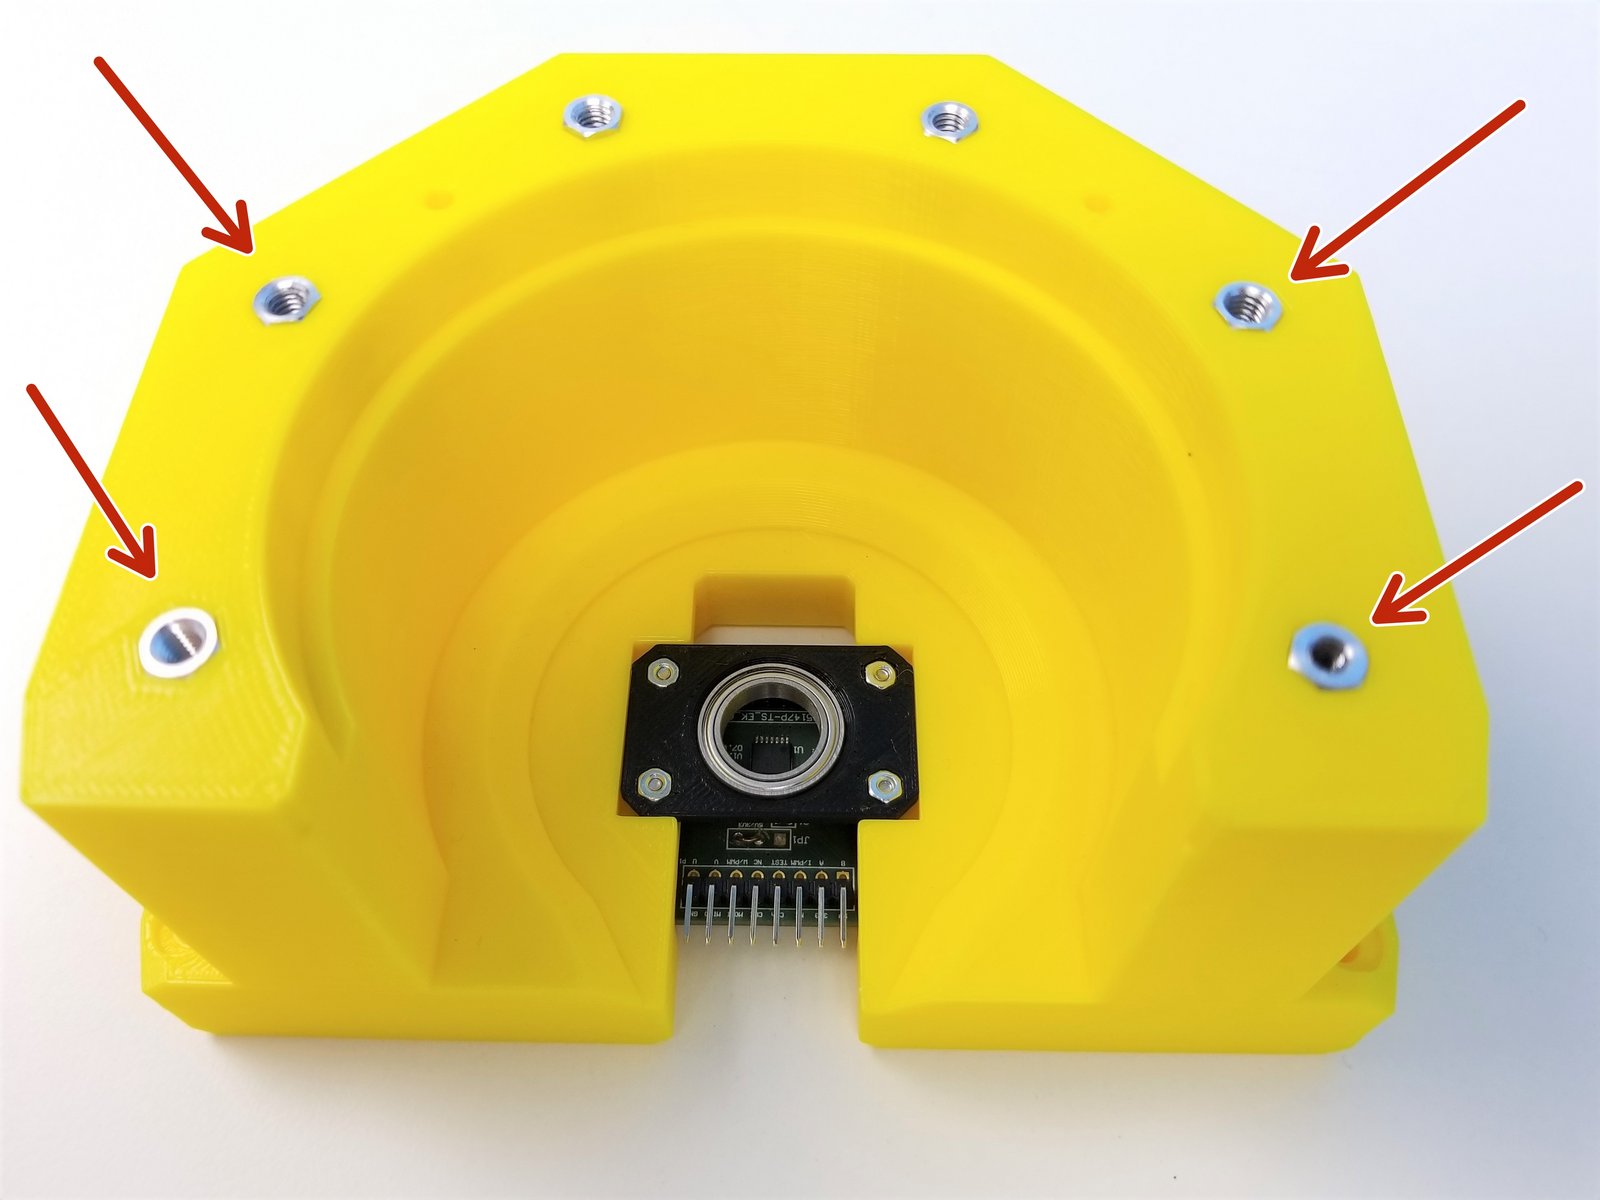
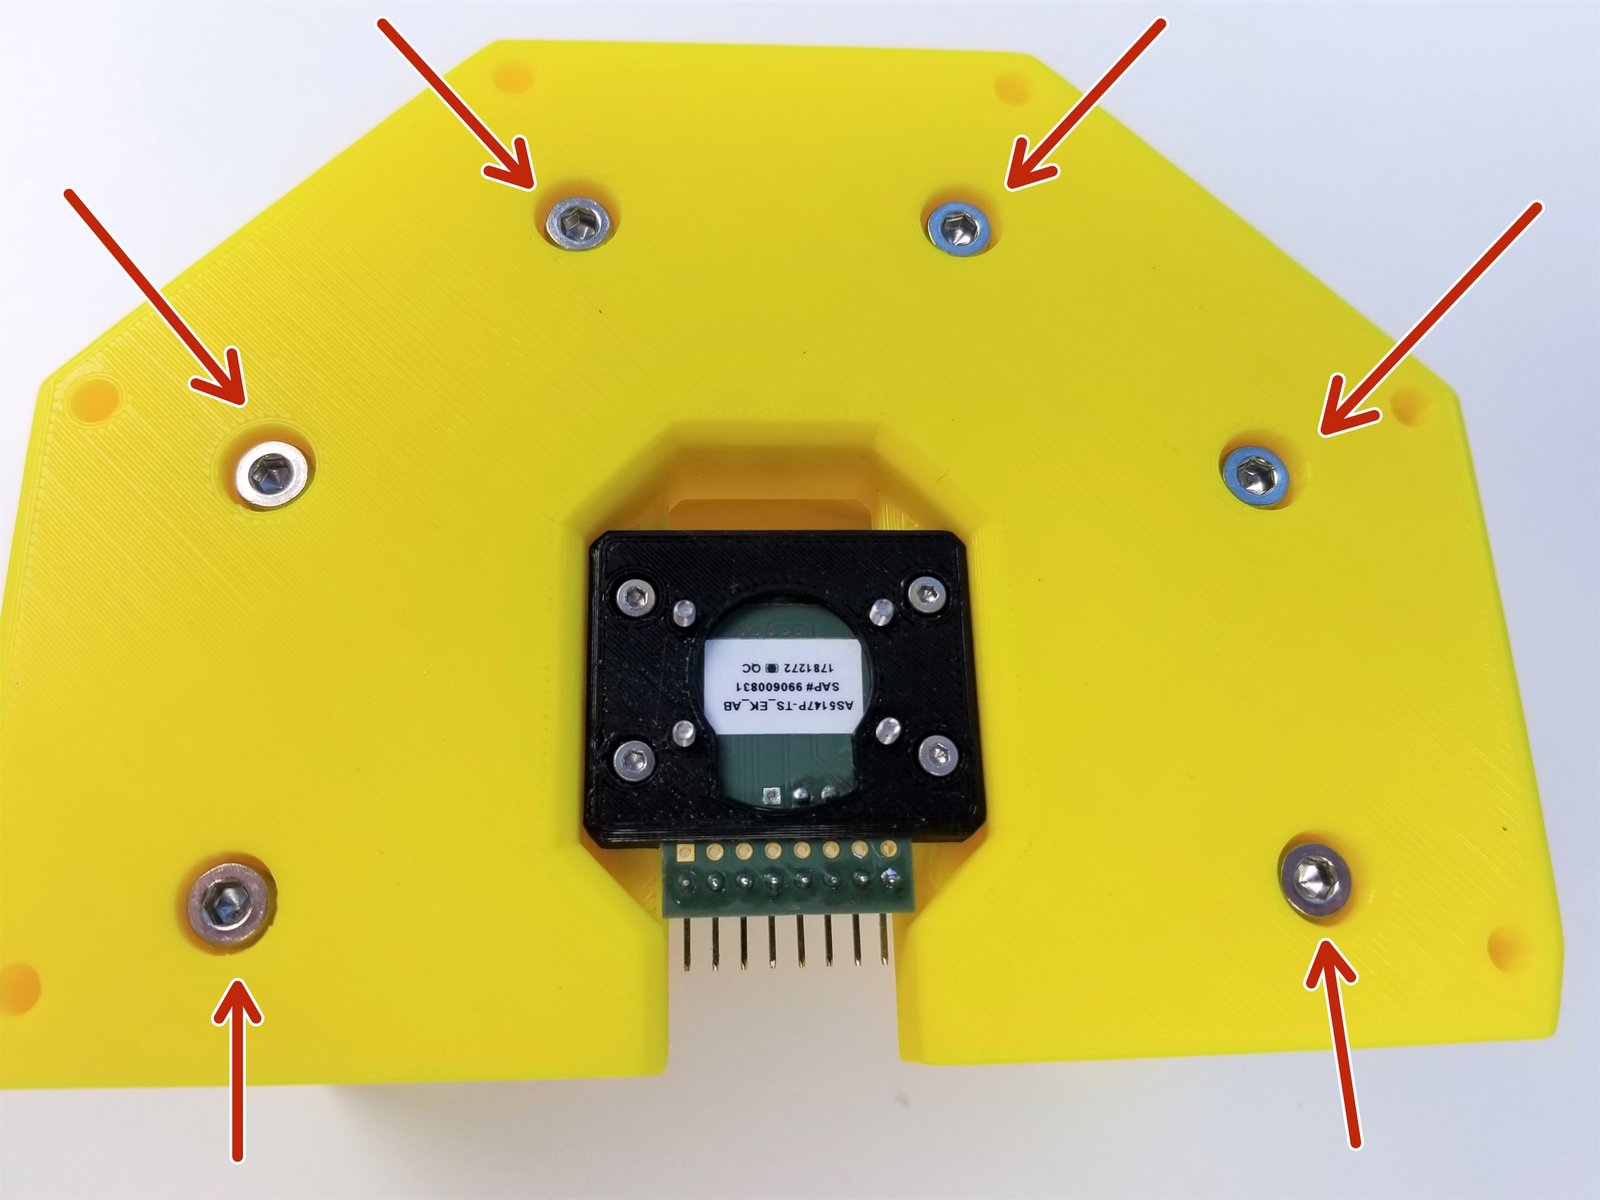
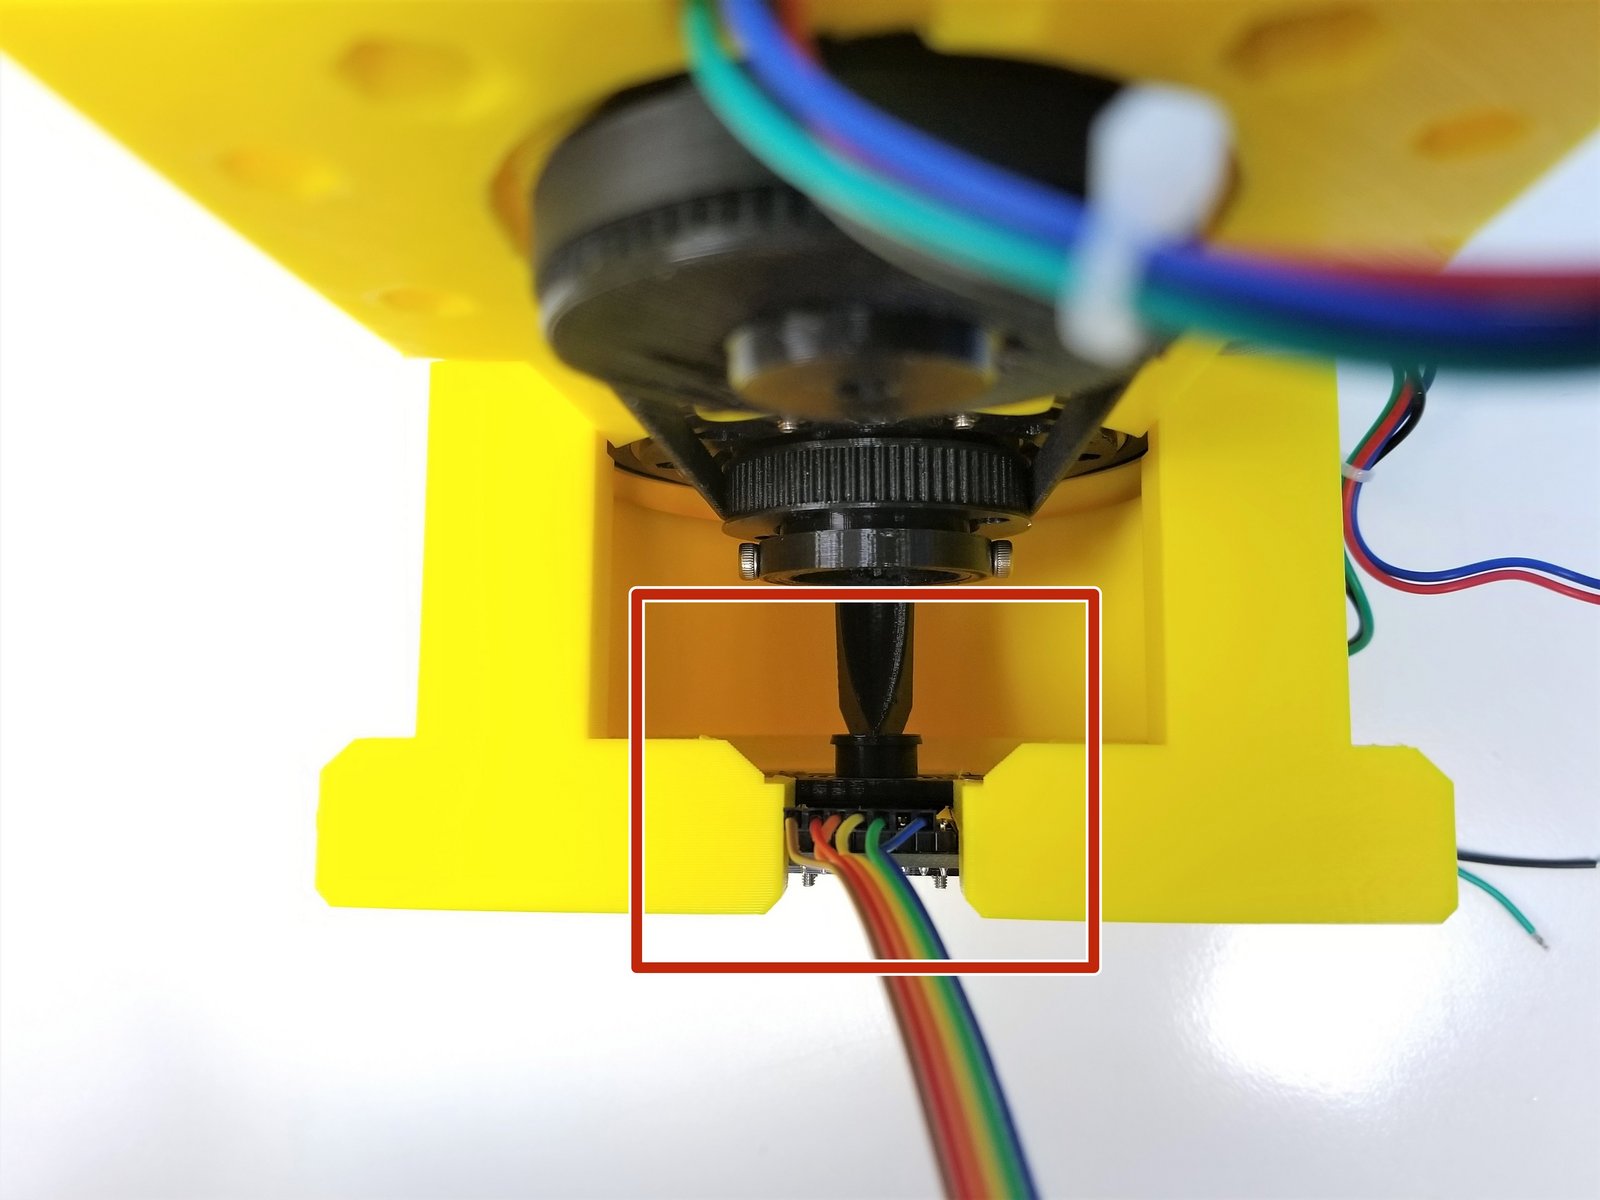
Screw in the Hex Standoffs to the Anchor Front Bottom using M4x45mm Screws
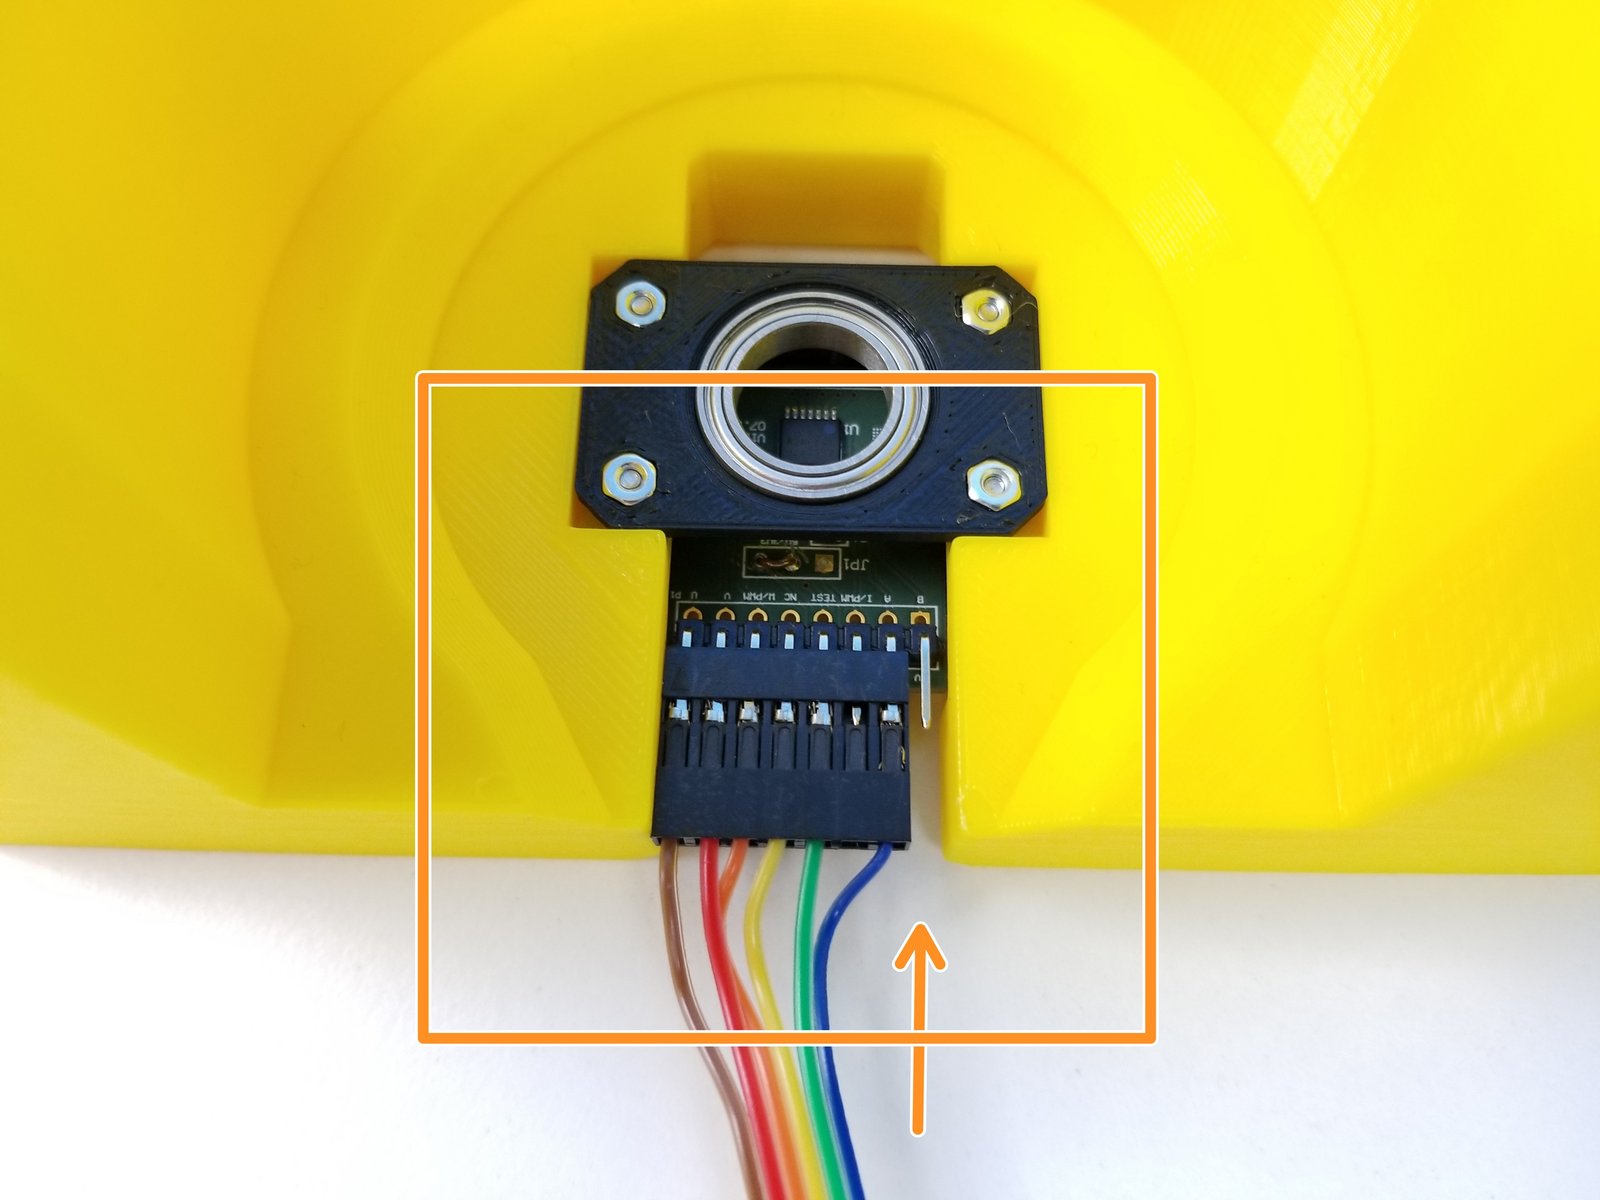
Connect the Anchor Sensor Cable to the sensor as shown in the picture
- Note:
BLUE = 3.3V
Step 29 Anchor Front Bottom - 3
Click the large image to open full size.
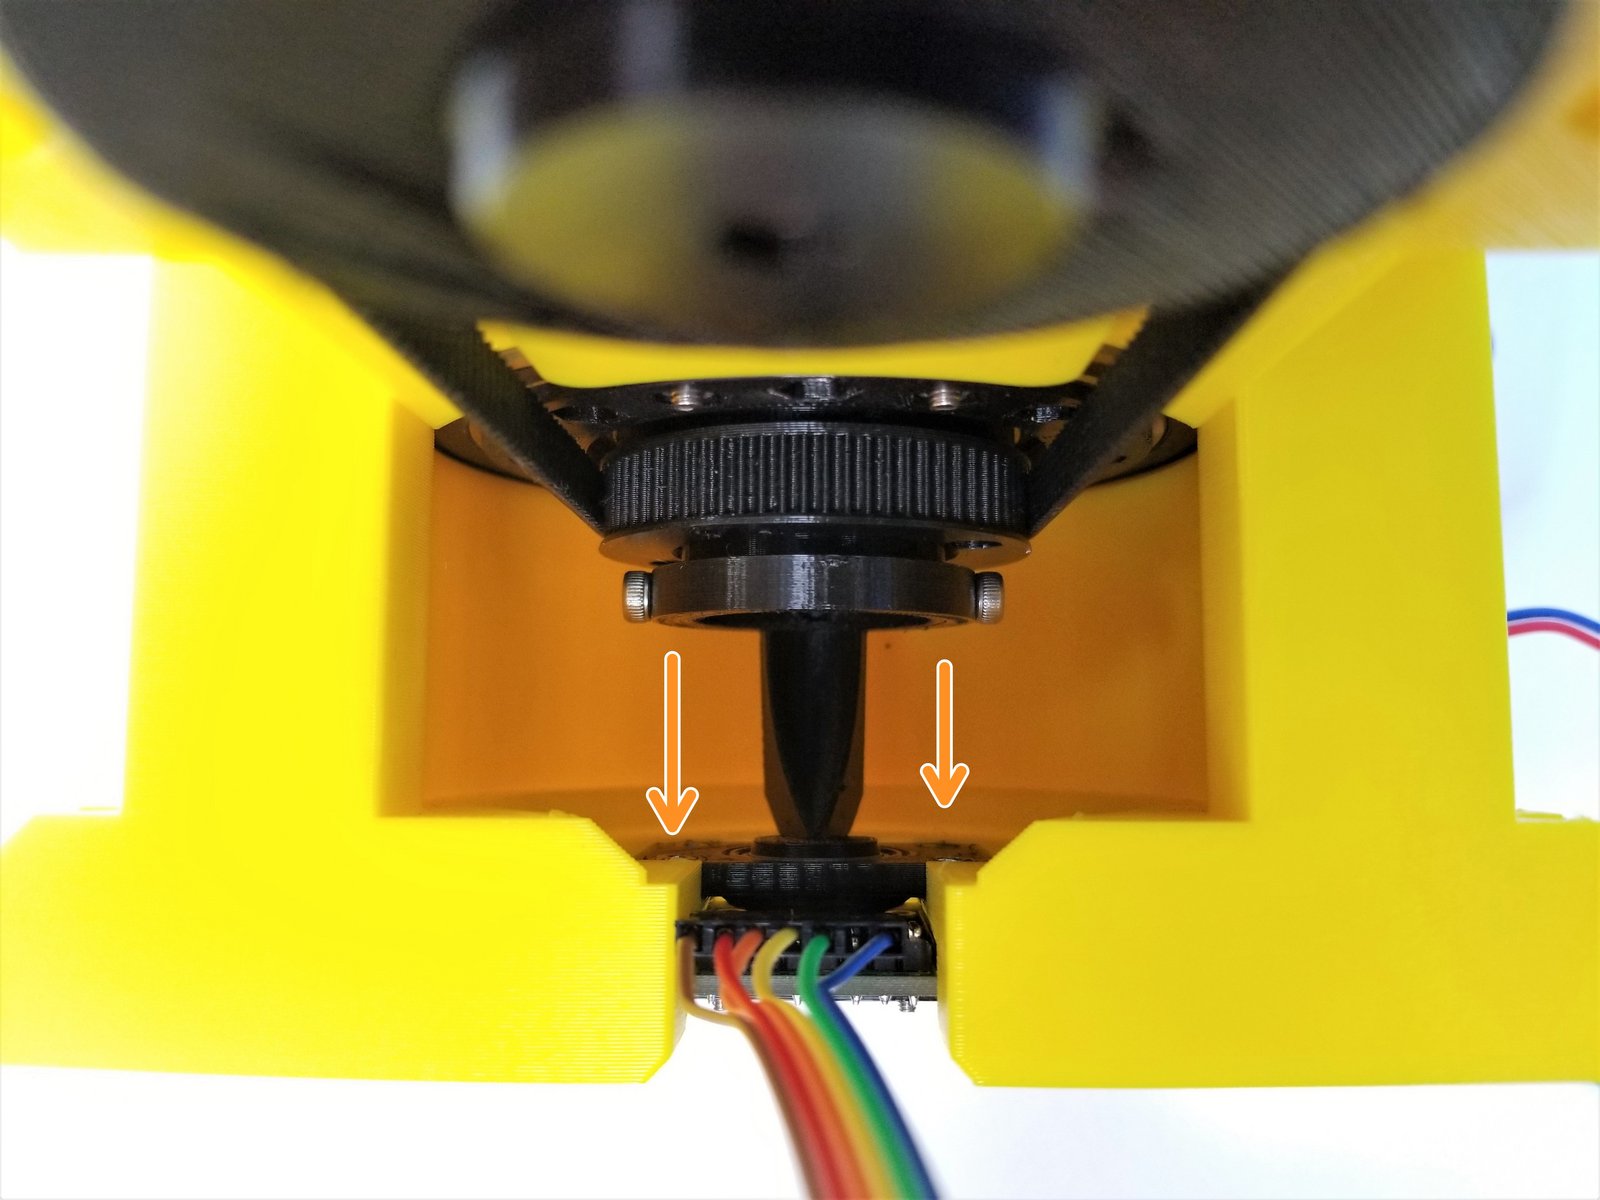
Align the Anchor Front Bottom to the Anchor Gearbox
- Warning:
Make sure the Magnet Holder is aligned with the Bearing!!!
Insert the Magnet Holder to the Bearing
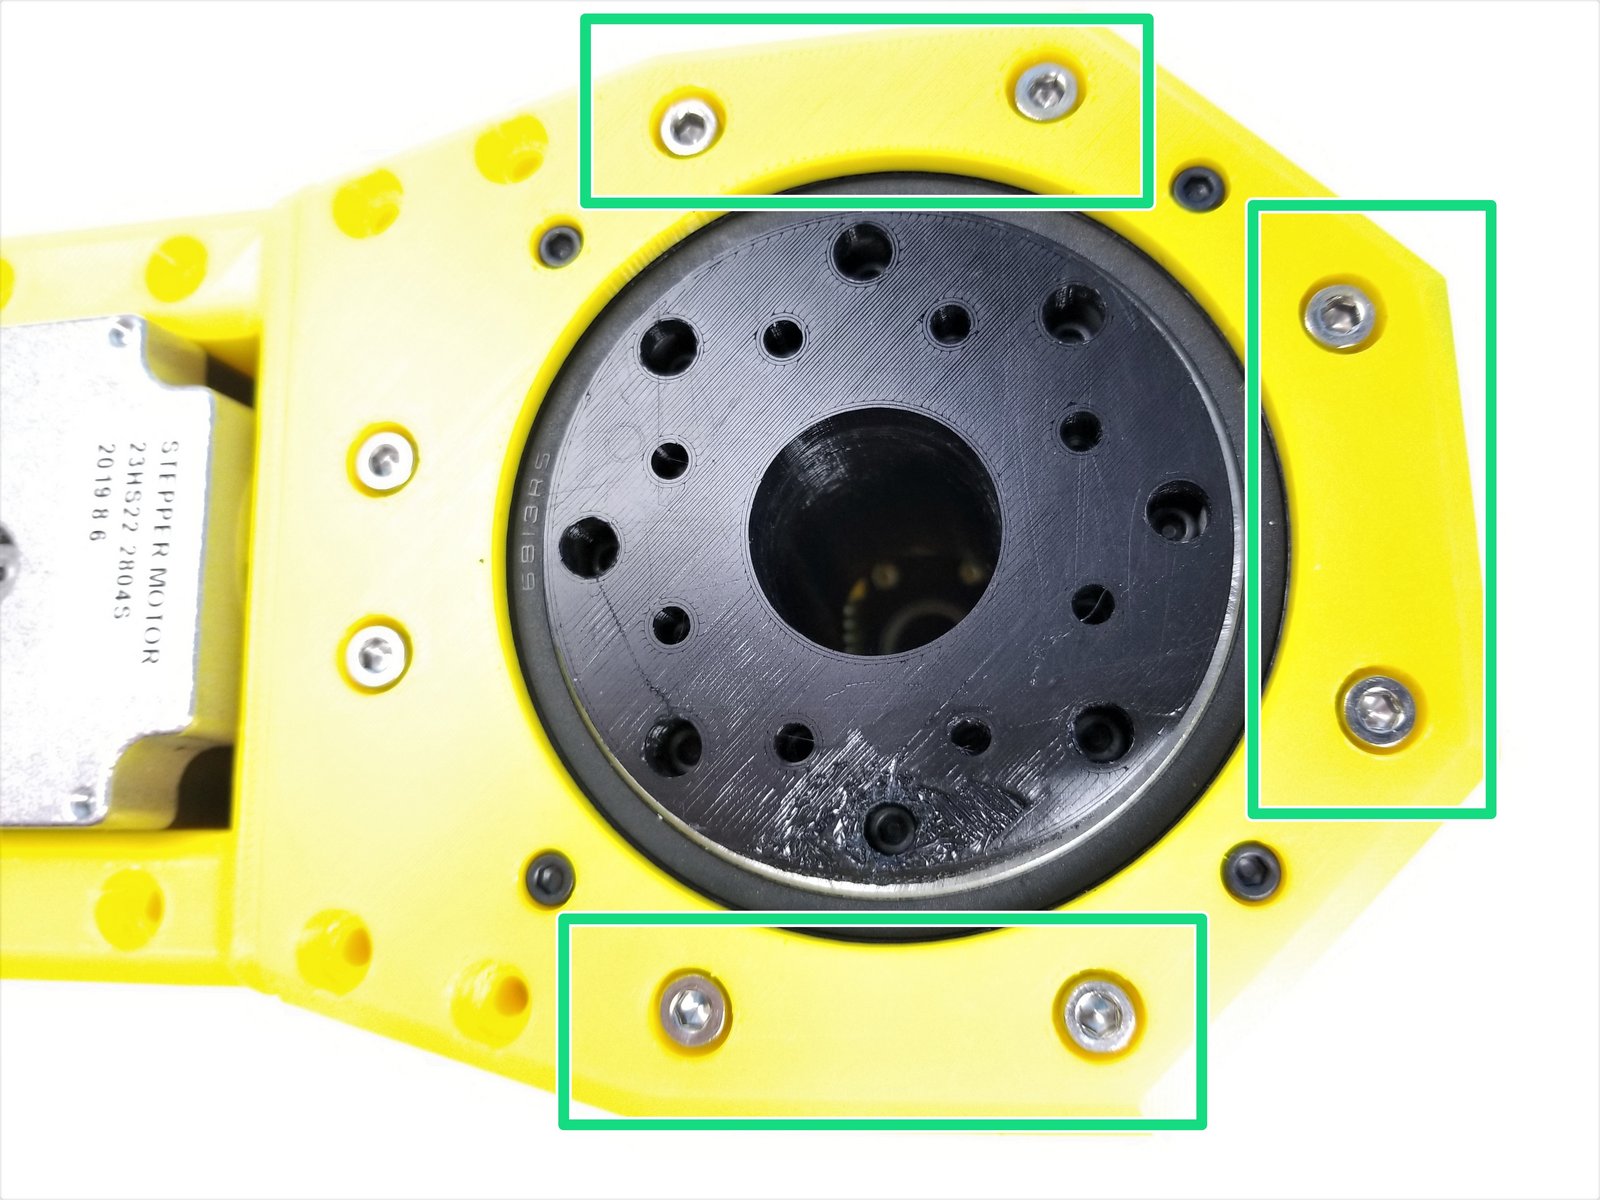
Secure it using M4x45mm Screws on the Anchor Gearbox
Step 30 Anchor Back Panel Preparation - Parts
Click the large image to open full size.
- Note:
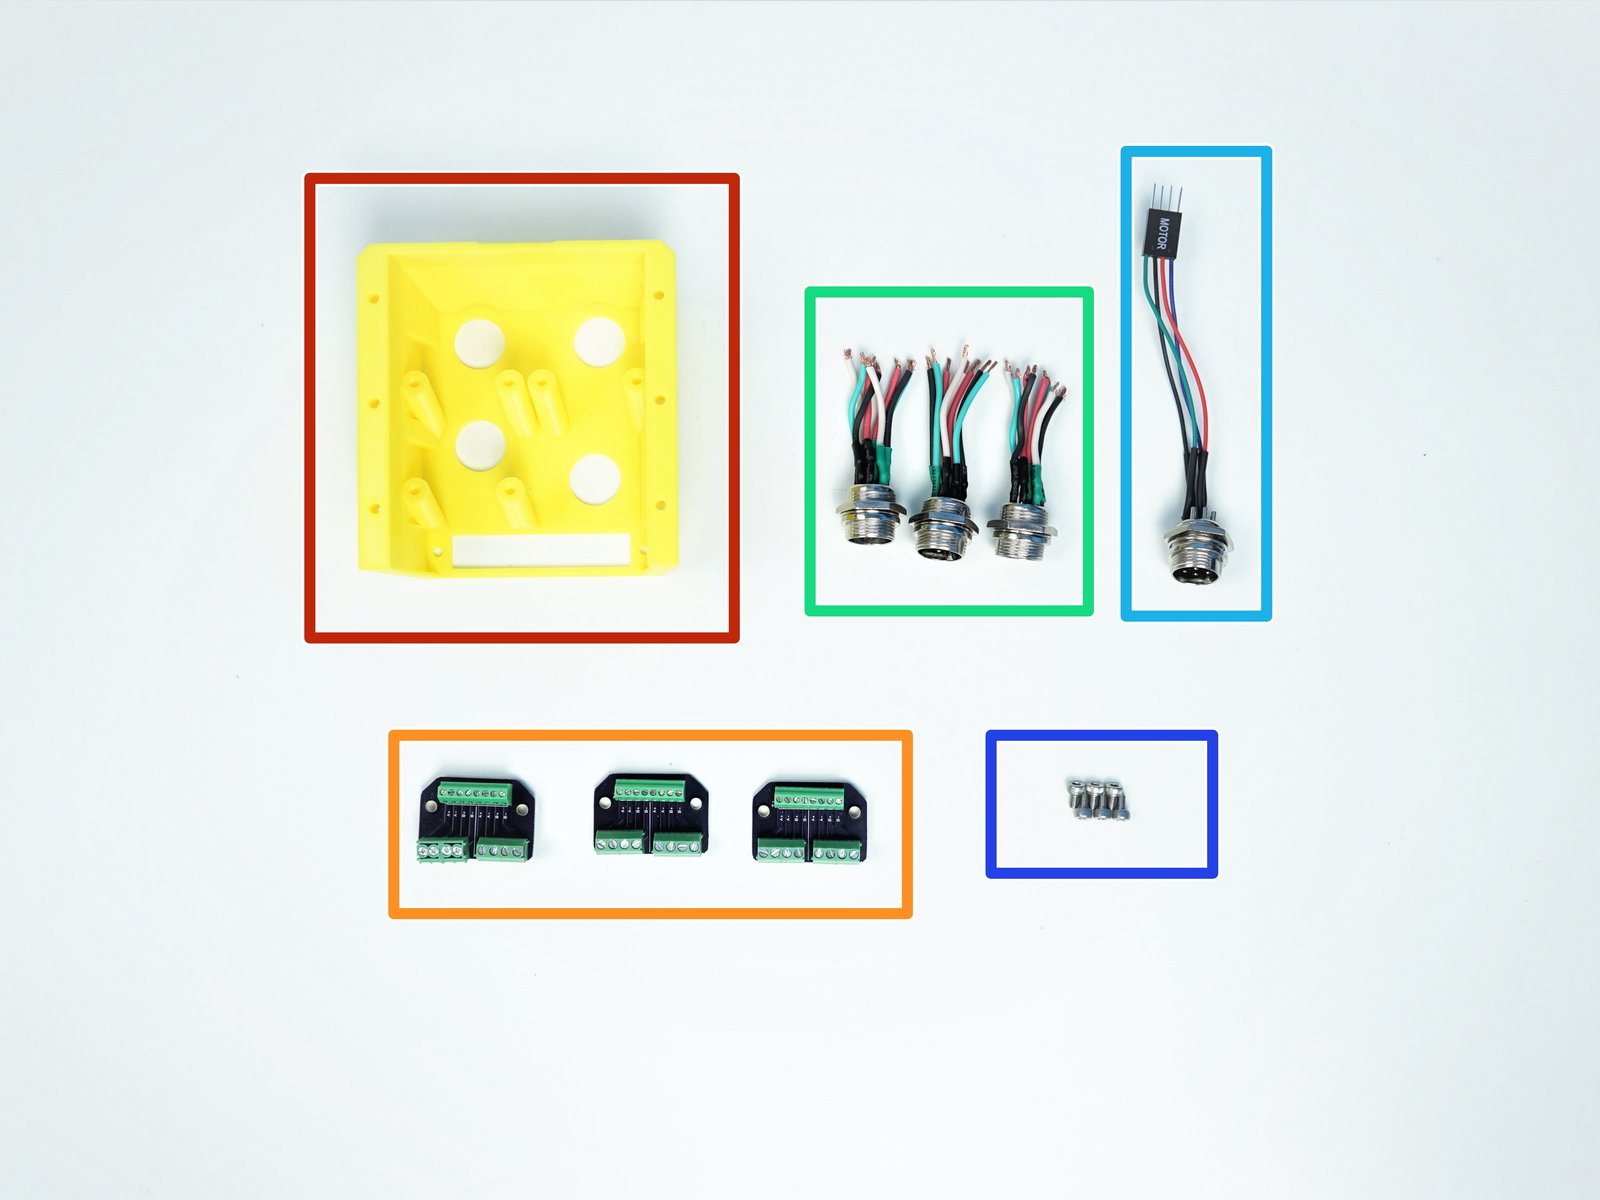
Prepare the following components:
[3D] - 1C Anchor Panel Mount
Panel Mount PCBs (x3)
Aviation GX16-8p Cable M/O - [45mm] (x3)
Aviation GX16-8p Cable M/M {other end 4 pin dupont} - [80mm]
M3x8mm Screws (x6)
Step 31 Anchor Back Panel Preparation - 1
Click the large image to open full size.
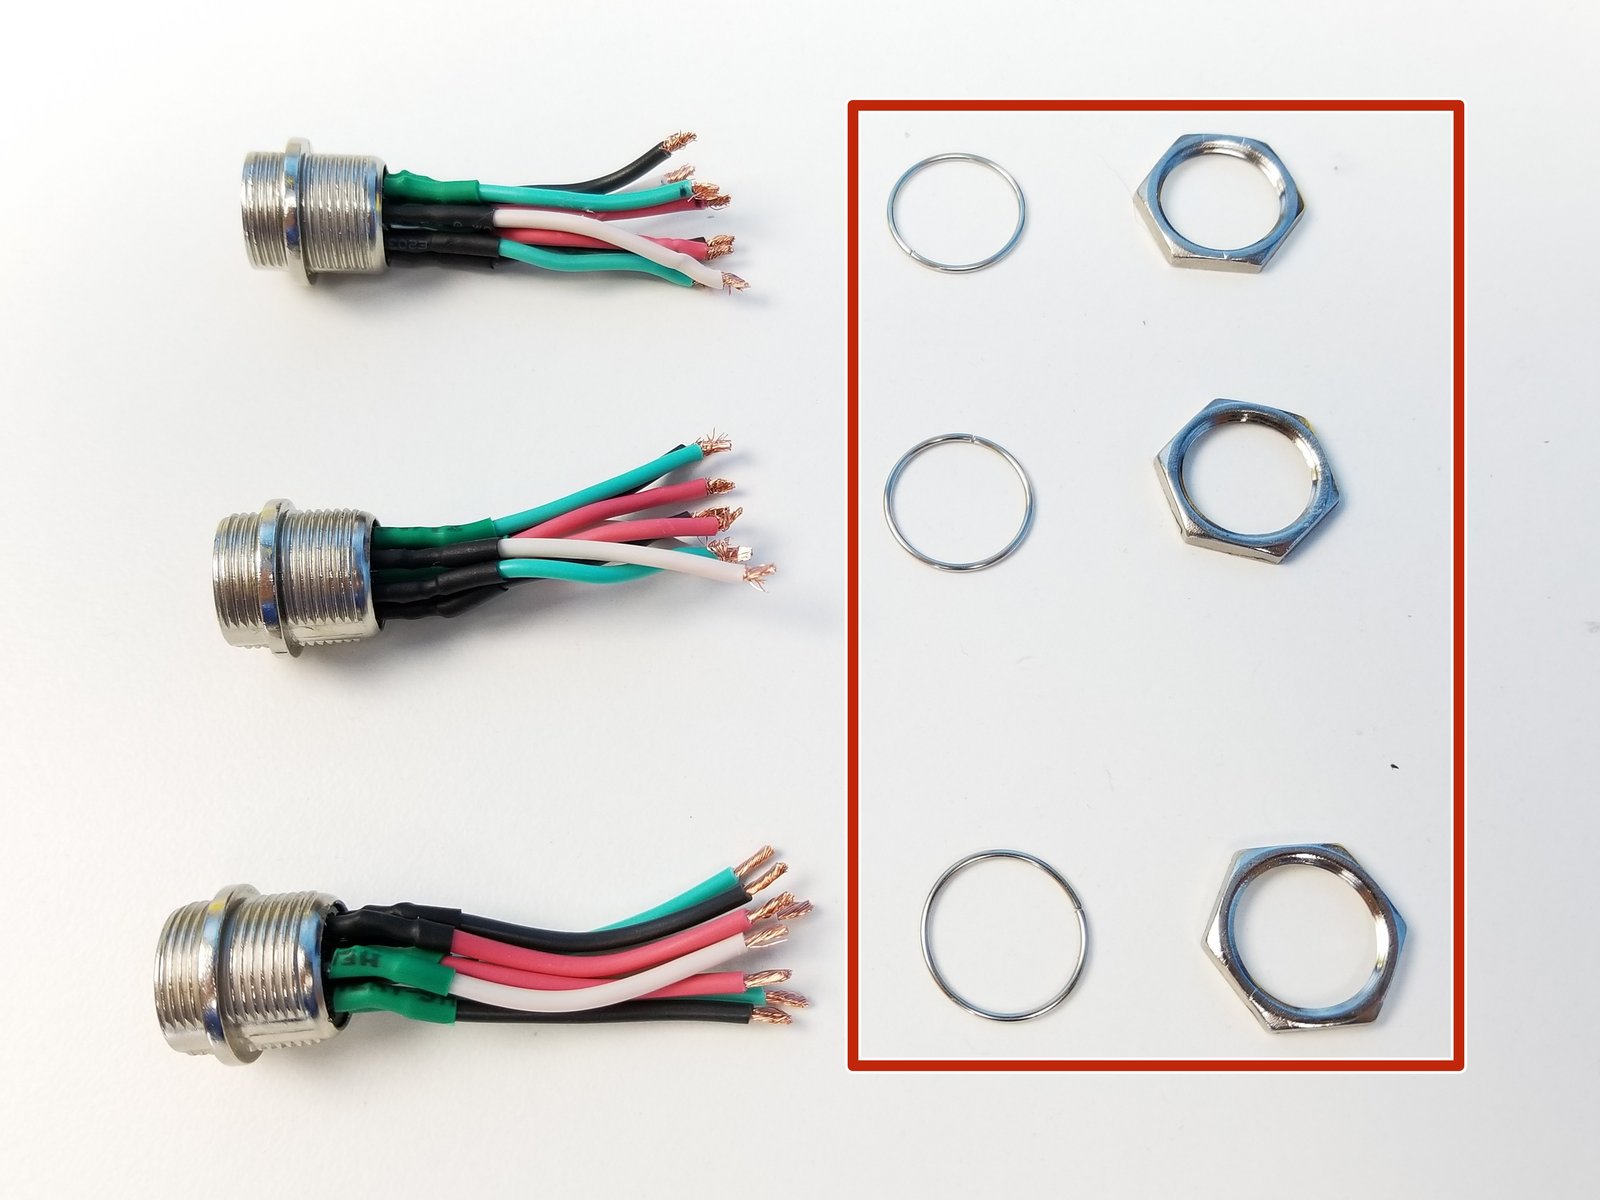
Unscrew all the Nuts and Washers from the Aviation Plugs [43mm]
- Note:
Notice that all 8 pins are soldered to the Plugs
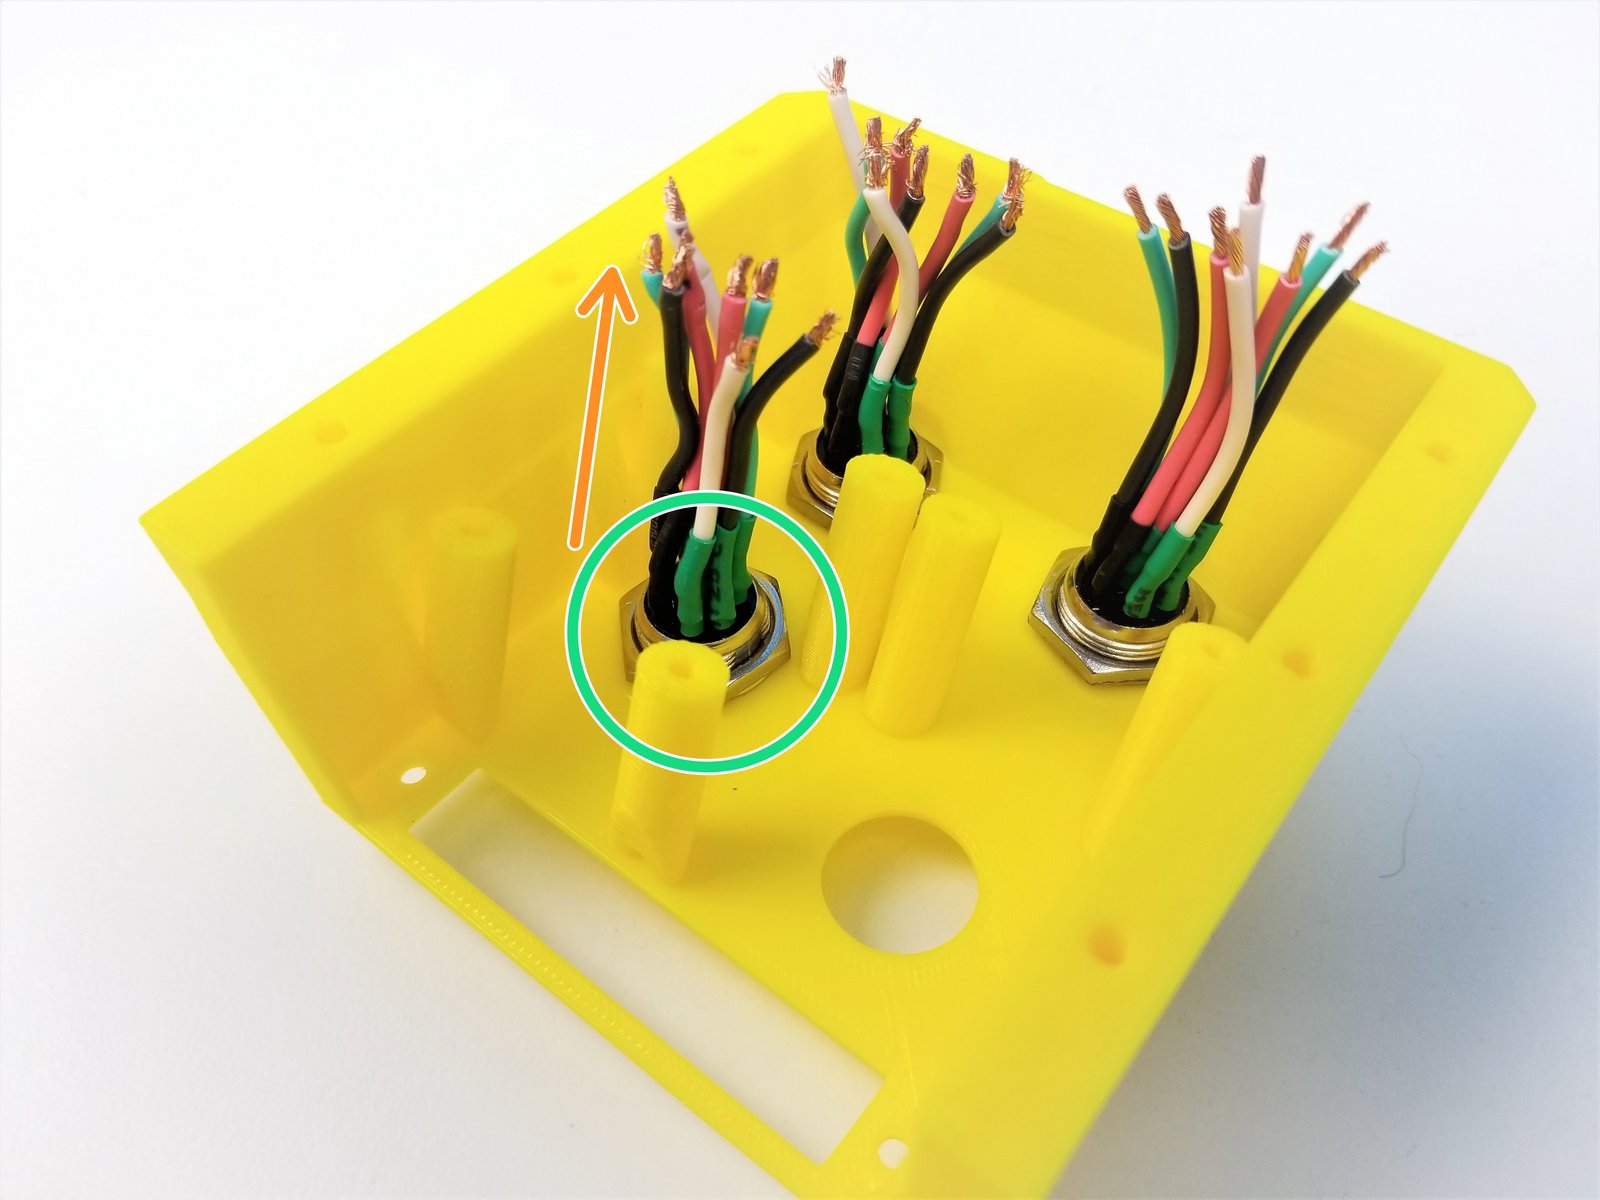
Insert the Plugsinto the Back Panel
Secure them by screwing in the Nuts and Washers
Step 32 Anchor Back Panel Preparation - 2
Click the large image to open full size.
- Warning:
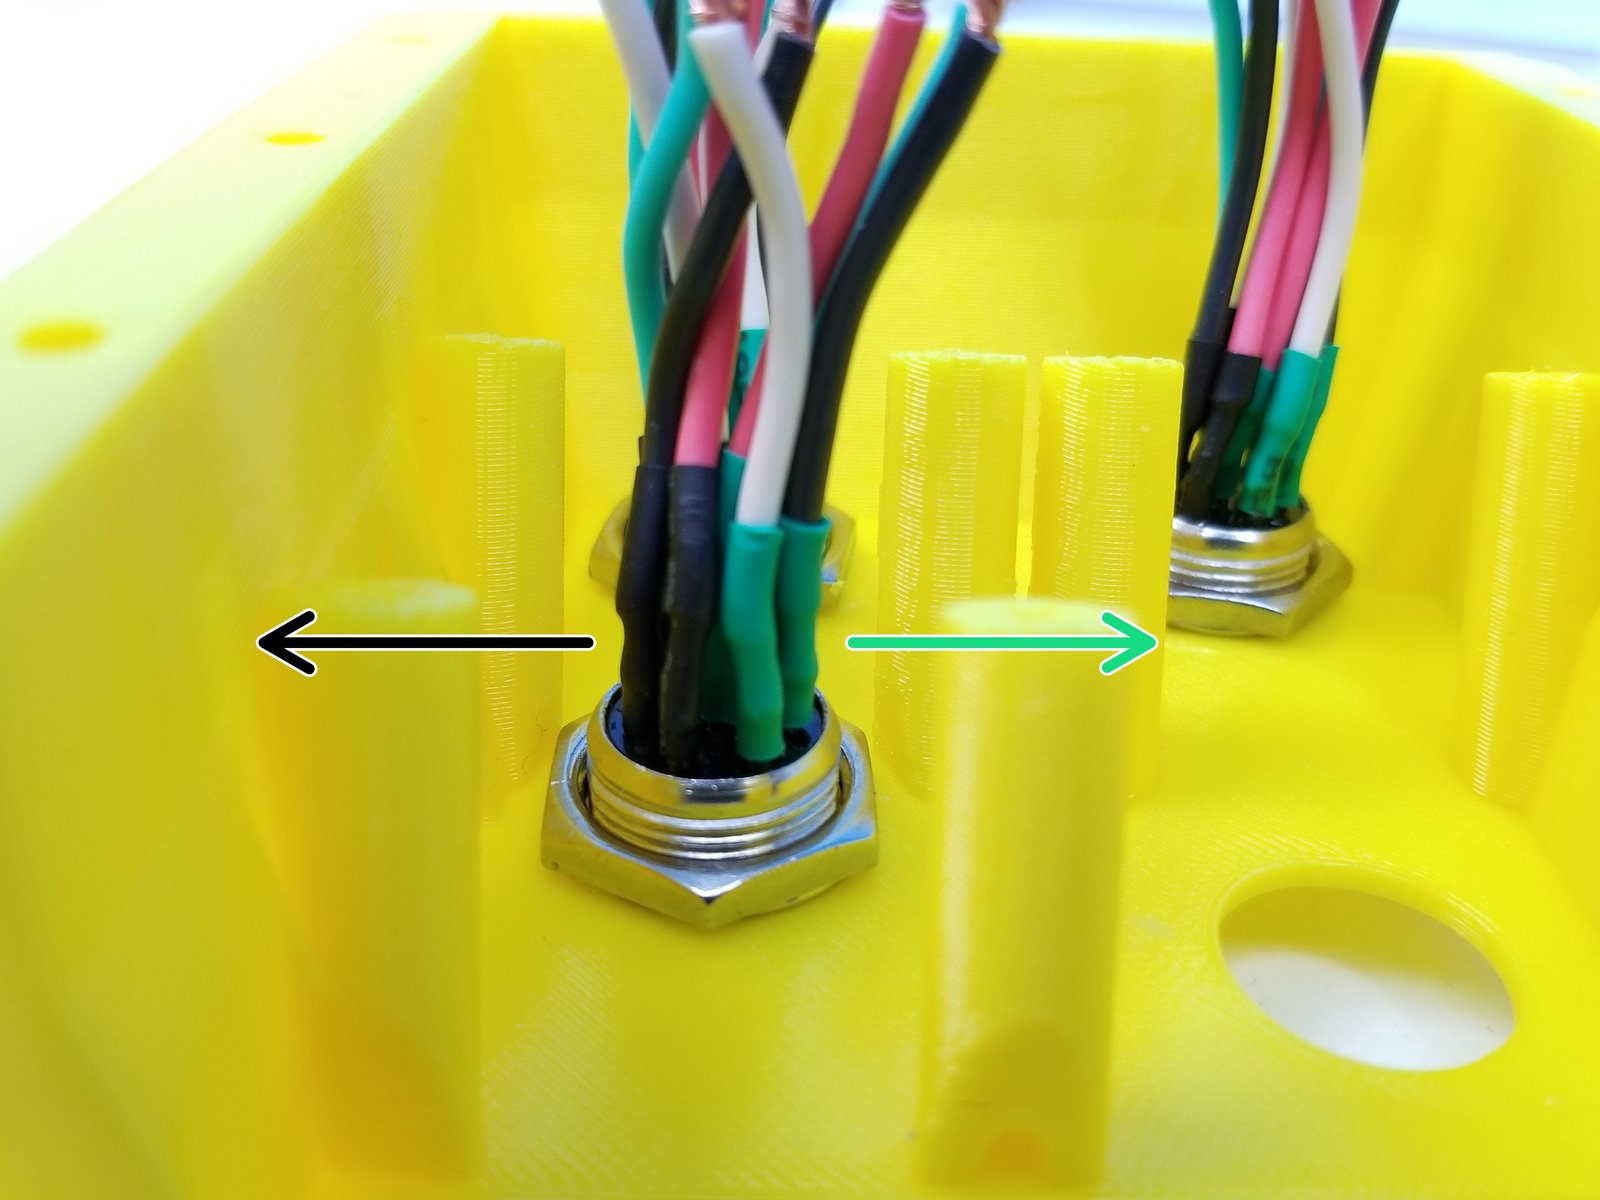
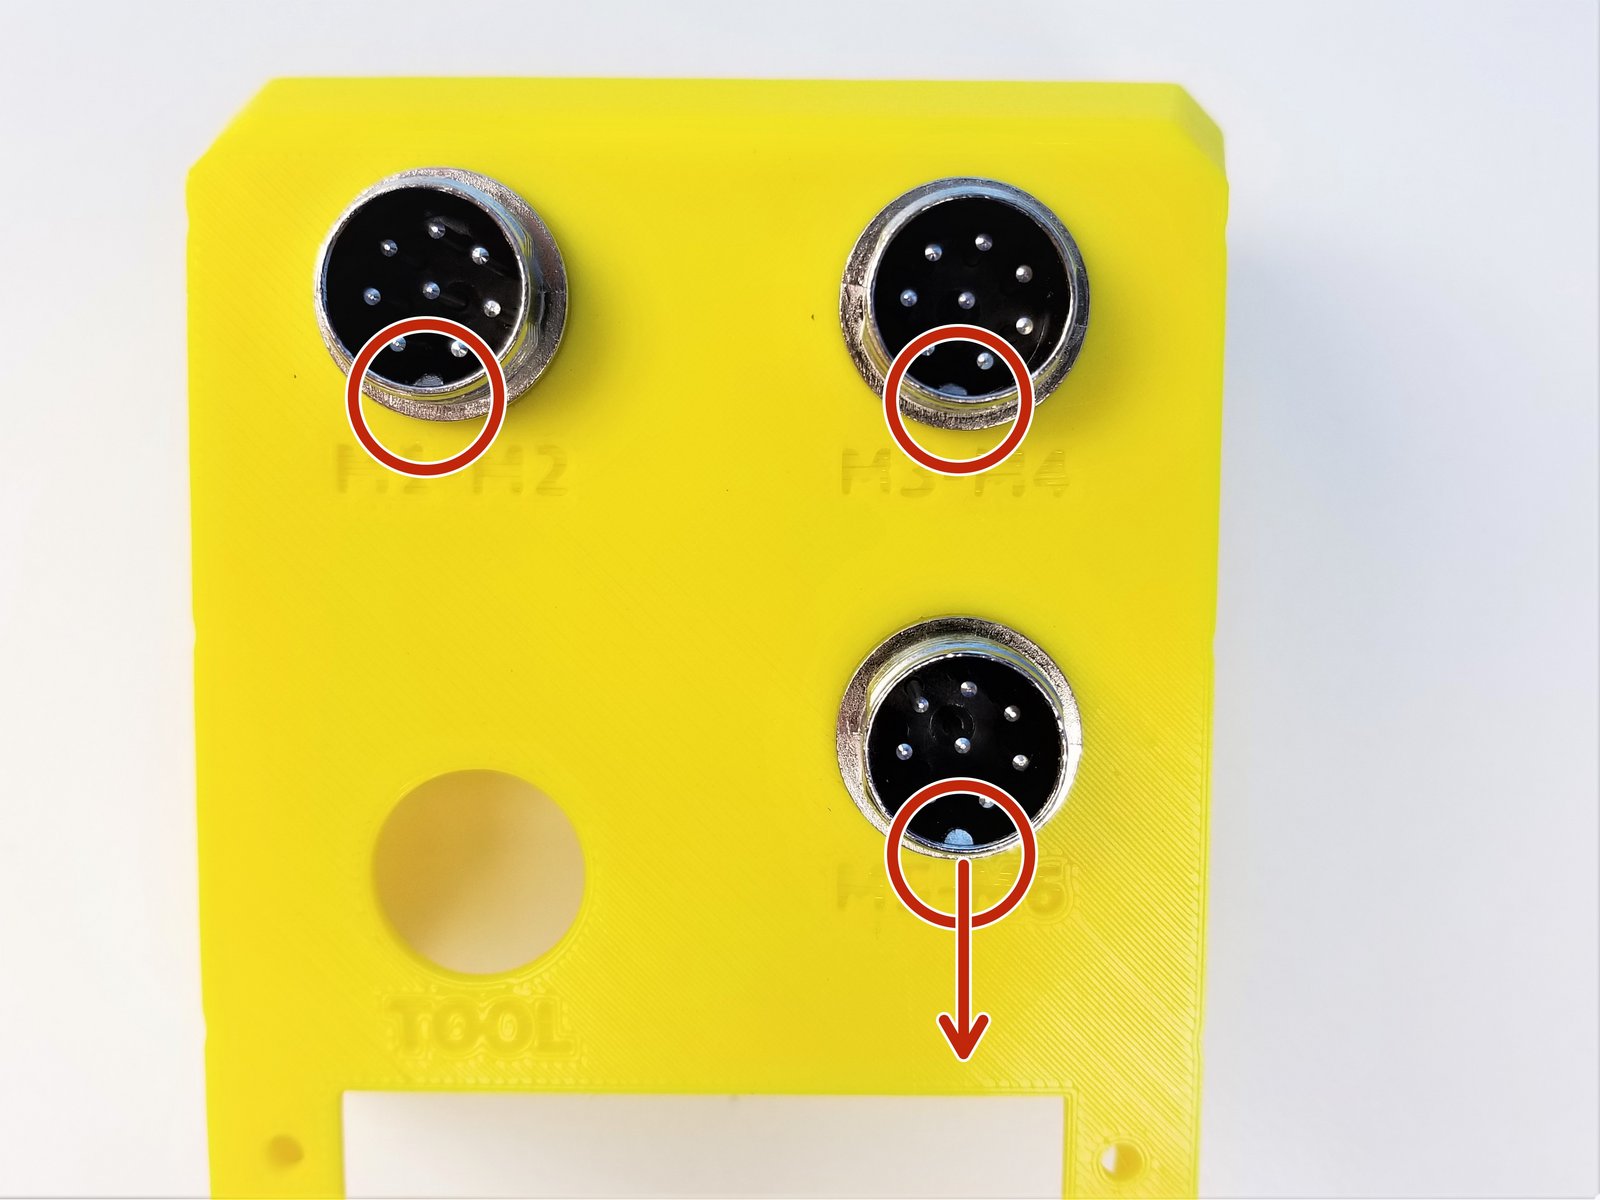
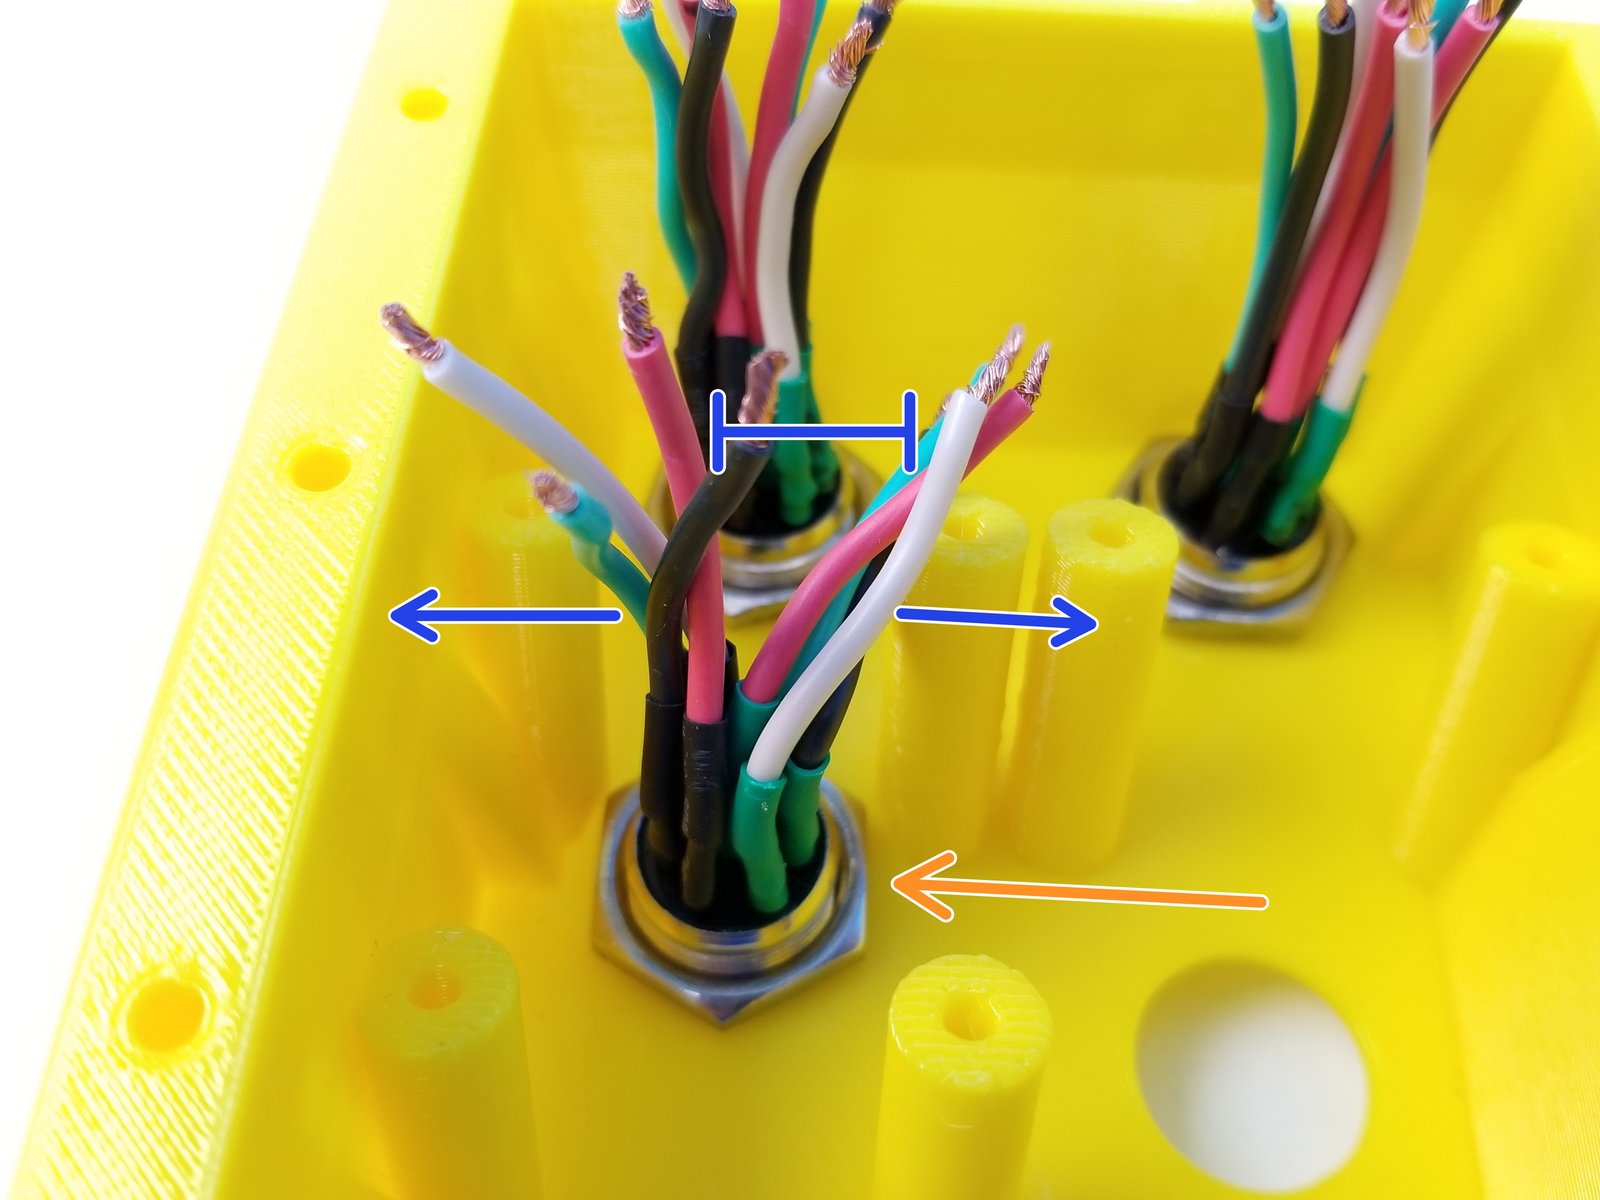
Plug Alignment is very IMPORTANT!
Out of 8 pins, 4 pins are soldered then protected with Black Heat Shrinks
Other 4 pins are done with Green Heat Shrinks
- Note:
Make sure that Black Set of Wires are on the LEFT
When done correctly, alignment aid of the plug should point DOWN
Tighten the Plug Nut again
Split the Black Set of Wires from the Green Set of Wires
Step 33 Anchor Back Panel Preparation - 3
Click the large image to open full size.
- Warning:
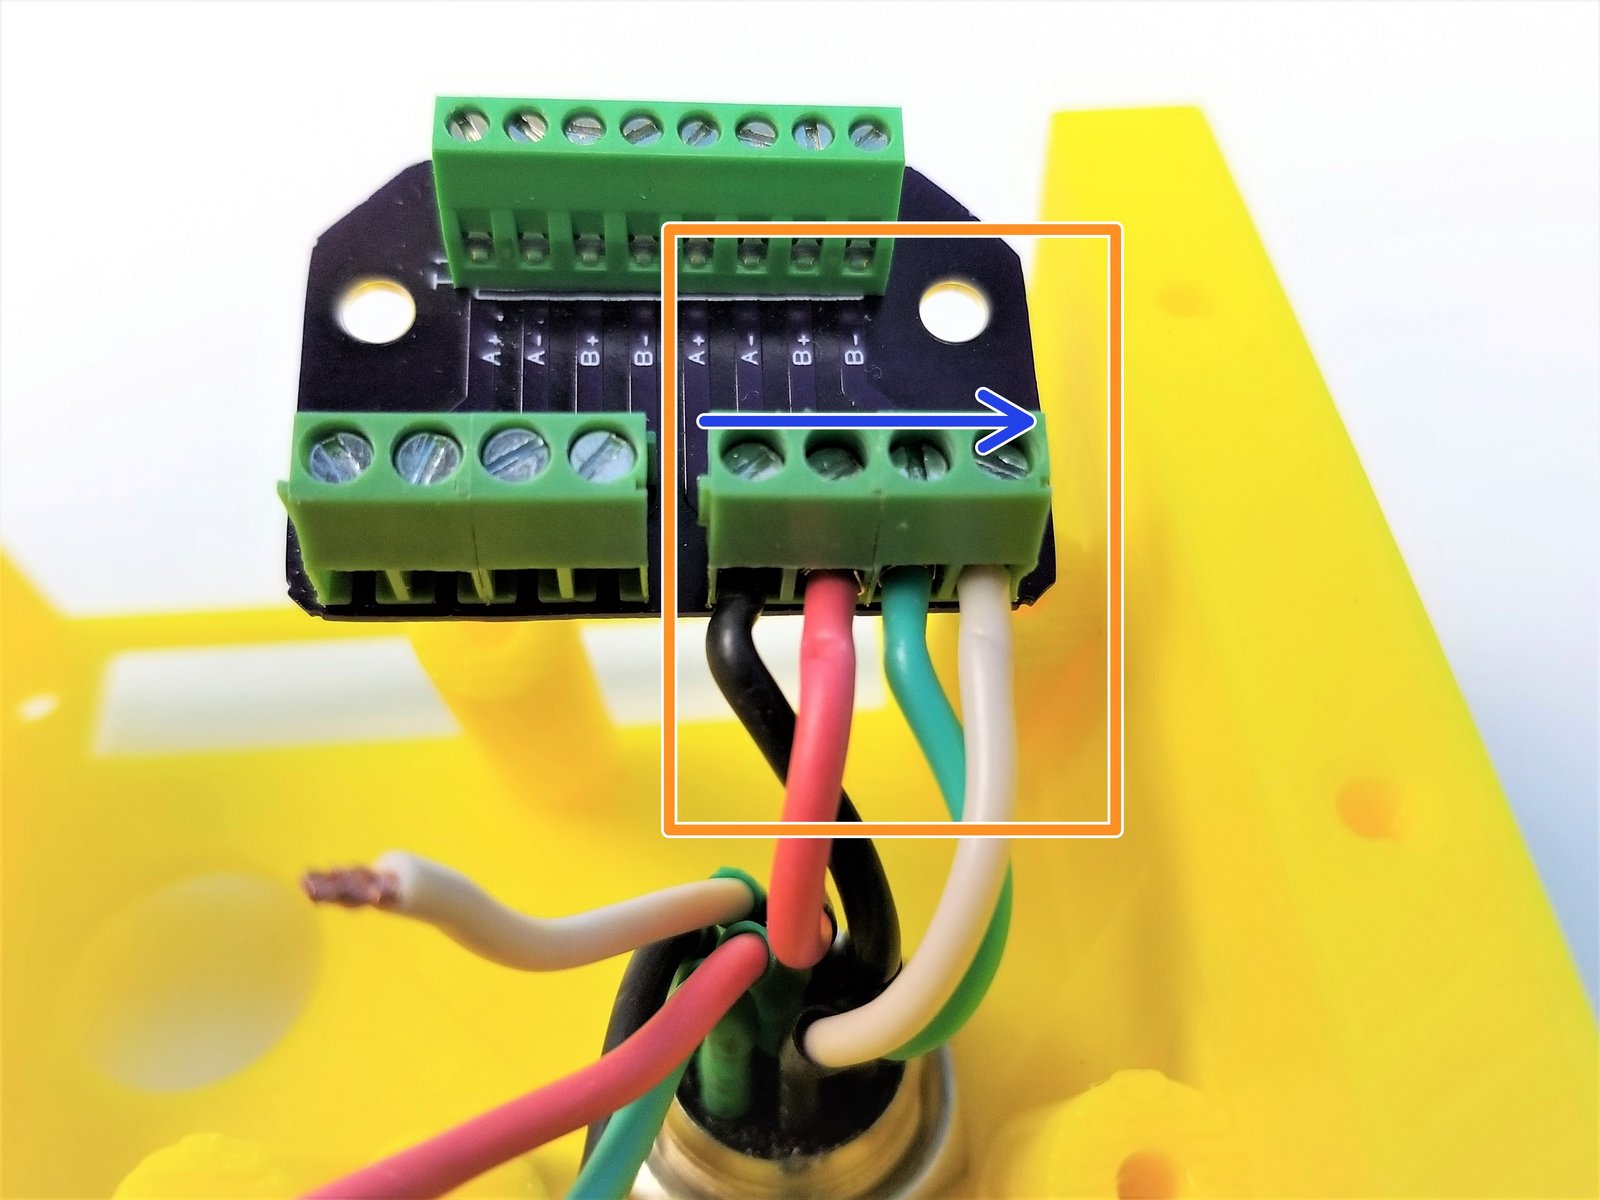
START with the Black Set of Wires of the Bottom Solo Plug
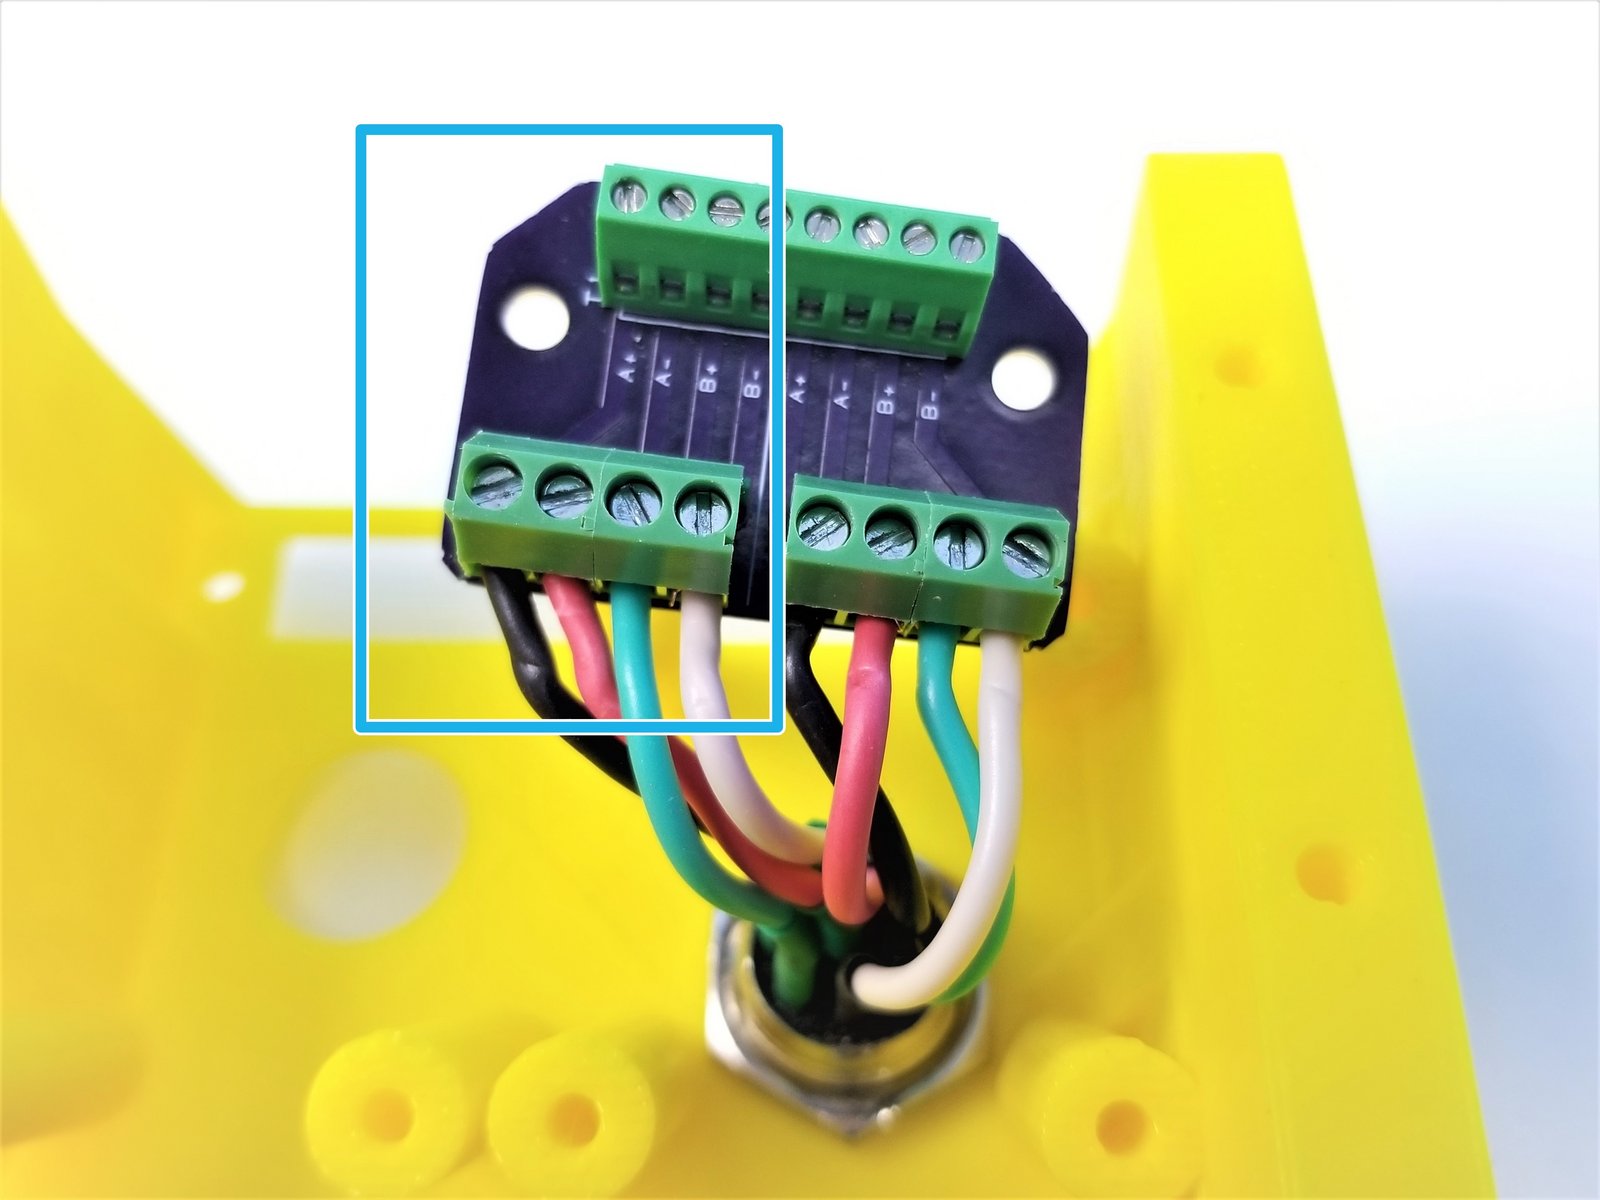
Insert the Wires to the Bigger Screw Terminal as shown in the picture
- Note:
From Left (A+) to End (B-)
Black -> Red -> Green -> White
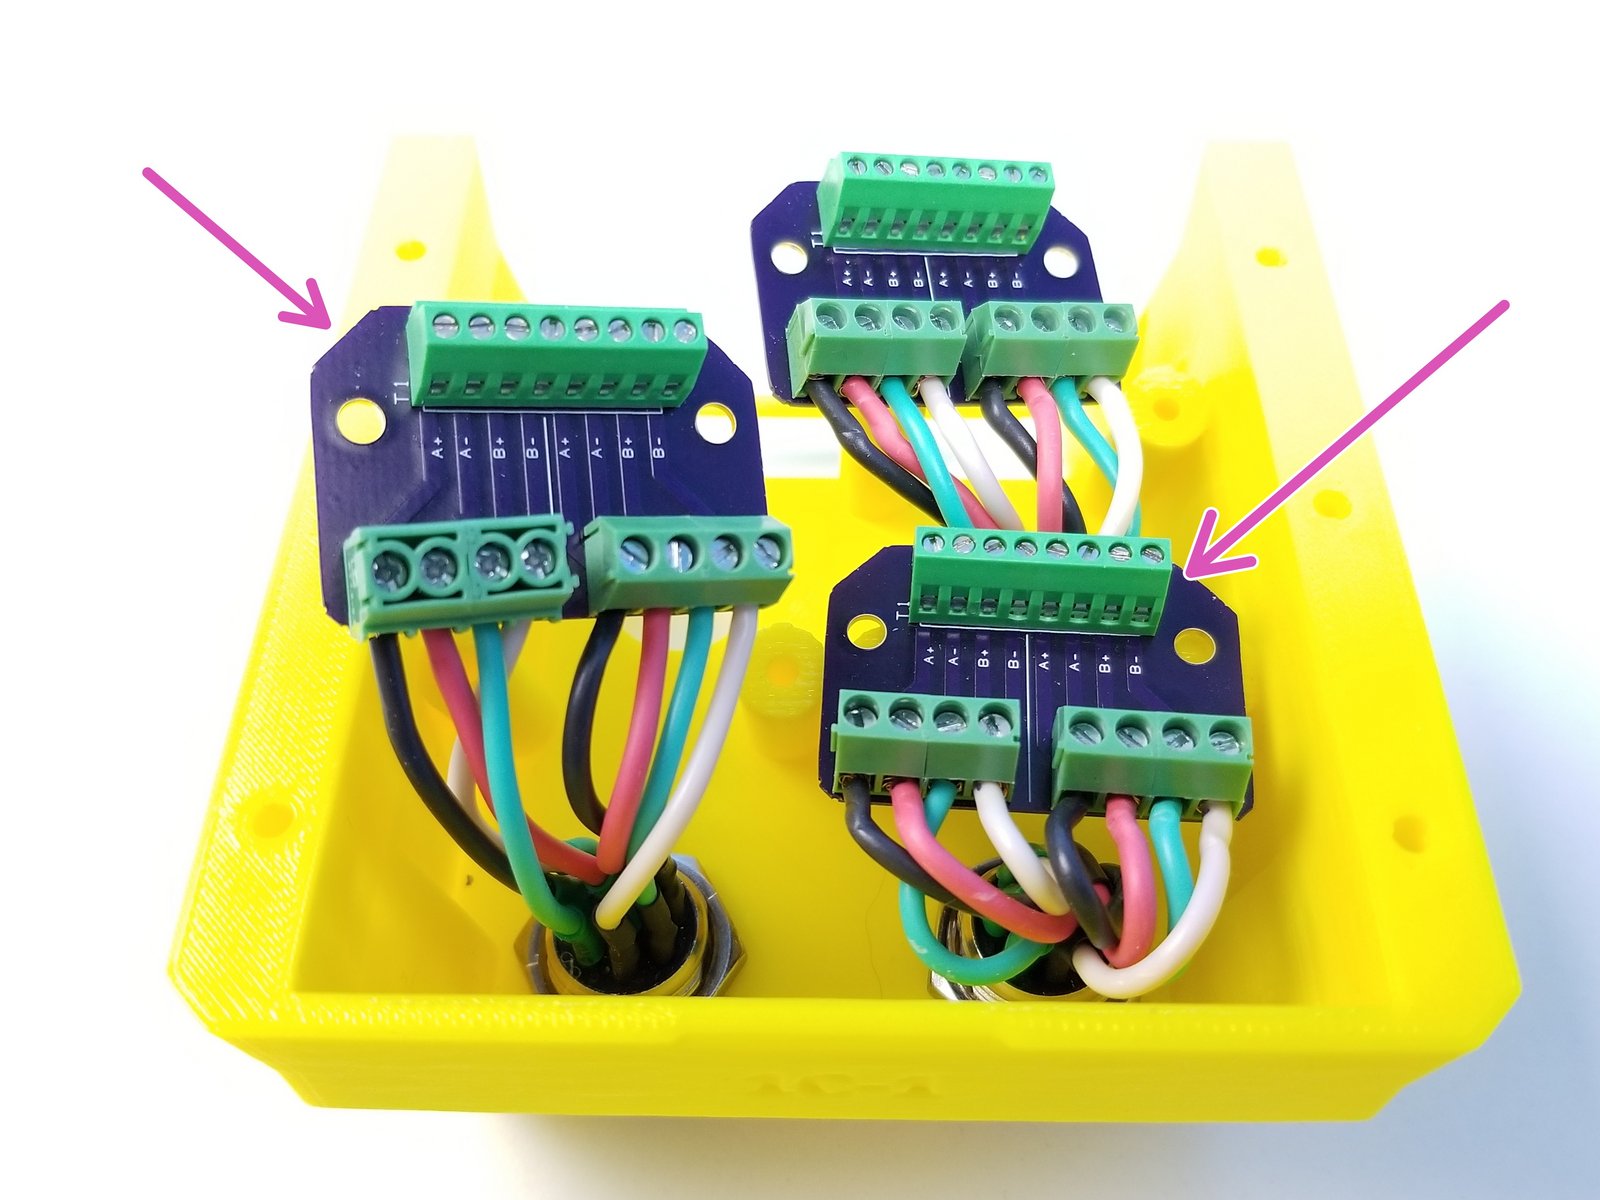
REPEAT the above process for the Green Set of Wires
Do the same for the rest of the Plugs
Step 34 Anchor Back Panel Preparation - 4
Click the large image to open full size.
- Warning:
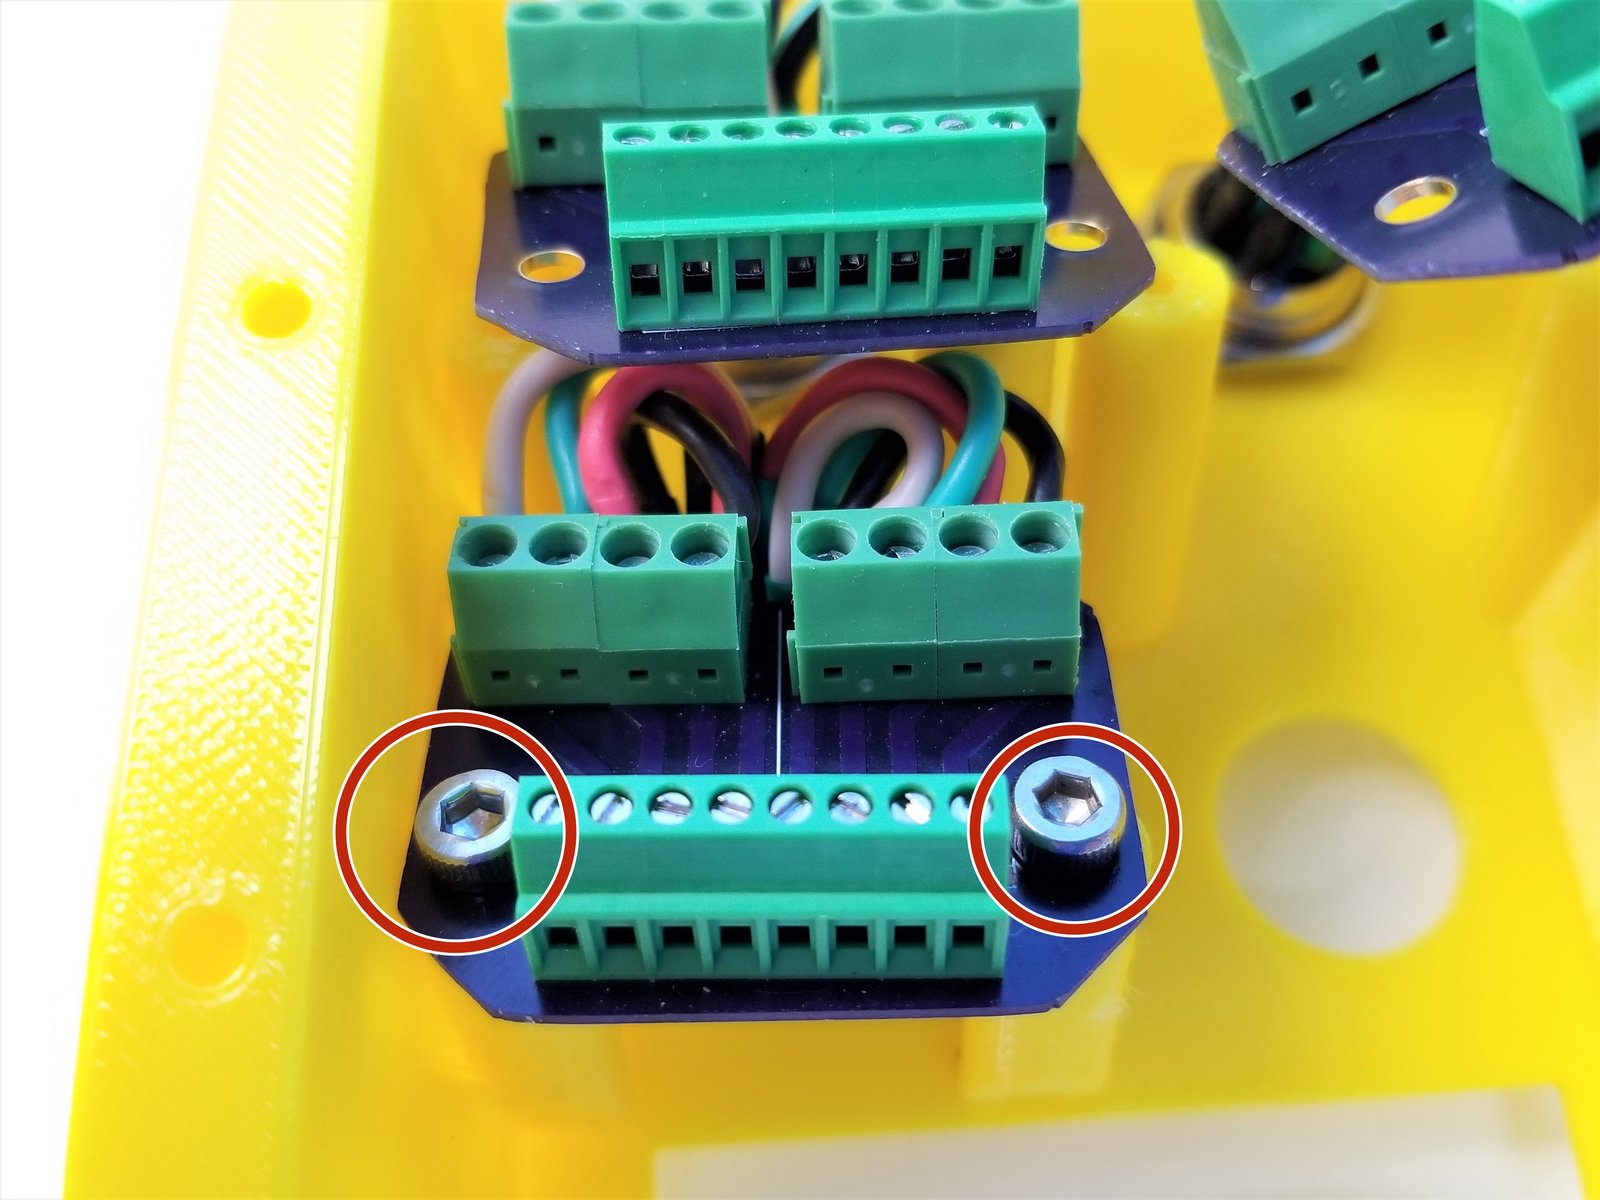
START with the Bottom Solo PCB
Secure the PCB to the Back Panel using M3x8mm Screws
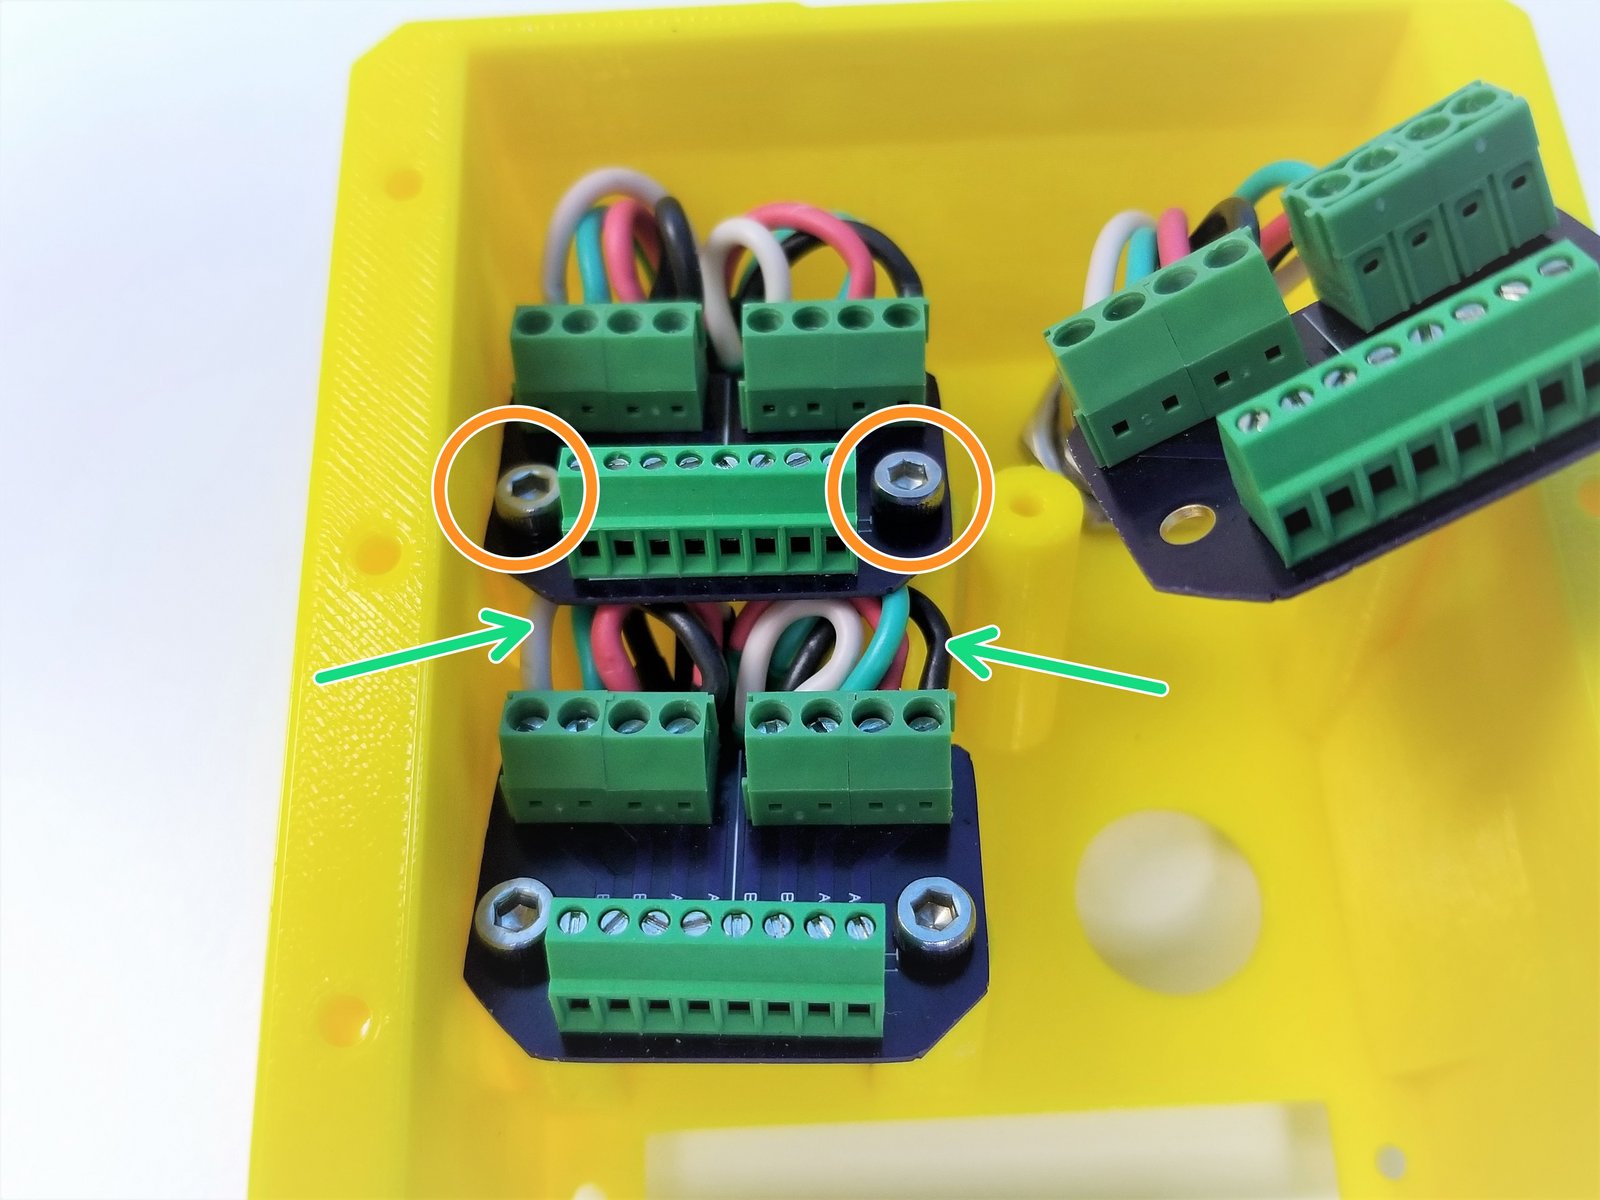
Secure the Top Left PCB next
The Wires from the Bottom Solo Plug needs to bend enough for the the Top Left PCB to sit comfortably
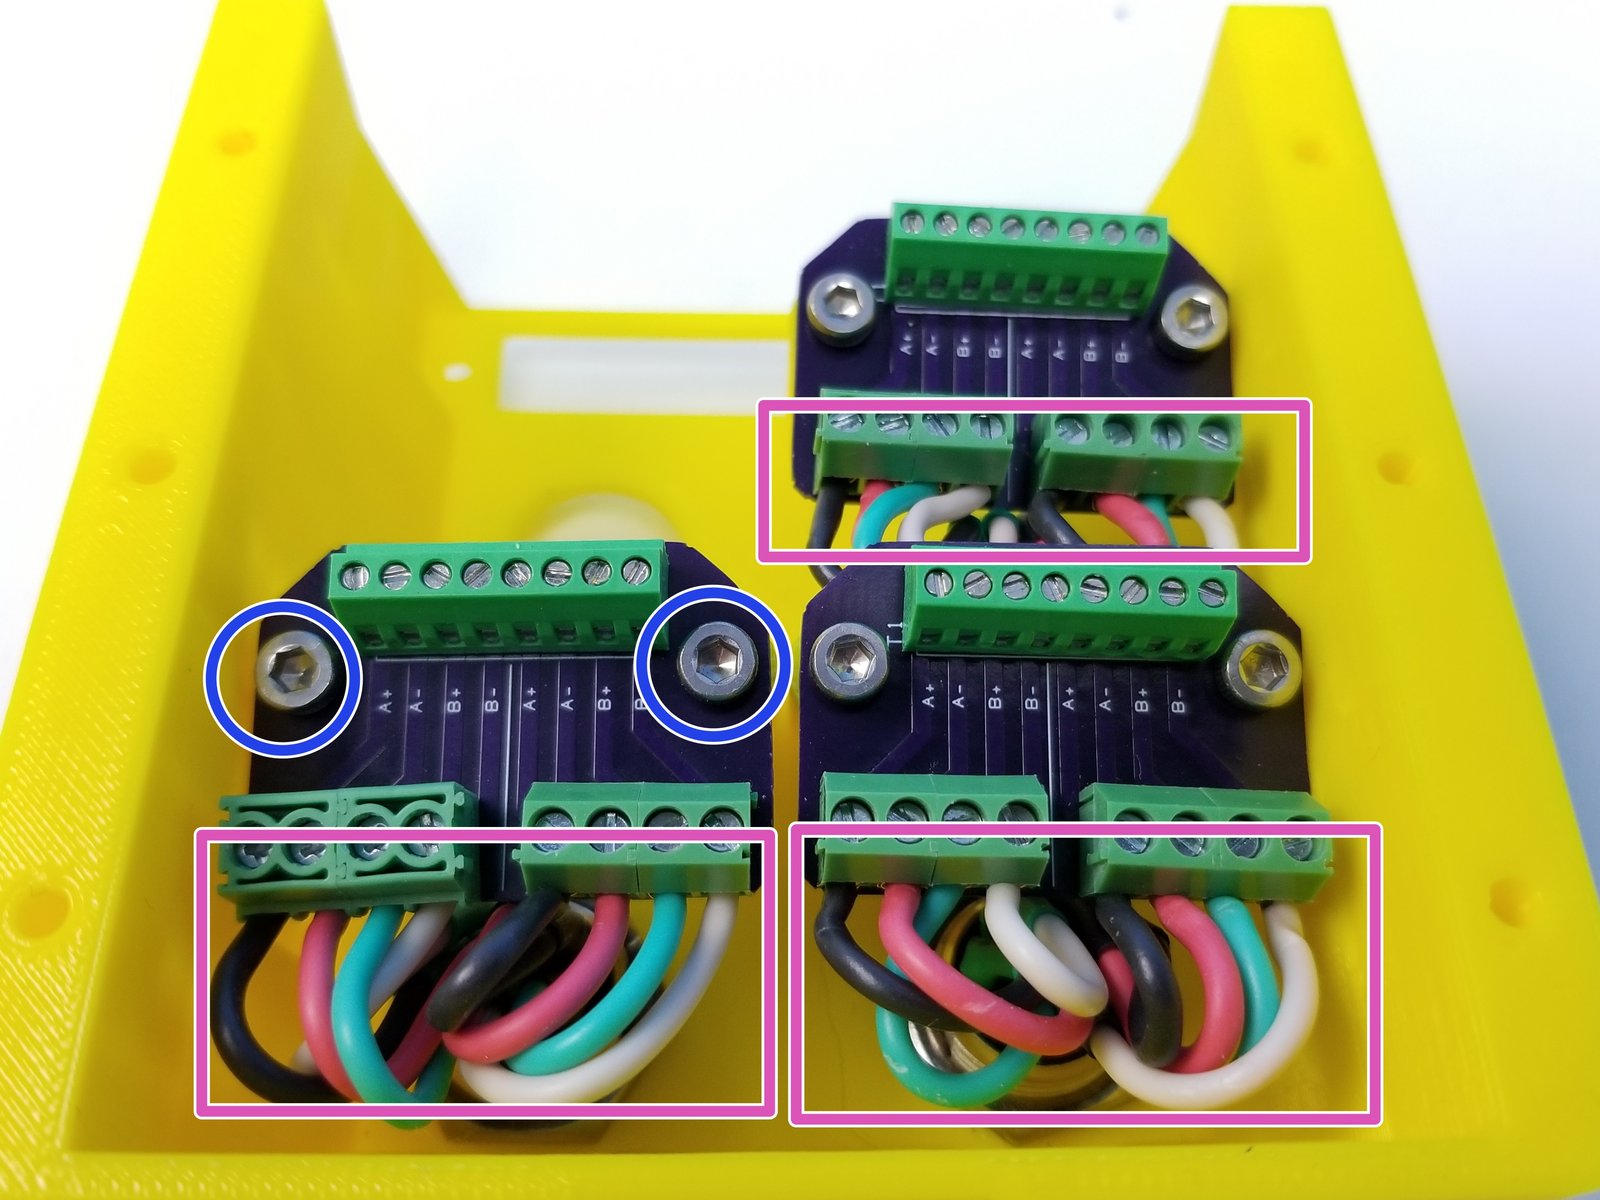
Finally Top Right PCB
Make sure the wires stays in the connectors while bending them
- Warning:
Watch out for some of the strands of a wire that could bleed to the neighboring pins!
Step 35 Anchor Back Panel Preparation - 5
Click the large image to open full size.
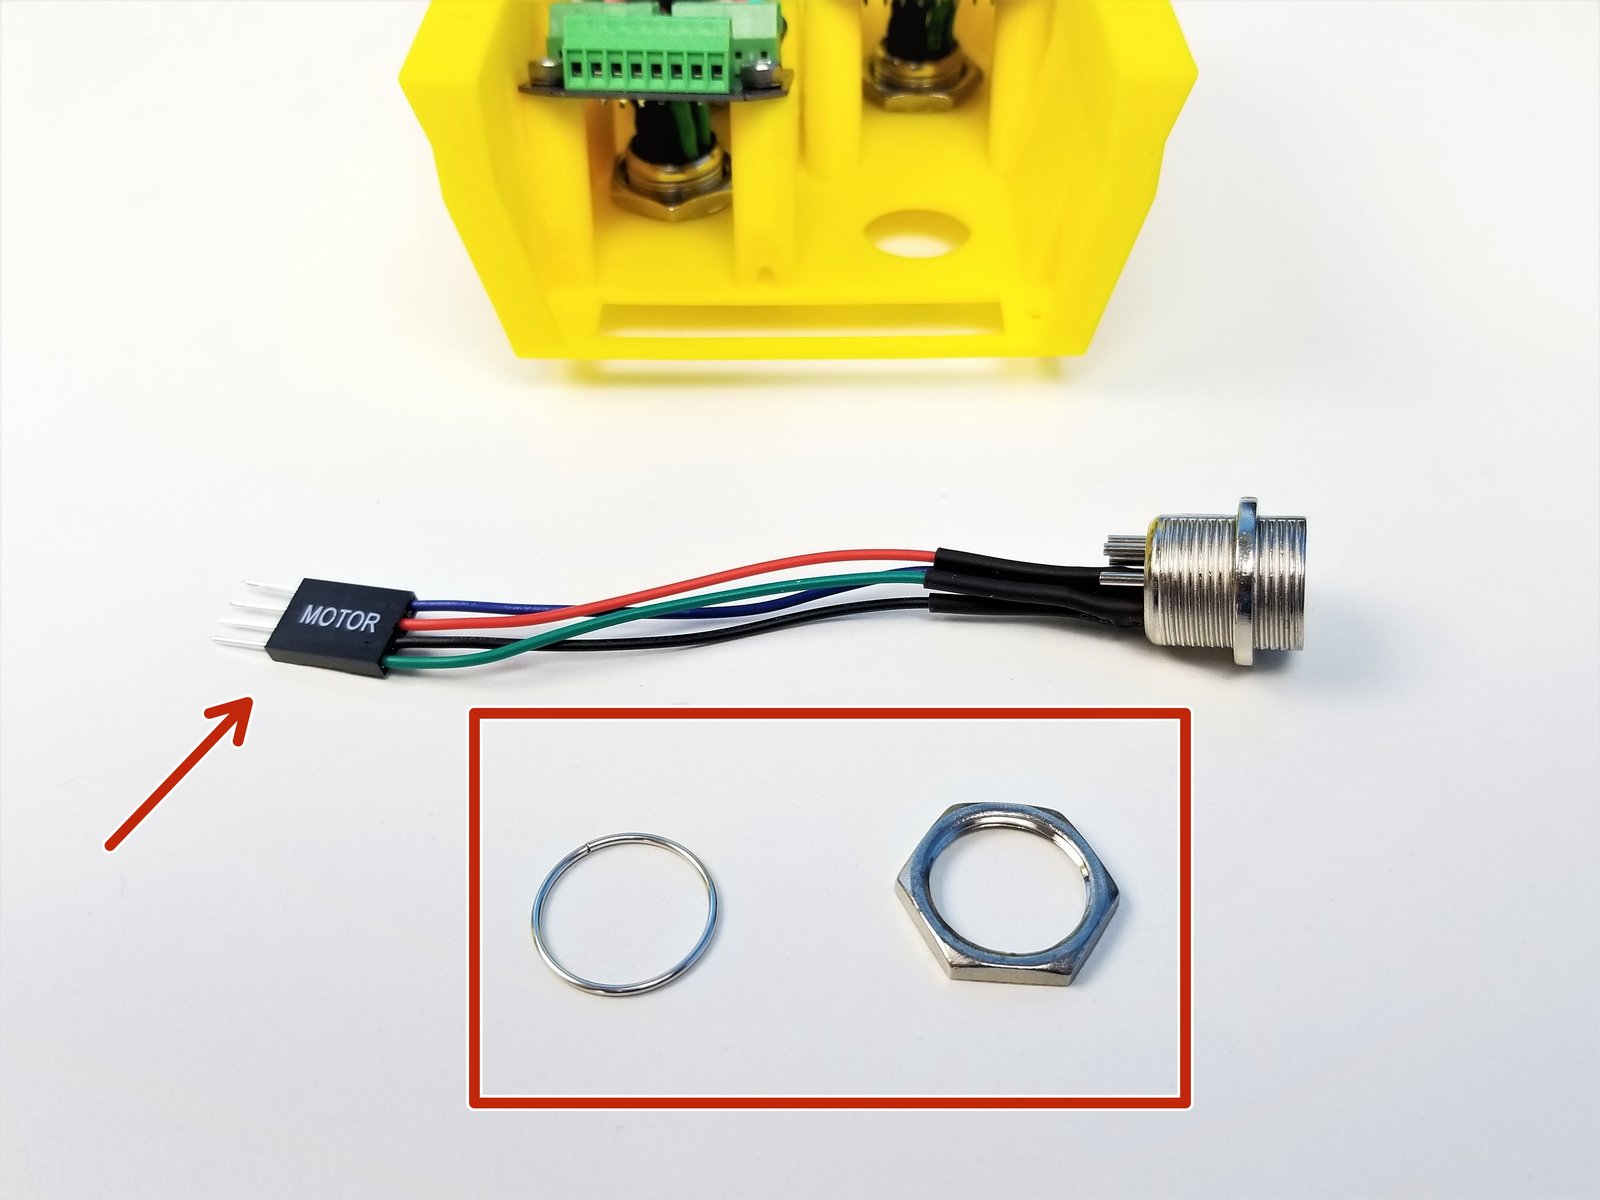
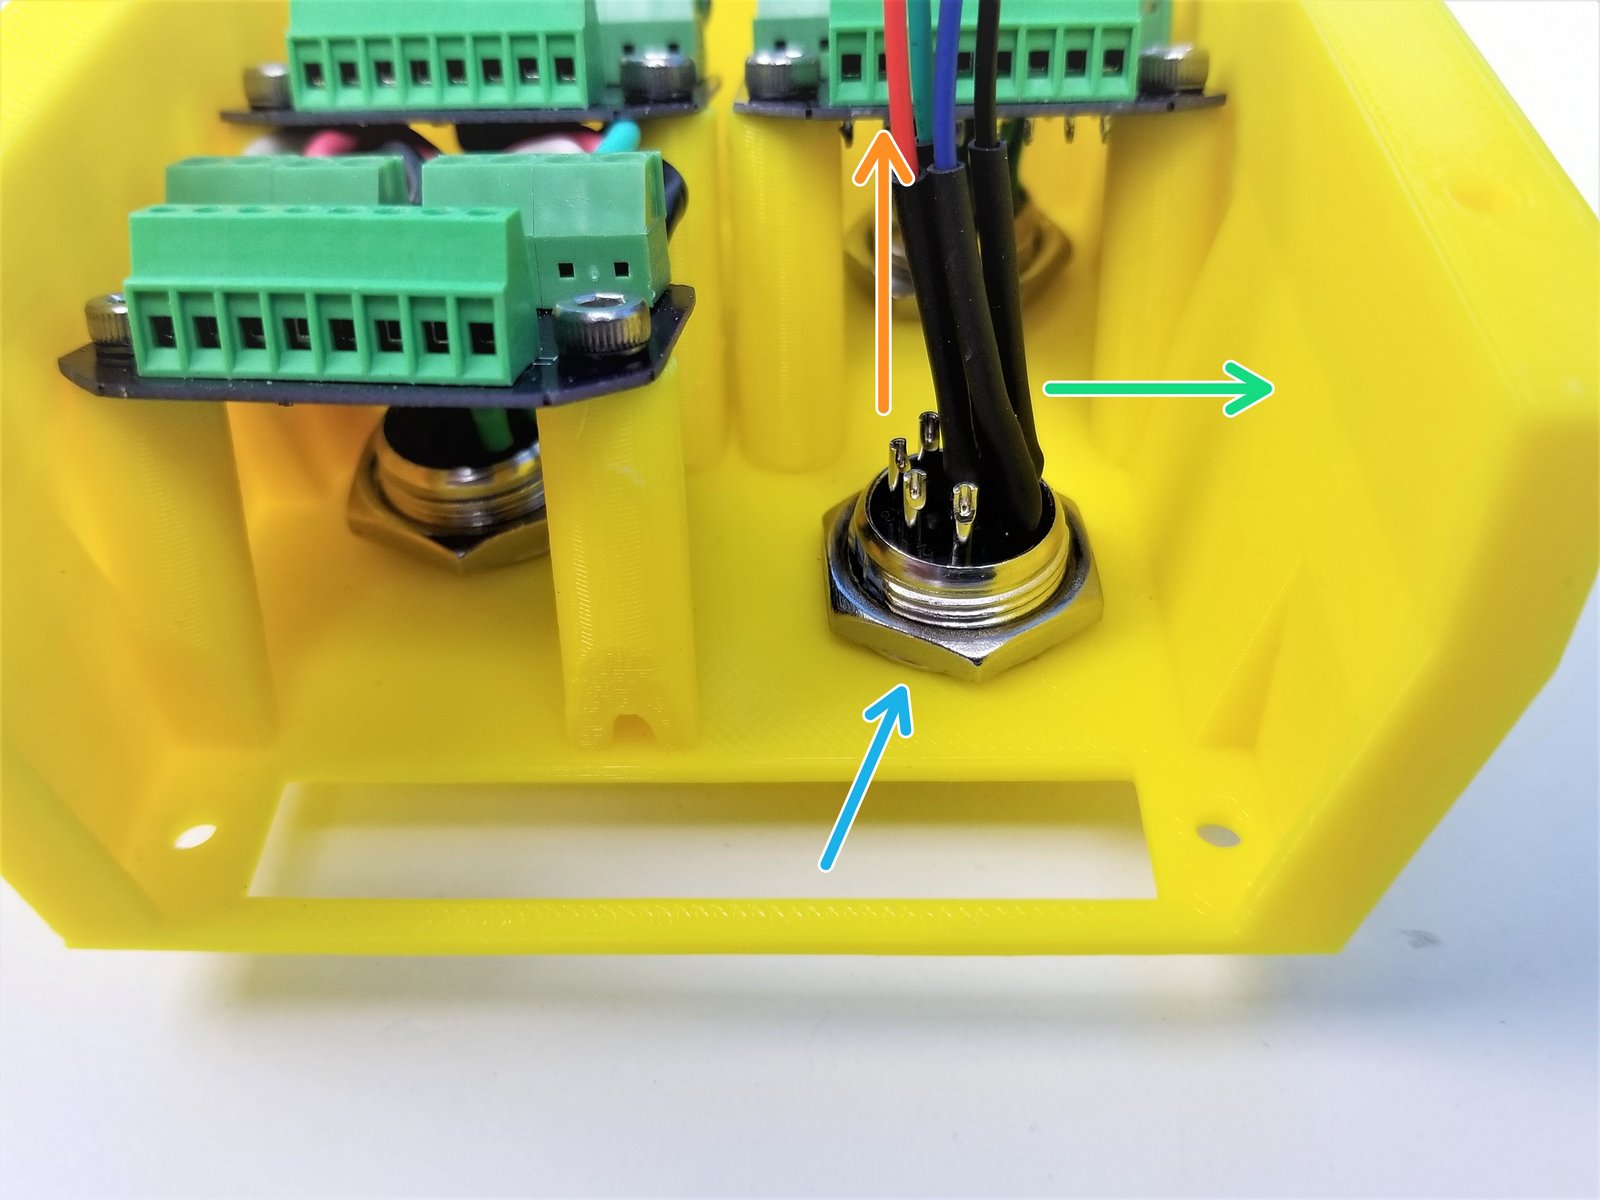
Unscrew all the Nut and Washer from the Aviation Plug [80mm]
- Note:
Notice that there's only 4 wires connected to this plug with 4-pin Male Dupont Connetor
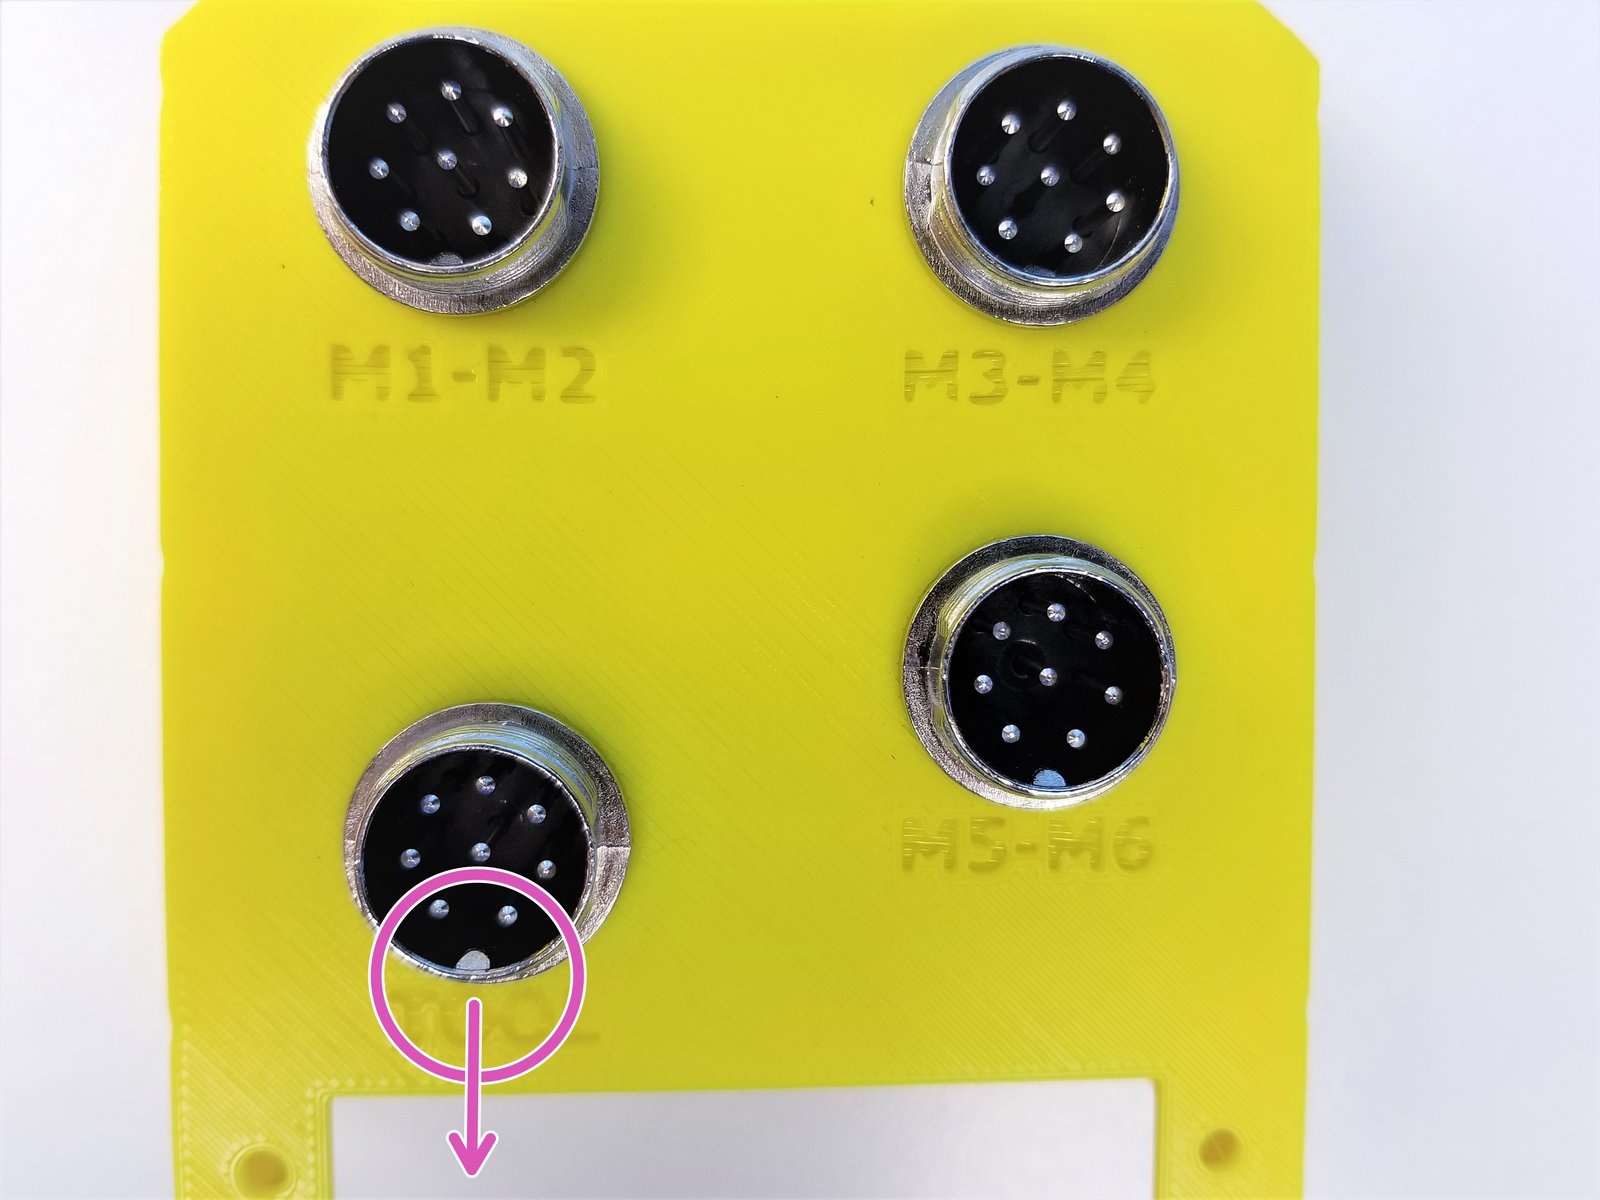
Insert the Plug in the Back Panel
Align the Plug so that the 4 Wires are on the RIGHT side
Tighten the Nut and Washer to secure the Plug
When done correctly, alignment aid of the plug should point DOWN
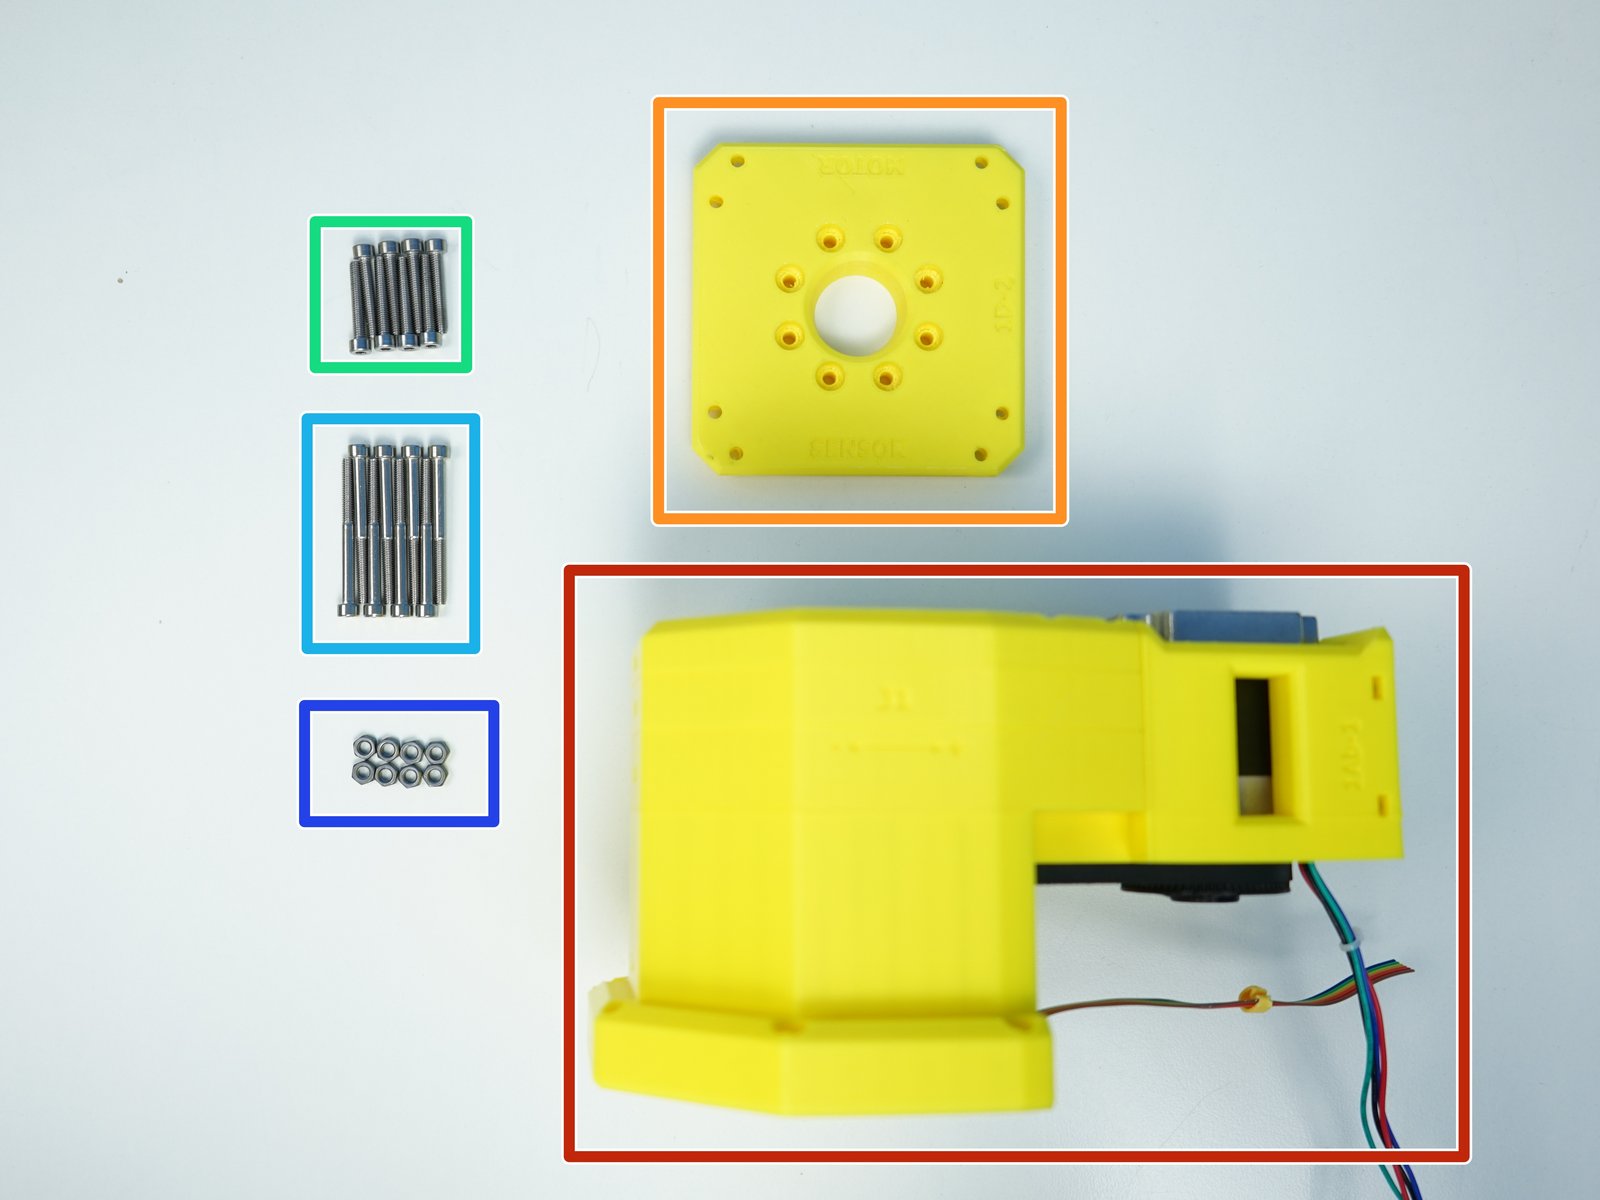
Step 36 Shoulder Mount - Parts
Click the large image to open full size.
- Note:
Prepare the following components:
Assembled Arm (up to pre-anchor, not shown in the picture)
Assembled Anchor (so far)
[3D] - 1D Shoulder Mount
M4x25mm Screws (x8)
M4x45mm Screws (x8)
M4 Hex Nuts (x8)
Step 37 Shoulder Mount - 1
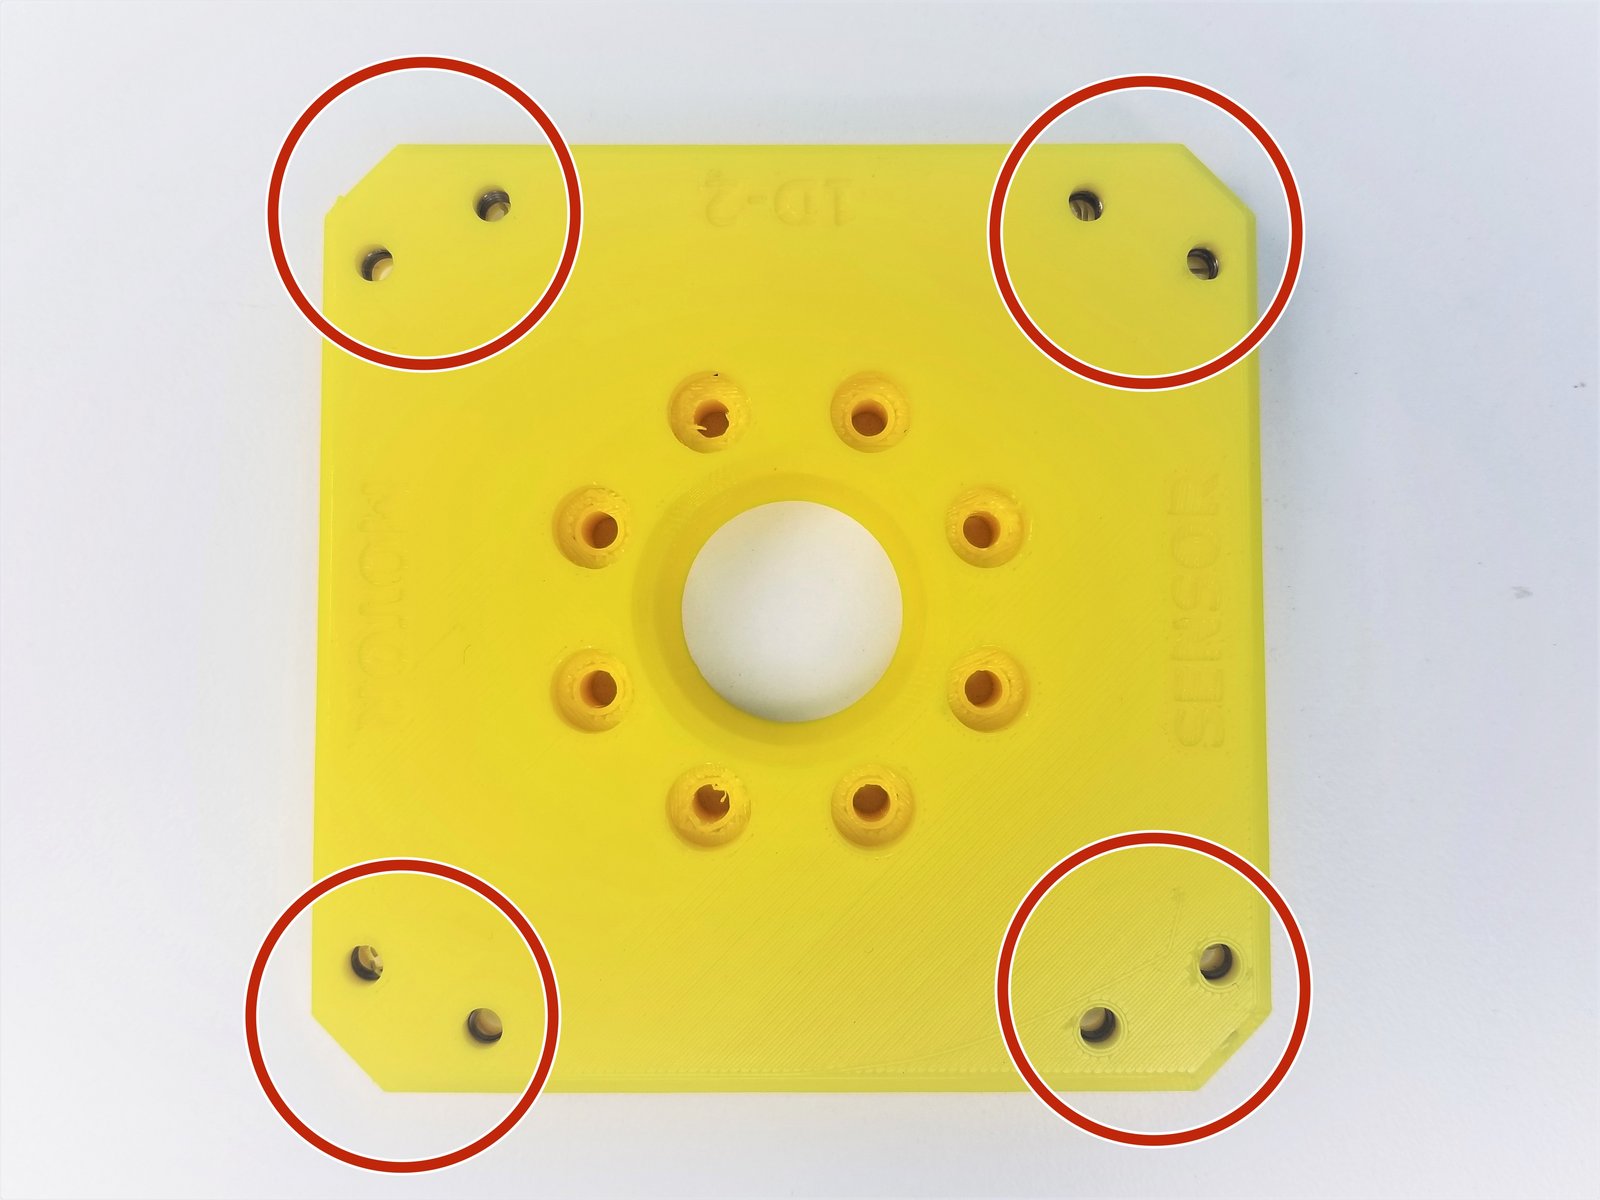
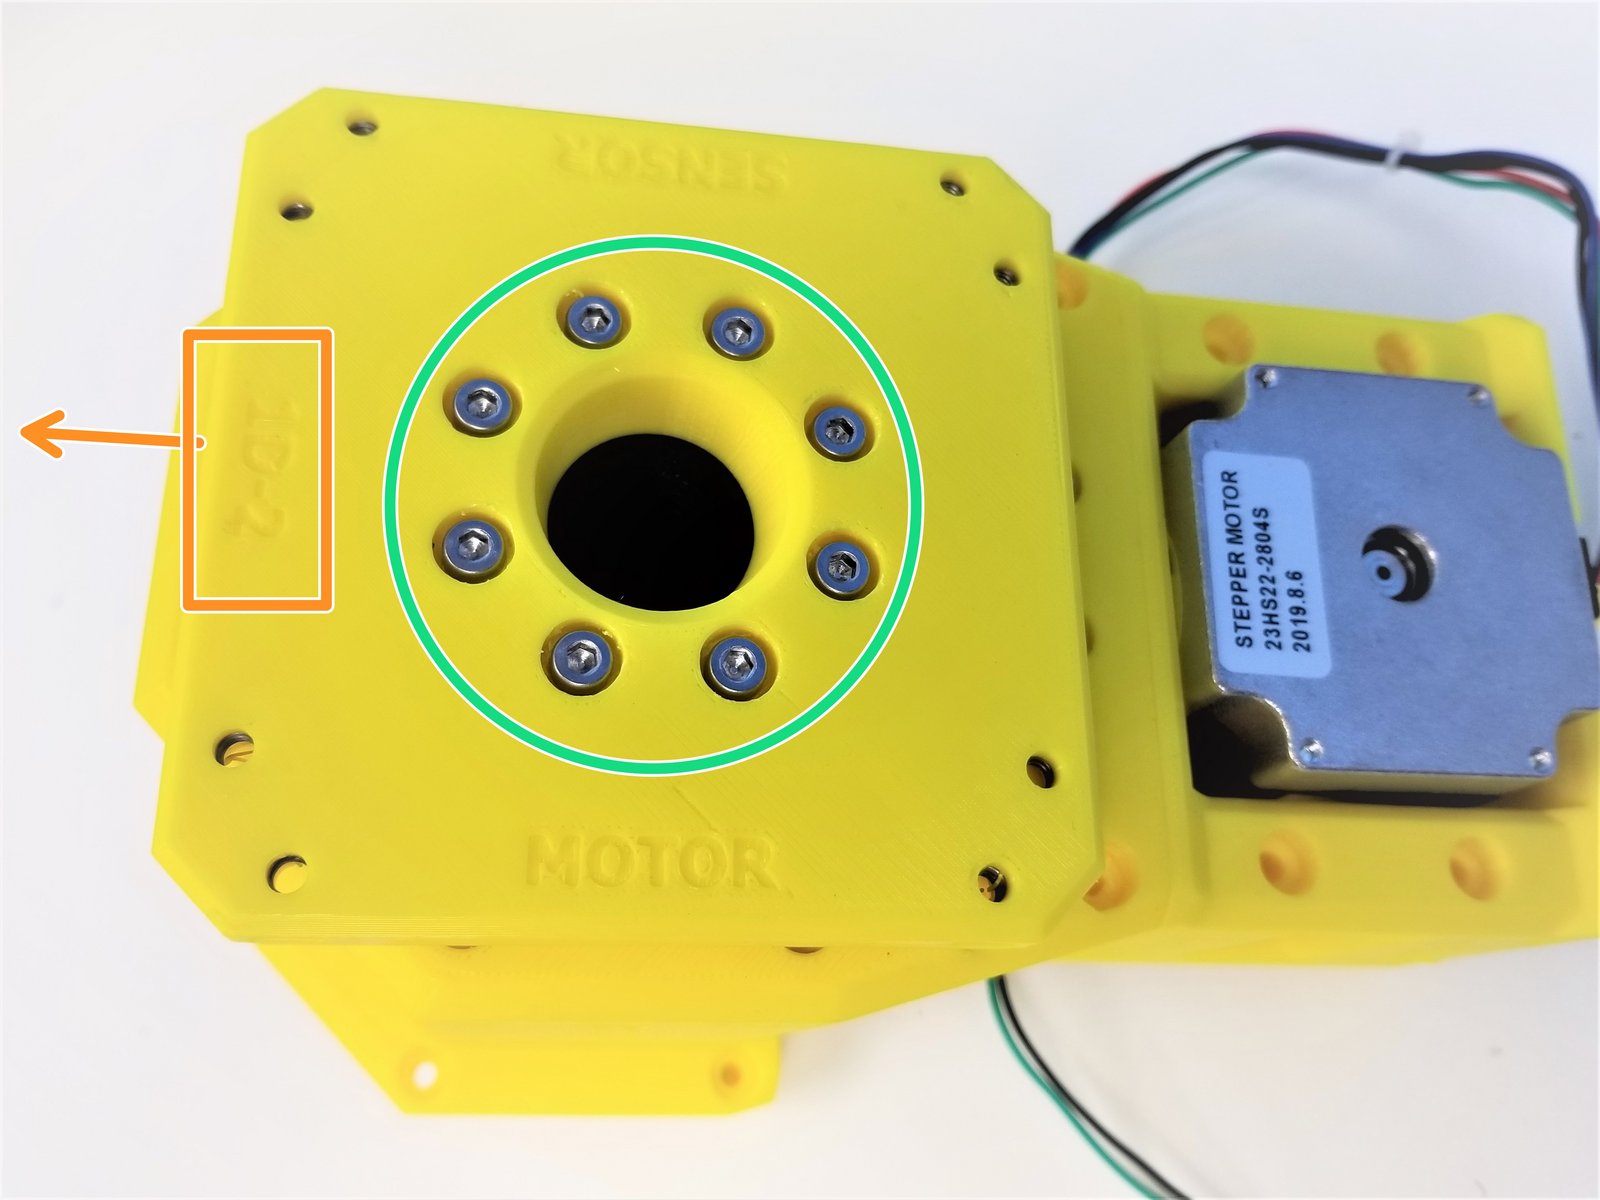
Click the large image to open full size.
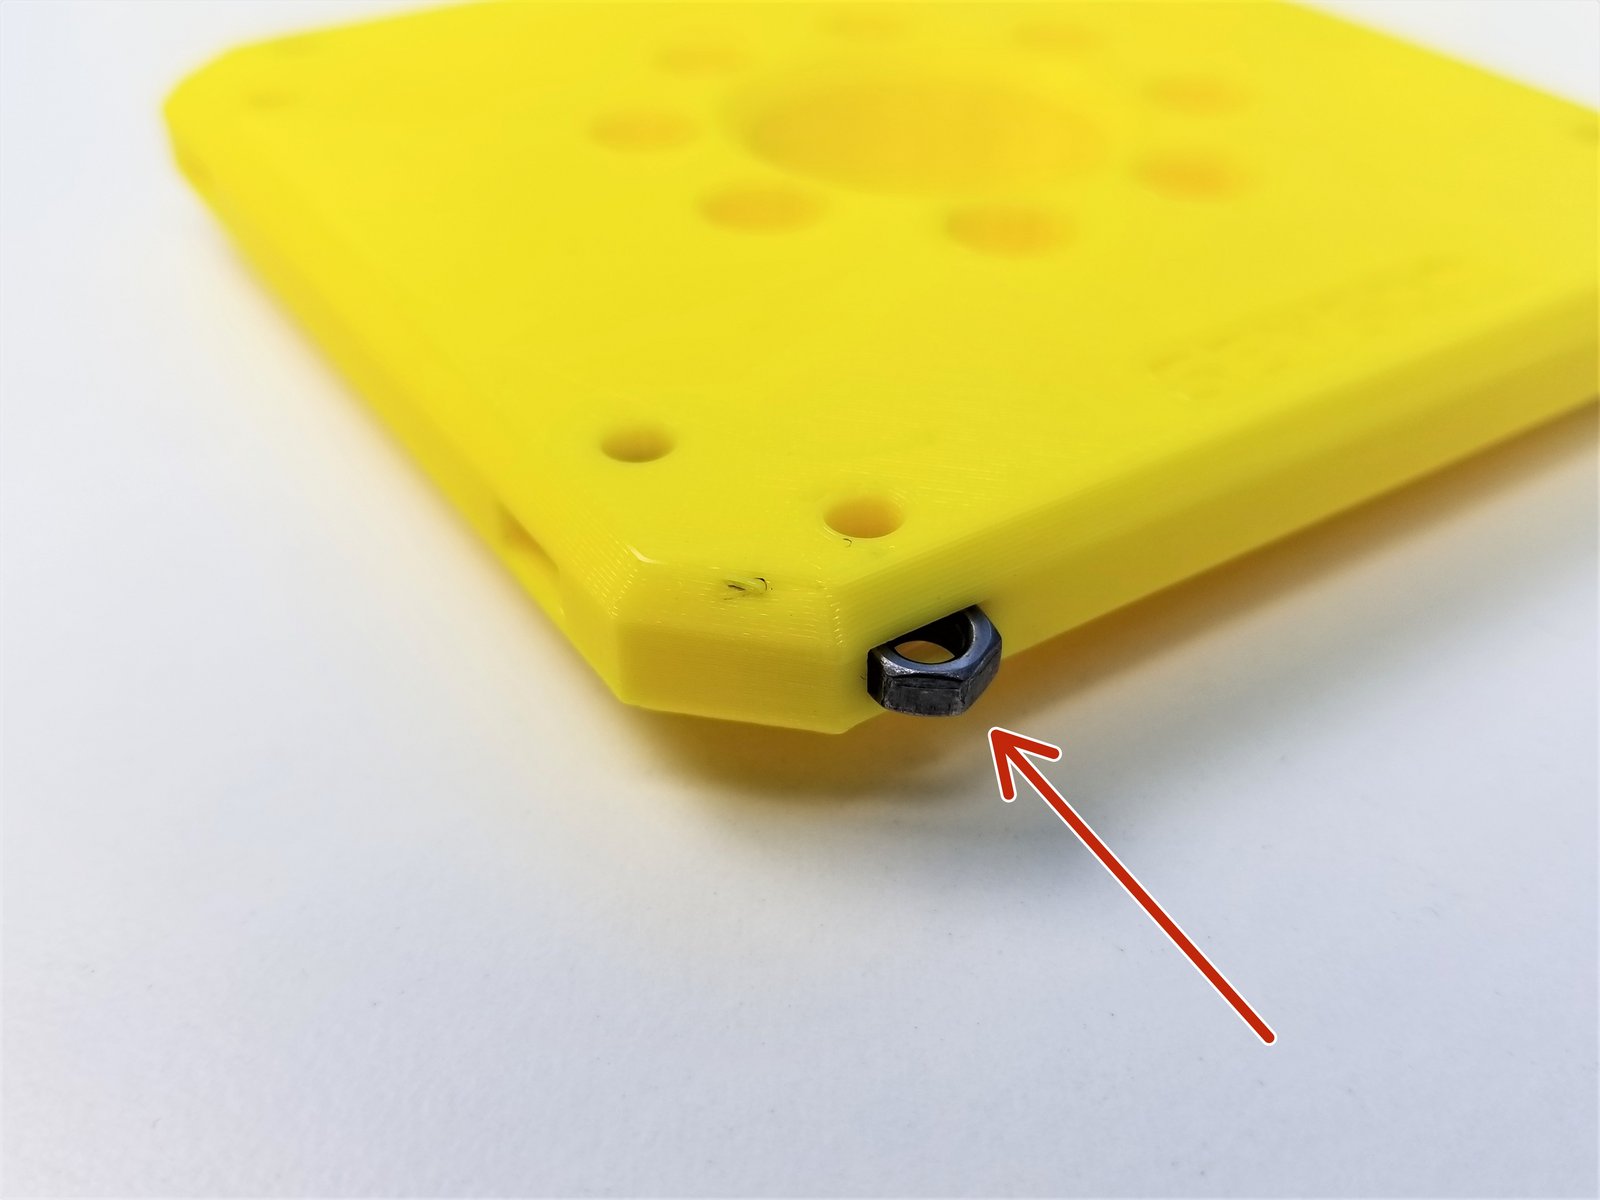
Insert M4 Hex Nuts in the side of Shoulder Mount
Align the Shoulder Mount to the Anchor so that "1D" label is facing the FRONT
Secure the Shoulder Mount to Anchor using M4x25mm Screws
Step 38 Shoulder Mount - 2
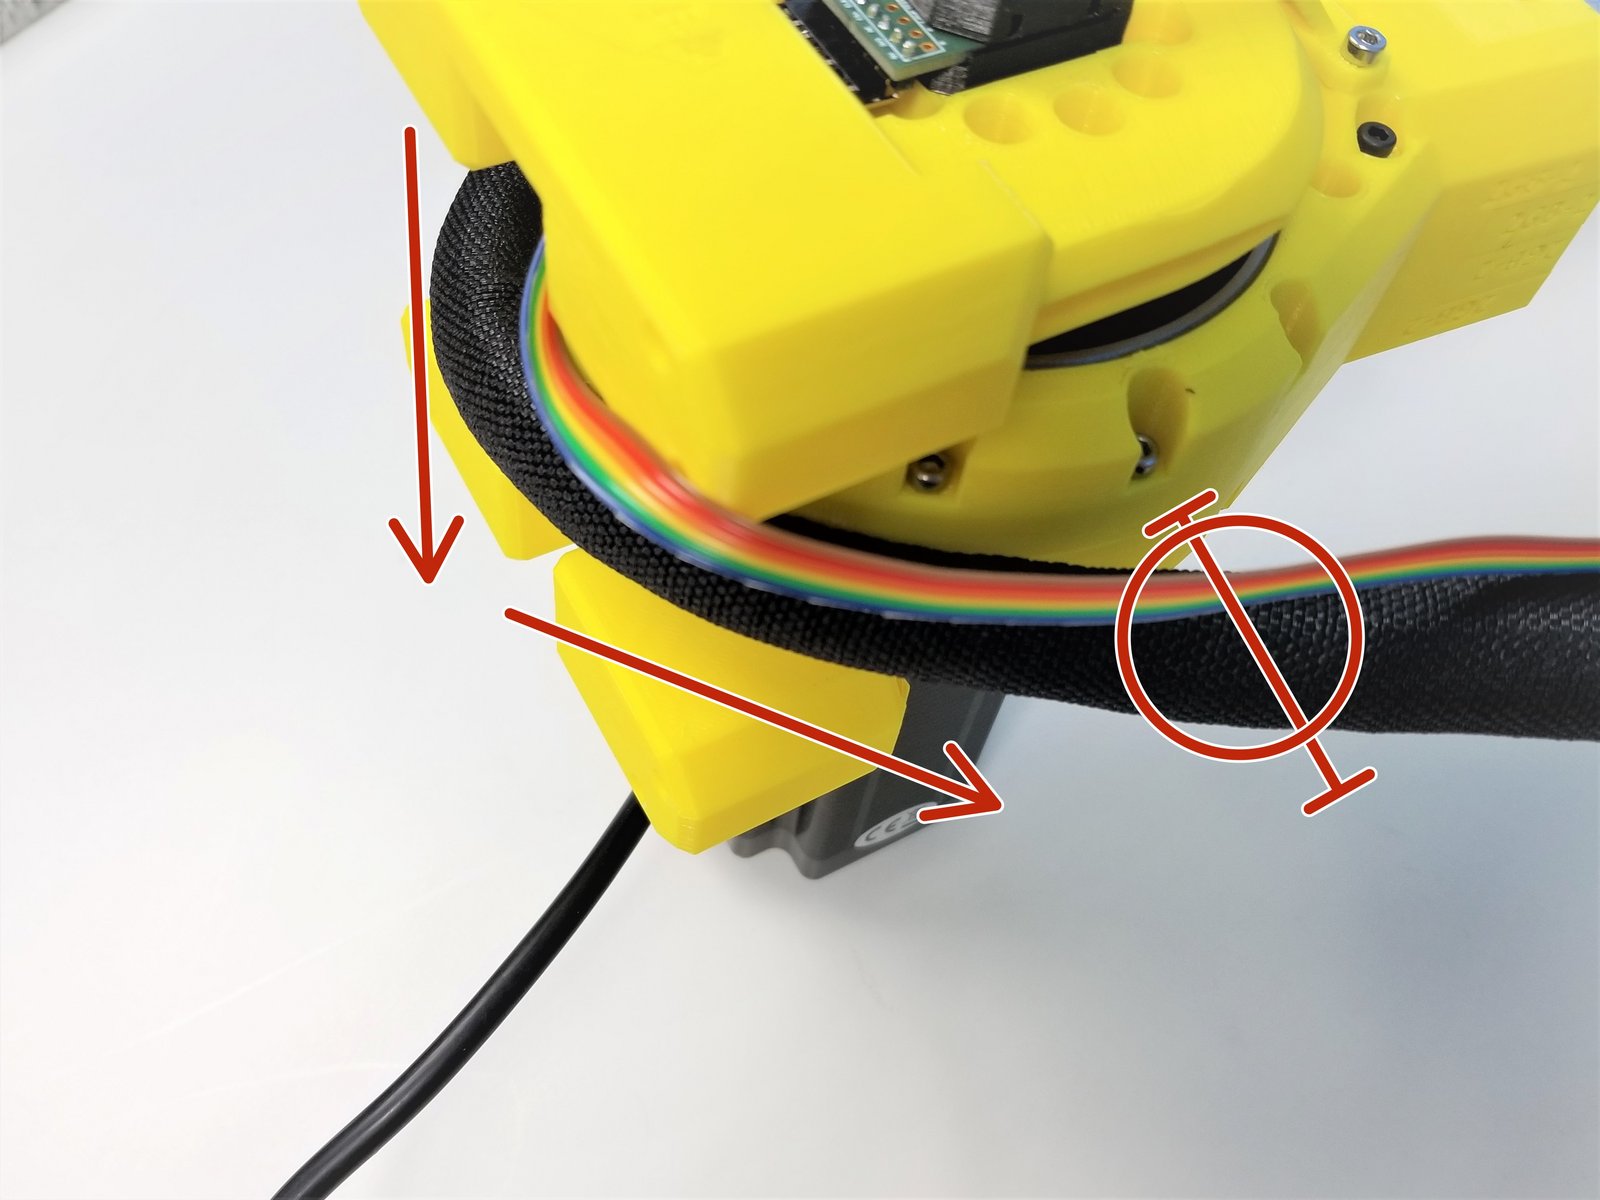
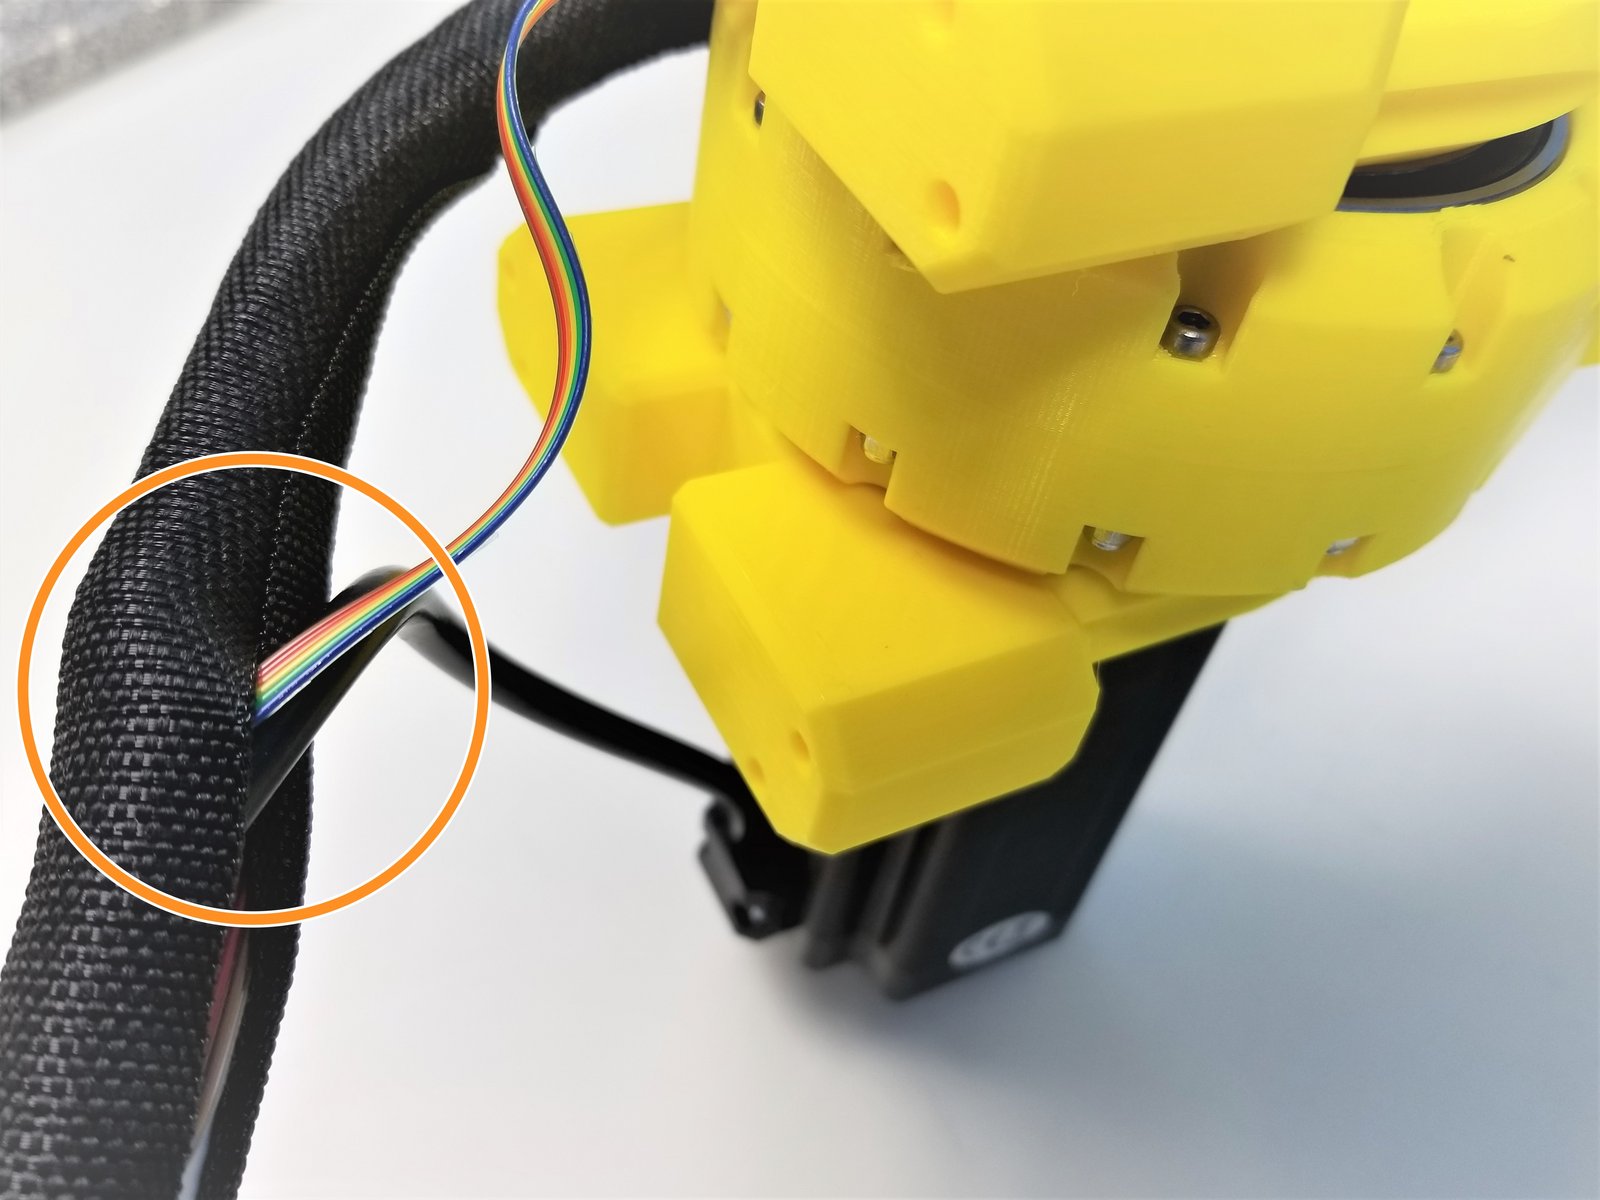
Click the large image to open full size.
- Note:
Shoulder should be at a Neutral Position (middle)
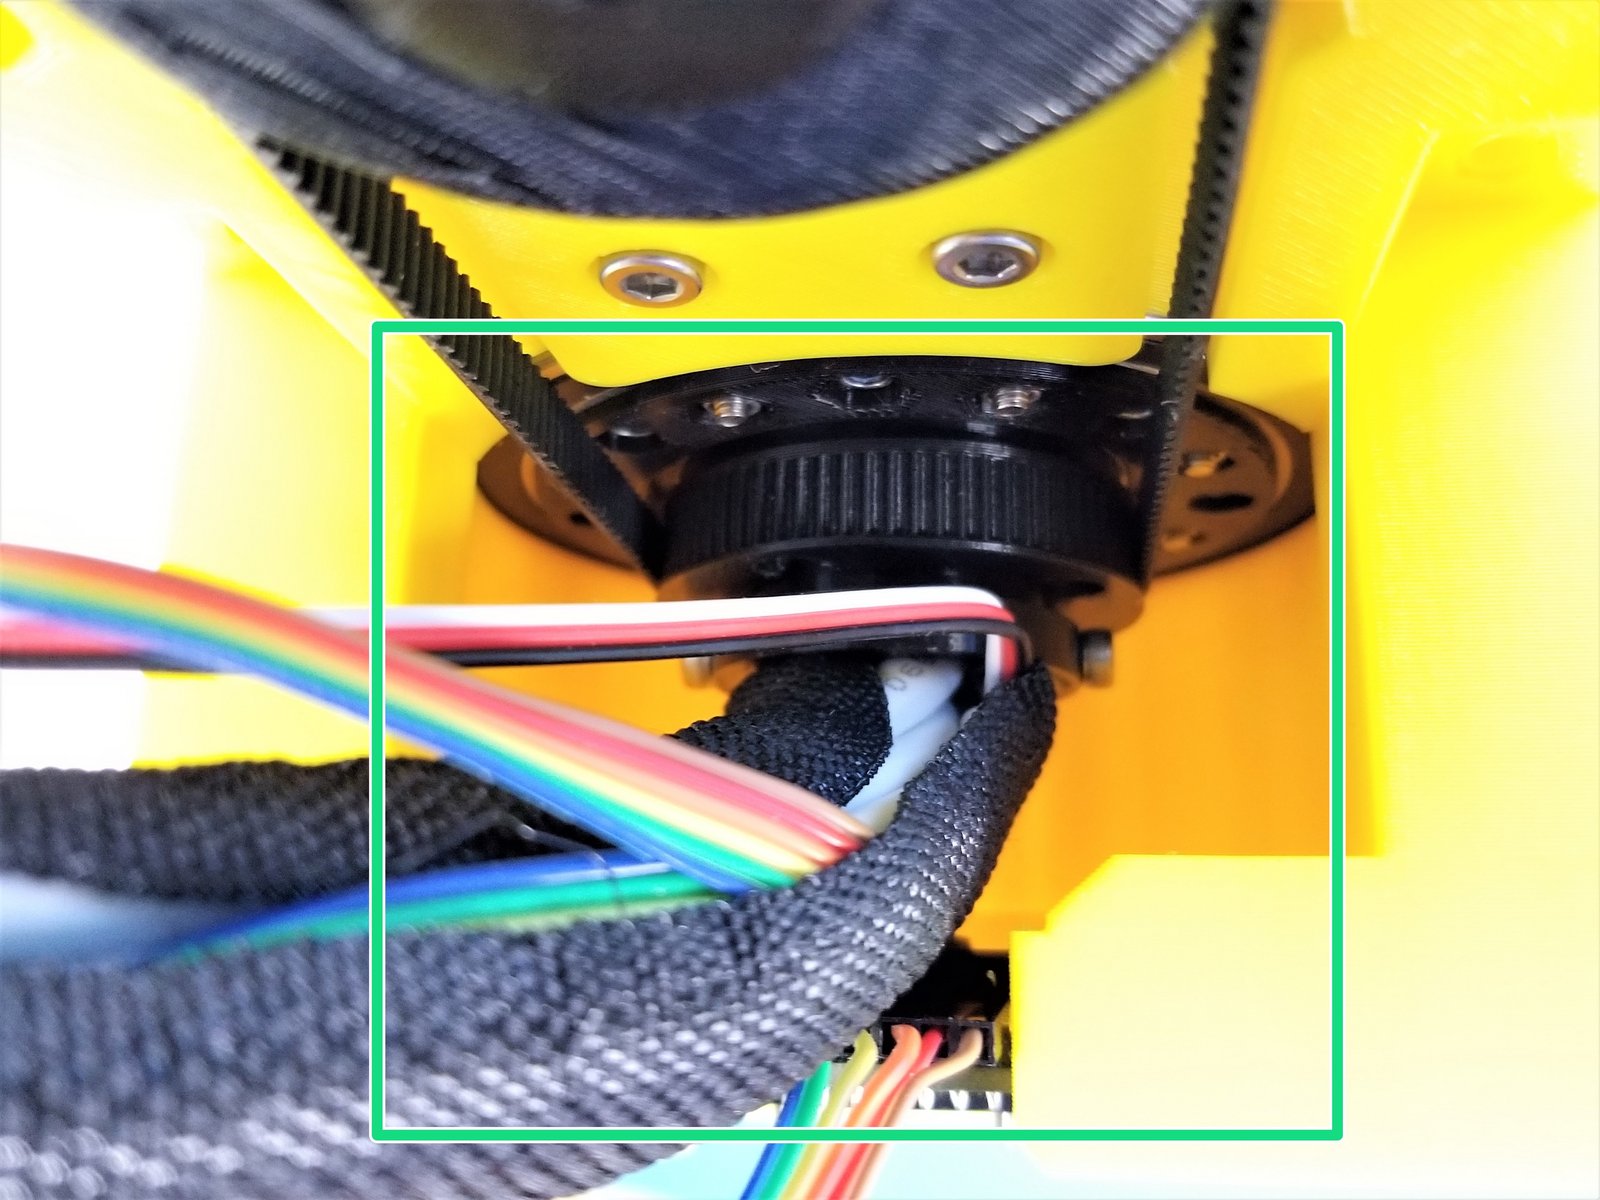
Loop the Braided Cable all the way around the Shoulder Gearbox up to when it reaches 180 degrees
- Note:
Mark this spot on the Braided Cable
Insert the Shoulder Motor and Sensor Cables in the Braided Cable at the Marked Location
Insert the Braided Cable through the middle hollow tunnel of the Anchor Gearbox
- Warning:
Only up to the Marked Location
Step 39 Shoulder Mount - 3
Click the large image to open full size.
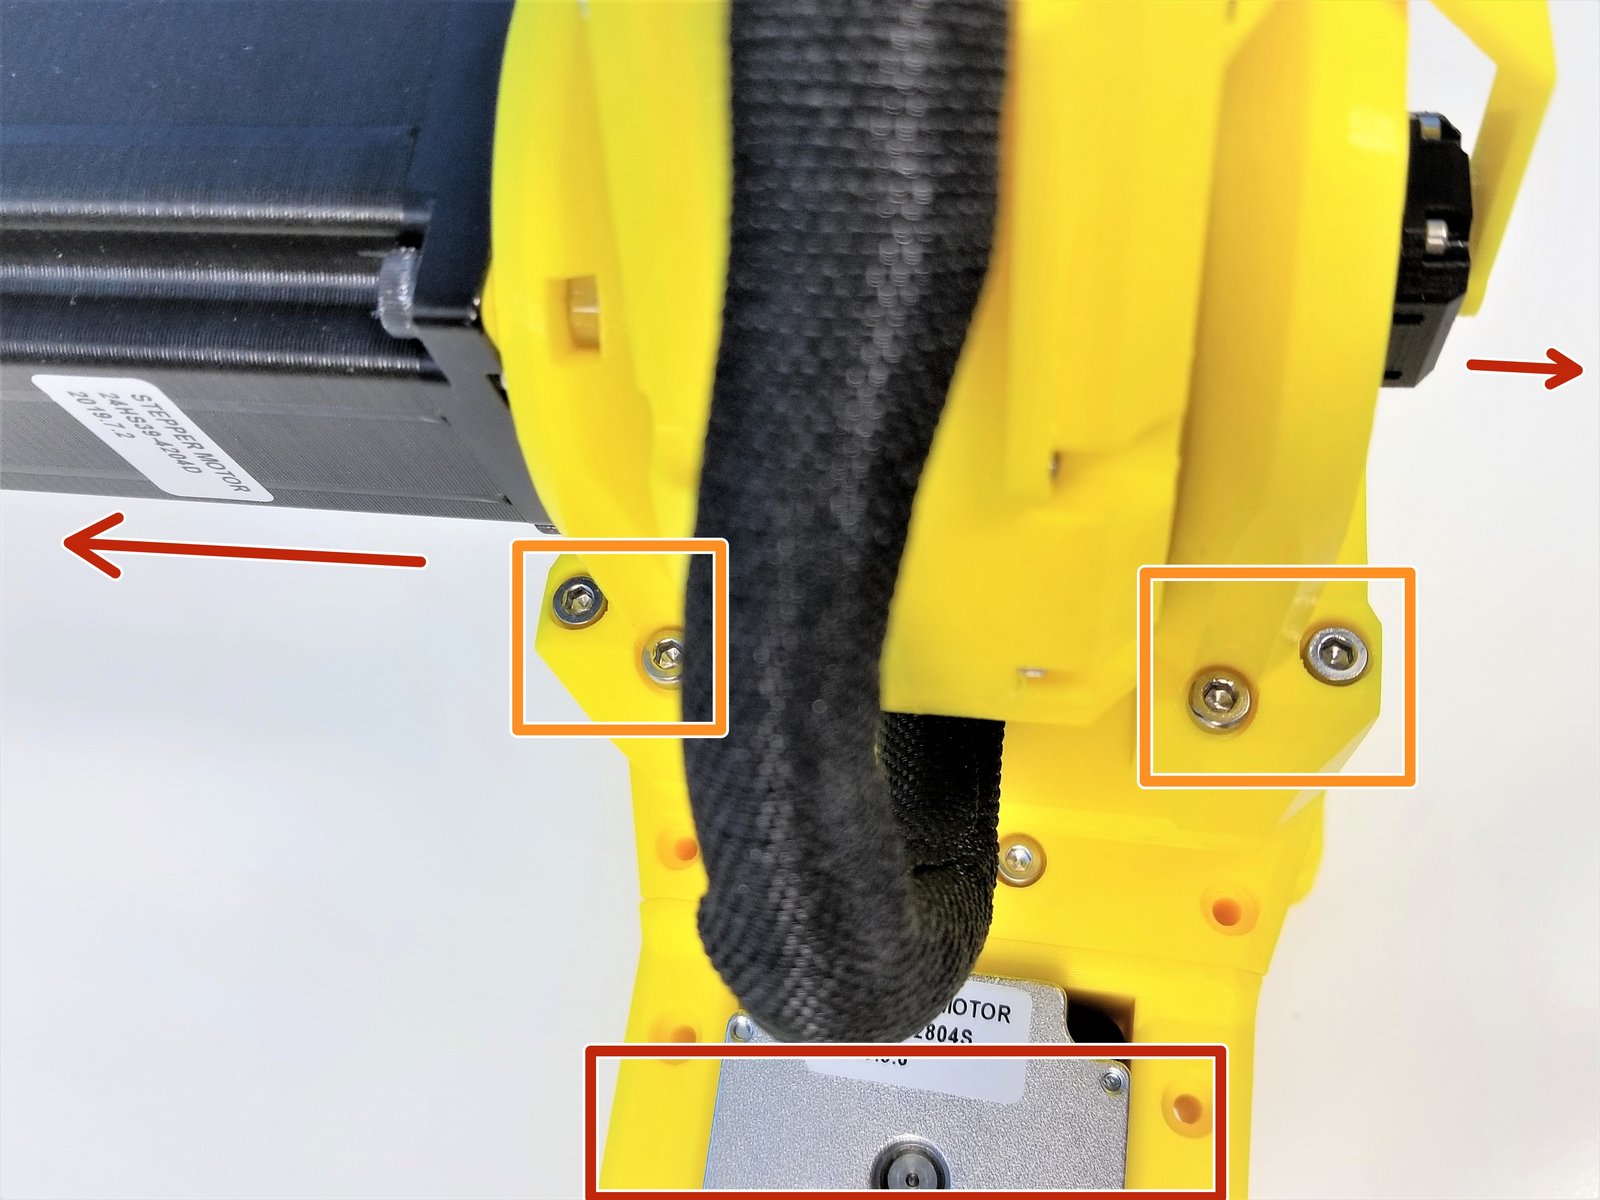
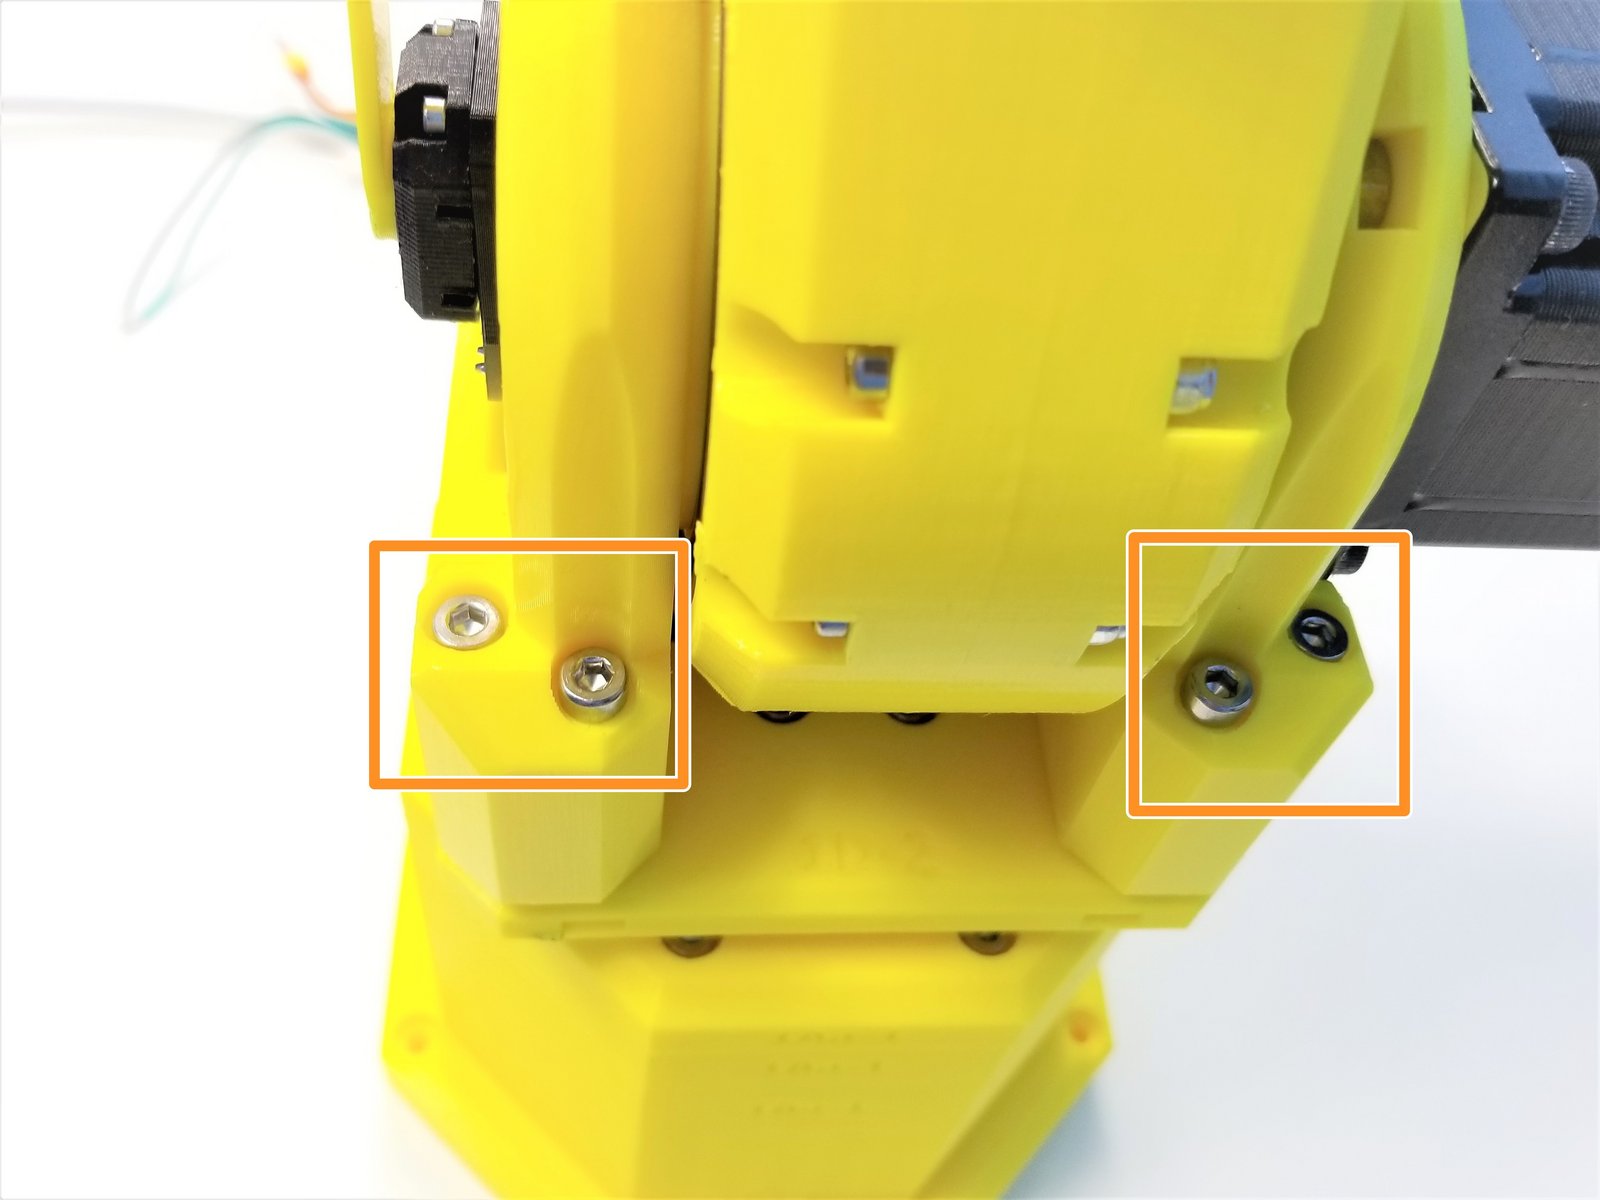
Align the Shoulder Gearbox to the Shoulder Mount (by label on the Mount)
Secure the Shoulder using the M4x45mm Screws
Step 40 Sixi Final Cable Management - Parts
Click the large image to open full size.
- Note:
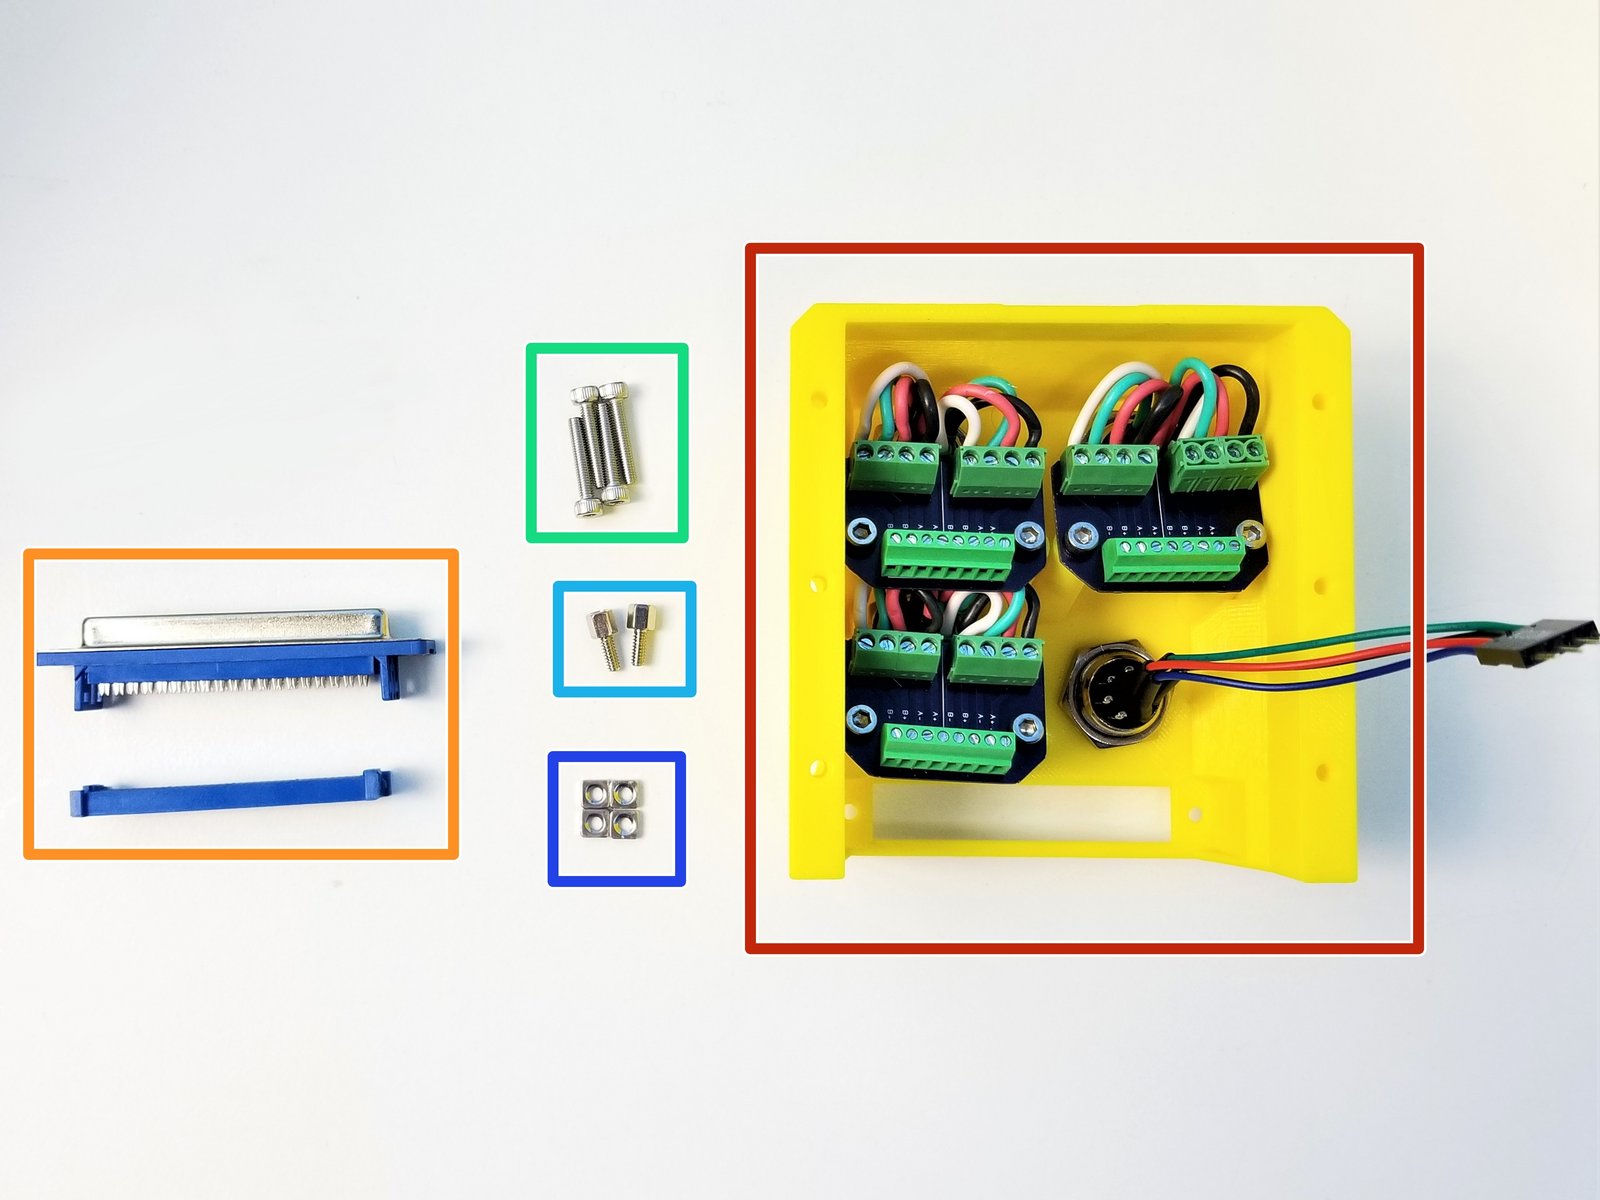
Prepare the following components:
Assembled Anchor Back Panel
D-SUB F-Conn IDC 37p
M3x16mm Screws (x4)
#4-40x7mm M/F Standoff
M3 Square Nuts (x4)
Step 41 Sixi Final Cable Management - 1
Click the large image to open full size.
- Note:
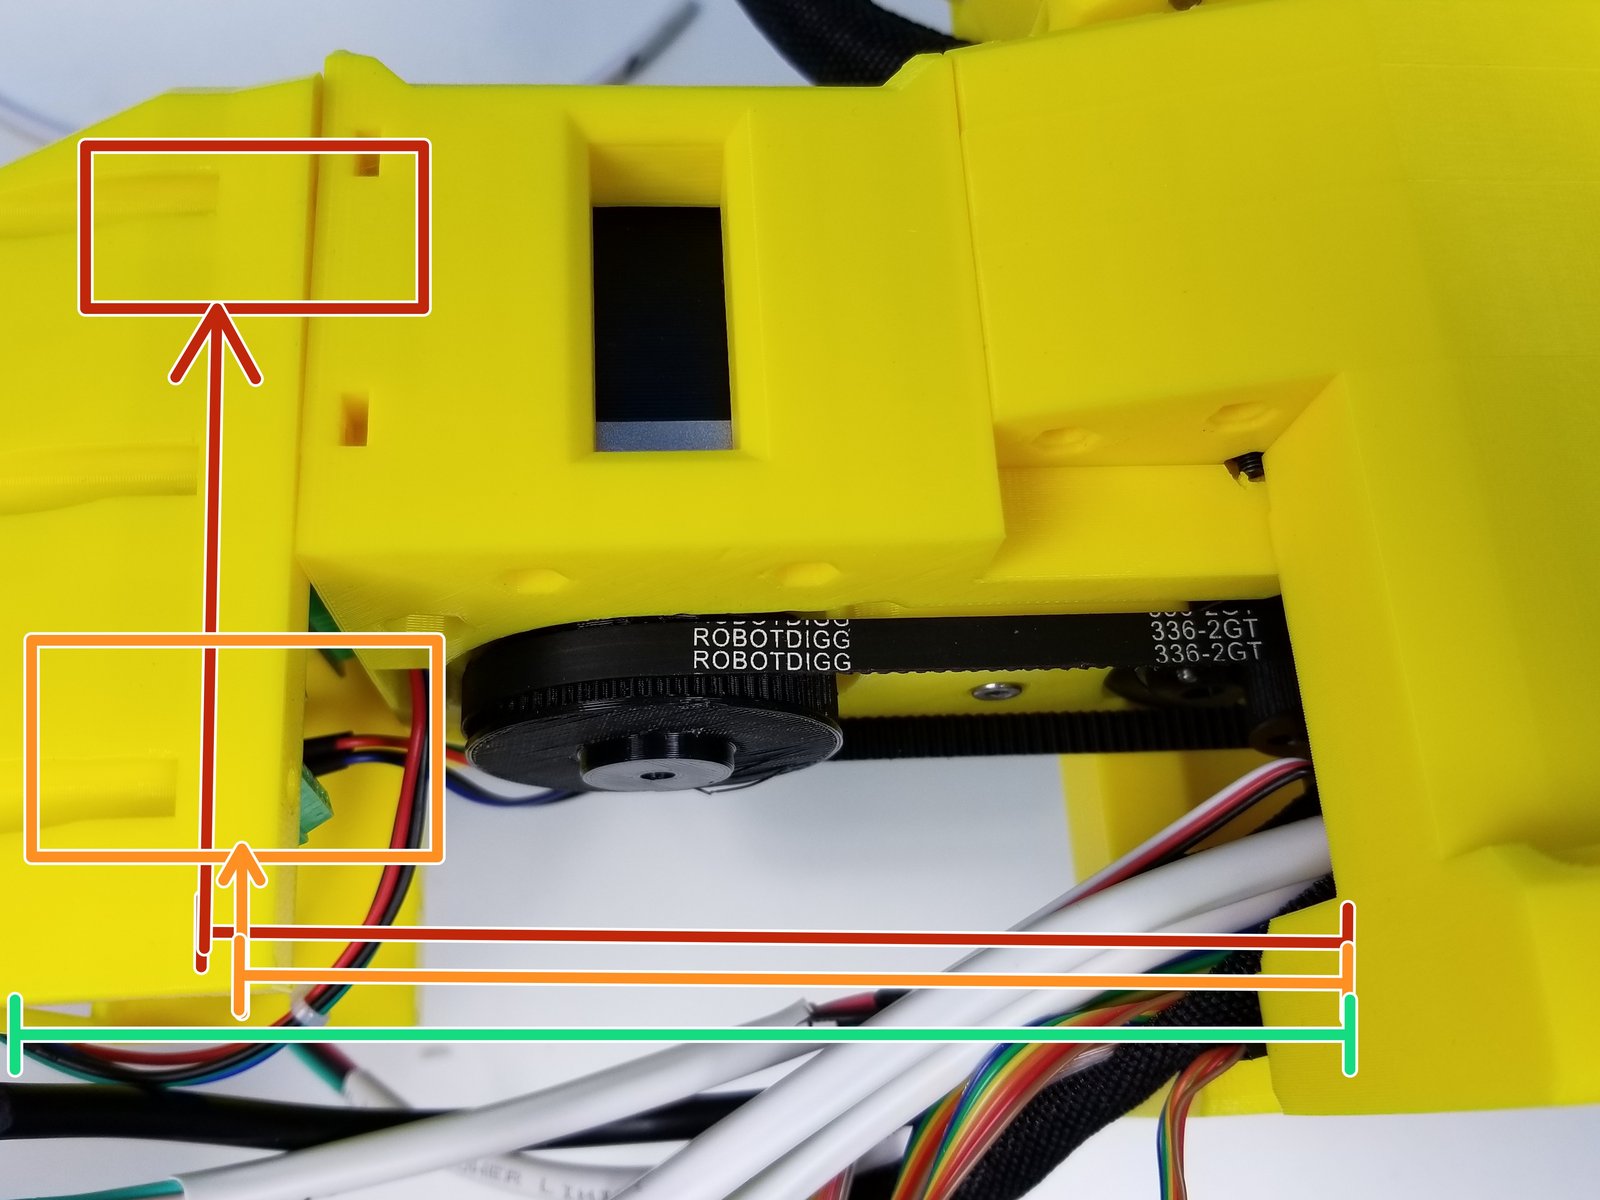
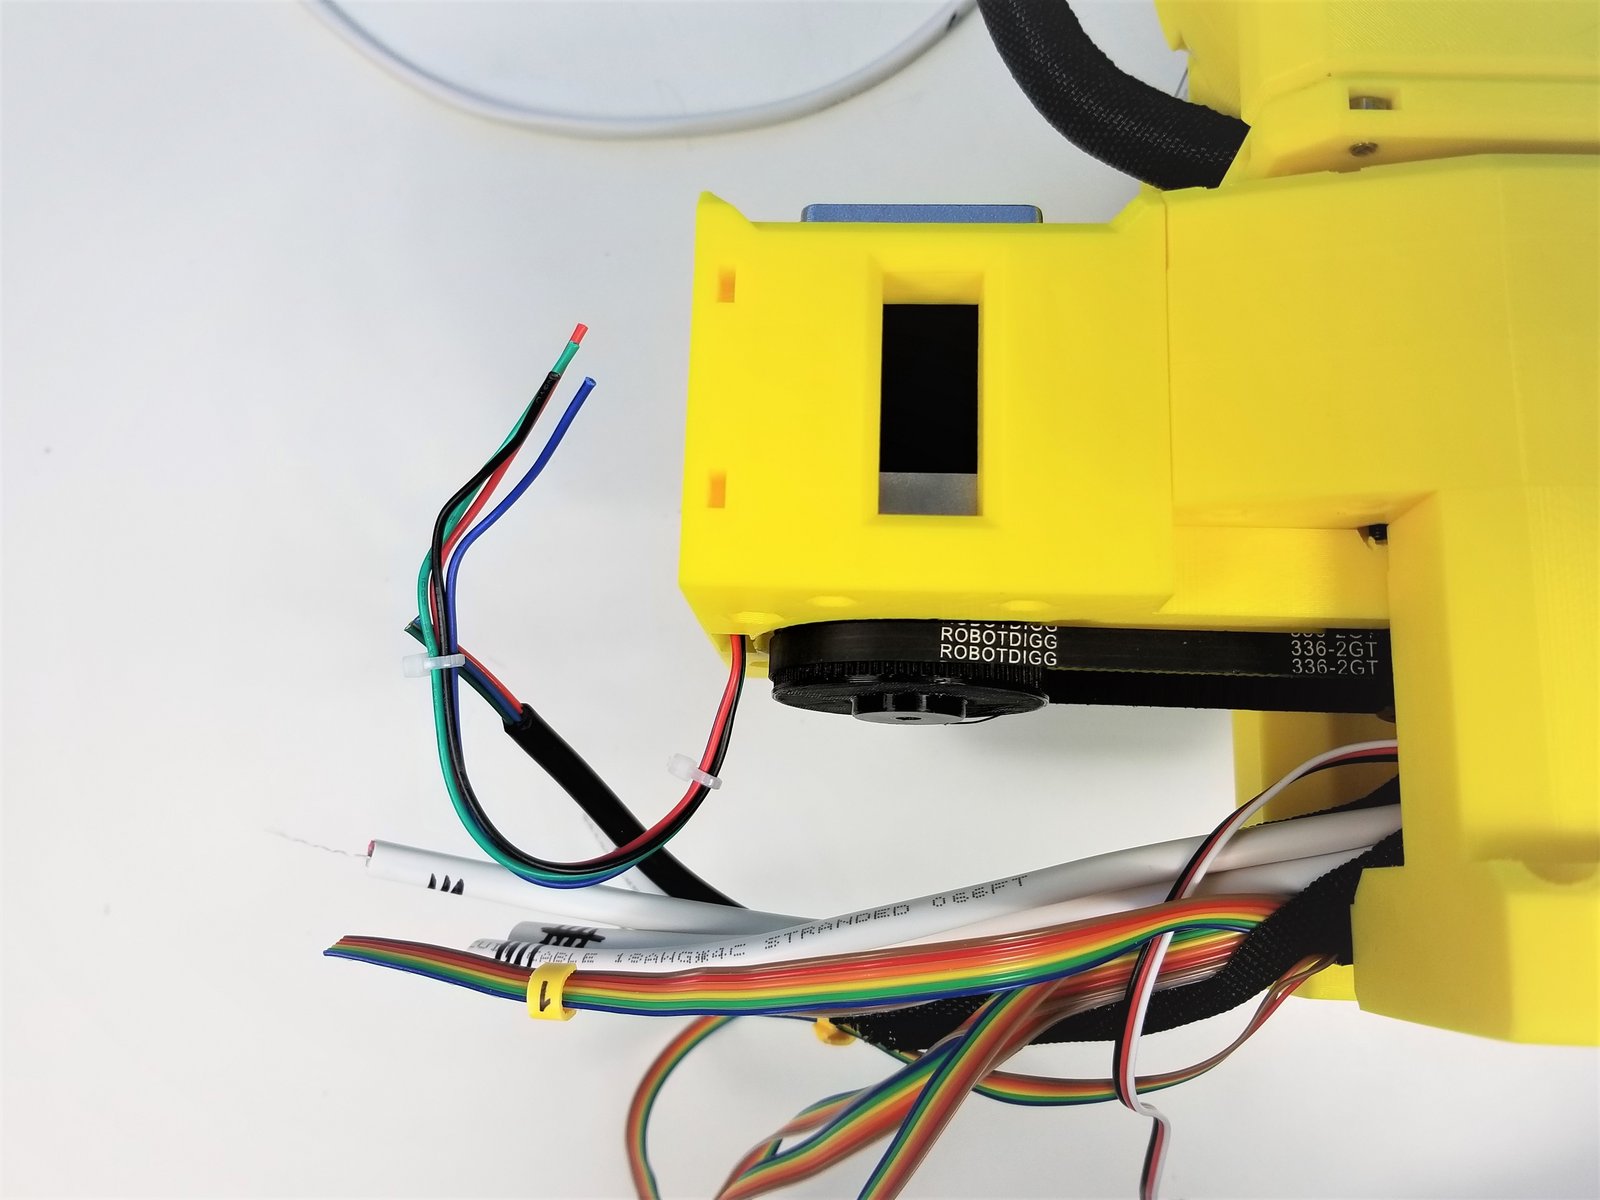
At this point, you will notice that the most of the cables are way longer than the Anchor can hold. '''Therefore we need to cut them to certain length
Motor 0 to Motor 3 (4 sets of motor cables)
- Note:
Align each motor cables to this colored line and cut them at the end of the Arrow
Motor 4 and 5
Sensor Cables
Step 42 Sixi Final Cable Management - 2
Click the large image to open full size.
- Note:
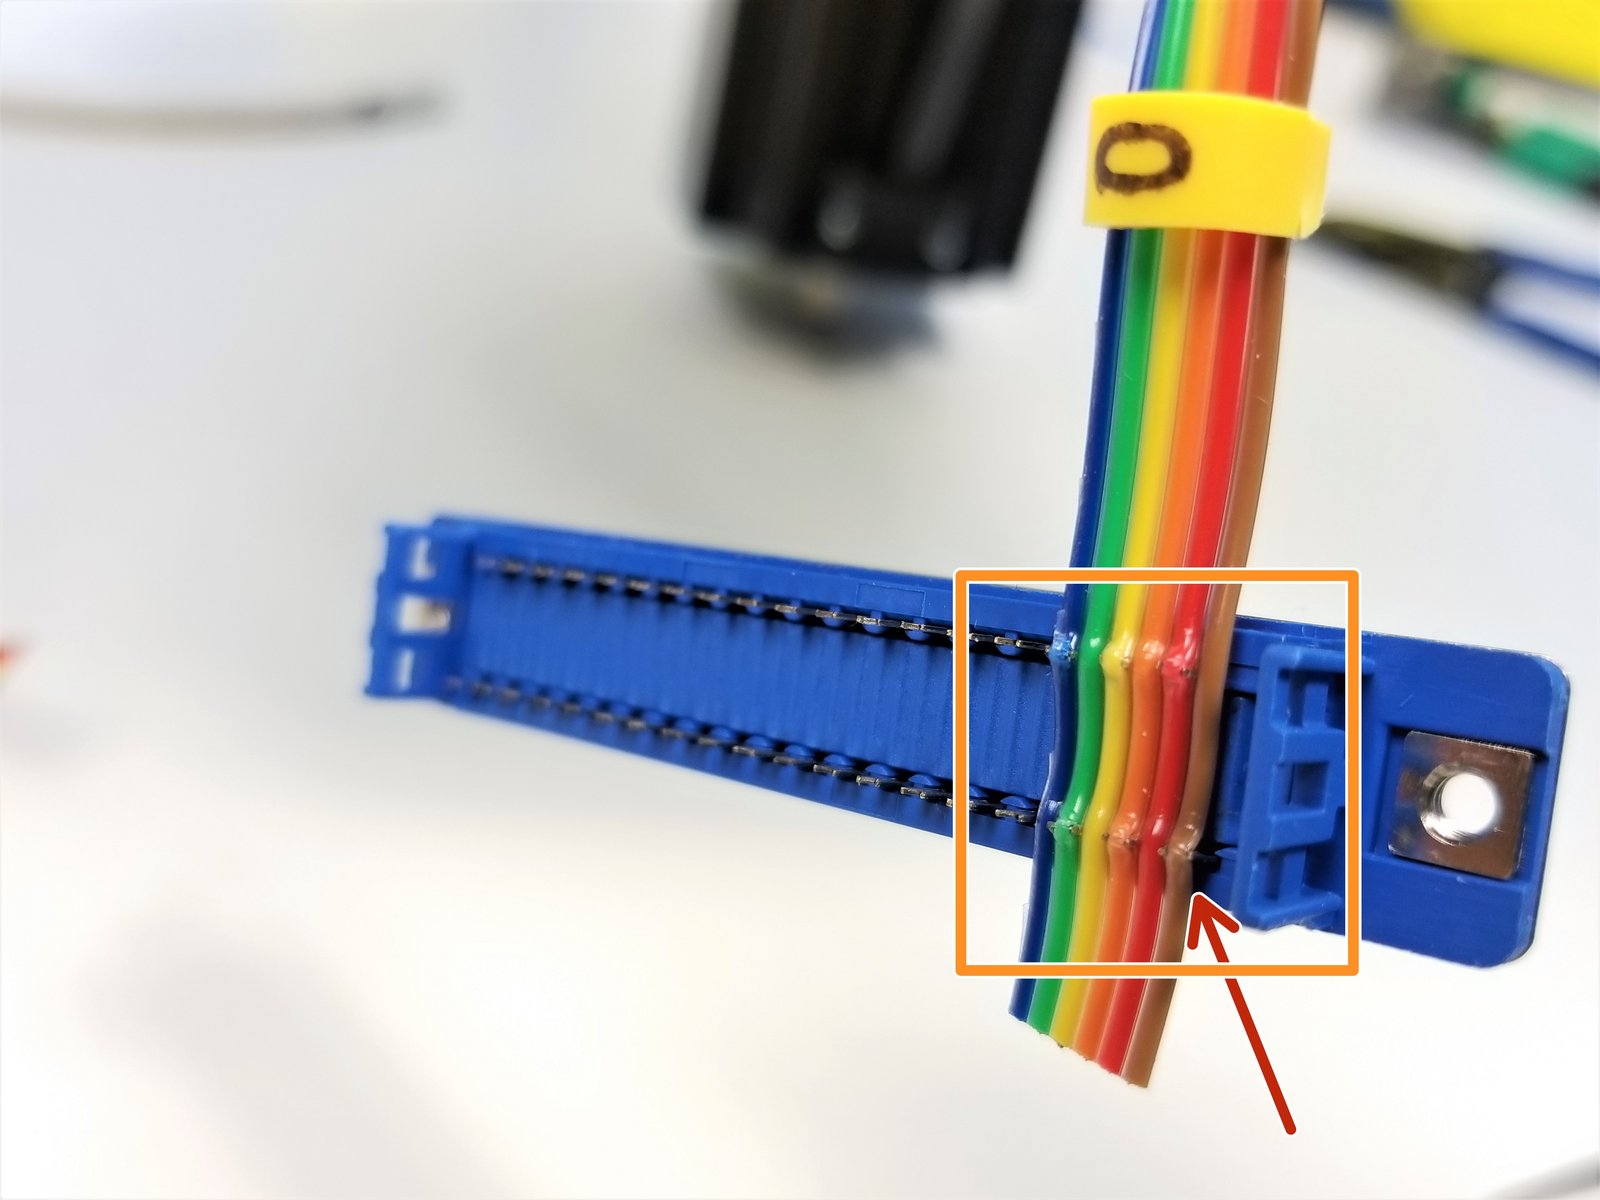
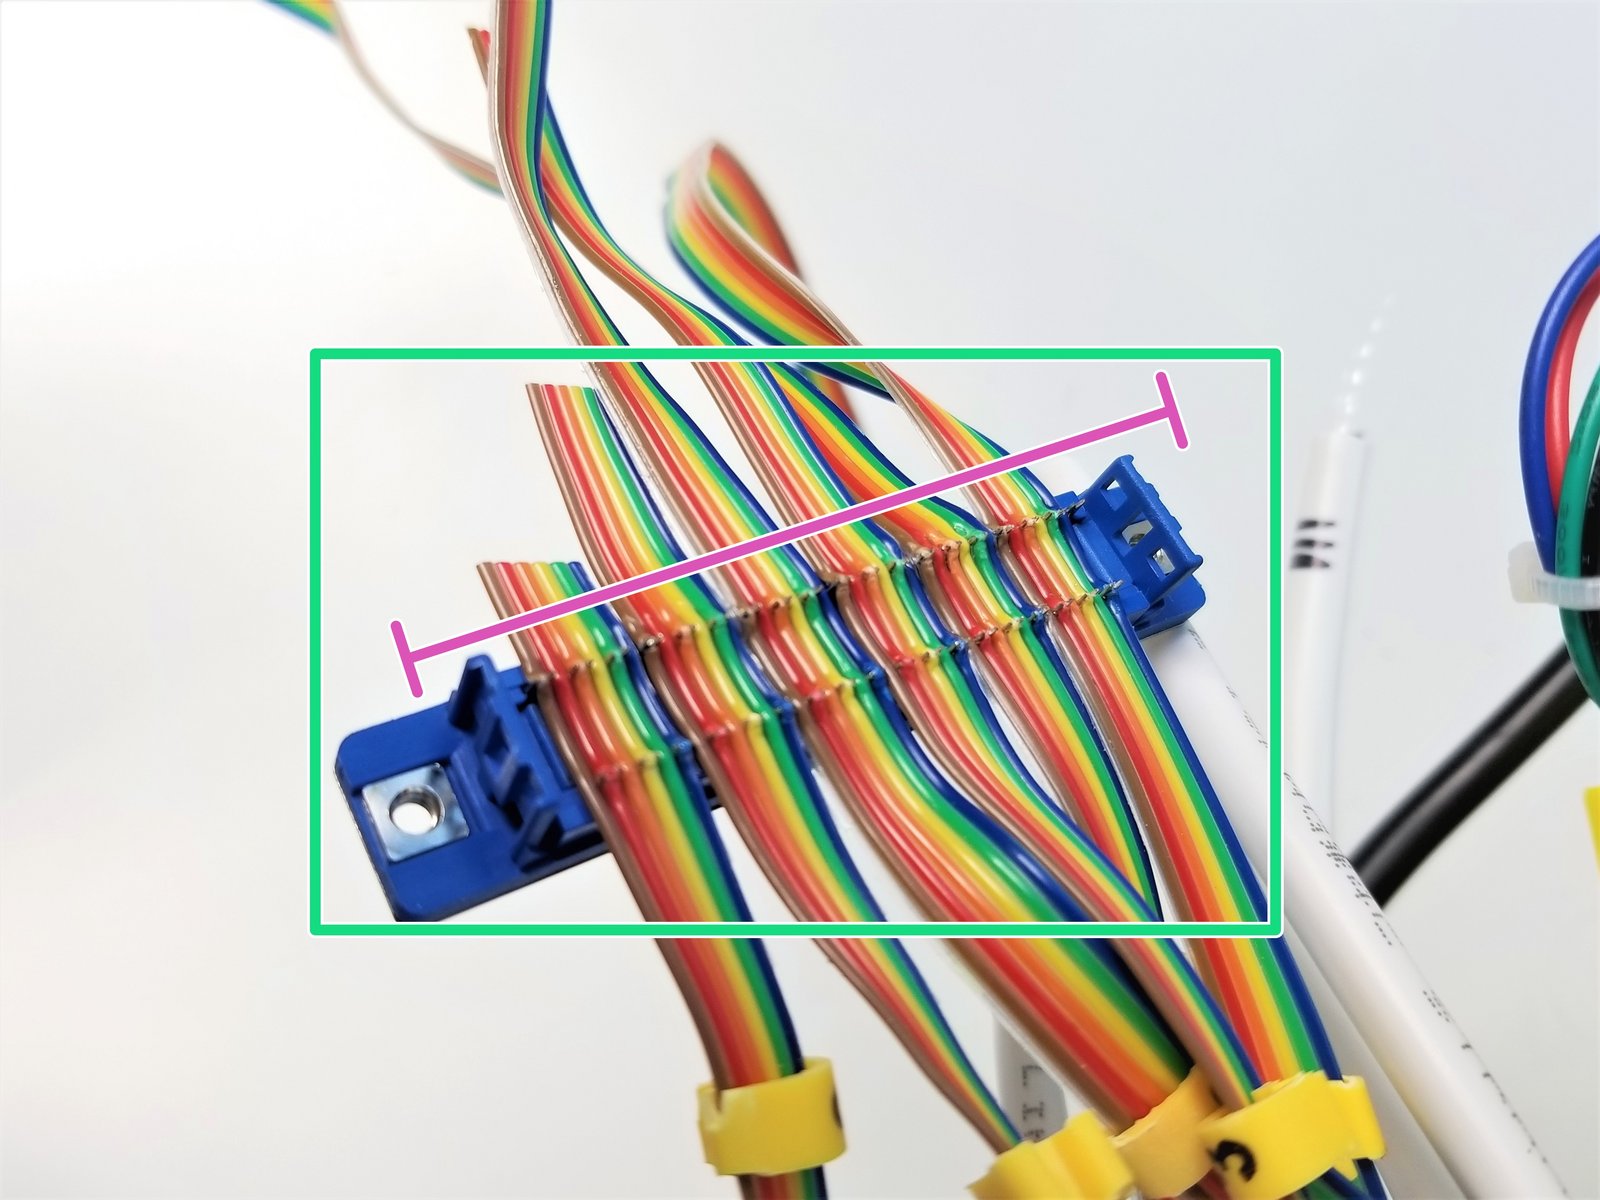
START with the Anchor Sensor Cable
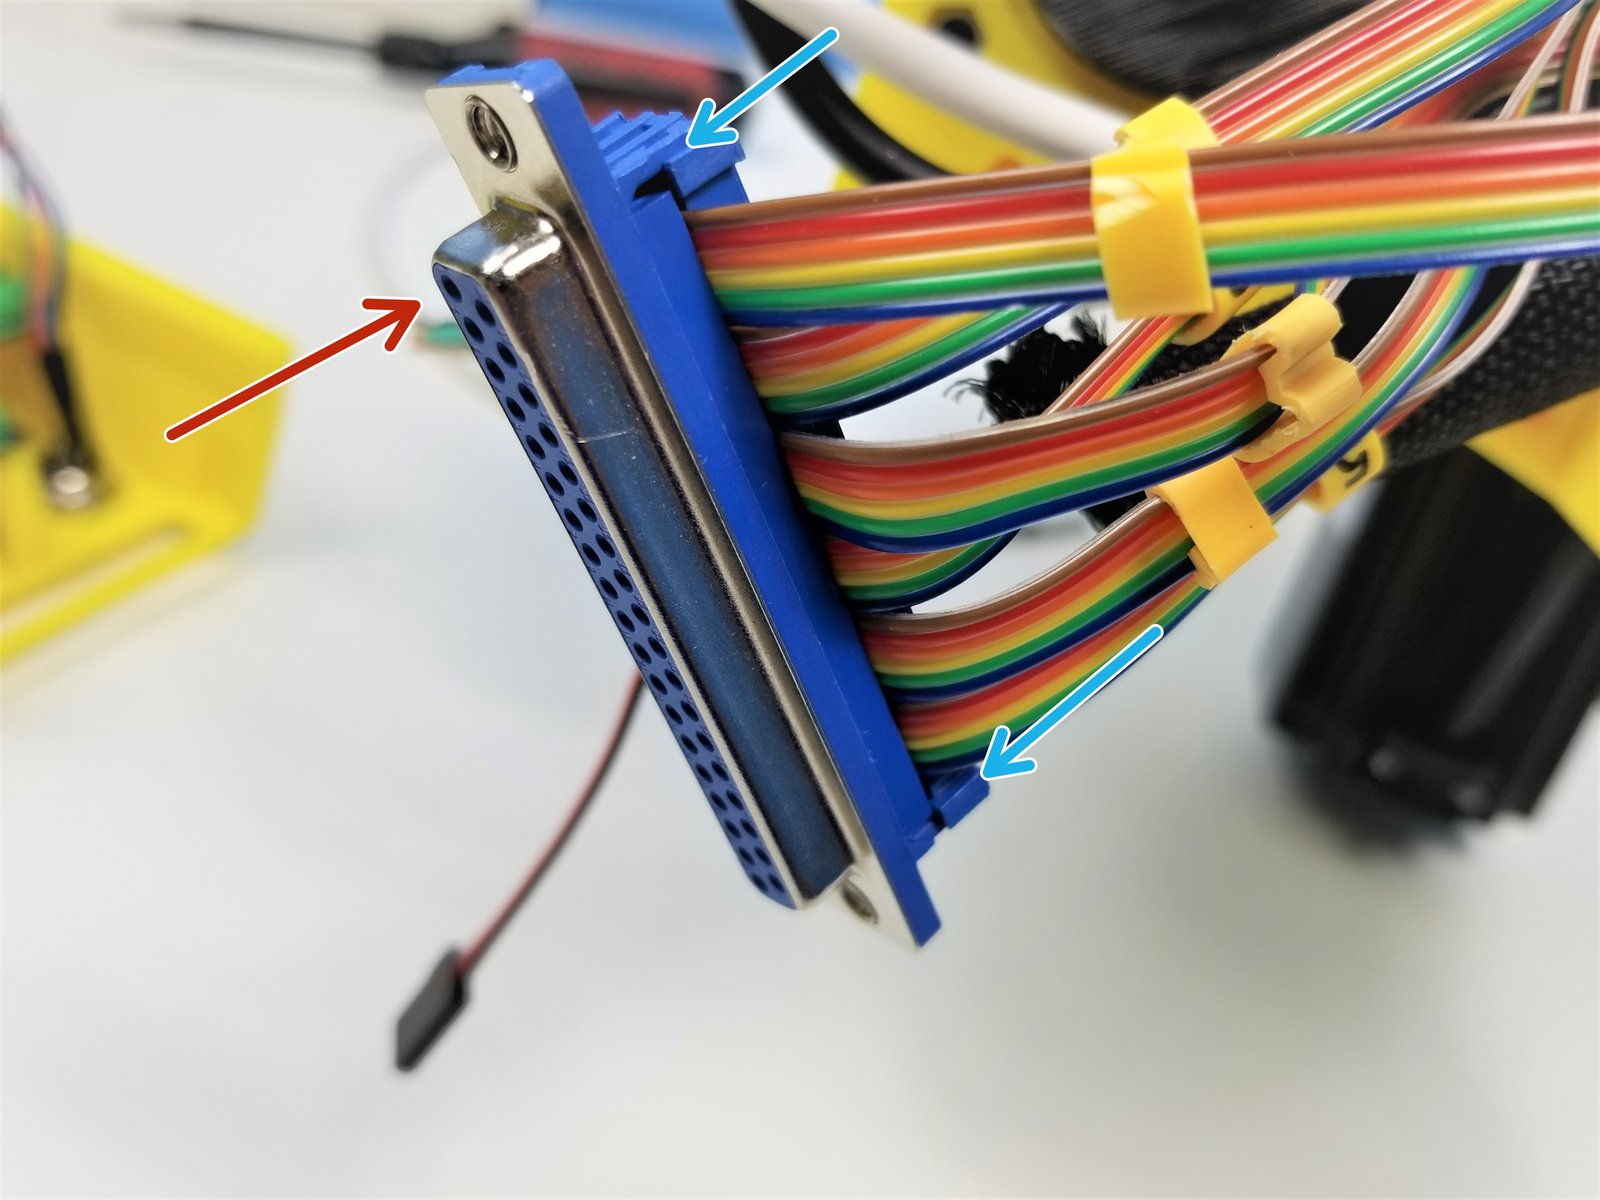
Align the Brown wire to the Pin #1. The outside face of the connector is marked with pin numbers to help you get it the right way around.
Using the Plier, push the wires into each IDC pins
REPEAT for the rest of the Sensor Cables in an incremental arrangment - Anchor[0], Shoulder[1], Elbow[2], Ulna[3], Wrist[4], Hand[5].
- Note:
With 36 wires in total, the last fork at the end will be empty.
Once all wires of each cables are in contact with IDC pins, Clamp the IDC Enclosure. Verify that the clamp locks into place on both side to ensure good electric contact.
Cut any leftover Cables
Step 43 Sixi Final Cable Management - 3
Click the large image to open full size.
- Note:
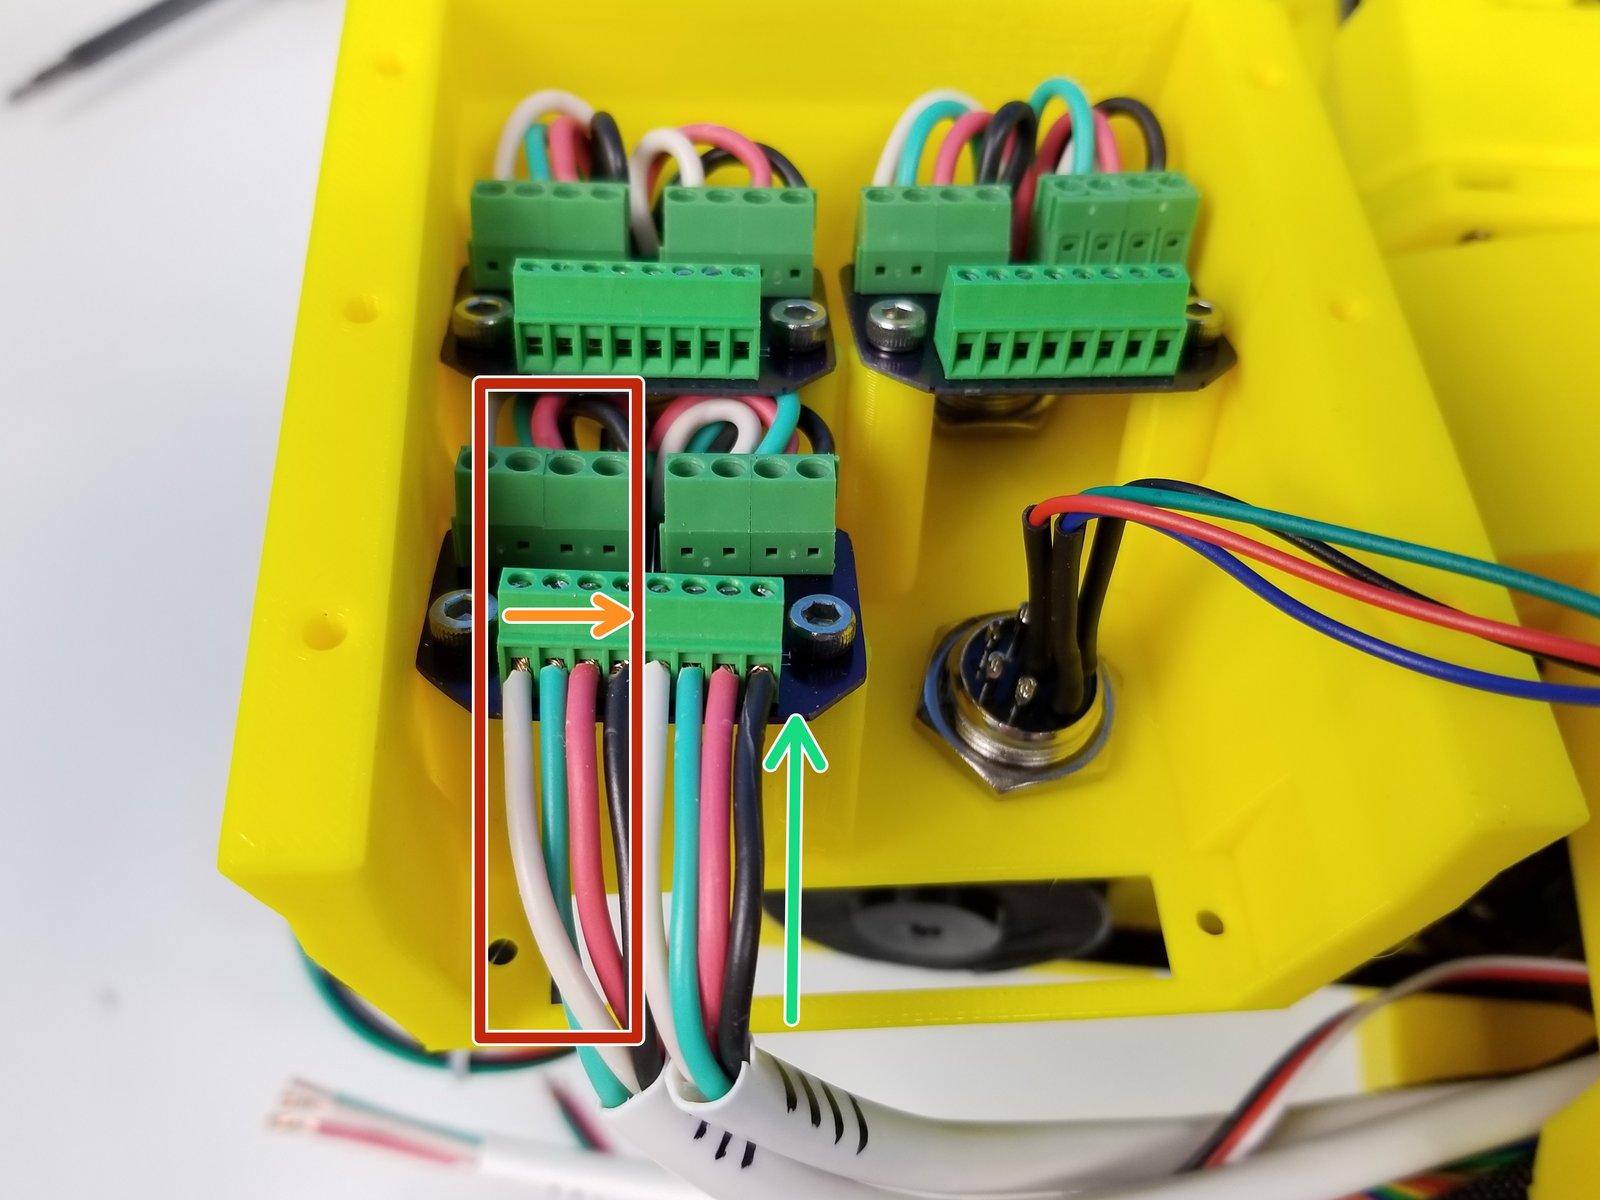
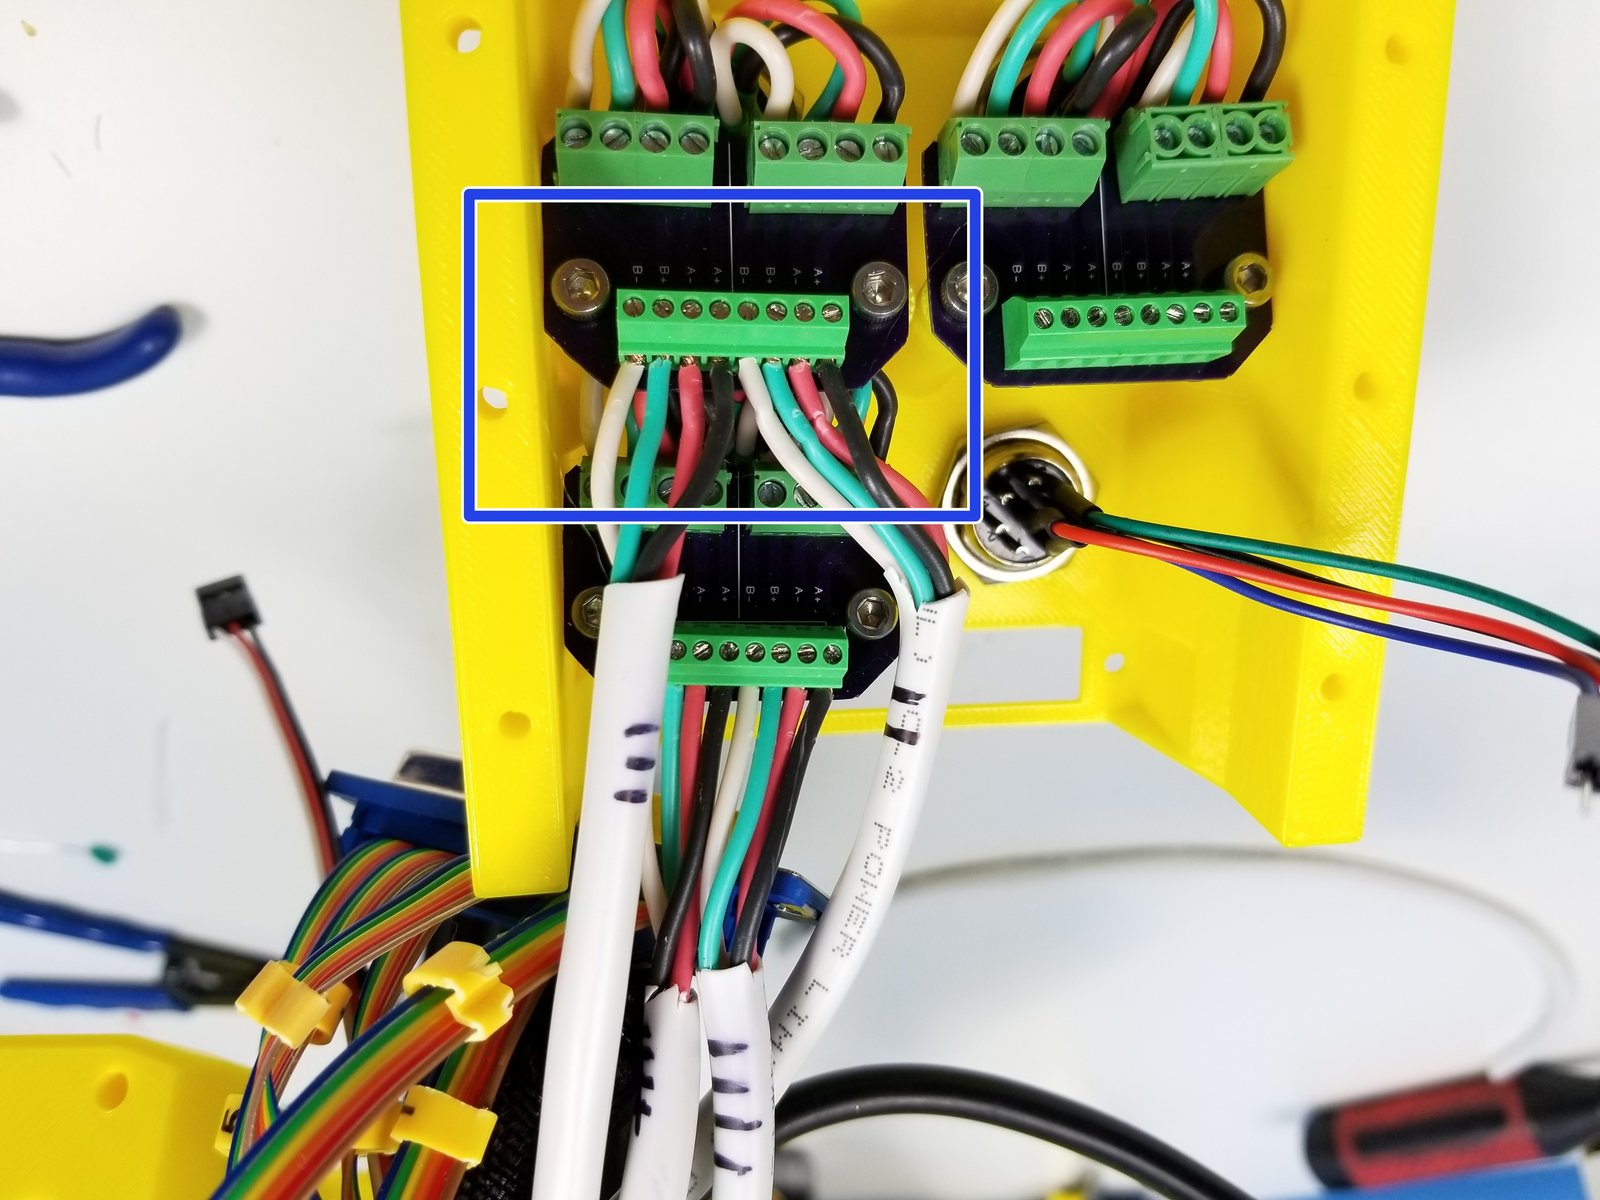
START with the M4 and M5 Cables
Connect M5 Cable on the LEFT side
- Note:
From LEFT
White -> Green -> Red -> Black
REPEAT for M4 Cable on the RIGHT side
Do the same for M2 and M3 Cables with M3 Cable on the LEFT side
Step 44 Sixi Final Cable Management - 4
Click the large image to open full size.
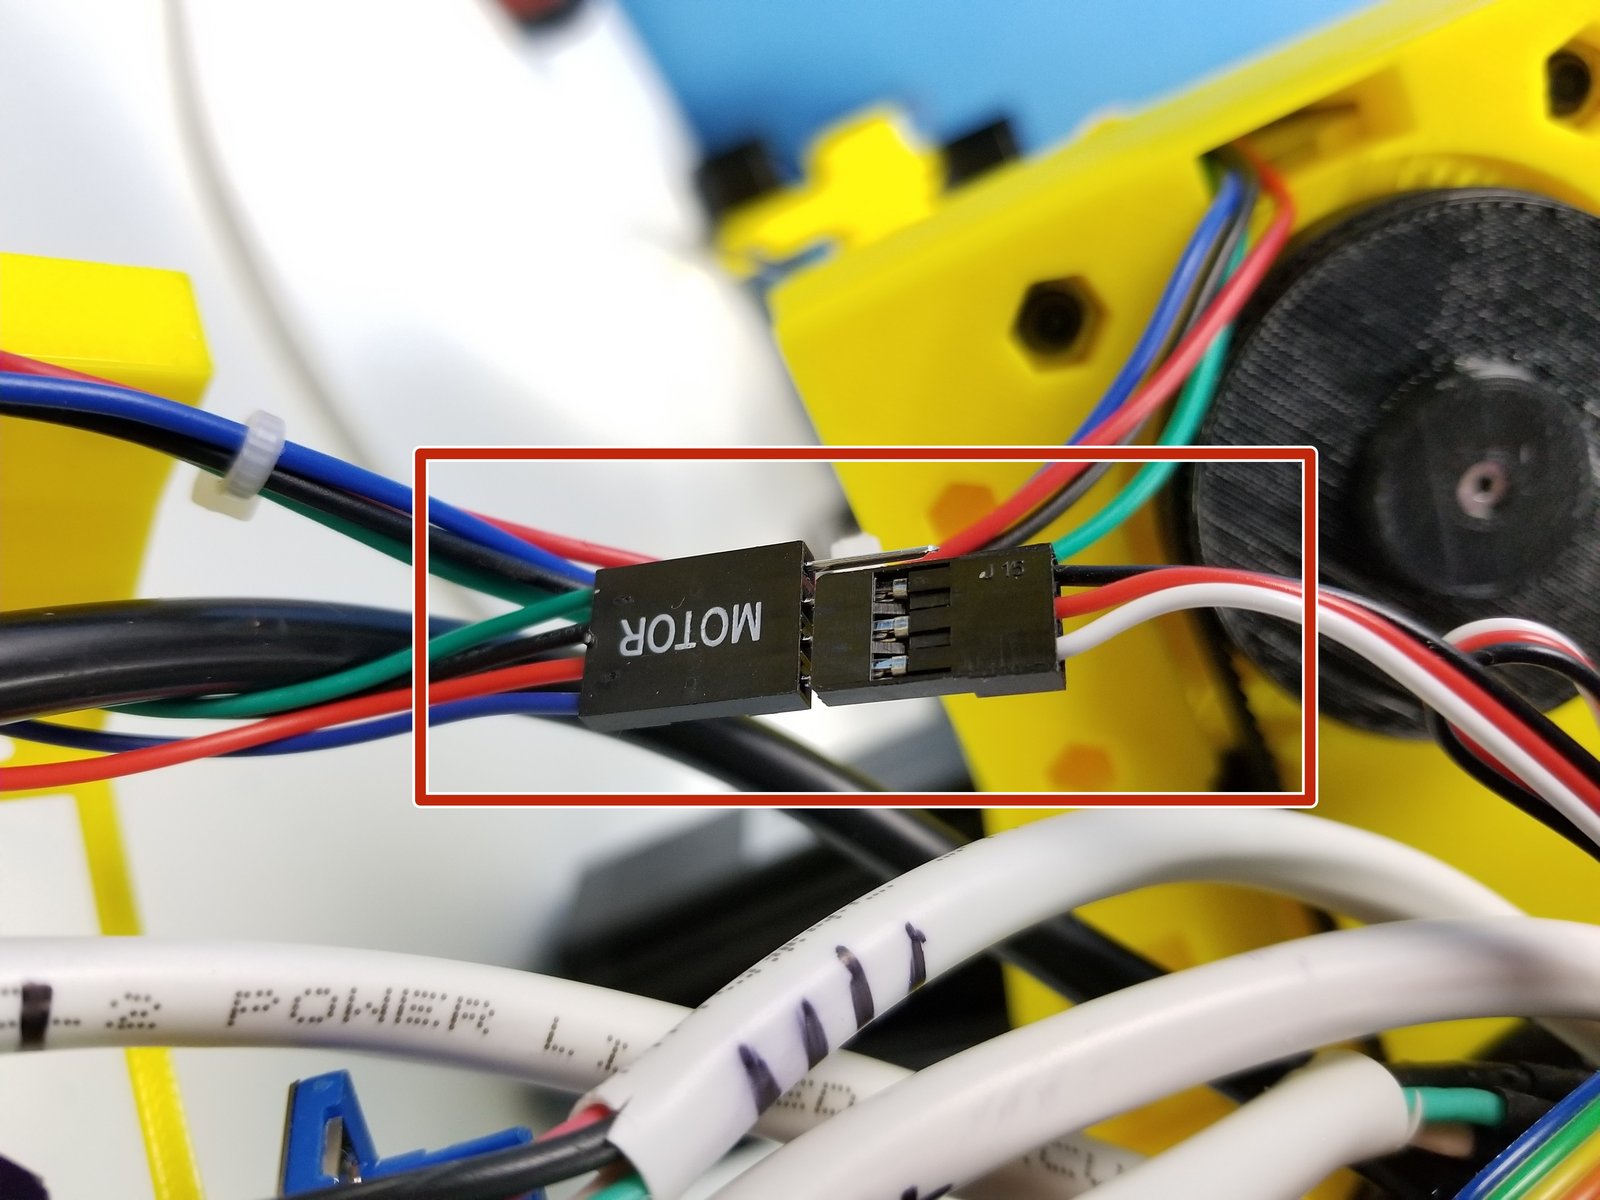
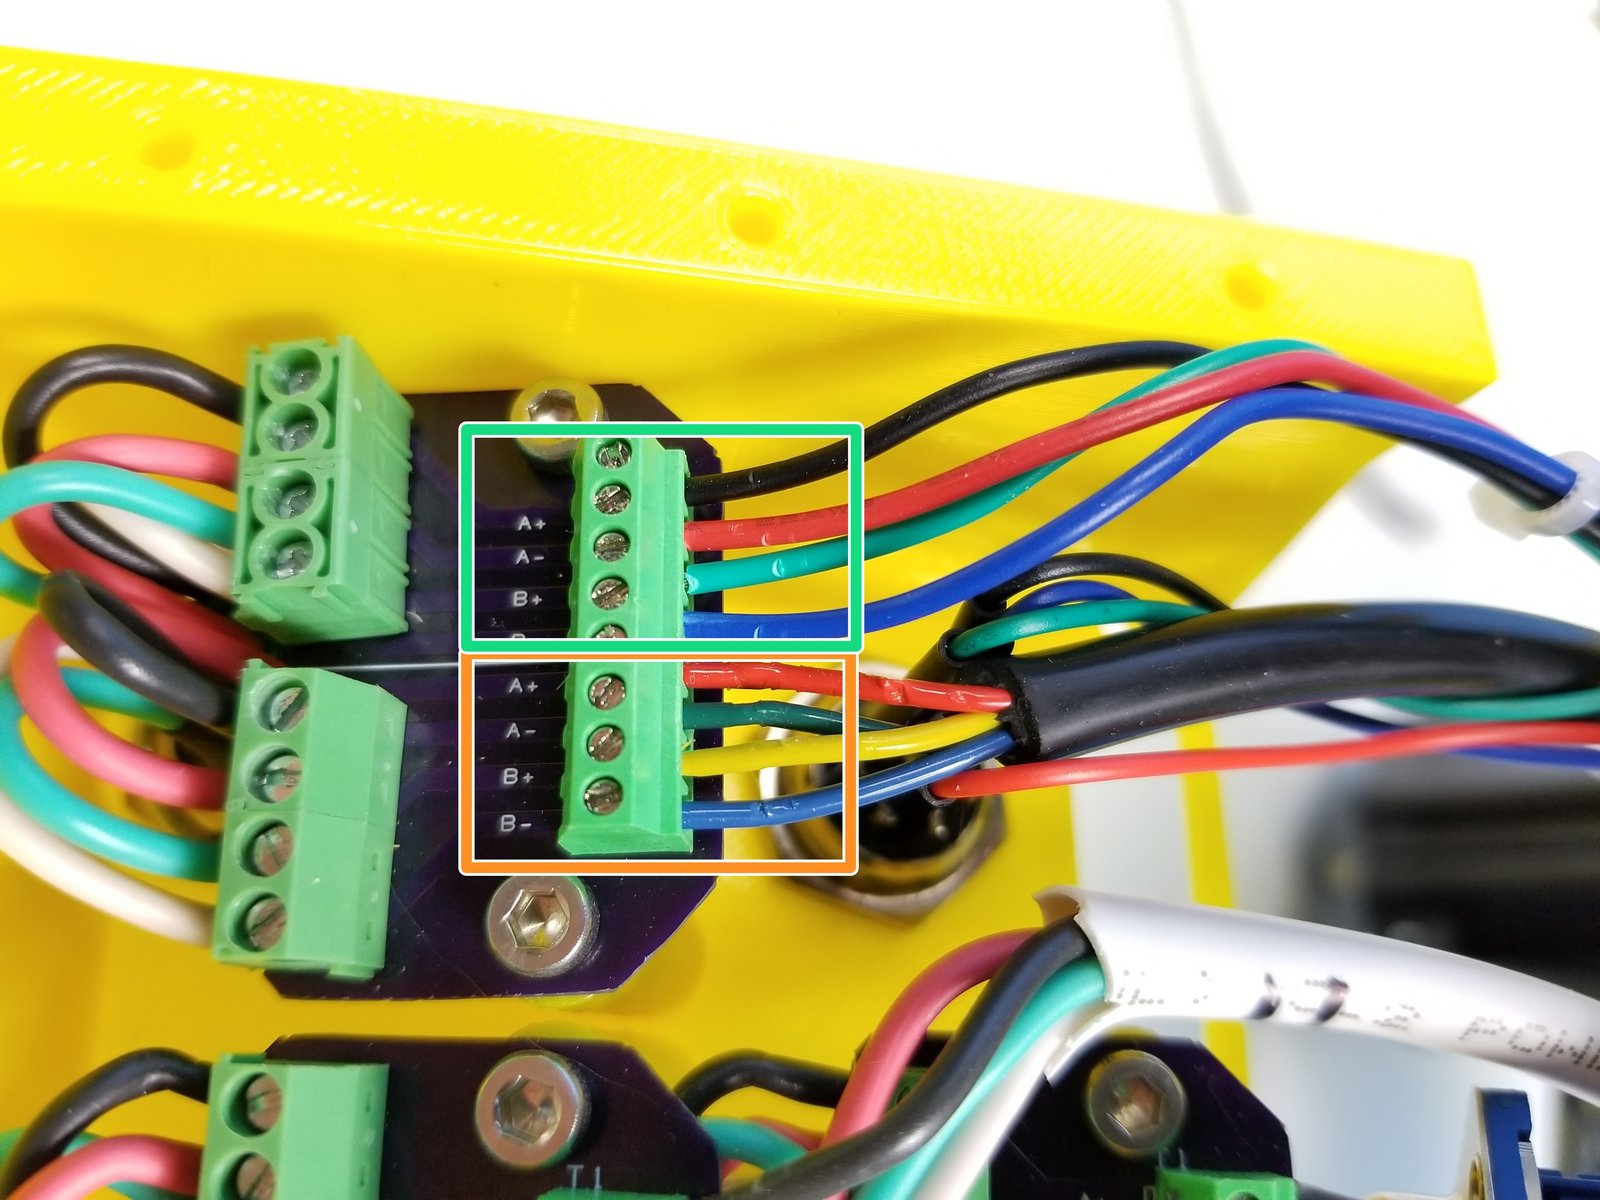
Connect the Tool Cables to each other
- Note:
Black to Black -> Red to Red -> Blue to White
Connect M1 Cable
- Note:
According to StepperOnline, from Bottom
- Warning:
Blue -> Yellow -> Green -> Red
- Note:
According to Real Life, from Bottom --- DIFFERENT FROM PICTURE
- Warning:
Blue -> Green -> Yellow -> Red
Connect M0 Cable from Bottom --- Blue -> Green -> Red -> Black
Step 45 Sixi Final Cable Management - 5
Click the large image to open full size.
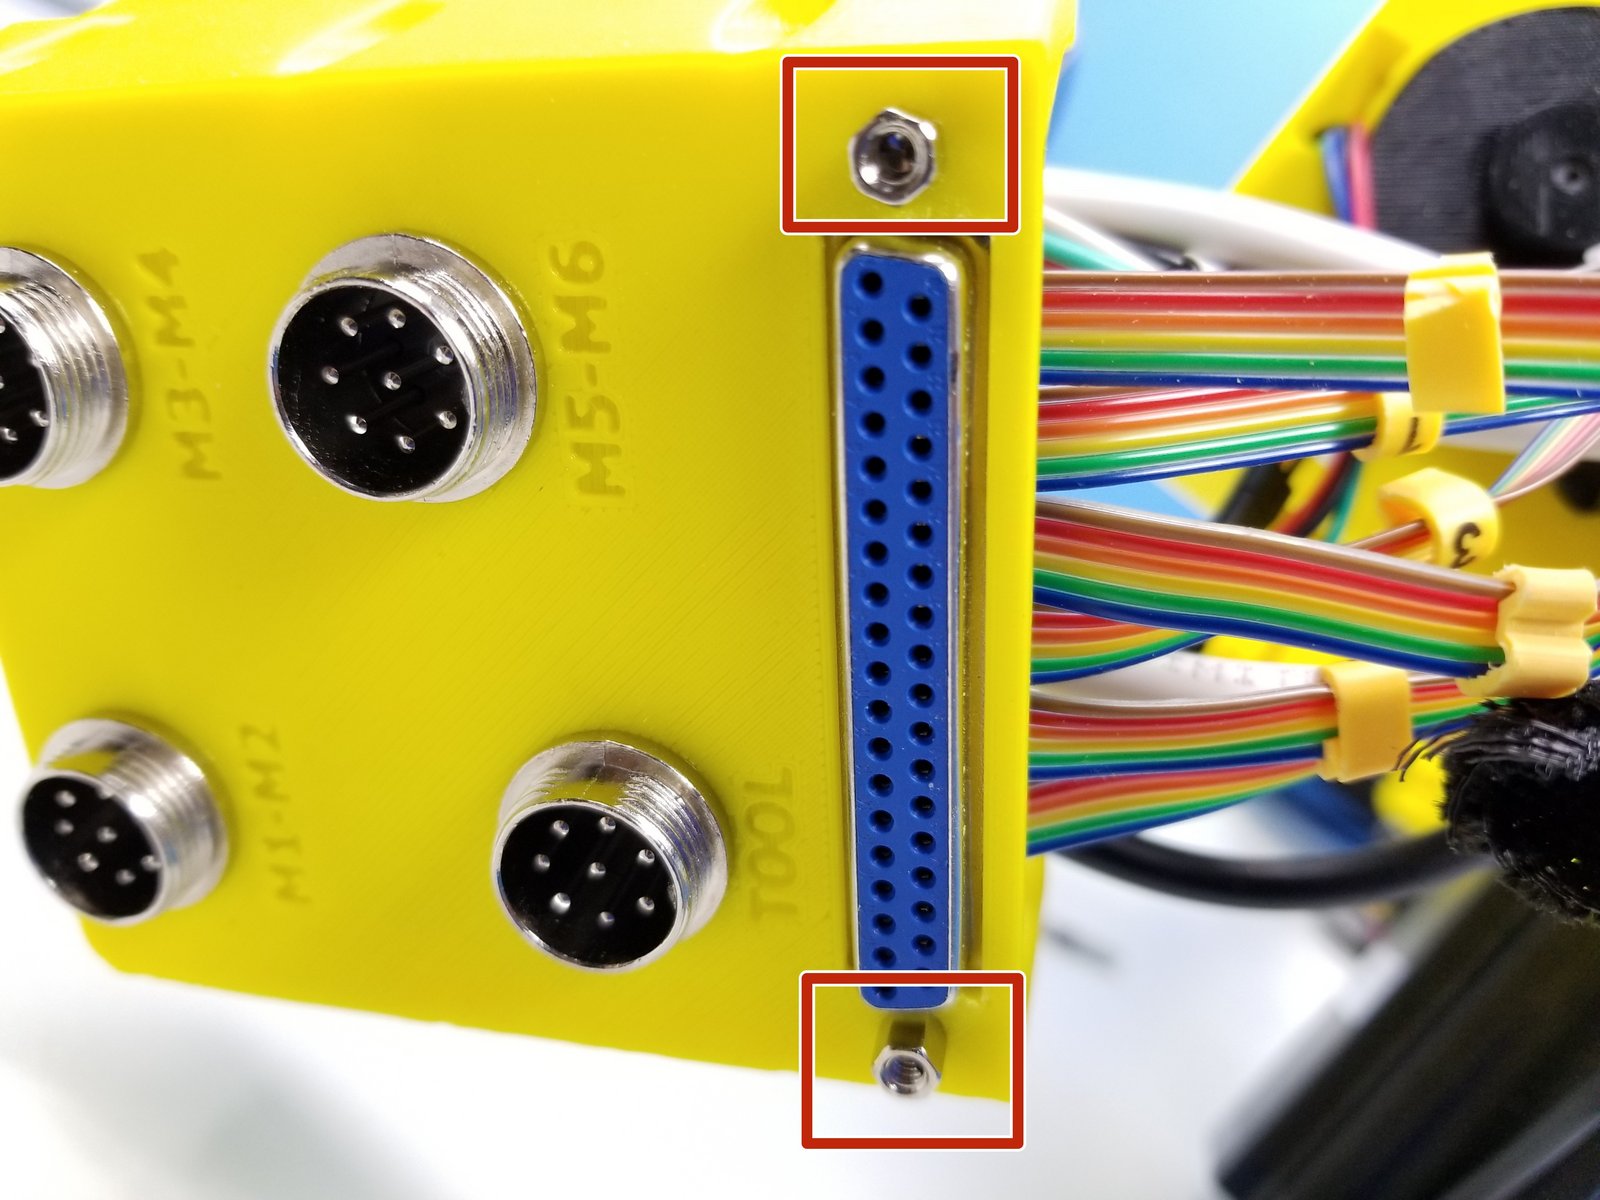
Insert the D-Sub Connector and use #4-40 Standoff to secure it in place.
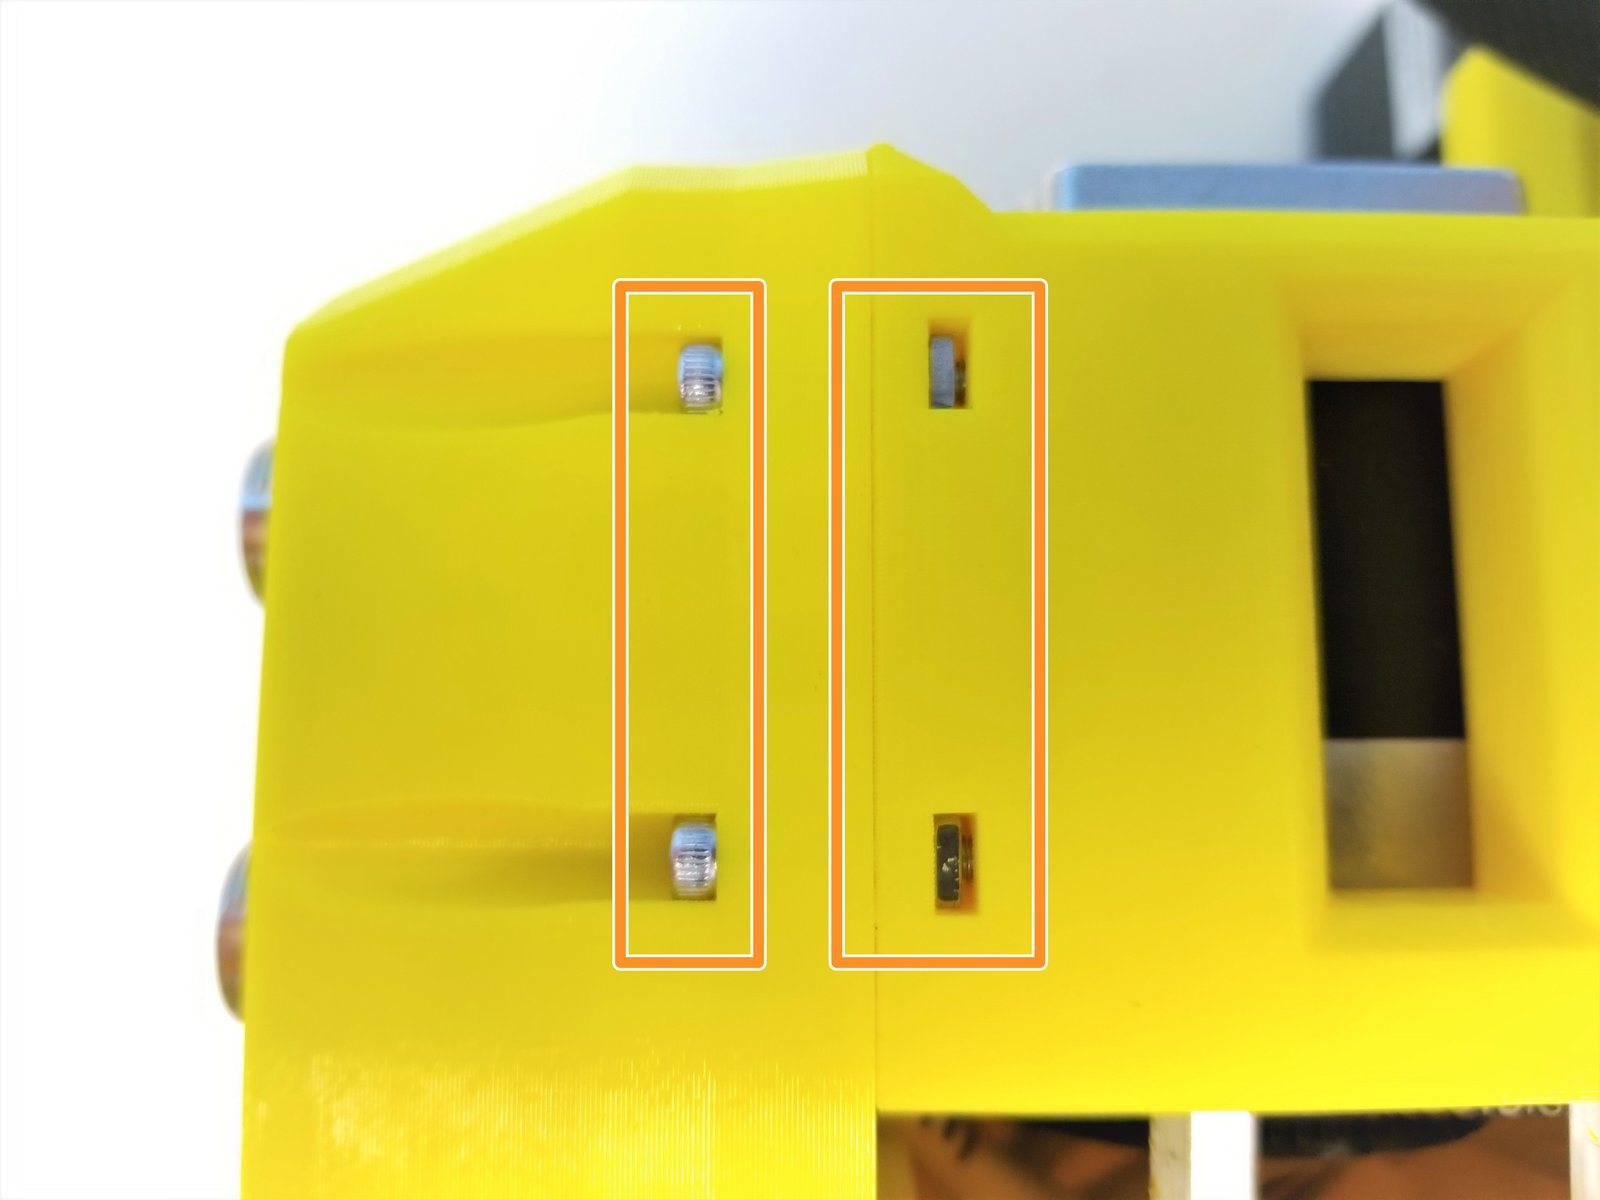
Using M3 Square Nuts and M3x16mm Screws, to secure the Back Panel to the Anchor
Step 46 Anchor Rear Bottom - Parts
Click the large image to open full size.
- Note:
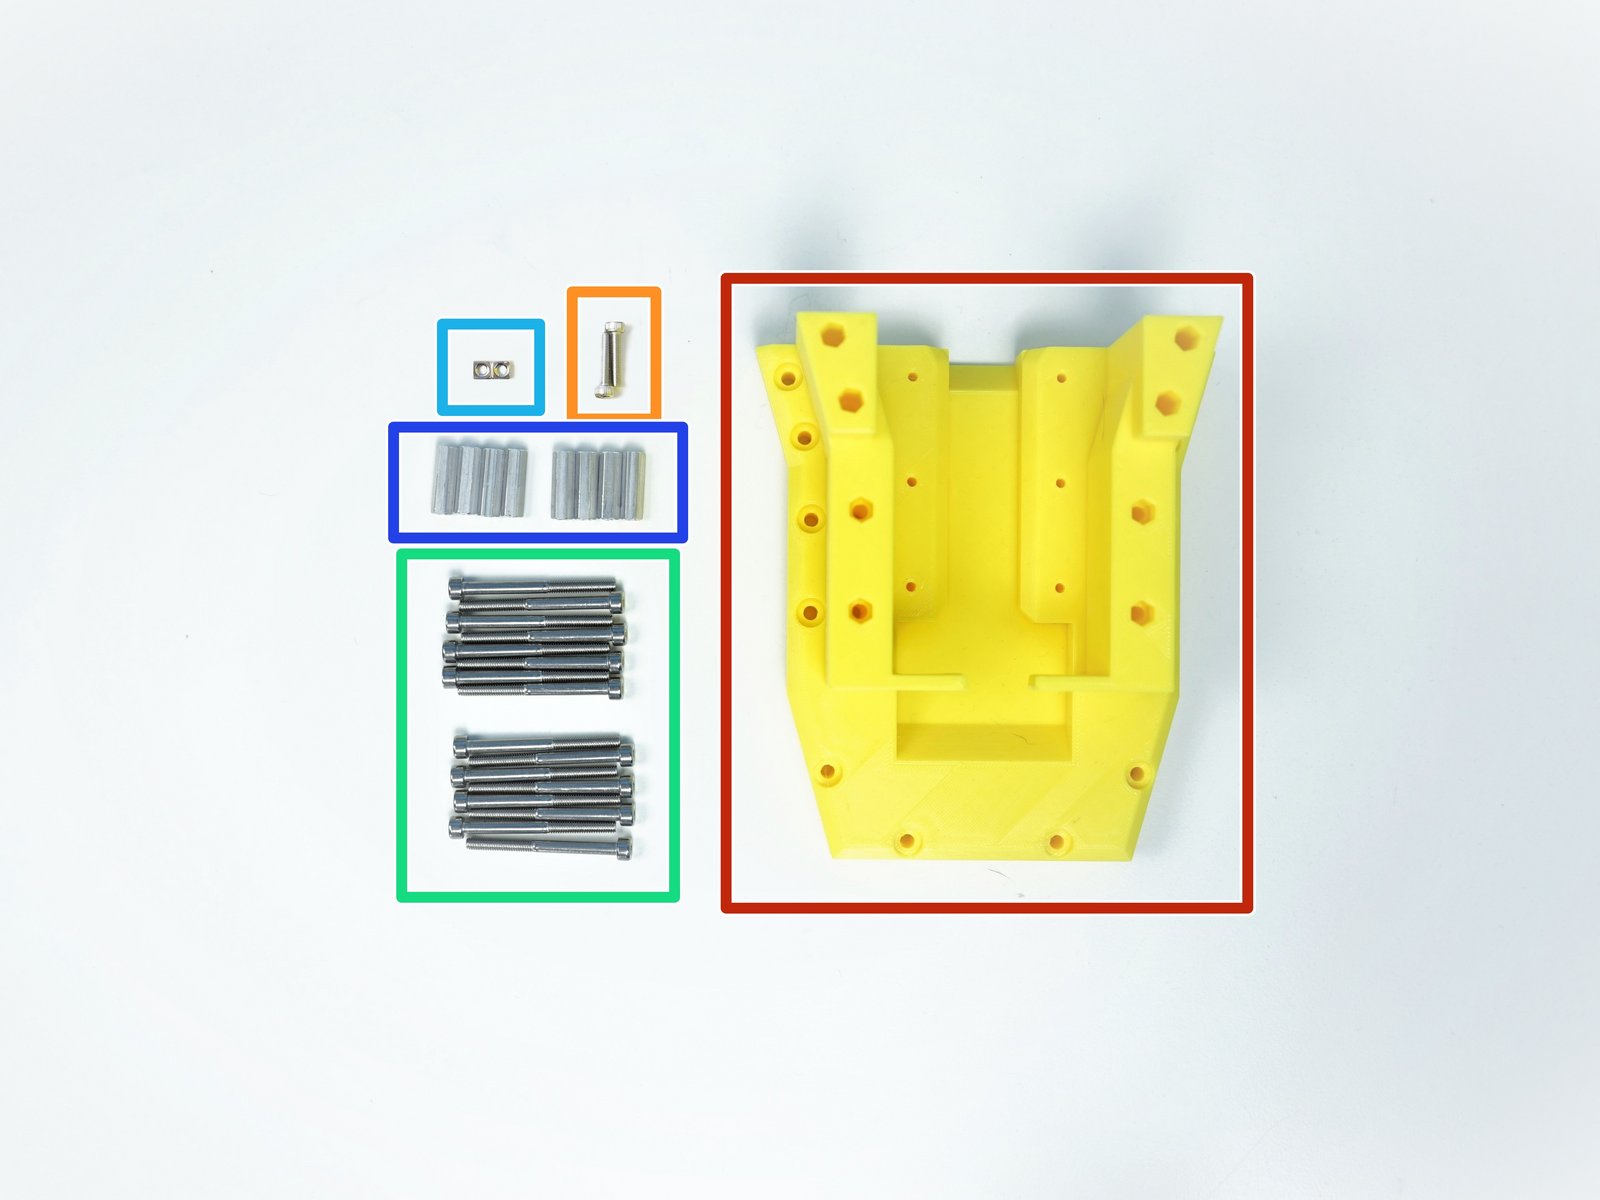
Prepare the following components:
[3D] - 1Bb AnchorRearBottom
M3x16mm Screws (x2)
M4x45mm Screws (x16)
- Note:
4 of them are optional
M3 Square Nuts (x2)
M4 Hex Standoffs (x8)
- Note:
2 of them are optional
Step 47 Anchor Rear Bottom - 1
Click the large image to open full size.
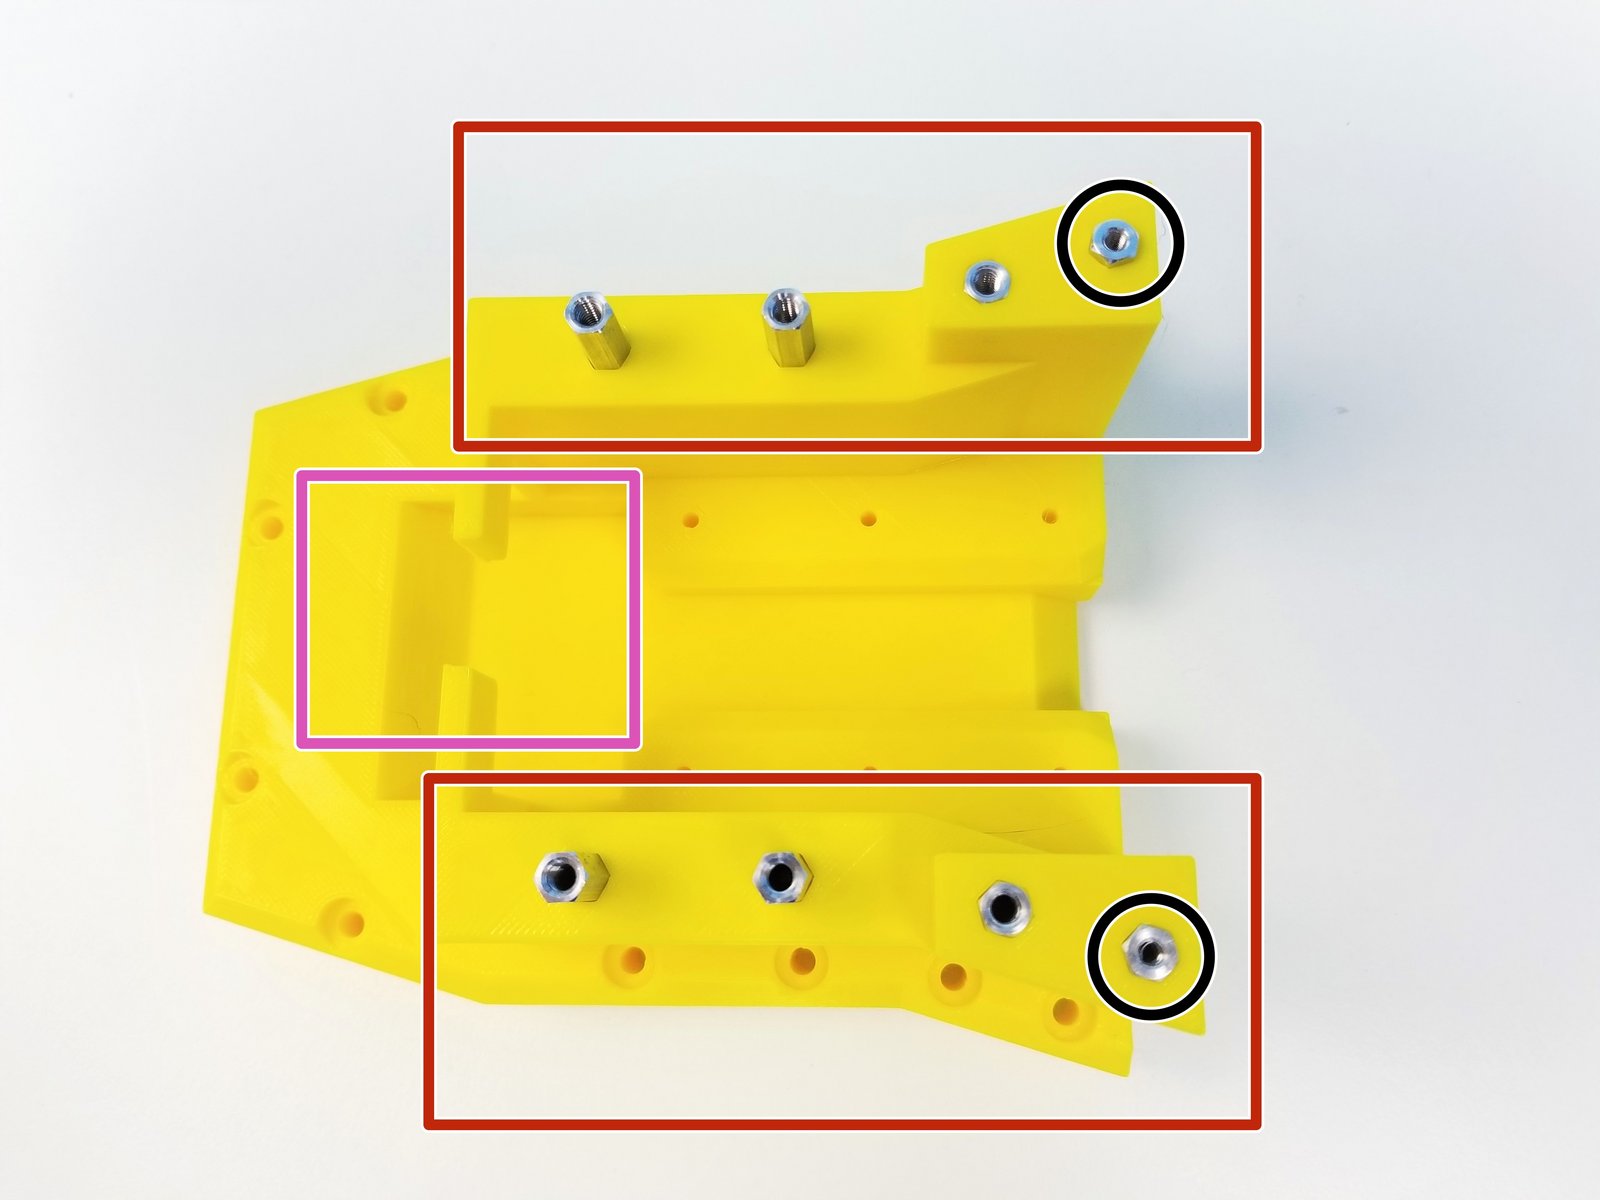
Insert M4 Hex Standoffs in the Anchor Rear Bottom
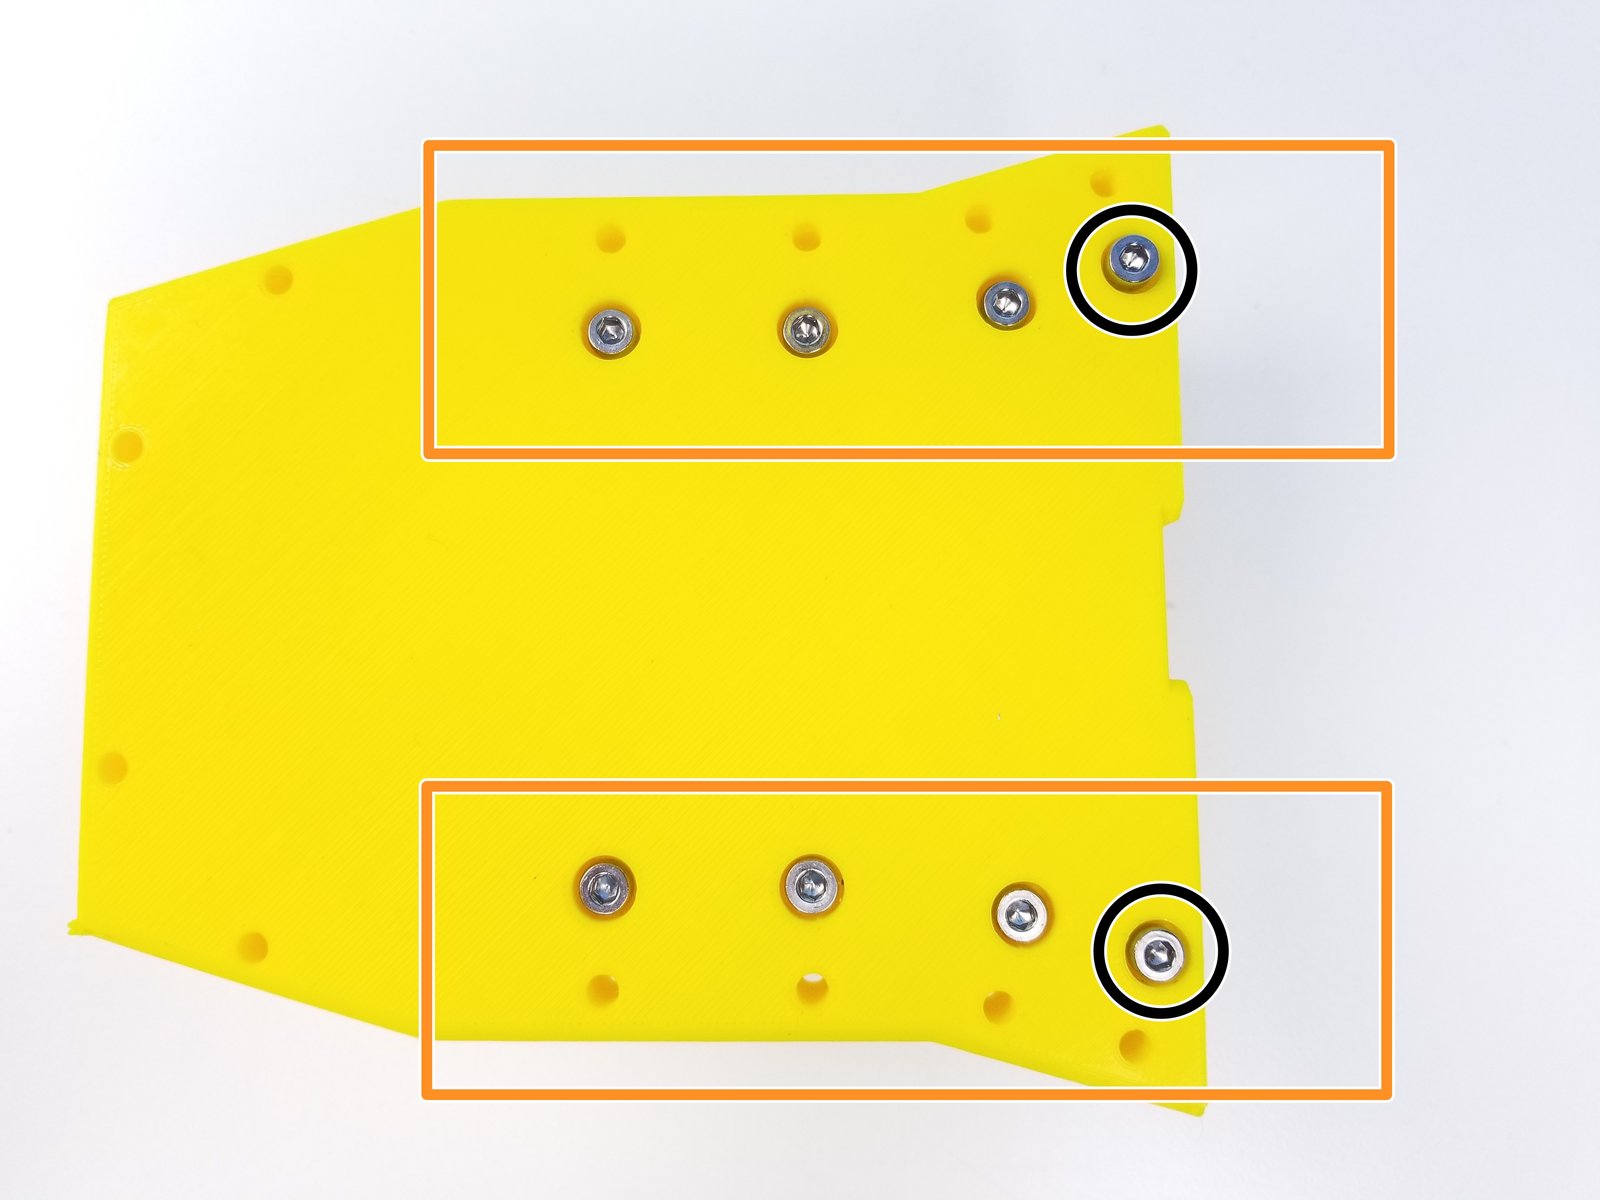
Circled ones are optional
Secure that using M4x45mm Screws
Circled ones are optional
REMEMBER THIS OPENING
Step 48 Anchor Rear Bottom - 2
Click the large image to open full size.
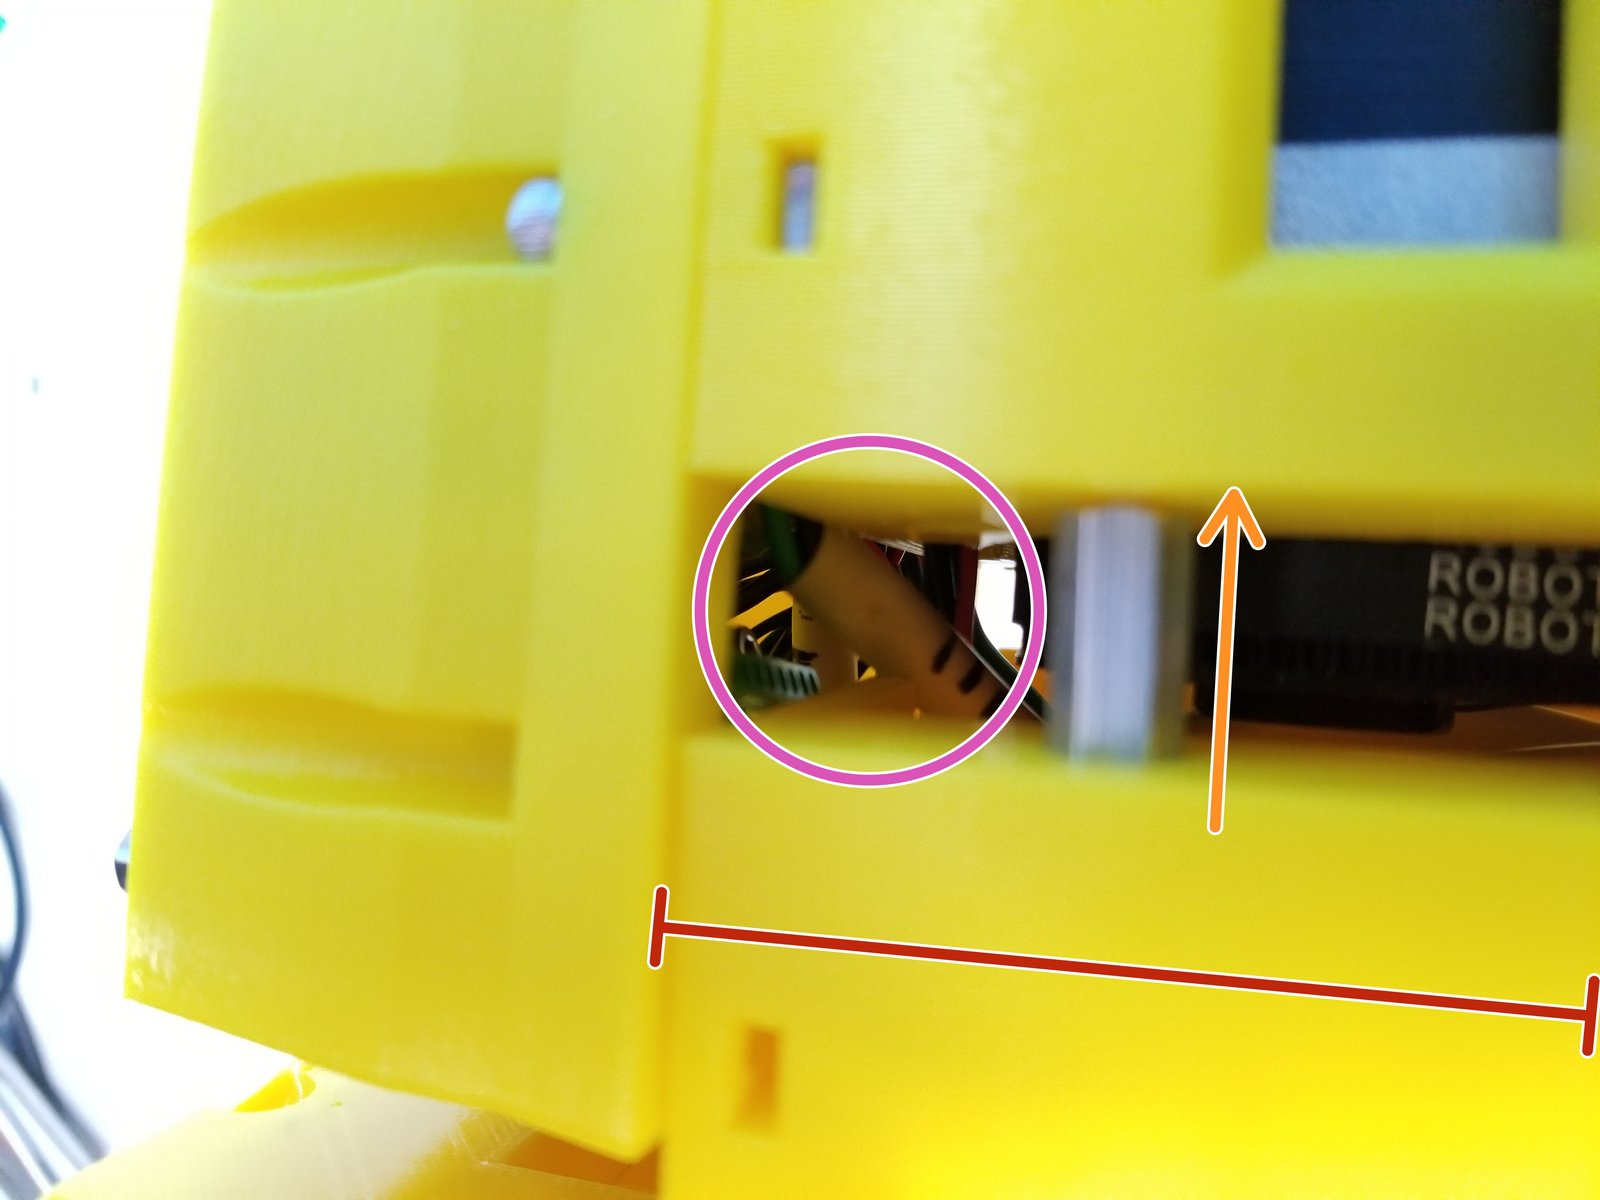
Align the Anchor Rear Bottom to the Anchor
- Note:
Make sure the Cables are fed through the opening (pink reminder from last step)
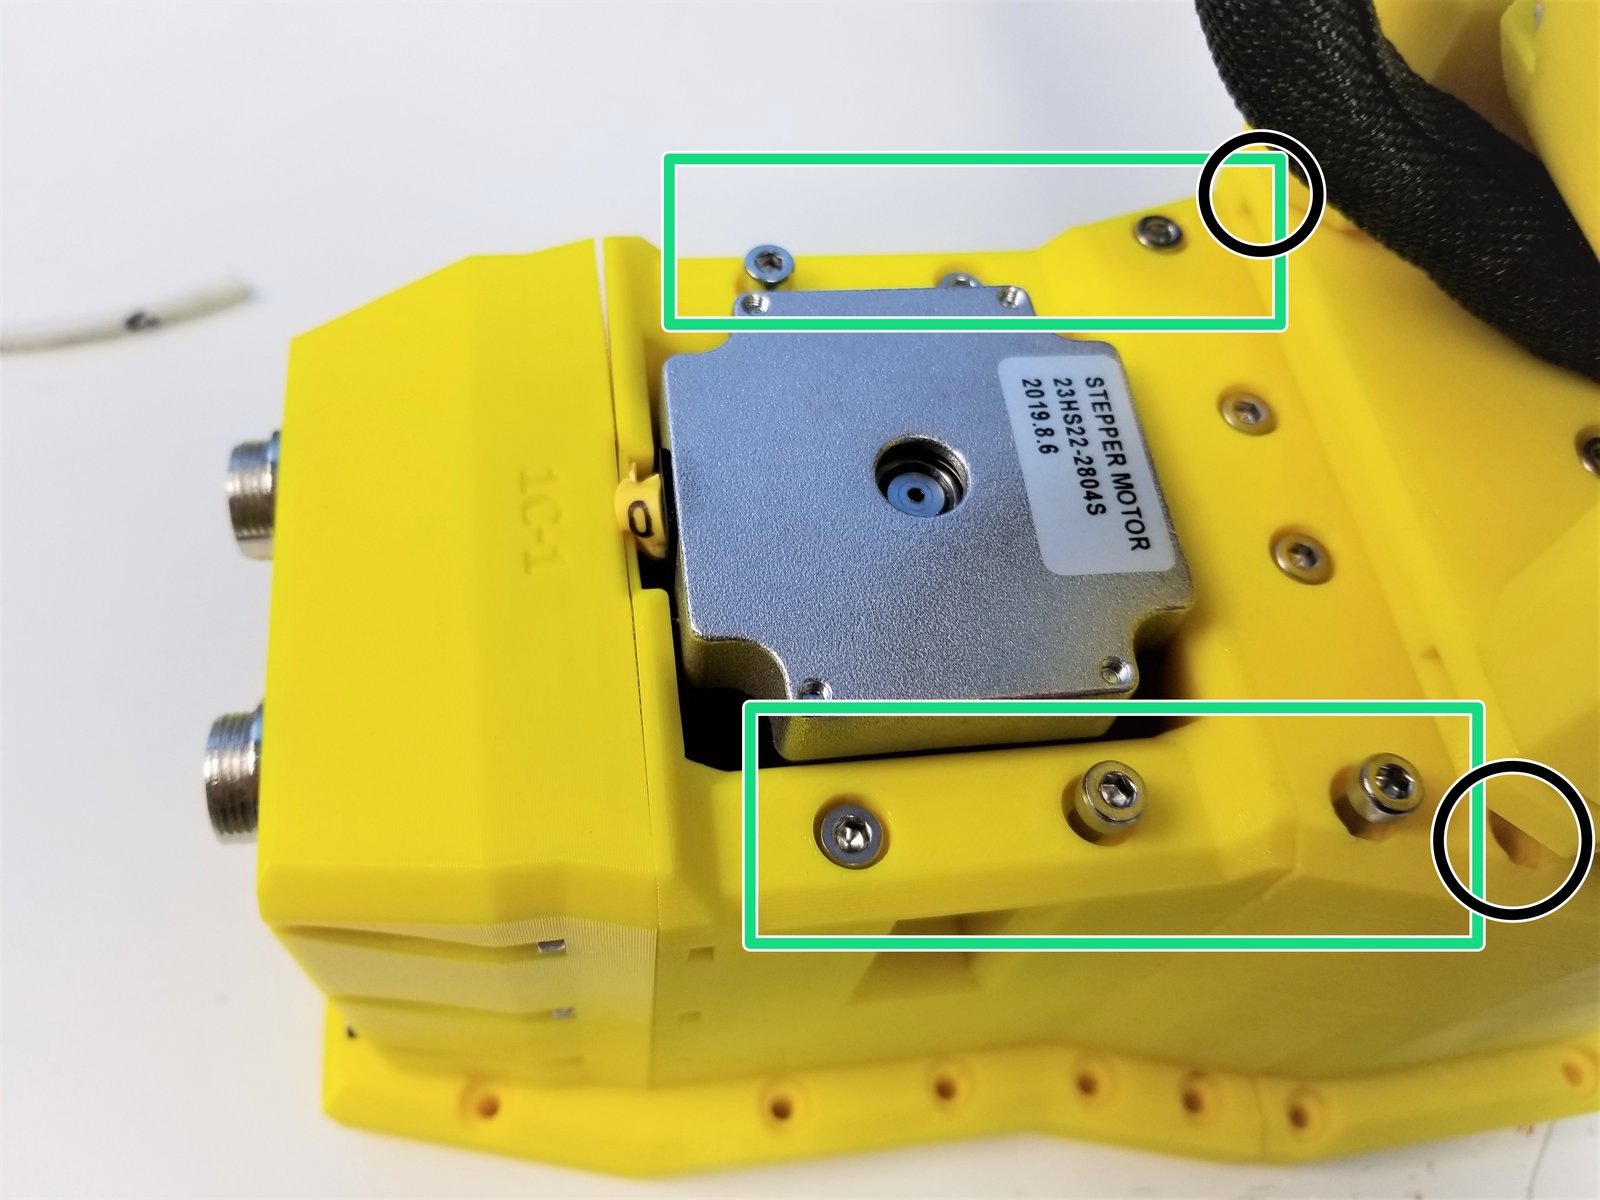
Insert the Hex Standoffs into the Anchor.
Secure the 2 components using M4x45mm Screws
Optional screw is circled in BLACK
- Note:
You could rotate the Anchor to make an opening for the Screws to go in.
Step 49 Anchor Mount Plate - Parts
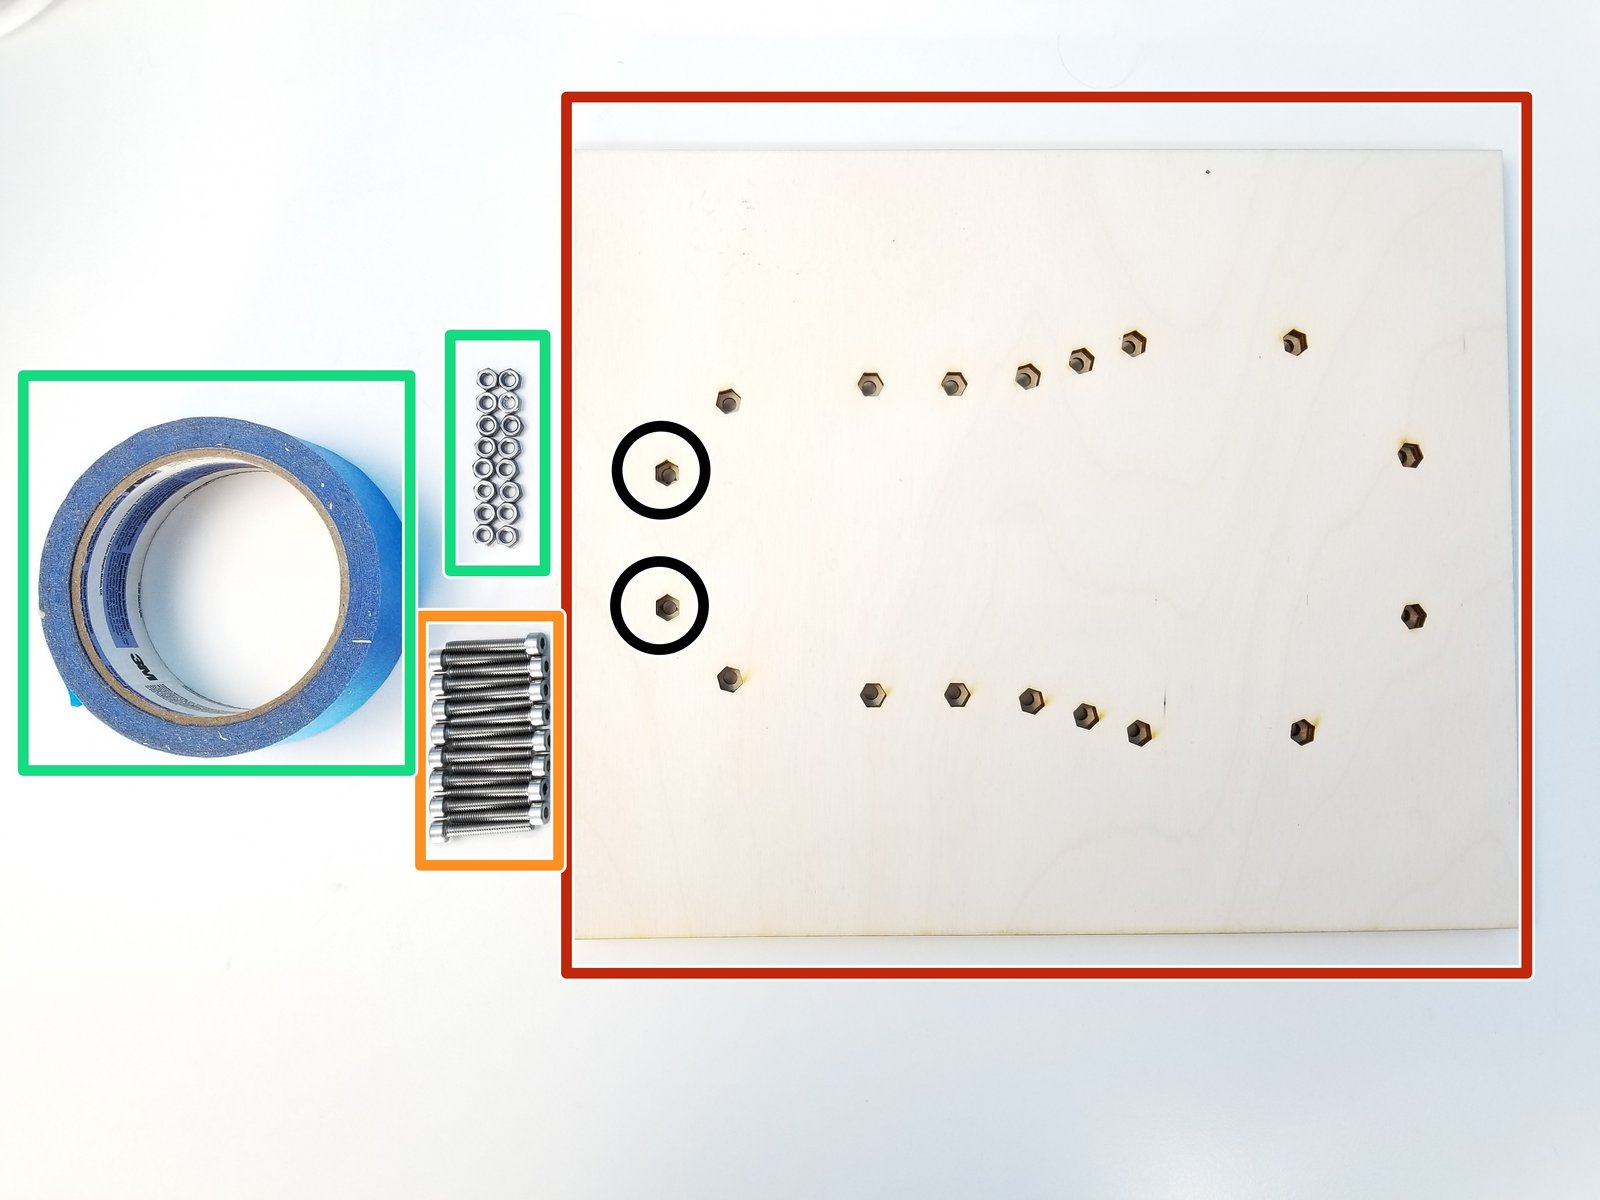
Click the large image to open full size.
- Note:
Prepare the following components:
[LSR] - Anchor Mounting Board (3 plates already glued)
M4x25mm Screws (x16)
M4 Hex Nuts (x16)
Tape
- Note:
Circled Hex Nut Inserts are optional, can be ignored.
Step 50 Anchor Mount Plate - 1
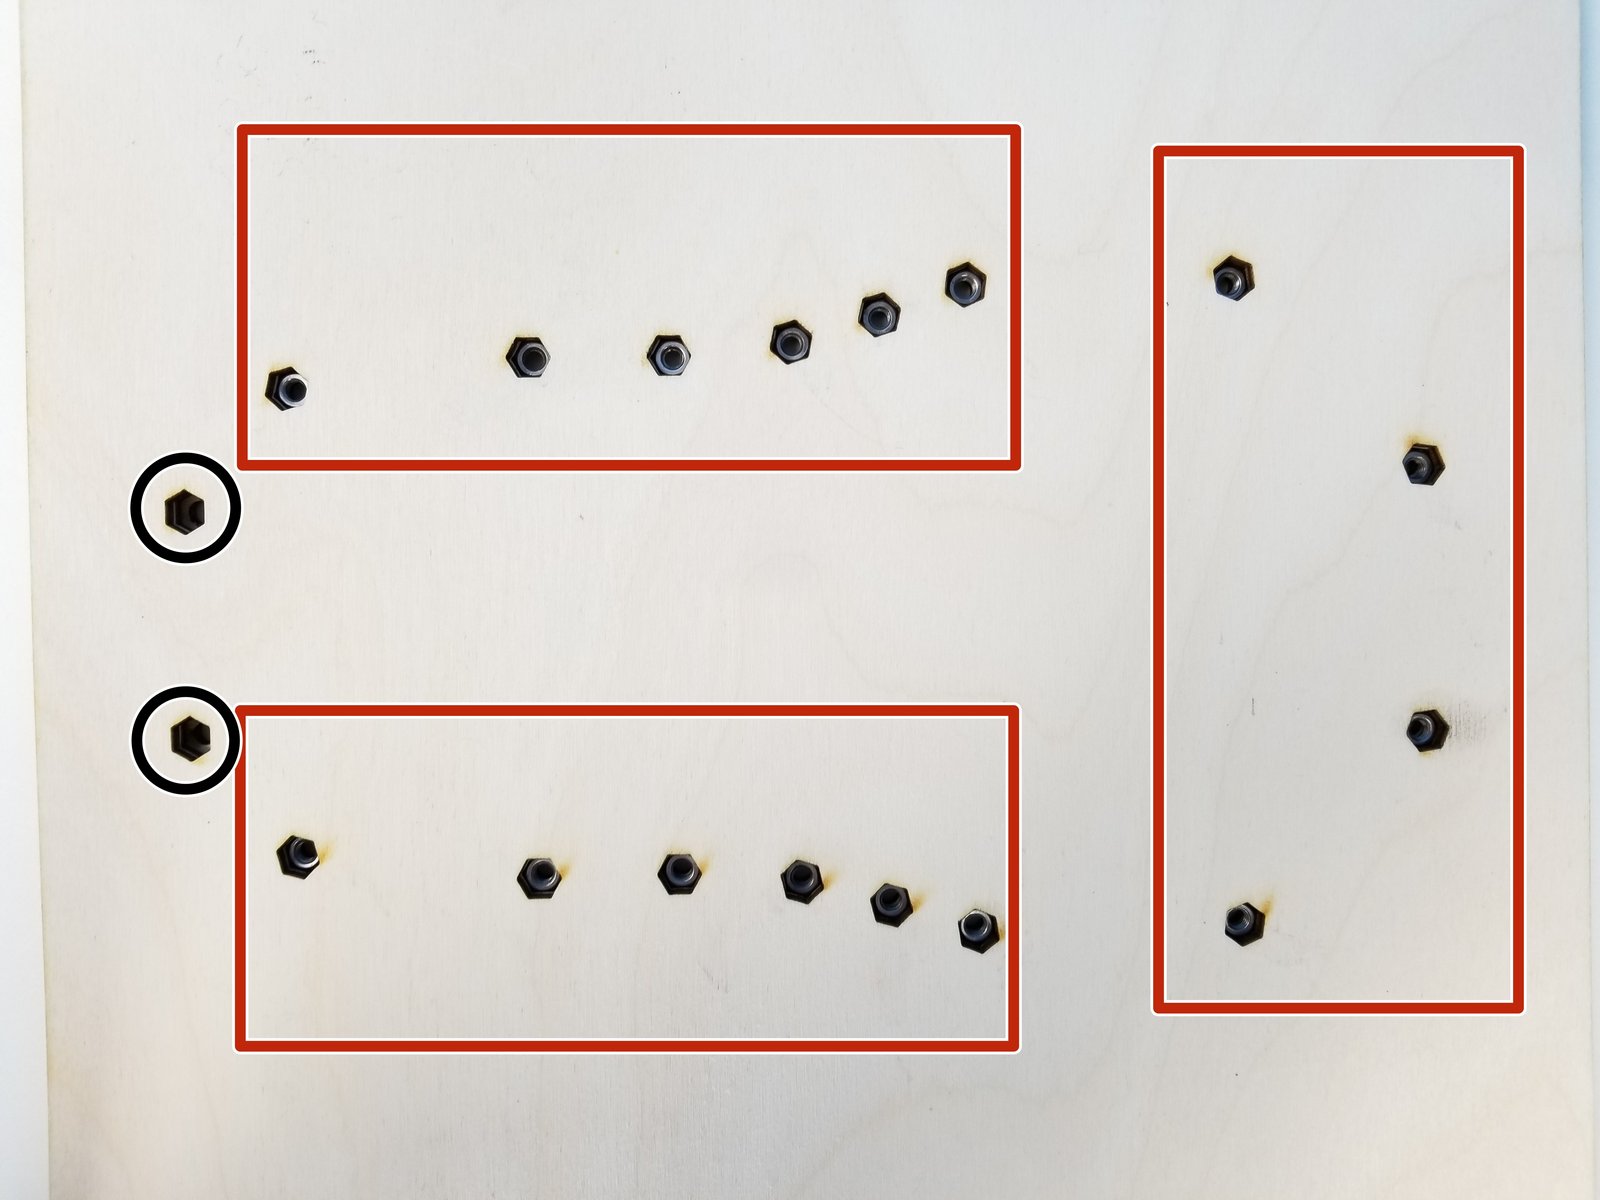
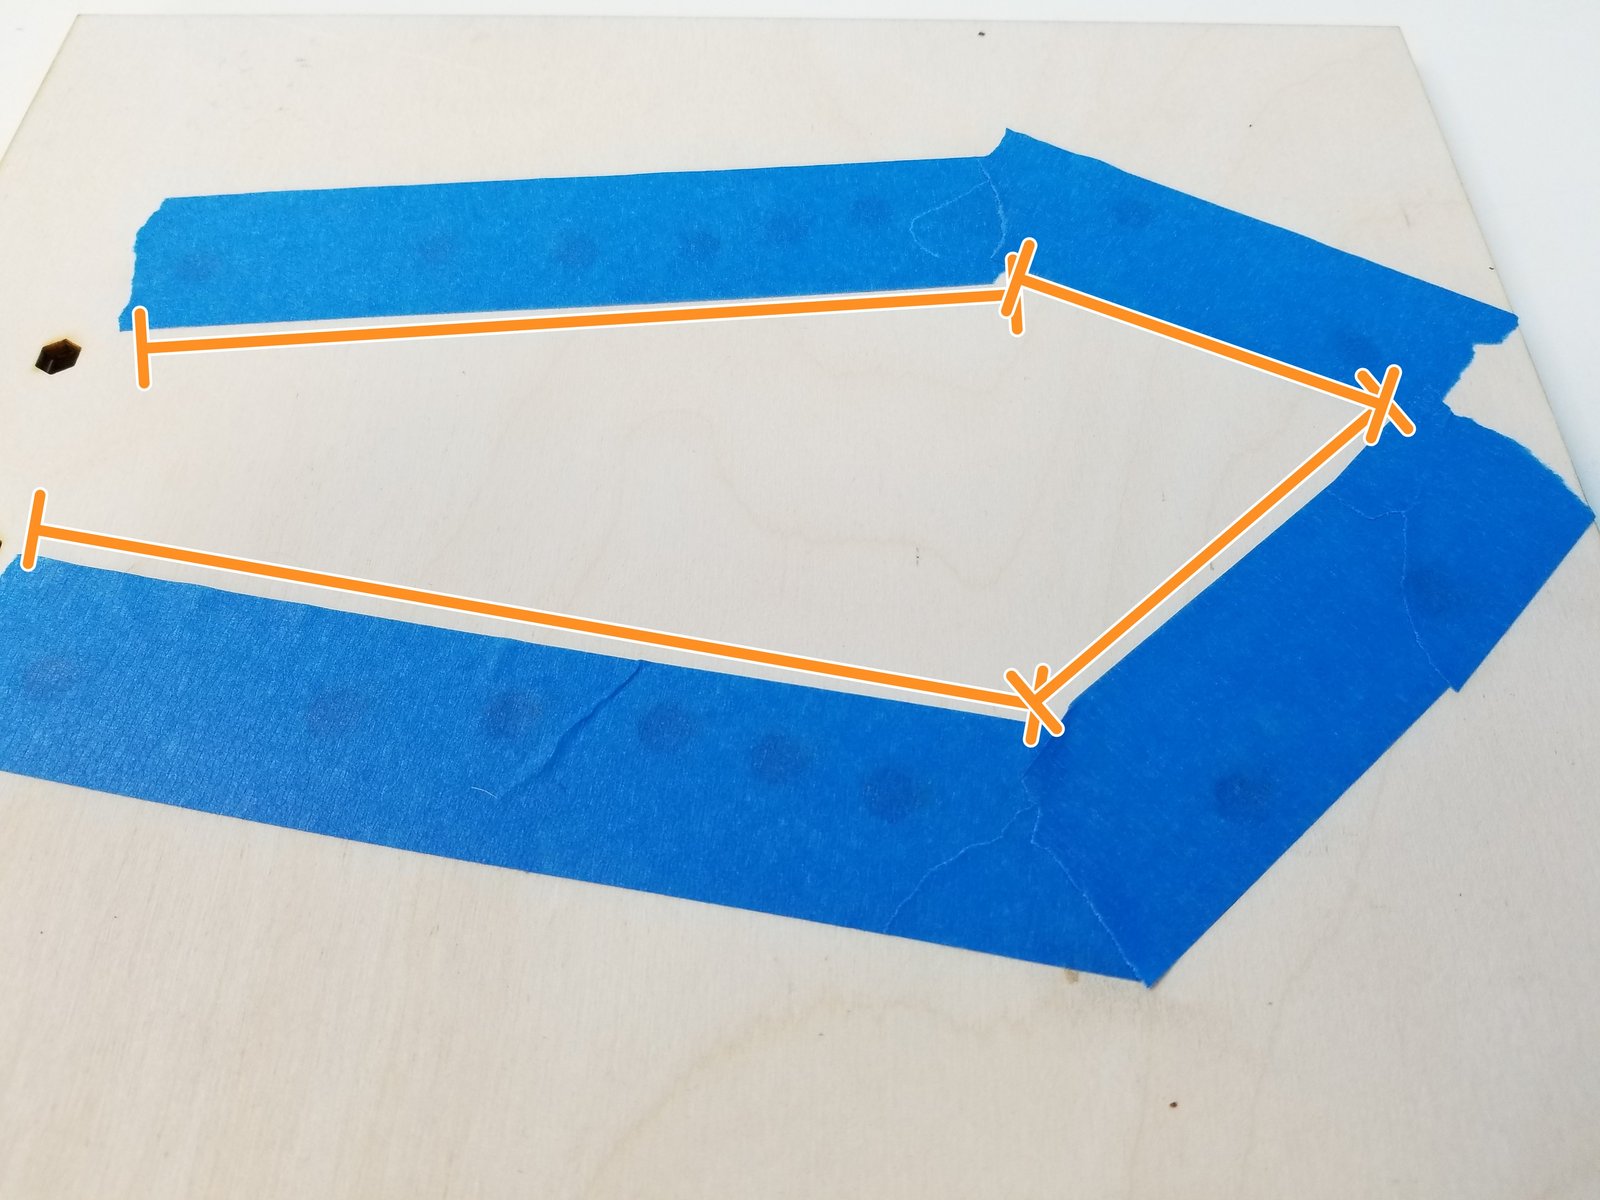
Click the large image to open full size.
Insert all the M4 Hex Nuts in the Mounting Plate
- Note:
Except for the circled ones
Put the Tape over the Nut inserts
Step 51 Anchor Mount Plate - 2
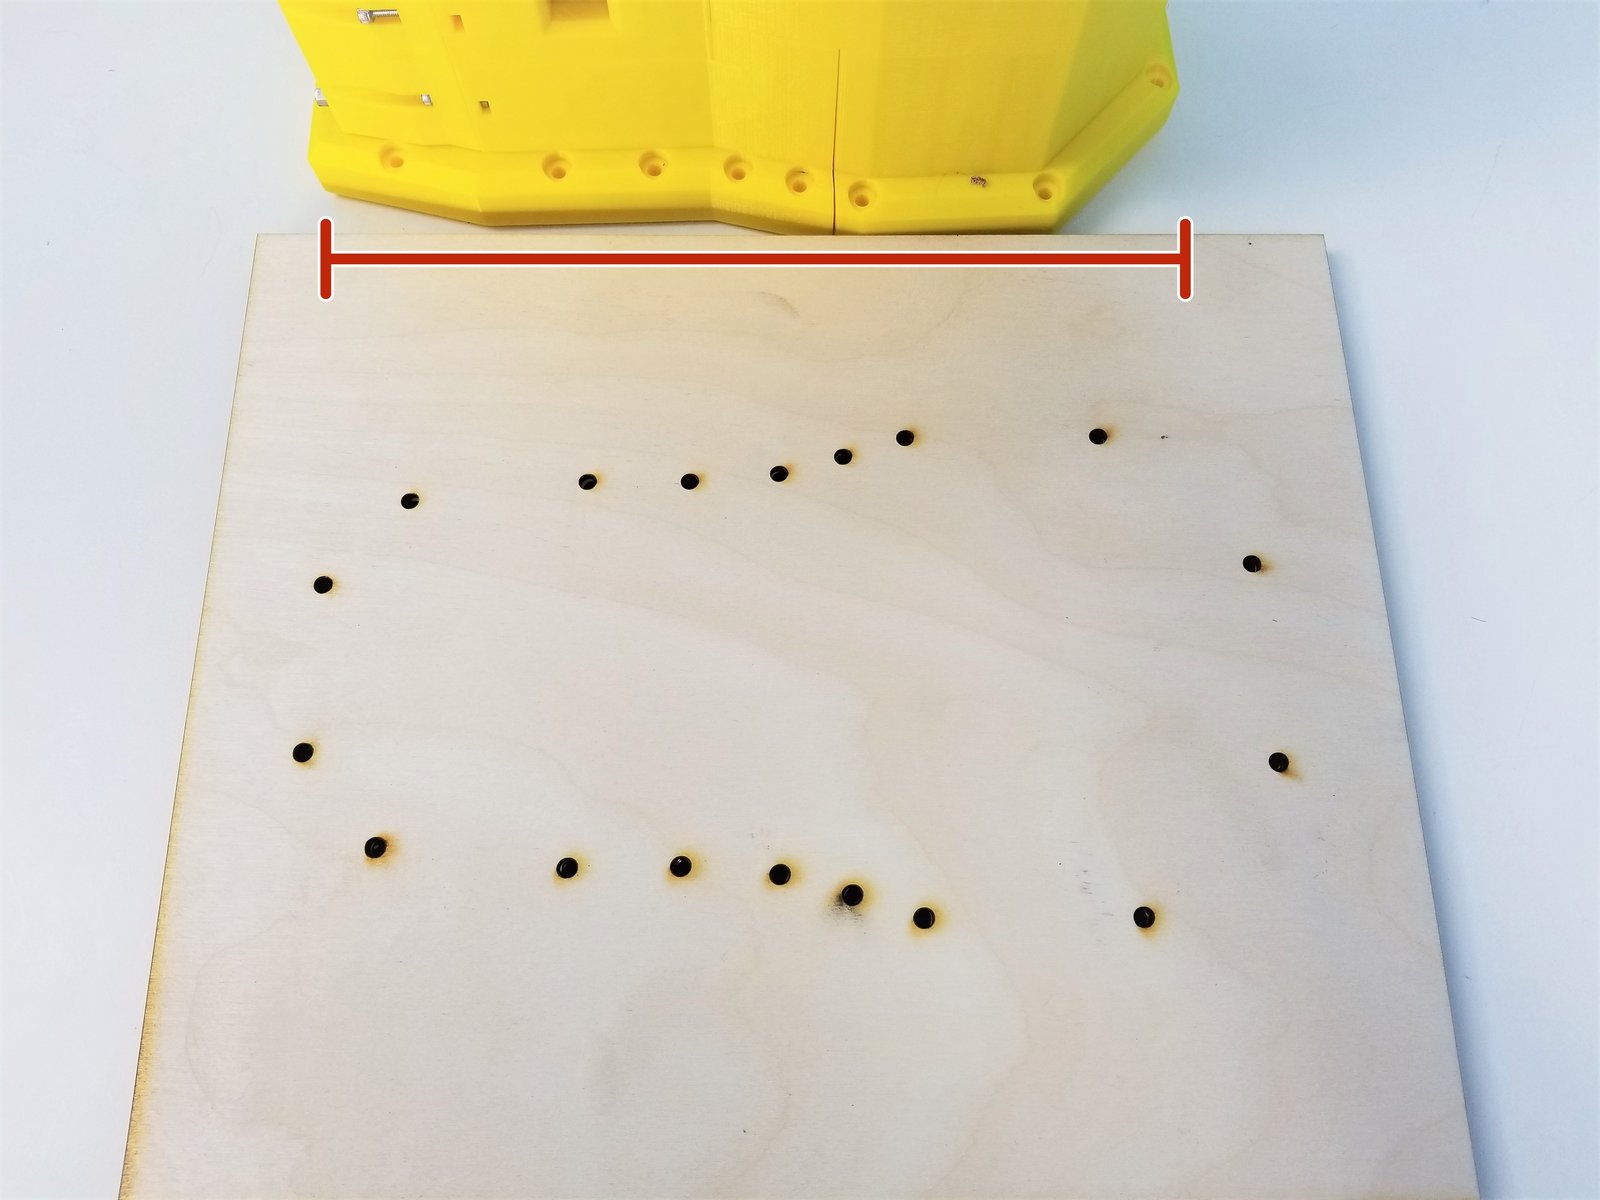
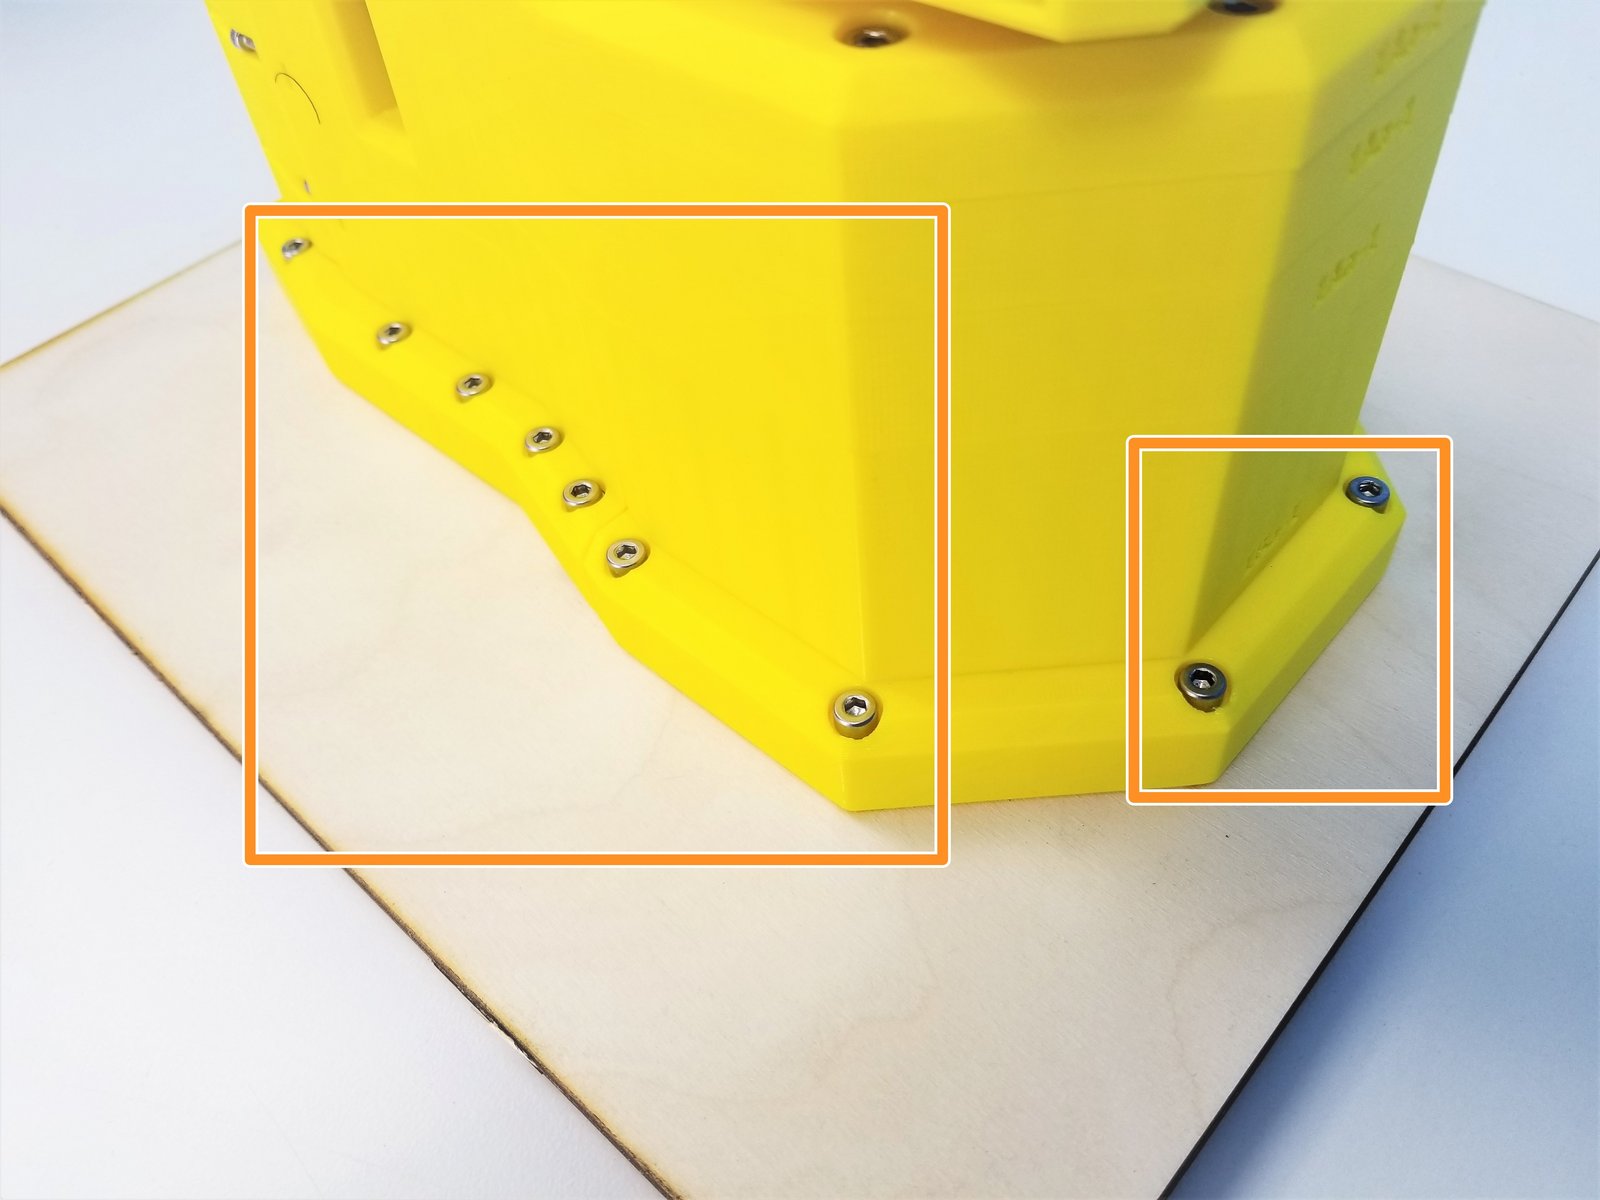
Click the large image to open full size.
Align the Anchor to the Mounting Plate
Secure the Anchor to the Plate using M4x25mm Screws
Step 52 Finished!!!
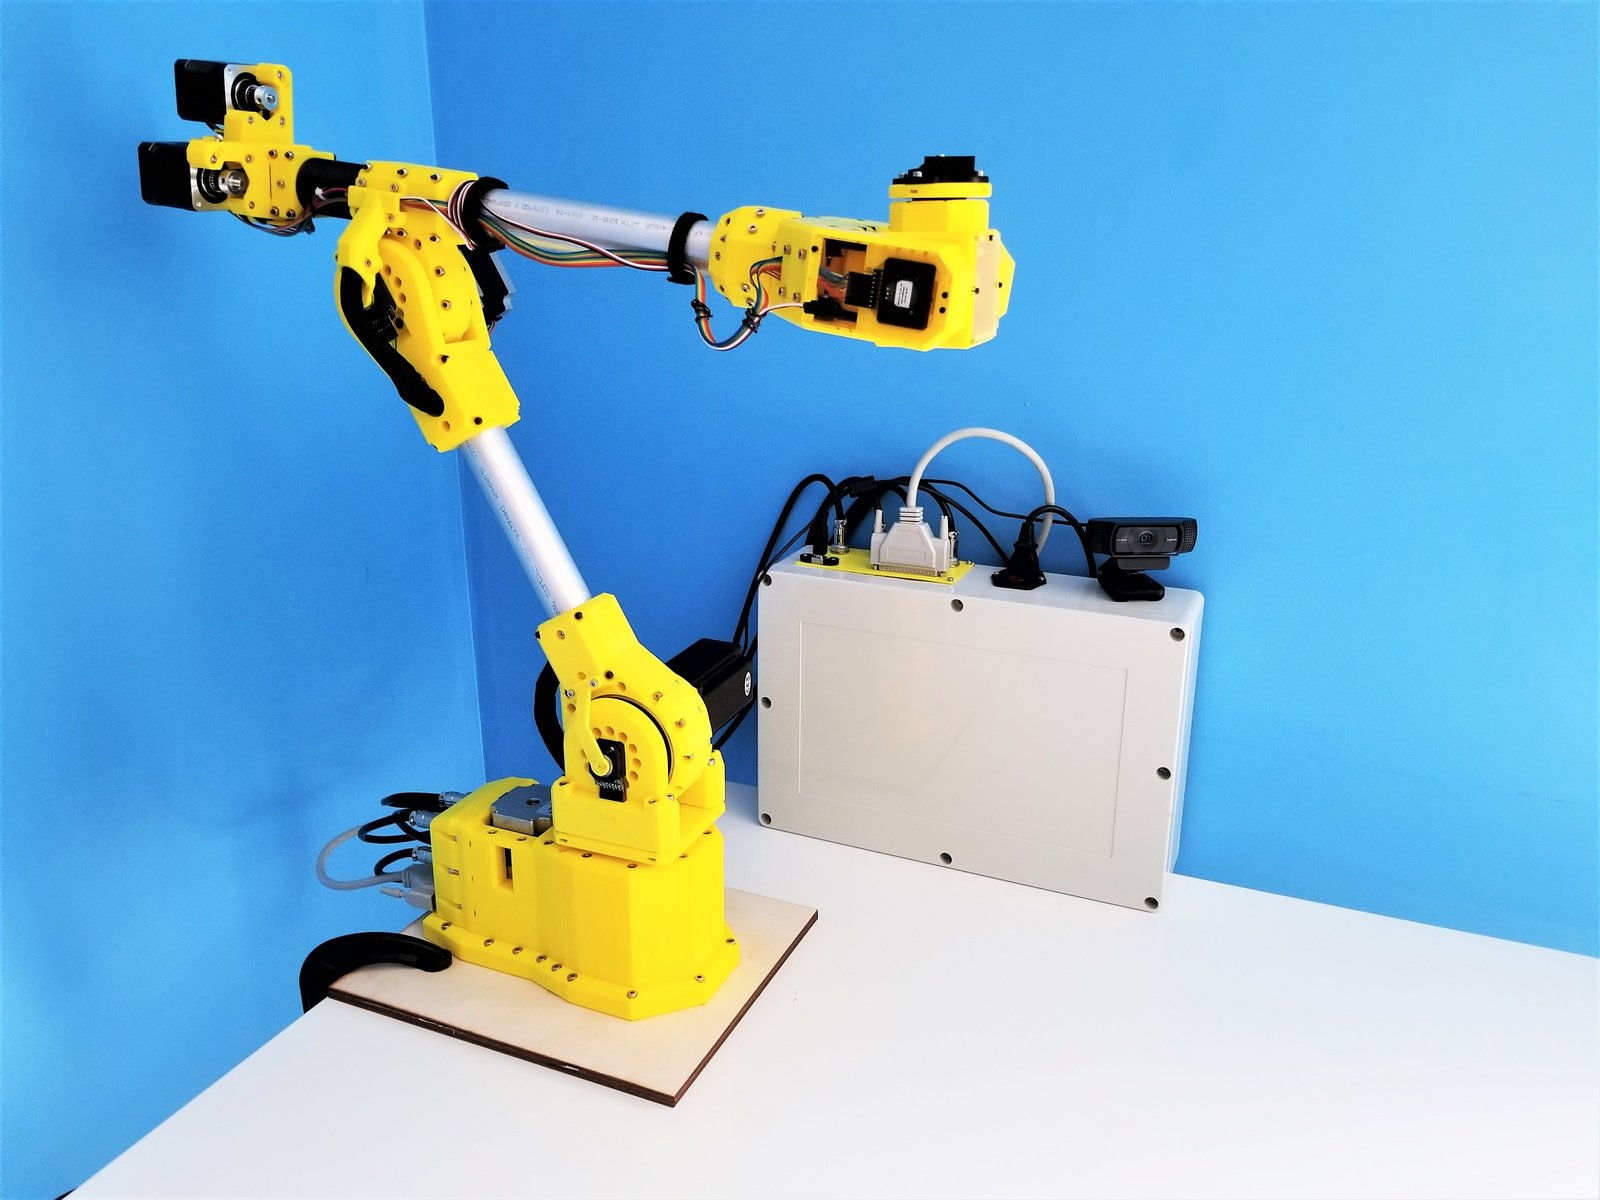
Click the large image to open full size.
CONGRATULATION!
you have completed building SIXI!