Makelangelo 5 & legacy
[old] How to use Makelangelo Software 7.24-7.31
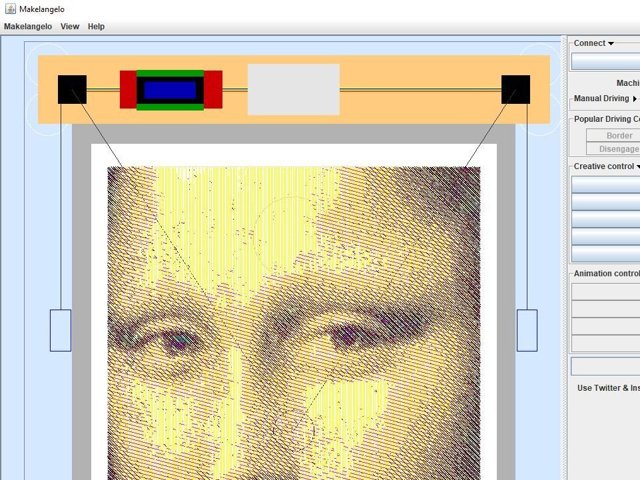
There is more than one way to Prepare art and more than one way to Run the robot. It's OK to skip some steps.
Step 1 Install Java and Makelangelo Software
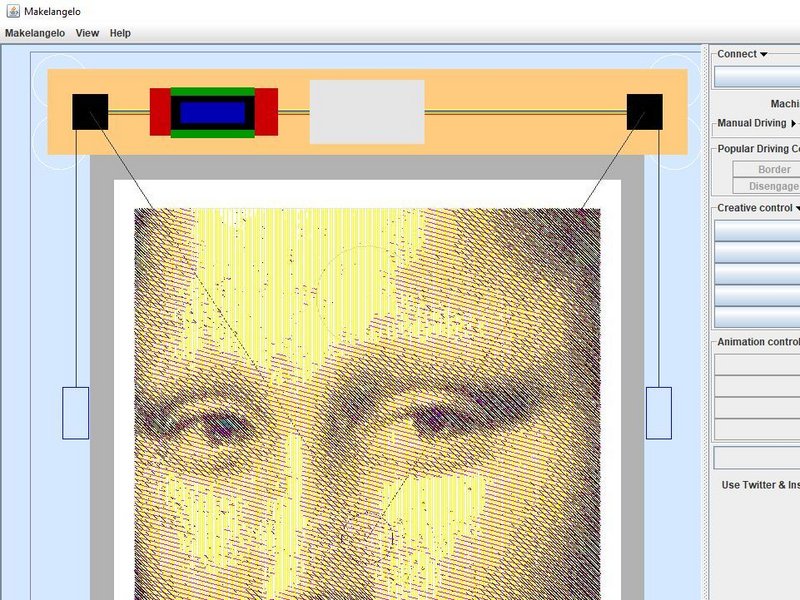
Click the large image to open full size.
I don't have a picture for this. Please enjoy this Mona Lisa.
Java can be downloaded from https://www.java.com/en/download/
Makelangelo Software can be downloaded from https://www.marginallyclever.com/product...
Step 2 Windows only: Install Drivers
If you are on Windows, please make sure you already have the drivers for the RUMBA board from https://reprap.org/wiki/RUMBA#RUMBA_USB_...
Step 3 MacOS "Makelangelo is damaged"
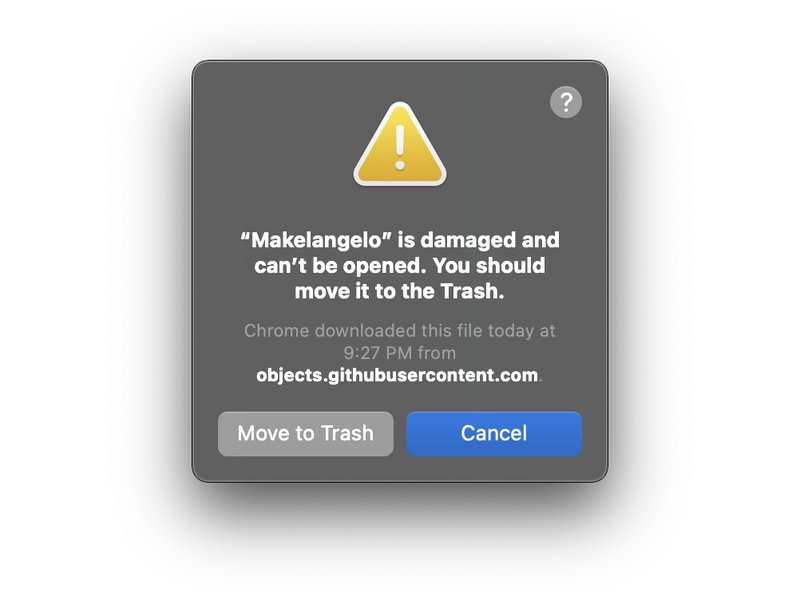
Click the large image to open full size.
on macOS, when launching the app, you will have an error: Makelangelo is damaged and can't be opened, you should move it to the trash.
It can be fixed by opening a console and entering the command sudo xattr -cr /Applications/Makelangelo.app
- Note:
This is due to this bug
To open a console, do one of the following:
Click the Launchpad icon in the Dock, type Terminal in the search field, then click Terminal.
In the Finder , open the /Applications/Utilities folder, then double-click Terminal.
Step 4 Run Makelangelo Software
Double click on the app in your PC.
Some windows users may need to click the start windows.bat file instead.
Step 5 OSX only: Security issues?
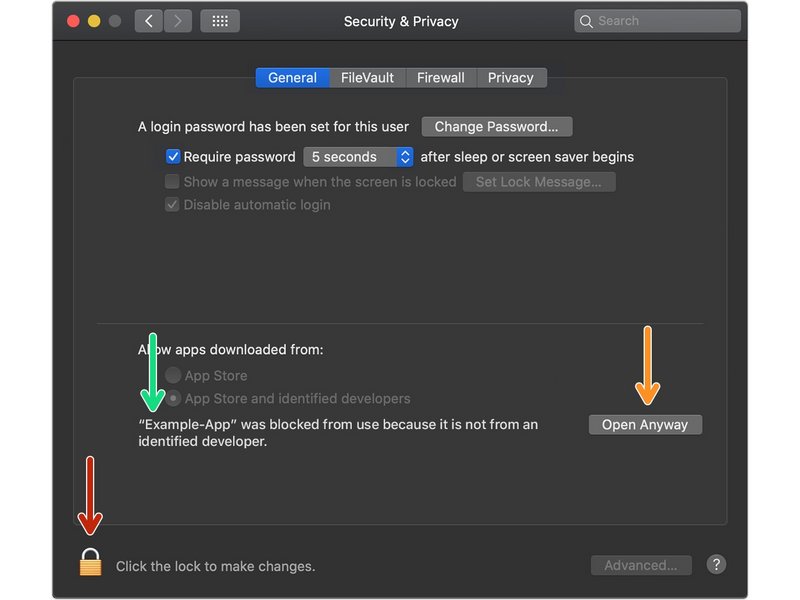
Click the large image to open full size.
OSX may block the Makelangelo Software because it is from an "unidentified developer".
Click the apple icon in the top left, then System Preferences, then Security & Privacy. Having just tried to run Makelangelo-software*.jar, it should appear in this message.
You might need to unlock to allow security changes.
Click Open Anyways.
- Note:
Your security for this version of the app should now be set forever. Next time the app updates you might need to do this again.
Step 6 Familiarize yourself with the controls
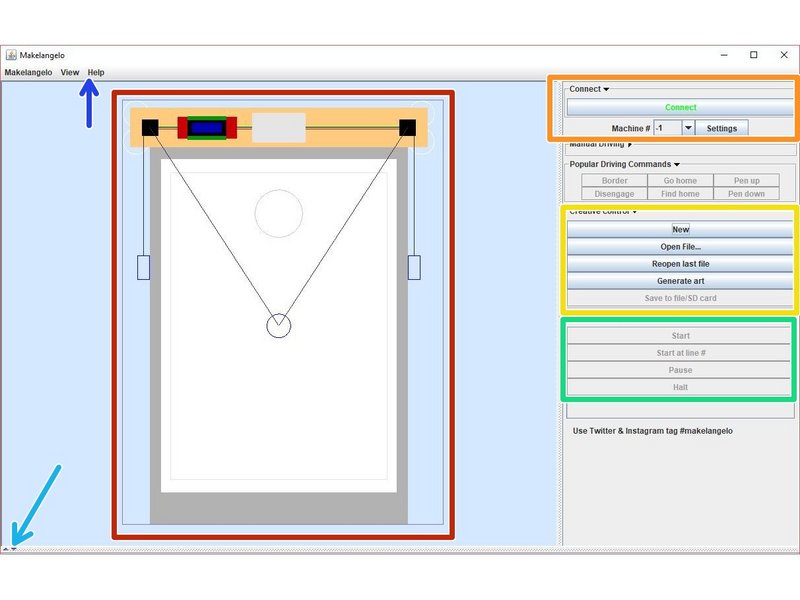
Click the large image to open full size.
In the main window you can drag to pan and scroll the mouse wheel to zoom the what you see is what you get preview.
The Connect panel is like a phone call from your PC to your robot and allows for direct control.
The Creative control panel is for managing art that will be drawn by the robot.
The Animation control panel is also used for direct control of the robot: start, stop, pause, etc.
The advanced dialog at the bottom shows the conversation with the robot and gives you a way to directly type commands in text.
The top level menu has helpful links to the support forums and more configuration options.
Step 7 Adjust settings
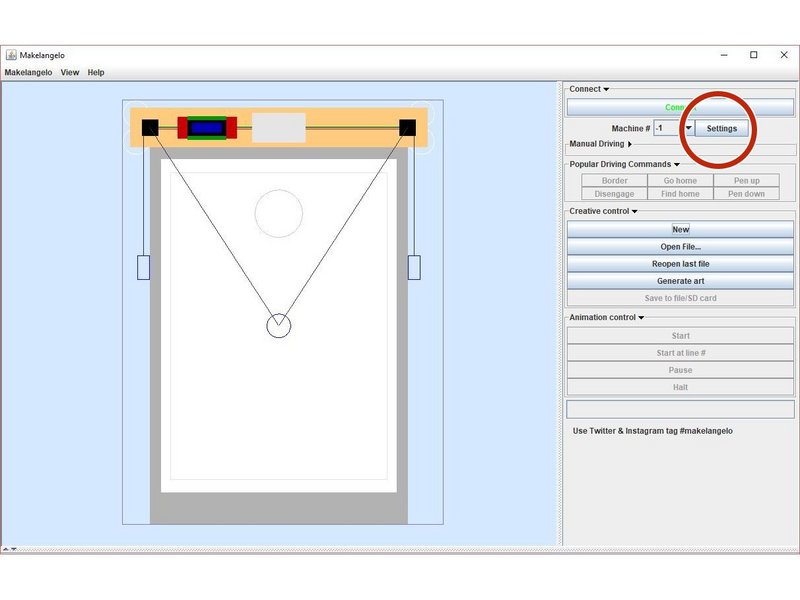
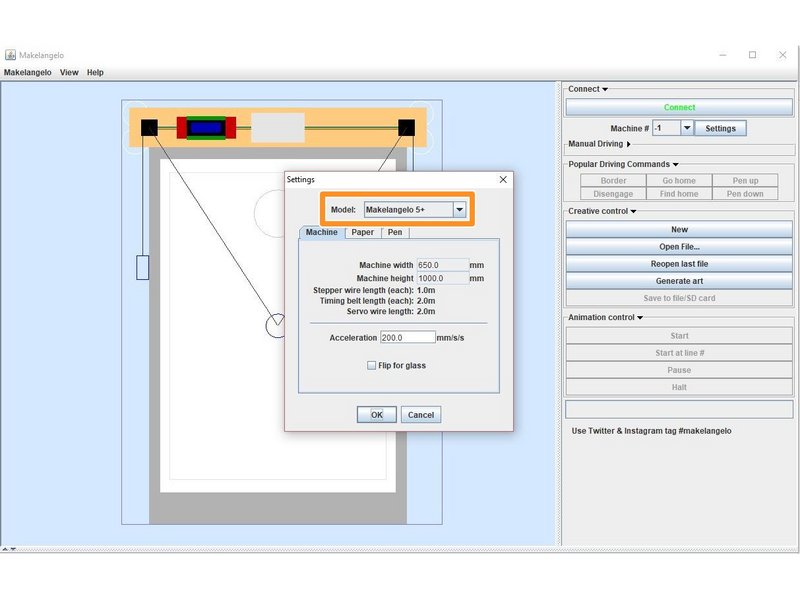
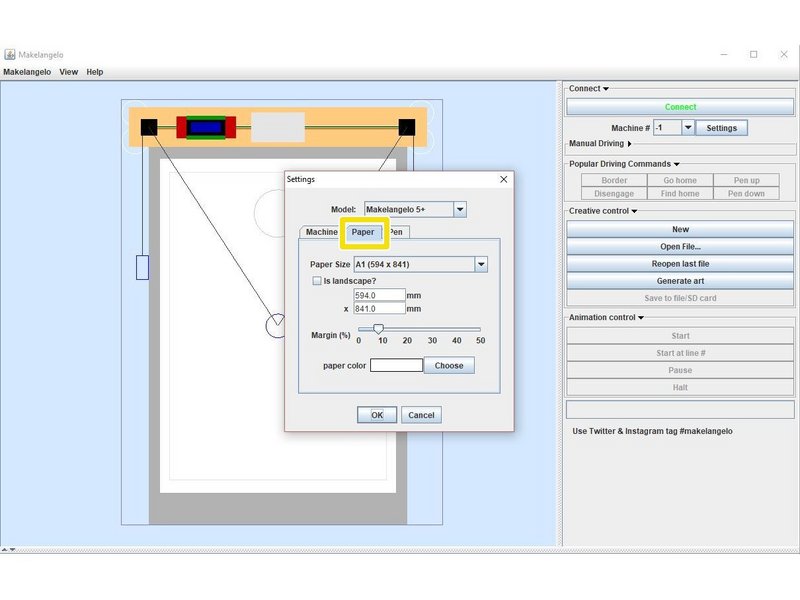
Click the large image to open full size.
Click the Settings button.
Change the Model to your machine version.
Click Paper and then change the Paper Size, Is Landscape, and Margin to match your preferences.
- Note:
A Makelangelo 5 can draw A1 portrait, A2 landscape.
Close the settings dialog by clicking 'OK'. You are now ready to prepare a drawing.
Step 8 Prepare a photo
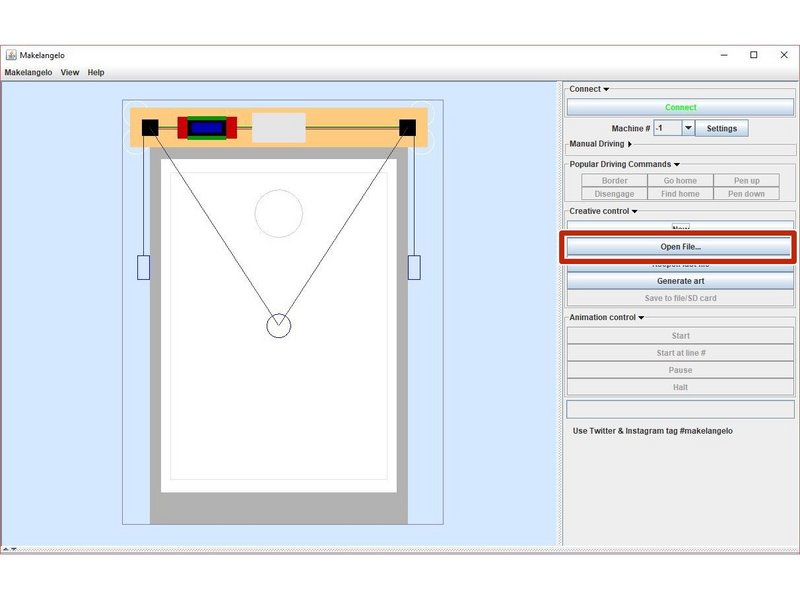
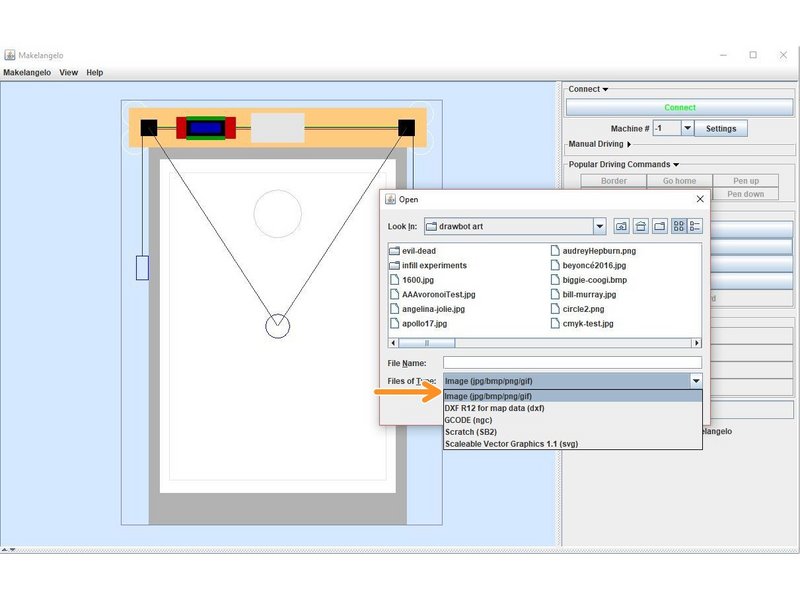
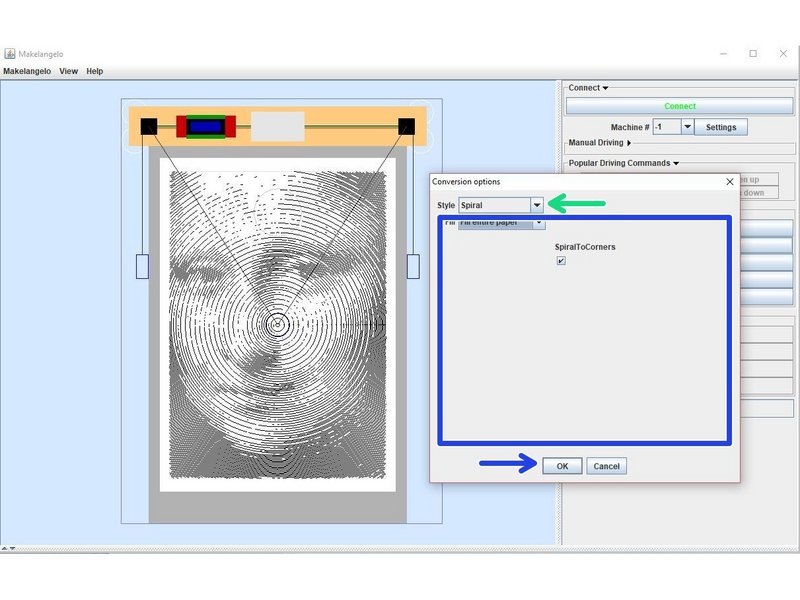
Click the large image to open full size.
Click Open File....
At the bottom of the save dialog change the Files of Type to Image. Select your jpg, png, bmp, or gif.
Play with Conversion Options until the preview looks appealing. There are several major styles.
Some styles are iterative and take time to generate results - let them run until you are satisfied. Others may have sub-options for tweaking.
Close the Conversion Options dialog. Your image is ready to Run.
Here's a Youtube example of the same lesson.
Step 9 Prepare a vector file
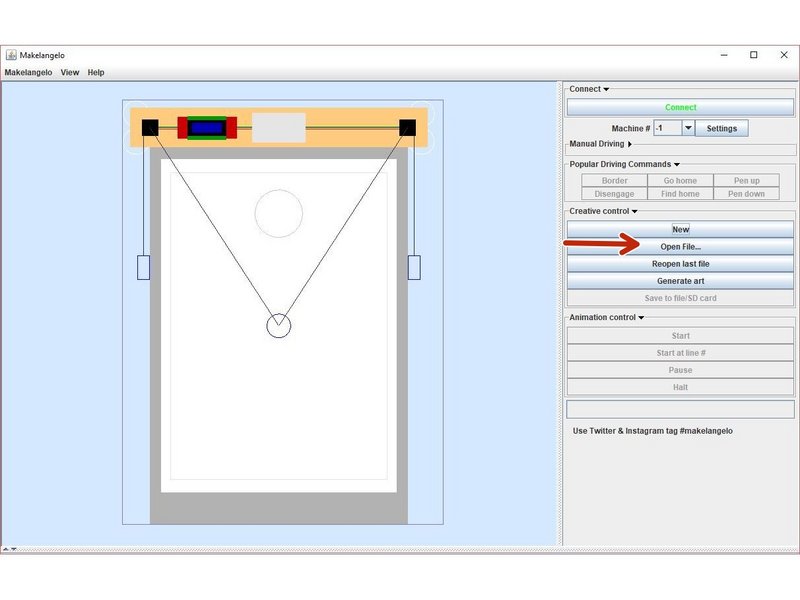
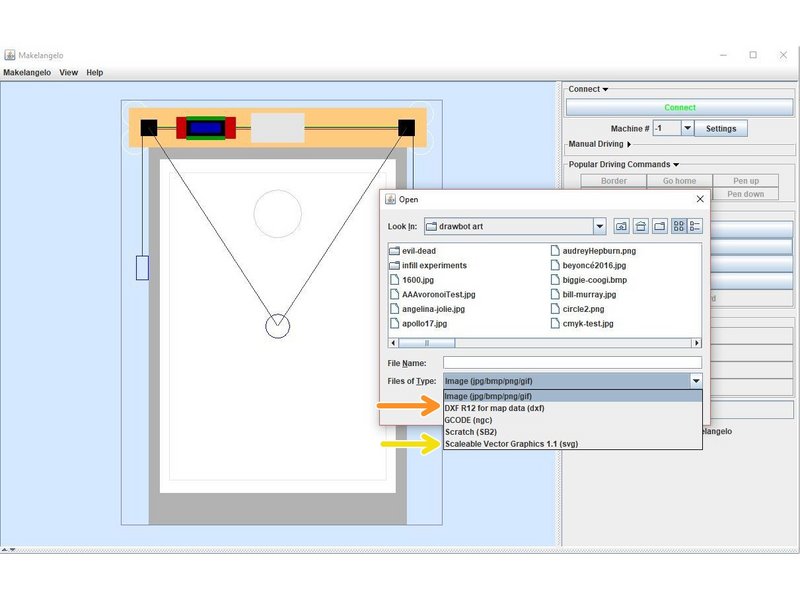
Click the large image to open full size.
Click Open File....
At the bottom of the save dialog change the Files of Type to DXF R12 for map data (dxf). Select your file.
- Note:
DXF may offer to optimize on load. This will greatly improve your drawing time AND will take longer to load your file. Choose wisely.
Another option is Scalable Vector Graphics 1.1 (SVG). SVG files are automtically scaled to fill the margins of the paper.
Your image is ready to Run.
Step 10 Prepare a Scratch file
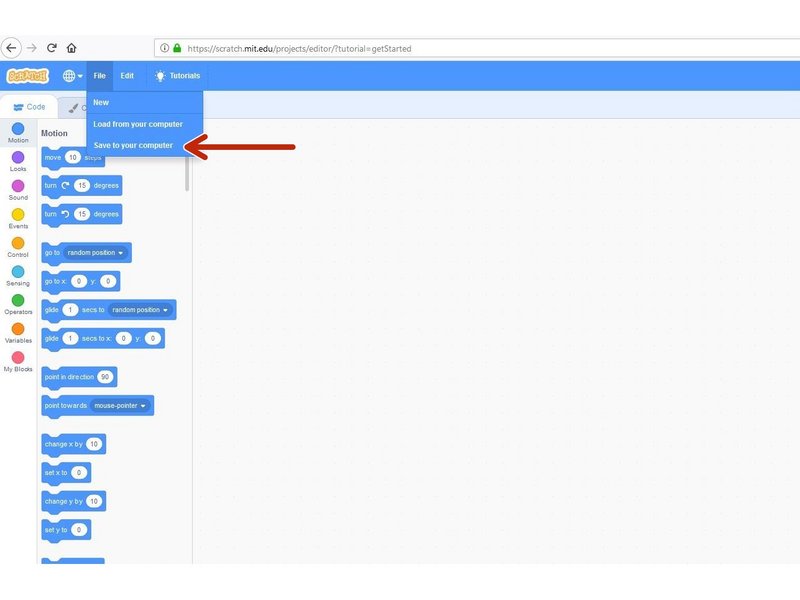
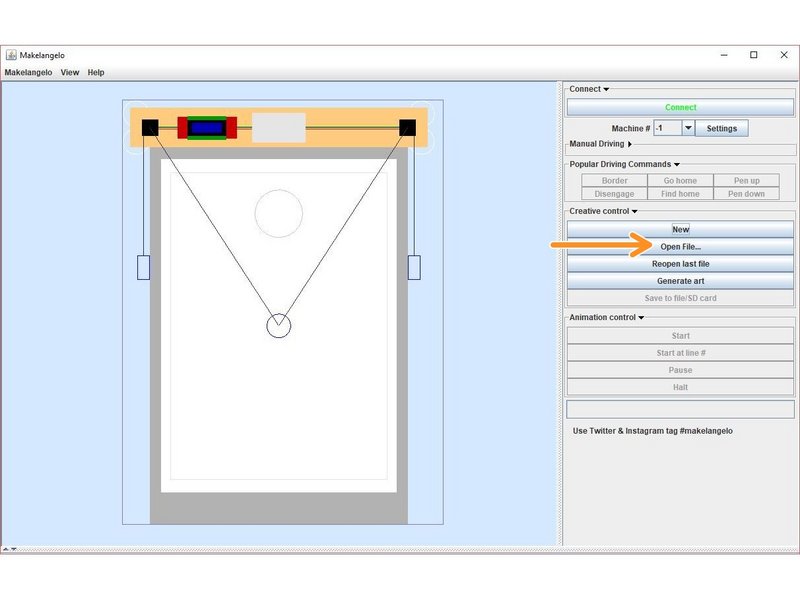
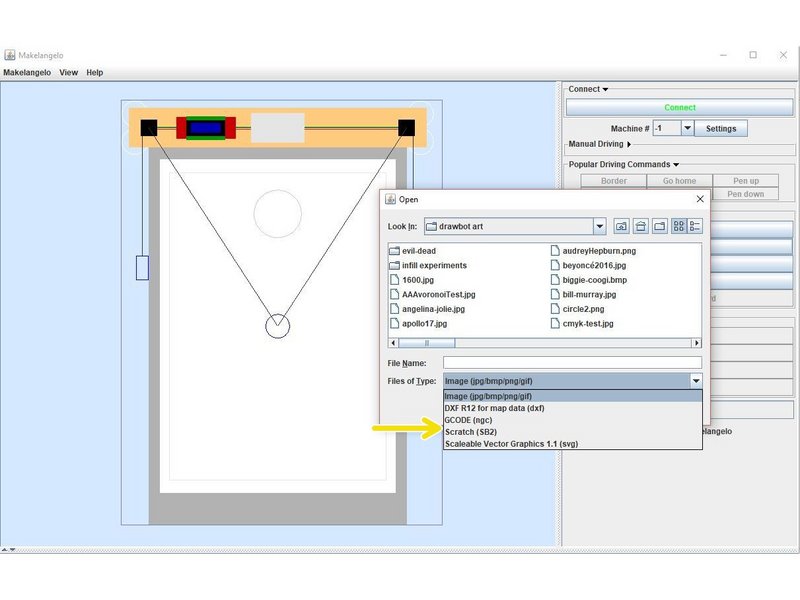
Click the large image to open full size.
Build your Scratch drawing at https://scratch.mit.edu/.
Click File > Save to your computer.
In Makelangelo Software, Click Open File....
At the bottom of the save dialog change the Files of Type to Scratch (SB2). Select your file.
Your image is ready to Run.
Step 11 Prepare a Generated drawing
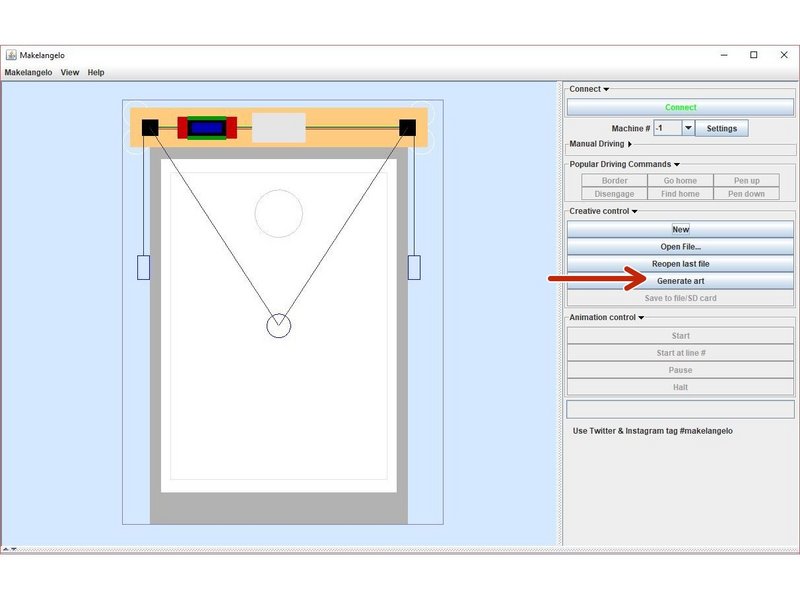
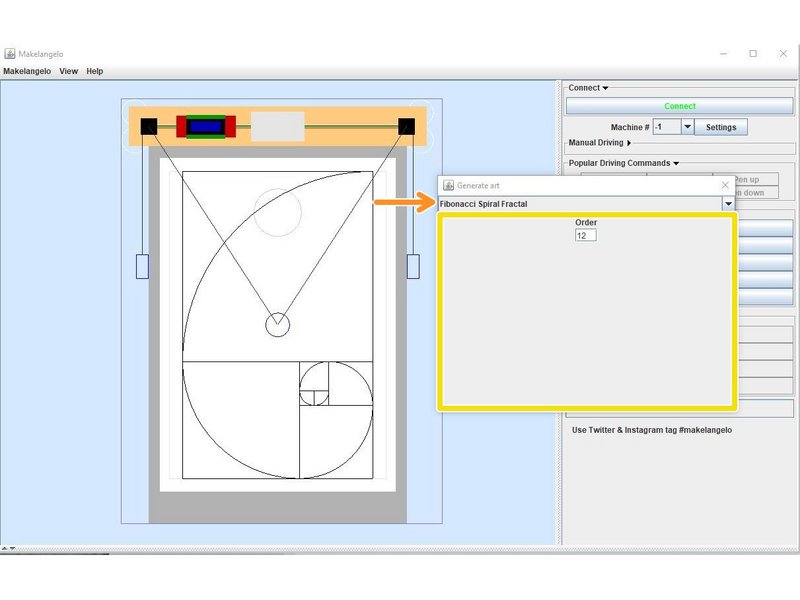
Click the large image to open full size.
Click Generate Art.
From the first drop down, select a style of art to generate.
Adjust any additional parameters. After changing a parameter you may need to press the Tab key to see changes in the preview window.
Close the additional parameters dialog. Your image is ready to Run.
Step 12 Run the robot unconnected
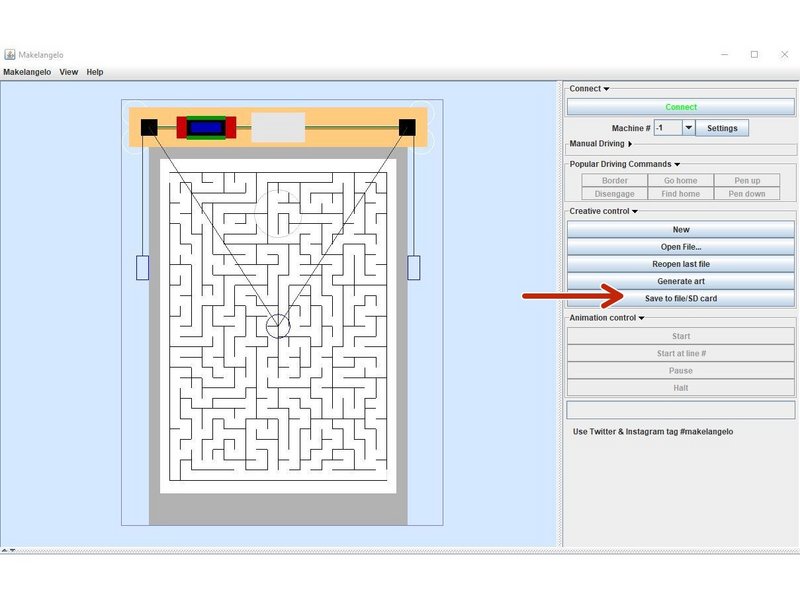
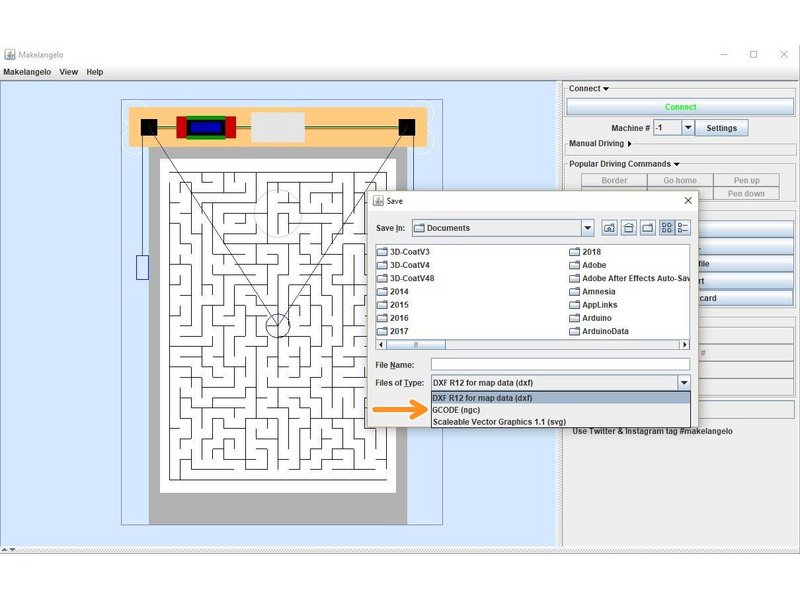
Click the large image to open full size.
Put your SD card in your computer and click save to file/SD card in the Makelangelo Software.
At the bottom of the save dialog change the Files of Type to GCODE (ngc). Save your file to the SD card.
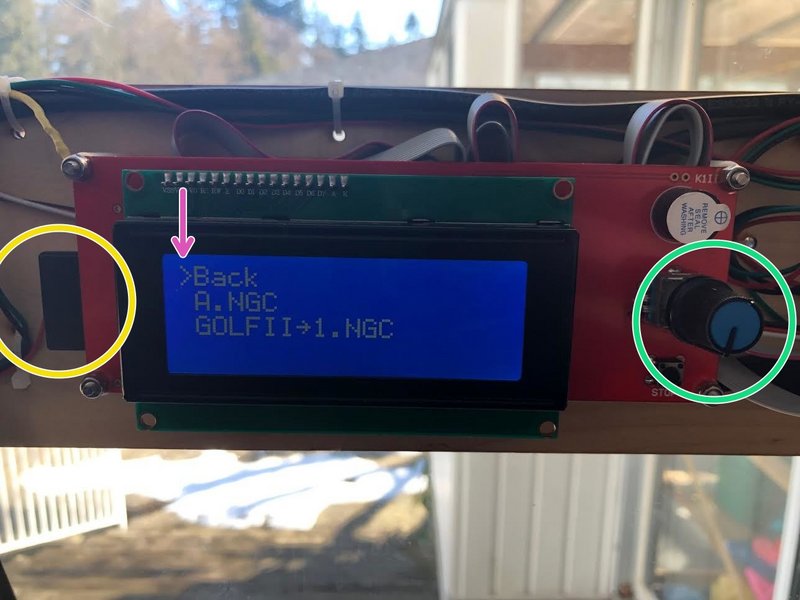
Eject the SD card and plug it into the robot on the left side of the LCD panel.
Click the dial, scroll down to print from SD card, click again, scroll to the file, and click one more time. Follow the prompts on the LCD panel.
- Note:
Don't forget to Find home on the robot before starting your drawing! Find home can also be done through the LCD menu.
Step 13 Run the robot connected
Click the large image to open full size.
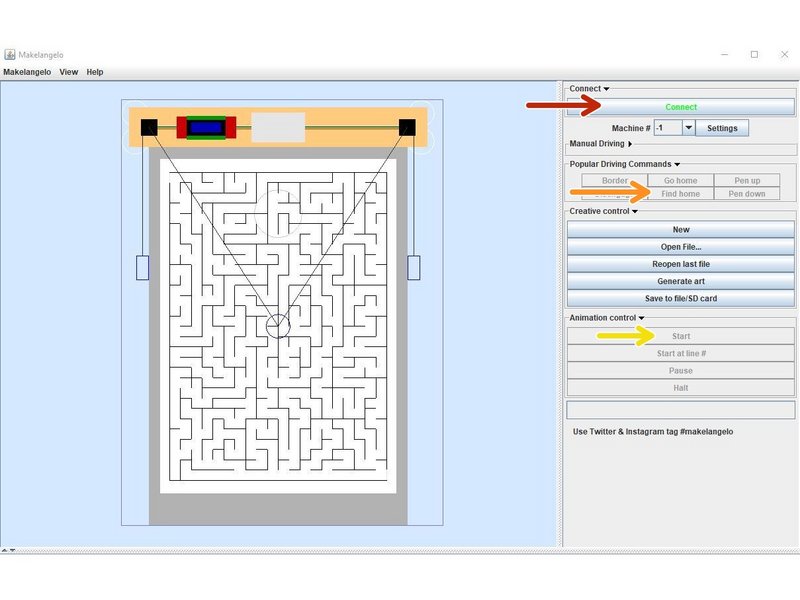
Plug the a USB cable from the robot into your PC running Makelangelo Software.
Click Connect and choose one of the USB ports. After a few seconds the buttons under connect should turn from grey to black.
- Note:
If there are no ports, refer to the Updating Makelangelo firmware guide steps for updating the USB driver.
- Warning:
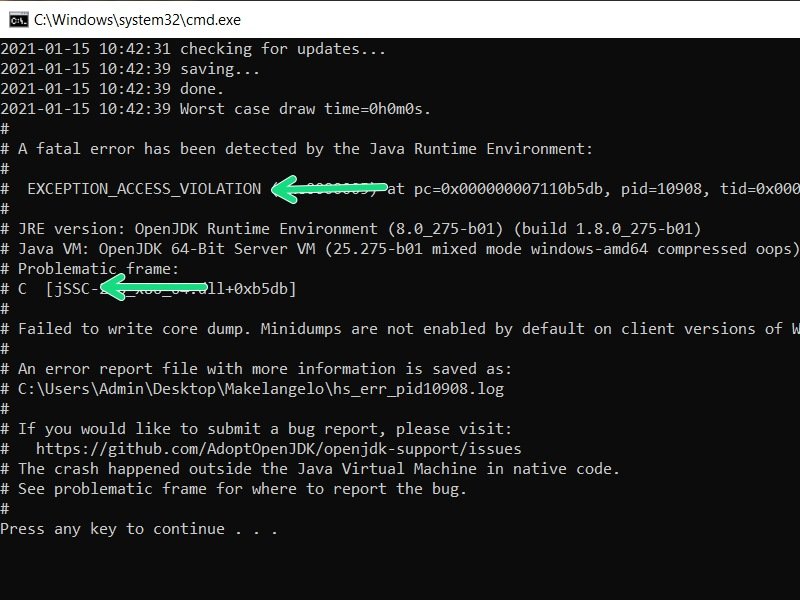
If the application gets angry when it tries to connect, don't panic. See the next step for more information.
Click Start. Follow the prompts on the LCD panel.
Step 14 If Windows Firewall is blocking Makelangelo
Click the large image to open full size.
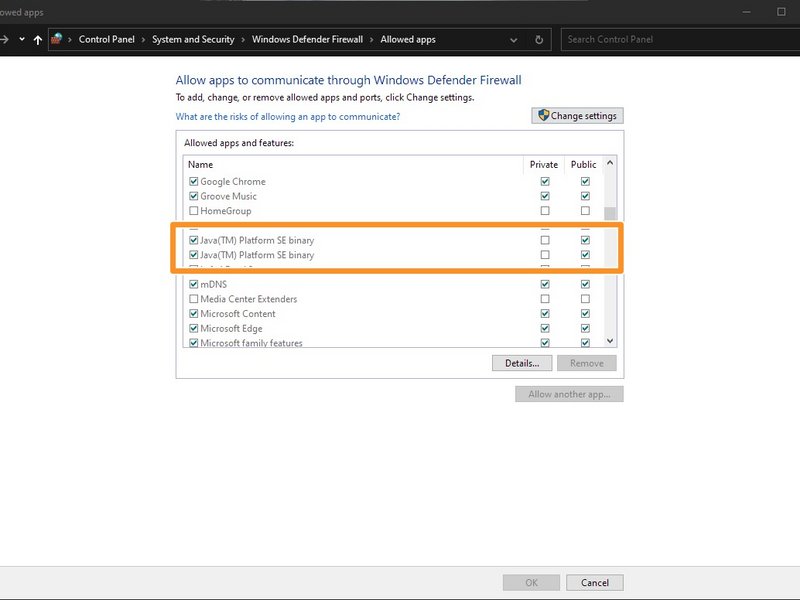
This error often looks like Windows crashes when you click Connect.
Press Windows Key + R to open Run.
Type control and press OK to open Control Panel.
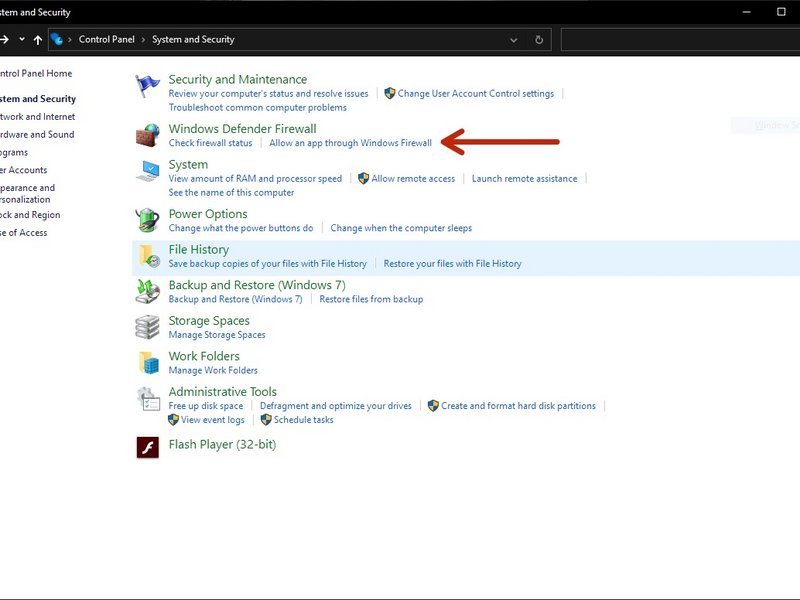
Click on System and Security, then Windows Defender Firewall, then Allow an app or feature through Windows Defender Firewall
In the allowed app window, scroll through all the apps. Locate the Makelangelo. If it does not appear, locate Java(TM) Platform SE binary.
If it is unchecked, the app is blocked on the Firewall. Check the app and click OK.
Step 15 Share your results
Click the large image to open full size.
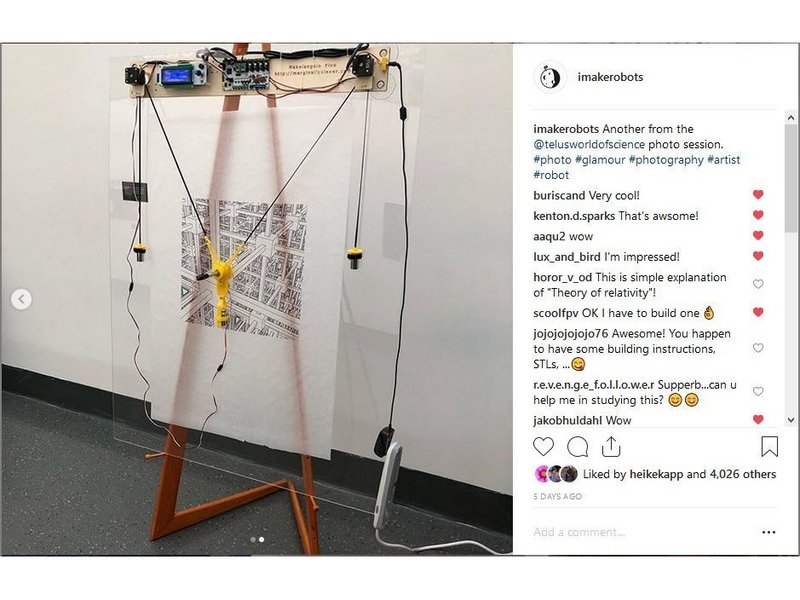
Take a picture.
Post it on social media. #plottertwitter is a great tag to use!
Tag your post #makelangelo or @imakerobots so we can +1 like kudos it.
Complete
Your robot should now be drawing your work of art. Congratulations! For more help and robots, join us on Discord at https://discord.gg/QtvHqAv8yp